757 lines
47 KiB
Markdown
757 lines
47 KiB
Markdown
[![GitHub Release][releases-shield]][releases]
|
||
[![GitHub Activity][commits-shield]][commits]
|
||
[![License][license-shield]](LICENSE)
|
||
[![hacs][hacs_badge]][hacs]
|
||
[![BuyMeCoffee][buymecoffeebadge]][buymecoffee]
|
||
|
||
|
||
|
||
>  This thermostat integration aims to drastically simplify your automations around climate management. Because all classical events in climate are natively handled by the thermostat (nobody at home ?, activity detected in a room ?, window open ?, power shedding ?), you don't have to build over complicated scripts and automations to manage your climates ;-).
|
||
|
||
- [Thanks for the beer buymecoffee](#thanks-for-the-beer-buymecoffee)
|
||
- [When to use / not use](#when-to-use--not-use)
|
||
- [Why another thermostat implementation ?](#why-another-thermostat-implementation-)
|
||
- [How to install this incredible Versatile Thermostat ?](#how-to-install-this-incredible-versatile-thermostat-)
|
||
- [HACS installation (recommended)](#hacs-installation-recommended)
|
||
- [Manual installation](#manual-installation)
|
||
- [Configuration](#configuration)
|
||
- [Minimal configuration update](#minimal-configuration-update)
|
||
- [Select the driven entity](#select-the-driven-entity)
|
||
- [Configure the TPI algorithm coefficients](#configure-the-tpi-algorithm-coefficients)
|
||
- [Configure the preset temperature](#configure-the-preset-temperature)
|
||
- [Configure the doors/windows turning on/off the thermostats](#configure-the-doorswindows-turning-onoff-the-thermostats)
|
||
- [The sensor mode](#the-sensor-mode)
|
||
- [Auto mode](#auto-mode)
|
||
- [Configure the activity mode or motion detection](#configure-the-activity-mode-or-motion-detection)
|
||
- [Configure the power management](#configure-the-power-management)
|
||
- [Configure the presence or occupancy](#configure-the-presence-or-occupancy)
|
||
- [Advanced configuration](#advanced-configuration)
|
||
- [Examples tuning](#examples-tuning)
|
||
- [Electrical heater](#electrical-heater)
|
||
- [Central heating (gaz or fuel heating system)](#central-heating-gaz-or-fuel-heating-system)
|
||
- [Temperature sensor will battery](#temperature-sensor-will-battery)
|
||
- [Reactive temperature sensor (on mains)](#reactive-temperature-sensor-on-mains)
|
||
- [My preset configuration](#my-preset-configuration)
|
||
- [Algorithm](#algorithm)
|
||
- [TPI algorithm](#tpi-algorithm)
|
||
- [Sensors](#sensors)
|
||
- [Services](#services)
|
||
- [Force the presence / occupancy](#force-the-presence--occupancy)
|
||
- [Change the temperature of presets](#change-the-temperature-of-presets)
|
||
- [Change security settings](#change-security-settings)
|
||
- [Notifications](#notifications)
|
||
- [Custom attributes](#custom-attributes)
|
||
- [Some results](#some-results)
|
||
- [Even better](#even-better)
|
||
- [Even Better with Scheduler Component !](#even-better-with-scheduler-component-)
|
||
- [Even-even better with custom:simple-thermostat front integration](#even-even-better-with-customsimple-thermostat-front-integration)
|
||
- [Even better with Apex-chart to tune your Thermostat](#even-better-with-apex-chart-to-tune-your-thermostat)
|
||
- [And always better and better with the NOTIFIER daemon app to notify events](#and-always-better-and-better-with-the-notifier-daemon-app-to-notify-events)
|
||
- [Contributions are welcome!](#contributions-are-welcome)
|
||
|
||
|
||
This custom component for Home Assistant is an upgrade and is a complete rewrite of the component "Awesome thermostat" (see [Github](https://github.com/dadge/awesome_thermostat)) with addition of features.
|
||
|
||
> _*News*_
|
||
> * **Release 3.2**: added the ability to control multiple switches from the same thermostat. In this mode, the switches are triggered with a delay to minimize the power required at one time (we minimize the recovery periods). See [Configuration](#select-the-driven-entity)
|
||
> * **Release 3.1**: added detection of open windows/doors by temperature drop. This new function makes it possible to automatically stop a radiator when the temperature drops suddenly. See [Auto mode](#auto-mode)
|
||
> * **Major release 3.0**: addition of thermostat equipment and associated sensors (binary and non-binary). Much closer to the Home Assistant philosophy, you now have direct access to the energy consumed by the radiator controlled by the thermostat and many other sensors that will be useful in your automations and dashboard.
|
||
> * **release 2.3**: addition of the power and energy measurement of the radiator controlled by the thermostat.
|
||
> * **release 2.2**: addition of a safety function allowing a radiator not to be left heating forever in the event of a thermometer failure
|
||
> * **major release 2.0**: addition of the "over climate" thermostat allowing you to transform any thermostat into a Versatile Thermostat and add all the functions of the latter.
|
||
|
||
# Thanks for the beer [buymecoffee](https://www.buymeacoffee.com/jmcollin78)
|
||
Many thanks to @salabur for the beer. It's very pleasing. (Vielen Dank an @salabur für das Bier. Es ist sehr erfreulich.)
|
||
|
||
# When to use / not use
|
||
This thermostat can control 2 types of equipment:
|
||
1. a heater that only works in on/off mode (named ```thermostat_over_switch```). The minimum configuration required to use this type of thermostat is:
|
||
has. equipment such as a radiator (a ```switch``` or equivalent),
|
||
b. a temperature probe for the room (or an input_number),
|
||
vs. an external temperature sensor (think about weather integration if you don't have one)
|
||
2. another thermostat that has its own operating modes (named ```thermostat_over_climate```). For this type of thermostat, the minimum configuration requires:
|
||
has. equipment such as air conditioning which is controlled by its own ```climate``` type entity,
|
||
b. a temperature probe for the room (or an input_number),
|
||
vs. an external temperature sensor (think about weather integration if you don't have one)
|
||
|
||
The ```thermostat_over_climate``` type allows you to add all the functionality provided by VersatileThermostat to your existing equipment. The climate VersatileThermostat entity will control your climate entity, turning it off if the windows are open, switching it to Eco mode if no one is present, etc. See [here](#why-a-new-implementation-of-the-thermostat). For this type of thermostat, any heating cycles are controlled by the underlying climate entity and not by the Versatile Thermostat itself.
|
||
|
||
# Why another thermostat implementation ?
|
||
|
||
|
||
This component named __Versatile thermostat__ manage the following use cases :
|
||
- Configuration through standard integration GUI (using Config Entry flow),
|
||
- Full uses of **presets mode**,
|
||
- Unset the preset mode when the temperature is **manually defined** on a thermostat,
|
||
- Turn off/on a thermostat when a **door or windows is opened/closed** after a certain delay,
|
||
- Change preset when an **activity is detected** or not in a room for a defined time,
|
||
- Use a **TPI (Time Proportional Interval) algorithm** thank's to [[Argonaute](https://forum.hacf.fr/u/argonaute/summary)] algorithm ,
|
||
- Add **power shedding management** or regulation to avoid exceeding a defined total power. When max power is exceeded, a hidden 'power' preset is set on the climate entity. When power goes below the max, the previous preset is restored.
|
||
- Add **home presence management**. This feature allows you to dynamically change the temperature of preset considering a occupancy sensor of your home.
|
||
- Add **services to interact with the thermostat** from others integration: you can force the presence / un-presence using a service, and you can dynamically change the temperature of the presets and change dynamically the security parameters.
|
||
- Add sensors to see the internal states of the thermostat
|
||
|
||
# How to install this incredible Versatile Thermostat ?
|
||
|
||
## HACS installation (recommended)
|
||
|
||
1. Install [HACS](https://hacs.xyz/). That way you get updates automatically.
|
||
2. Add this Github repository as custom repository in HACS settings.
|
||
3. search and install "Versatile Thermostat" in HACS and click `install`.
|
||
4. Restart Home Assistant,
|
||
5. Then you can add an Versatile Thermostat integration in the integration page. You add as many Versatile Thermostat that you need (typically one per heater that should be managed)
|
||
|
||
## Manual installation
|
||
|
||
1. Using the tool of choice open the directory (folder) for your HA configuration (where you find `configuration.yaml`).
|
||
2. If you do not have a `custom_components` directory (folder) there, you need to create it.
|
||
3. In the `custom_components` directory (folder) create a new folder called `versatile_thermostat`.
|
||
4. Download _all_ the files from the `custom_components/versatile_thermostat/` directory (folder) in this repository.
|
||
5. Place the files you downloaded in the new directory (folder) you created.
|
||
6. Restart Home Assistant
|
||
7. Configure new Versatile Thermostat integration
|
||
|
||
|
||
# Configuration
|
||
|
||
Note: no configuration in configuration.yaml is needed because all configuration is done through the standard GUI when adding the integration.
|
||
|
||
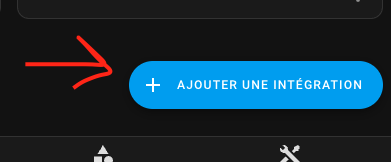
Click on Add integration button in the integration page
|
||
|
||
|
||
The configuration can be change through the same interface. Simply select the thermostat to change, hit "Configure" and you will be able to change some parameters or configuration.
|
||
|
||
Then follow the configurations steps as follow:
|
||
|
||
## Minimal configuration update
|
||
|
||
|
||
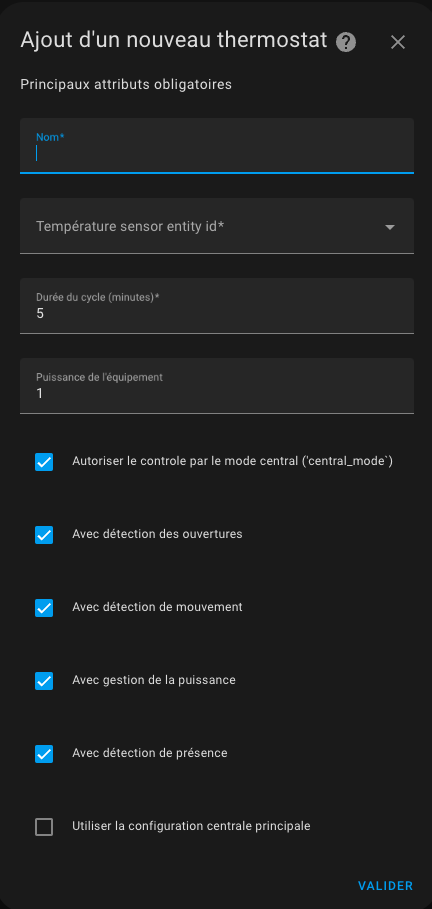
Give the main mandatory attributes:
|
||
1. a name (will be the name of the integration and also the name of the climate entity)
|
||
2. the type of thermostat ```thermostat_over_switch``` to control a radiator controlled by a switch or ```thermostat_over_climate``` to control another thermostat. Cf. [above](#why-a-new-thermostat-implementation)
|
||
4. a temperature sensor entity identifier which gives the temperature of the room in which the radiator is installed,
|
||
5. a temperature sensor entity giving the outside temperature. If you don't have an external sensor, you can use local weather integration
|
||
6. a cycle duration in minutes. On each cycle, the heater will cycle on and then off for a calculated time to reach the target temperature (see [preset](#configure-the-preset-temperature) below),
|
||
7. minimum and maximum thermostat temperatures,
|
||
8. the power of the l'équipement which will activate the power and energy sensors of the device,
|
||
9. the list of features that will be used for this thermostat. Depending on your choices, the following configuration screens will appear or not.
|
||
|
||
>  _*Notes*_
|
||
1. With the ```thermostat_over_switch``` type, calculation are done at each cycle. So in case of conditions change, you will have to wait for the next cycle to see a change. For this reason, the cycle should not be too long. **5 min is a good value**,
|
||
2. if the cycle is too short, the heater could never reach the target temperature indeed for heater with accumulation features and it will be unnecessary solicited
|
||
|
||
## Select the driven entity
|
||
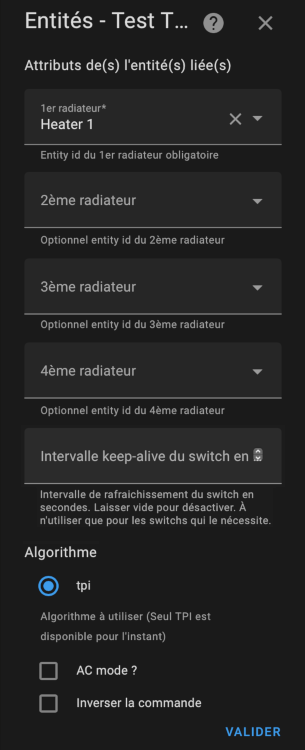
Depending on your choice on the type of thermostat, you will have to choose a switch type entity or a climate type entity. Only compatible entities are shown.
|
||
|
||
For a ```thermostat_over_switch``` thermostat:
|
||
|
||
The algorithm to be used today is limited to TPI is available. See [algorithm](#algorithm)
|
||
If several type entities are configured, the thermostat staggers the activations in order to minimize the number of active switches at a time t. This allows a better distribution of power since each radiator will turn on in turn.
|
||
Example of synchronized triggering:
|
||

|
||
|
||
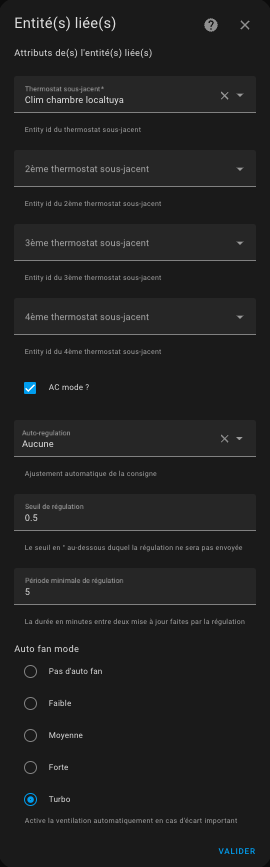
For a ```thermostat_over_climate``` thermostat:
|
||
|
||
|
||
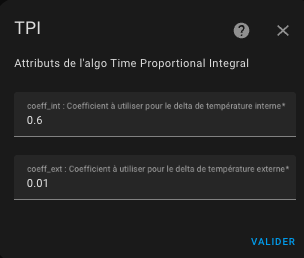
## Configure the TPI algorithm coefficients
|
||
Click on 'Validate' on the previous page and you will get there:
|
||
|
||
|
||
For more informations on the TPI algorithm and tuned please refer to [algorithm](#algorithm).
|
||
|
||
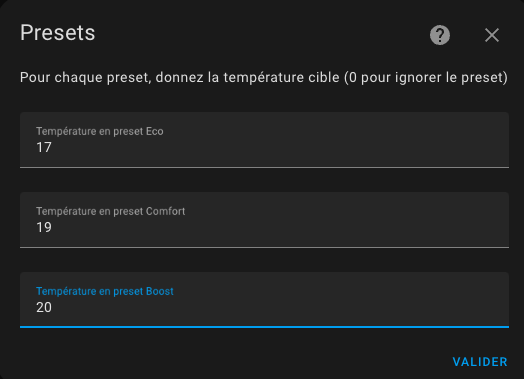
## Configure the preset temperature
|
||
Click on 'Validate' on the previous page and you will get there:
|
||
|
||
|
||
The preset mode allows you to pre-configurate targeted temperature. Used in conjonction with Scheduler (see [scheduler](#even-better-with-scheduler-component) you will have a powerfull and simple way to optimize the temperature vs electrical consumption of your hous. Preset handled are the following :
|
||
- **Eco** : device is running an energy-saving mode
|
||
- **Comfort** : device is in comfort mode
|
||
- **Boost** : device turn all valve full up
|
||
|
||
**None** is always added in the list of modes, as it is a way to not use the presets modes but a **manual temperature** instead.
|
||
|
||
>  _*Notes*_
|
||
1. Changing manually the target temperature, set the preset to None (no preset). This way you can always set a target temperature even if no preset are available.
|
||
2. standard ``Away`` preset is a hidden preset which is not directly selectable. Versatile Thermostat uses the presence management or movement management to set automatically and dynamically the target temperature depending on a presence in the home or an activity in the room. See [presence management](#configure-the-presence-management).
|
||
3. if you uses the power shedding management, you will see a hidden preset named ``power``. The heater preset is set to ``power`` when overpowering conditions are encountered and shedding is active for this heater. See [power management](#configure-the-power-management).
|
||
4. if you uses the advanced configuration you will see the preset set to ``security`` if the temperature could not be retrieved after a certain delay
|
||
5. ff you don't want to use the preseet, give 0 as temperature. The preset will then been ignored and will not displayed in the front component
|
||
|
||
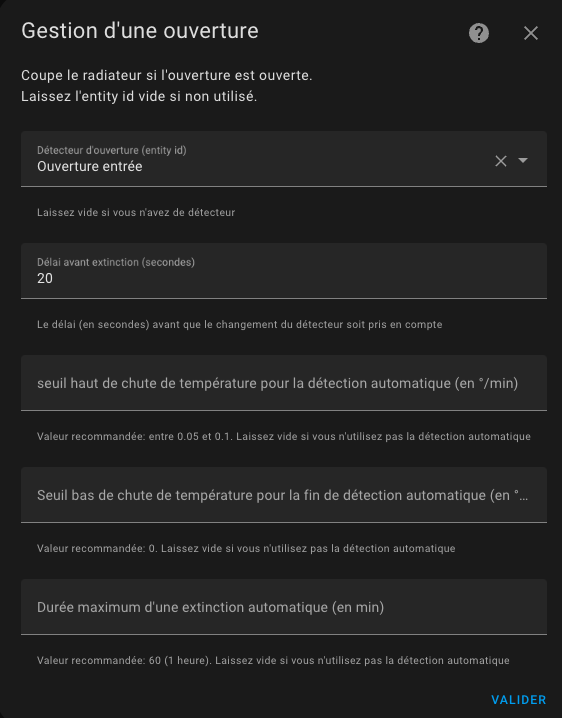
## Configure the doors/windows turning on/off the thermostats
|
||
You must have chosen the ```With opening detection``` feature on the first page to arrive on this page.
|
||
The detection of openings can be done in 2 ways:
|
||
1. either with a sensor placed on the opening (sensor mode),
|
||
2. either by detecting a sudden drop in temperature (auto mode)
|
||
|
||
### The sensor mode
|
||
In sensor mode, you must fill in the following information:
|
||
|
||
|
||
1. an entity ID of a **window/door sensor**. It should be a binary_sensor or an input_boolean. The state of the entity must be 'on' when the window is open or 'off' when it is closed
|
||
2. a **delay in seconds** before any change. This allows a window to be opened quickly without stopping the heating.
|
||
|
||
### Auto mode
|
||
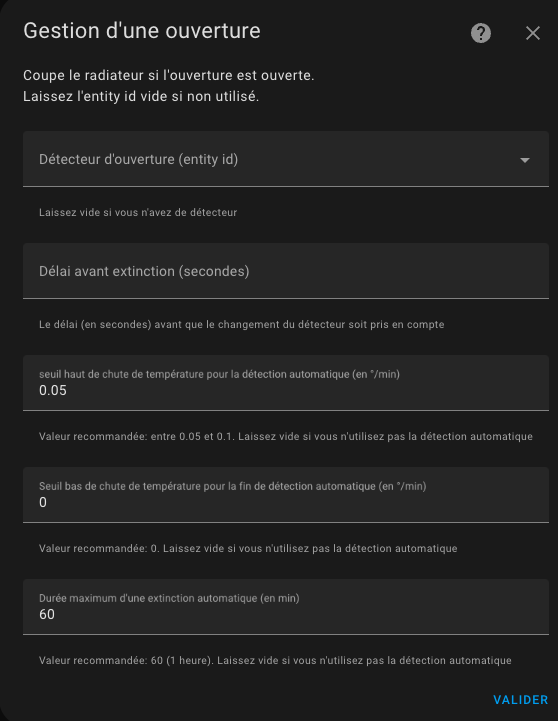
In auto mode, the configuration is as follows:
|
||
|
||
|
||
1. a detection threshold in degrees per minute. When the temperature drops below this threshold, the thermostat will turn off. The lower this value, the faster the detection will be (in return for a risk of false positives),
|
||
2. an end of detection threshold in degrees per minute. When the temperature drop goes above this value, the thermostat will go back to the previous mode (mode and preset),
|
||
3. maximum detection time. Beyond this time, the thermostat will return to its previous mode and preset even if the temperature continues to drop.
|
||
|
||
To set the thresholds it is advisable to start with the reference values and adjust the detection thresholds. A few tries gave me the following values (for a desktop):
|
||
- detection threshold: 0.05°C/min
|
||
- non-detection threshold: 0 °C/min
|
||
- maximum duration: 60 min.
|
||
|
||
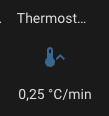
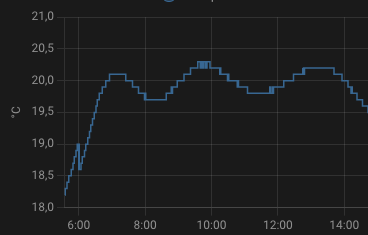
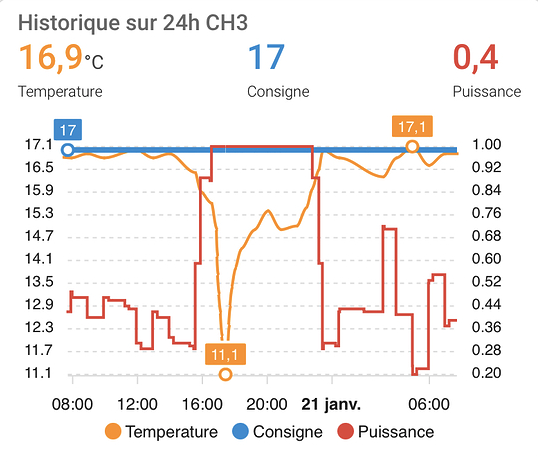
A new "slope" sensor has been added for all thermostats. It gives the slope of the temperature curve in °C/min (or °K/min). This slope is smoothed and filtered to avoid aberrant values from the thermometers which would interfere with the measurement.
|
||
|
||
|
||
To properly adjust it is advisable to display on the same historical graph the temperature curve and the slope of the curve (the "slope"):
|
||

|
||
|
||
And that's all ! your thermostat will turn off when the windows are open and turn back on when closed.
|
||
|
||
>  _*Notes*_
|
||
1. If you want to use **multiple door/window sensors** to automate your thermostat, just create a group with the usual behavior (https://www.home-assistant.io/integrations/binary_sensor.group/)
|
||
2. If you don't have a window/door sensor in your room, just leave the sensor entity id blank,
|
||
3. **Only one mode is allowed**. You cannot configure a thermostat with a sensor and automatic detection. The 2 modes may contradict each other, it is not possible to have the 2 modes at the same time,
|
||
4. It is not recommended to use the automatic mode for equipment subject to frequent and normal temperature variations (corridors, open areas, ...)
|
||
## Configure the activity mode or motion detection
|
||
If you choose the ```Motion management``` feature, lick on 'Validate' on the previous page and you will get there:
|
||
|
||
|
||
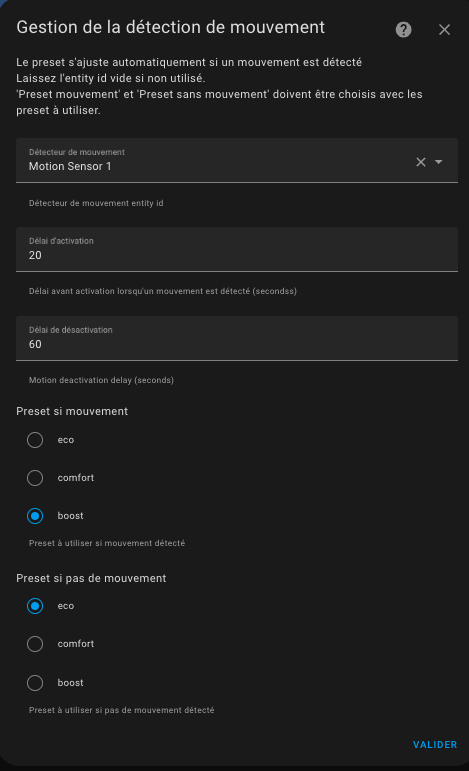
We will now see how to configure the new Activity mode.
|
||
What we need:
|
||
- a **motion sensor**. The entity id of a motion sensor. Motion sensor states should be 'on' (motion detected) or 'off' (no motion detected)
|
||
- a **motion delay** (in seconds) duration defining how long we wait for motion confirmation before considering the motion
|
||
- a **target "motion" preset**. We will used the temperature of this preset when an activity is detected.
|
||
- a **target "no motion" preset**. We will used the temperature of this second preset when no activity is detected.
|
||
|
||
So imagine we want to have the following behavior :
|
||
- we have room with a thermostat set in activity mode, the "motion" mode chosen is comfort (21.5C), the "no motion" mode chosen is Eco (18.5 C) and the motion delay is 5 min.
|
||
- the room is empty for a while (no activity detected), the temperature of this room is 18.5 C
|
||
- somebody enters into the room, an activity is detected the temperature is set to 21.5 C
|
||
- the person leaves the room, after 5 min the temperature is set back to 18.5 C
|
||
|
||
For this to work, the climate thermostat should be in ``Activity`` preset mode.
|
||
|
||
>  _*Notes*_
|
||
1. Be aware that as for the others preset modes, ``Activity`` will only be proposed if it's correctly configure. In other words, the 4 configuration keys have to be set if you want to see Activity in home assistant Interface
|
||
|
||
## Configure the power management
|
||
|
||
If you choose the ```Power management``` feature, click on 'Validate' on the previous page and you will get there:
|
||
|
||
|
||
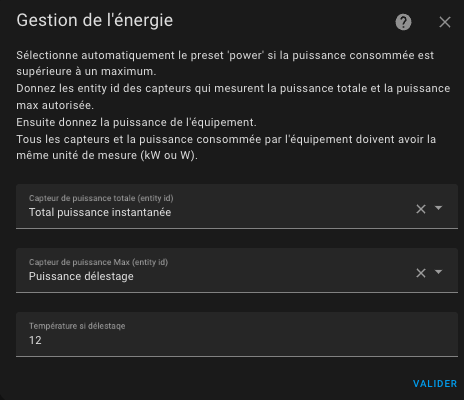
This feature allows you to regulate the power consumption of your radiators. Known as shedding, this feature allows you to limit the electrical power consumption of your heater if overpowering conditions are detected. Give a **sensor to the current power consumption of your house**, a **sensor to the max power** that should not be exceeded, the **power consumption of your heater** (in the first step of the configuration) and the algorithm will not start a radiator if the max power will be exceeded after radiator starts.
|
||
|
||
|
||
Note that all power values should have the same units (kW or W for example).
|
||
This allows you to change the max power along time using a Scheduler or whatever you like.
|
||
|
||
>  _*Notes*_
|
||
1. When shedding is encountered, the heater is set to the preset named ``power``. This is a hidden preset, you cannot select it manually.
|
||
2. I use this to avoid exceeded the limit of my electrical power contract when an electrical vehicle is charging. This makes a kind of auto-regulation.
|
||
3. Always keep a margin, because max power can be briefly exceeded while waiting for the next cycle calculation typically or by not regulated equipement.
|
||
4. If you don't want to use this feature, just leave the entities id empty
|
||
|
||
## Configure the presence or occupancy
|
||
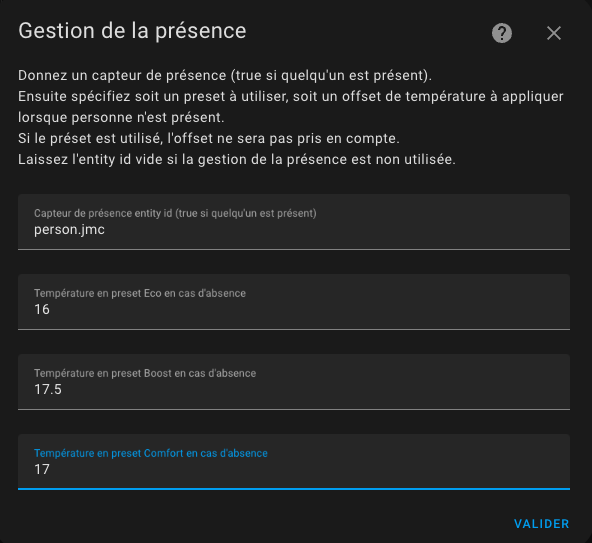
If you choose the ```Presence management``` feature, this feature allows you to dynamically changes the temperature of all configured Versatile thermostat's presets when nobody is at home or when someone comes back home. For this, you have to configure the temperature that will be used for each preset when presence is off. When the occupancy sensor turns to off, those tempoeratures will be used. When it turns on again the "normal" temperature configured for the preset is used. See [preset management](#configure-the-preset-temperature).
|
||
To configure presence fills this form:
|
||
|
||
|
||
|
||
For this you need to configure:
|
||
1. A **occupancy sensor** which state should be 'on' or 'home' if someone is present or 'off' or 'not_home' else,
|
||
2. The **temperature used in Eco** preset when absent,
|
||
3. The **temperature used in Comfort** preset when absent,
|
||
4. The **temperature used in Boost** preset when absent
|
||
|
||
>  _*Notes*_
|
||
1. the switch of temperature is immediate and is reflected on the front component. The calculation will take the new target temperature into account at the next cycle calculation,
|
||
2. you can use direct person.xxxx sensor or group of sensors of Home Assistant. The presence sensor handles ``on`` or ``home`` states as present and ``off`` or ``not_home`` state as absent.
|
||
|
||
## Advanced configuration
|
||
Those parameters allows to fine tune the thermostat.
|
||
The advanced configuration form is the following:
|
||
|
||

|
||
|
||
The first delay (minimal_activation_delay_sec) in sec in the minimum delay acceptable for turning on the heater. When calculation gives a power on delay below this value, the heater will stays off.
|
||
|
||
The second delay (security_delay_min) is the maximal delay between two temperature measure before setting the preset to ``security`` and turning off the thermostat. If the temperature sensor is no more giving temperature measures, the thermostat and heater will turns off after this delay and the preset of the thermostat will be set to ``security``. This is useful to avoid overheating is the battery of your temperature sensor is too low.
|
||
|
||
The third parameter (``security_min_on_percent``) is the minimum value of ``on_percent`` below which the security preset will not be activated. This parameter makes it possible not to put a thermostat in safety, if the controlled radiator does not heat sufficiently.
|
||
Setting this parameter to ``0.00`` will trigger the security preset regardless of the last heating setpoint, conversely ``1.00`` will never trigger the security preset (which amounts to disabling the function).
|
||
|
||
The fourth parameter (``security_default_on_percent``) is the ``on_percent`` value that will be used when the thermostat enters ``security`` mode. If you put ``0`` then the thermostat will be cut off when it goes into ``security`` mode, putting 0.2% for example allows you to keep a little heating (20% in this case), even in mode ``security``. It avoids finding your home totally frozen during a thermometer failure.
|
||
|
||
See [example tuning](#examples-tuning) for common tuning examples
|
||
|
||
> _*Notes*_
|
||
1. When the temperature sensor comes to life and returns the temperatures, the preset will be restored to its previous value,
|
||
3. Attention, two temperatures are needed: internal temperature and external temperature and each must give the temperature, otherwise the thermostat will be in "security" preset,
|
||
4. A service is available that allows you to set the 3 security parameters. This can be used to adapt the security function to your use.
|
||
5. For natural usage, the ``security_default_on_percent`` should be less than ``security_min_on_percent``,
|
||
6. When a ``thermostat_over_climate`` type thermostat goes into ``security`` mode it is turned off. The ``security_min_on_percent`` and ``security_default_on_percent`` parameters are then not used.
|
||
|
||
# Examples tuning
|
||
|
||
## Electrical heater
|
||
- cycle: between 5 and 10 minutes,
|
||
- minimal_activation_delay_sec: 30 seconds
|
||
|
||
## Central heating (gaz or fuel heating system)
|
||
- cycle: between 30 and 60 min,
|
||
- minimal_activation_delay_sec: 300 seconds (because of the response time)
|
||
|
||
## Temperature sensor will battery
|
||
- security_delay_min: 60 min (because these sensors are lazy)
|
||
- security_min_on_percent: 0.5 (50% - we go to the ``security`` preset if the radiator was heating more than 50% of the time)
|
||
- security_default_on_percent: 0.1 (10% - in preset ``security``, we keep a heating background 20% of the time)
|
||
|
||
These settings should be understood as follows:
|
||
|
||
> If the thermometer no longer sends the temperature for 1 hour and the heating percentage (``on_percent``) was greater than 50%, then this heating percentage is reduced to 10%.
|
||
|
||
It's up to you to adapt these settings to your case!
|
||
|
||
What is important is not to take too many risks with these parameters: suppose you are away for a long period, that the batteries of your thermometer reach the end of their life, your radiator will heat up 10% of the time for the whole the duration of the outage.
|
||
|
||
Versatile Thermostat allows you to be notified when an event of this type occurs. Set up the alerts that go well as soon as you use this thermostat. See (#notifications)
|
||
|
||
## Reactive temperature sensor (on mains)
|
||
- security_delay_min: 15min
|
||
- security_min_on_percent: 0.7 (70% - we go to the ``security`` preset if the radiator was heating more than 70% of the time)
|
||
- security_default_on_percent: 0.25 (25% - in preset ``security``, we keep a heating background 25% of the time)
|
||
|
||
## My preset configuration
|
||
This is just an example of how I use the preset. It up to you to adapt to your configuration but it can be useful to understand how it works.
|
||
``Eco``: 17 °C
|
||
``Comfort``: 19 °C
|
||
``Boost``: 20 °C
|
||
|
||
When presence if off:
|
||
``Eco``: 16.5 °C
|
||
``Comfort``: 17 °C
|
||
``Boost``: 18 °C
|
||
|
||
Motion detector in my office is set to use ``Boost`` when motion is detected and ``Eco`` if not.
|
||
|
||
# Algorithm
|
||
This integration uses a proportional algorithm. A Proportional algorithm is useful to avoid the oscillation around the target temperature. This algorithm is based on a cycle which alternate heating and stop heating. The proportion of heating vs not heating is determined by the difference between the temperature and the target temperature. Bigger the difference is and bigger is the proportion of heating inside the cycle.
|
||
|
||
This algorithm make the temperature converge and stop oscillating.
|
||
|
||
## TPI algorithm
|
||
The TPI algorithm consist in the calculation at each cycle of a percentage of On state vs Off state for the heater using the target temperature, the current temperature in the room and the current external temperature.
|
||
|
||
The percentage is calculated with this formula:
|
||
|
||
on_percent = coef_int * (target temperature - current temperature) + coef_ext * (target temperature - external temperature)
|
||
Then make 0 <= on_percent <= 1
|
||
|
||
Defaults values for coef_int and coef_ext are respectively: ``0.6`` and ``0.01``. Those defaults values are suitable for a standard well isolated room.
|
||
|
||
To tune those coefficients keep in mind that:
|
||
1. **if target temperature is not reach** after stable situation, you have to augment the ``coef_ext`` (the ``on_percent`` is too low),
|
||
2. **if target temperature is exceeded** after stable situation, you have to decrease the ``coef_ext`` (the ``on_percent`` is too high),
|
||
3. **if reaching the target temperature is too slow**, you can increase the ``coef_int`` to give more power to the heater,
|
||
4. **if reaching the target temperature is too fast and some oscillations appears** around the target, you can decrease the ``coef_int`` to give less power to the heater
|
||
|
||
See some situations at [examples](#some-results).
|
||
|
||
# Sensors
|
||
|
||
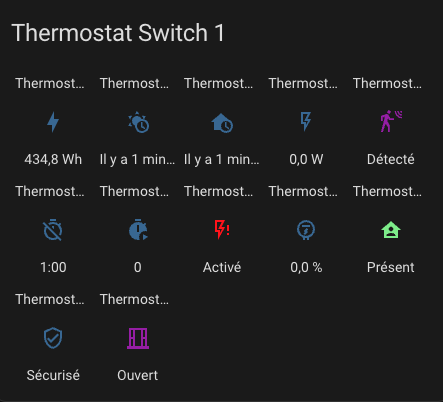
With the thermostat are available sensors that allow you to view the alerts and the internal status of the thermostat. They are available in the entities of the device associated with the thermostat:
|
||
|
||

|
||
|
||
In order, there are:
|
||
1. the main climate thermostat command entity,
|
||
2. the energy consumed by the thermostat (value which continuously increases),
|
||
3. the time of receipt of the last outside temperature,
|
||
4. the time of receipt of the last indoor temperature,
|
||
5. the average power of the device over the cycle (for TPIs only),
|
||
6. the time spent in the off state in the cycle (TPI only),
|
||
7. the time spent in the on state in the cycle (TPI only),
|
||
8. load shedding status,
|
||
9. cycle power percentage (TPI only),
|
||
10. presence status (if presence management is configured),
|
||
11. security status,
|
||
12. opening status (if opening management is configured),
|
||
13. motion status (if motion management is configured)
|
||
|
||
To color the sensors, add these lines and customize them as needed, in your configuration.yaml:
|
||
|
||
```
|
||
frontend:
|
||
themes:
|
||
versatile_thermostat_theme:
|
||
state-binary_sensor-safety-on-color: "#FF0B0B"
|
||
state-binary_sensor-power-on-color: "#FF0B0B"
|
||
state-binary_sensor-window-on-color: "rgb(156, 39, 176)"
|
||
state-binary_sensor-motion-on-color: "rgb(156, 39, 176)"
|
||
state-binary_sensor-presence-on-color: "lightgreen"
|
||
```
|
||
and choose the ```versatile_thermostat_theme``` theme in the panel configuration. You will get something that will look like this:
|
||
|
||
|
||
|
||
# Services
|
||
|
||
This custom implementation offers some specific services to facilitate integration with others Home Assisstant components.
|
||
|
||
## Force the presence / occupancy
|
||
This service allows you to force the presence status independantly of the presence sensor. This can be useful if you want to manage the presence through a service and not through a sensor. For example, you could use your alarm to force the absence when it is switched on.
|
||
|
||
The code to call this service is the following:
|
||
```
|
||
service: versatile_thermostat.set_presence
|
||
data:
|
||
presence: "off"
|
||
target:
|
||
entity_id: climate.my_thermostat
|
||
```
|
||
|
||
## Change the temperature of presets
|
||
This services is useful if you want to dynamically change the preset temperature. Instead of changing preset, some use-case need to change the temperature of the preset. So you can keep the Scheduler unchanged to manage the preset and adjust the temperature of the preset.
|
||
If the changed preset is currently selectionned, the modification of the target temperature is immediate and will be taken into account at the next calculation cycle.
|
||
|
||
You can change the one or the both temperature (when present or when absent) of each preset.
|
||
|
||
Use the following code the set the temperature of the preset:
|
||
```
|
||
service: versatile_thermostat.set_preset_temperature
|
||
data:
|
||
preset: boost
|
||
temperature: 17.8
|
||
temperature_away: 15
|
||
target:
|
||
entity_id: climate.my_thermostat
|
||
```
|
||
|
||
>  _*Notes*_
|
||
- after a restart the preset are resetted to the configured temperature. If you want your change to be permanent you should modify the temperature preset into the confguration of the integration.
|
||
|
||
## Change security settings
|
||
This service is used to dynamically modify the security parameters described here [Advanced configuration](#configuration-avanced).
|
||
If the thermostat is in ``security`` mode the new settings are applied immediately.
|
||
|
||
To change the security settings use the following code:
|
||
```
|
||
service : thermostat_polyvalent.set_security
|
||
date:
|
||
min_on_percent: "0.5"
|
||
default_on_percent: "0.1"
|
||
delay_min: 60
|
||
target:
|
||
entity_id : climate.my_thermostat
|
||
```
|
||
|
||
# Notifications
|
||
Significant thermostat events are notified via the message bus.
|
||
The notified events are as follows:
|
||
|
||
- ``versatile_thermostat_security_event``: a thermostat enters or exits the ``security`` preset
|
||
- ``versatile_thermostat_power_event``: a thermostat enters or exits the ``power`` preset
|
||
- ``versatile_thermostat_temperature_event``: one or both temperature measurements of a thermostat have not been updated for more than ``security_delay_min`` minutes
|
||
- ``versatile_thermostat_hvac_mode_event``: the thermostat is on or off. This event is also broadcast when the thermostat starts up
|
||
- ``versatile_thermostat_preset_event``: a new preset is selected on the thermostat. This event is also broadcast when the thermostat starts up
|
||
|
||
If you have followed correctly, when a thermostat goes into safety mode, 3 events are triggered:
|
||
1. ``versatile_thermostat_temperature_event`` to indicate that a thermometer has become unresponsive,
|
||
2. ``versatile_thermostat_preset_event`` to indicate the switch to ```security``` preset,
|
||
3. ``versatile_thermostat_hvac_mode_event`` to indicate the possible extinction of the thermostat
|
||
|
||
Each event carries the key values of the event (temperatures, current preset, current power, etc.) as well as the states of the thermostat.
|
||
|
||
You can very easily capture its events in an automation, for example to notify users.
|
||
|
||
# Custom attributes
|
||
|
||
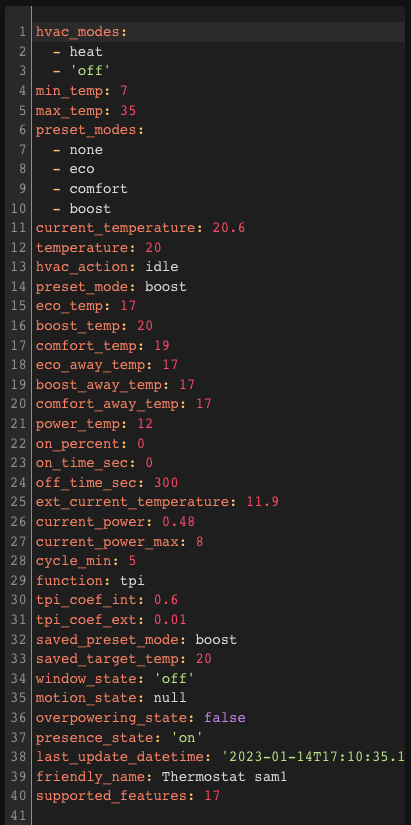
To tune the algorithm you have access to all context seen and calculted by the thermostat through dedicated attributes. You can see (and use) those attributes in the "Development tools / states" HMI of HA. Enter your thermostat and you will see something like this:
|
||
|
||
|
||
Custom attributes are the following:
|
||
|
||
| Attribute | Meaning |
|
||
| ----------| --------|
|
||
| ``hvac_modes`` | The list of modes supported by the thermostat |
|
||
| ``min_temp`` | The minimal temperature |
|
||
| ``max_temp`` | The maximal temperature |
|
||
| ``preset_modes`` | The presets visible for this thermostat. Hidden presets are not showed here |
|
||
| ``current_temperature`` | The current temperature as reported by the sensor |
|
||
| ``temperature`` | The target temperature |
|
||
| ``hvac_action`` | The action currently running by the heater. Can be idle, heating |
|
||
| ``preset_mode`` | The currently selected preset. Can be one of the 'preset_modes' or a hidden preset like power |
|
||
| ``[eco/comfort/boost]_temp`` | The temperature configured for the preset xxx |
|
||
| ``[eco/comfort/boost]_away_temp`` | The temperature configured for the preset xxx when presence is off or not_home |
|
||
| ``power_temp`` | The temperature used when shedding is detected |
|
||
| ``on_percent`` | (deprecated) The percentage on calculated by the TPI algorithm |
|
||
| ``on_time_sec`` | (deprecated) The On period in sec. Should be ```on_percent * cycle_min``` |
|
||
| ``off_time_sec`` | (deprecated) The Off period in sec. Should be ```(1 - on_percent) * cycle_min``` |
|
||
| ``cycle_min`` | The calculation cycle in minutes |
|
||
| ``function`` | The algorithm used for cycle calculation |
|
||
| ``tpi_coef_int`` | The ``coef_int`` of the TPI algorithm |
|
||
| ``tpi_coef_ext`` | The ``coef_ext`` of the TPI algorithm |
|
||
| ``saved_preset_mode`` | The last preset used before automatic switch of the preset |
|
||
| ``saved_target_temp`` | The last temperature used before automatic switching |
|
||
| ``window_state`` | (deprecated) The last known state of the window sensor. None if window is not configured |
|
||
| ``motion_state`` | (deprecated) The last known state of the motion sensor. None if motion is not configured |
|
||
| ``overpowering_state`` | (deprecated) The last known state of the overpowering sensor. None if power management is not configured |
|
||
| ``presence_state`` | (deprecated) The last known state of the presence sensor. None if presence management is not configured |
|
||
| ``security_delay_min`` | The delay before setting the security mode when temperature sensor are off |
|
||
| ``security_min_on_percent`` | The minimal on_percent below which security preset won't be trigger |
|
||
| ``security_default_on_percent`` | The on_percent used when thermostat is in ``security`` |
|
||
| ``last_temperature_datetime`` | (deprecated) The date and time in ISO8866 format of the last internal temperature reception |
|
||
| ``last_ext_temperature_datetime`` | (deprecated) The date and time in ISO8866 format of the last external temperature reception |
|
||
| ``security_state`` | (deprecated) The security state. true or false |
|
||
| ``minimal_activation_delay_sec`` | The minimal activation delay in seconds |
|
||
| ``last_update_datetime`` | The date and time in ISO8866 format of this state |
|
||
| ``friendly_name`` | The name of the thermostat |
|
||
| ``supported_features`` | A combination of all features supported by this thermostat. See official climate integration documentation for more informations |
|
||
|
||
# Some results
|
||
|
||
**Convergence of temperature to target configured by preset:**
|
||

|
||
|
||
[Cycle of on/off calculated by the integration:](https://)
|
||

|
||
|
||
**Coef_int too high (oscillations around the target)**
|
||
|
||
|
||
**Algorithm calculation evolution**
|
||
|
||
See the code of this component [[below](#even-better-with-apex-chart-to-tune-your-thermostat)]
|
||
|
||
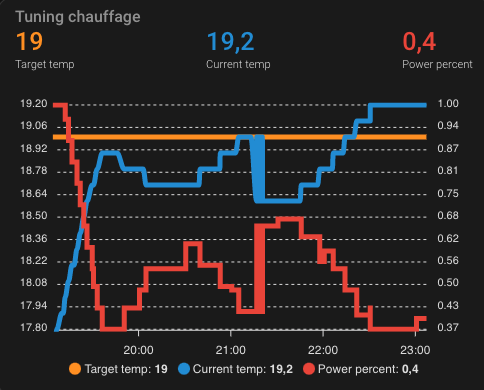
**Fine tuned thermostat**
|
||
Thank's [impuR_Shozz](https://forum.hacf.fr/u/impur_shozz/summary) !
|
||
We can see stability around the target temperature (consigne) and when at target the on_percent (puissance) is near 0.3 which seems a very good value.
|
||
|
||
|
||
|
||
Enjoy !
|
||
|
||
# Even better
|
||
|
||
## Even Better with Scheduler Component !
|
||
|
||
In order to enjoy the full power of Versatile Thermostat, I invite you to use it with https://github.com/nielsfaber/scheduler-component
|
||
Indeed, the scheduler component porpose a management of the climate base on the preset modes. This feature has limited interest with the generic thermostat but it becomes highly powerfull with Awesome thermostat :
|
||
|
||
Starting here, I assume you have installed Awesome Thermostat and Scheduler Component.
|
||
|
||
In Scheduler, add a schedule :
|
||
|
||

|
||
|
||
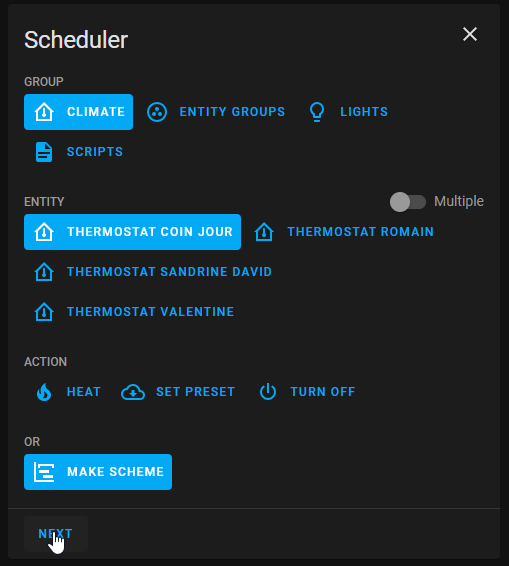
Choose "climate" group, choose one (or multiple) entity/ies, select "MAKE SCHEME" and click next :
|
||
(it is possible to choose "SET PRESET", but I prefer to use "MAKE SCHEME")
|
||
|
||
|
||
|
||
Set your mode scheme and save :
|
||
|
||
|
||

|
||
|
||
In this example I set ECO mode during the night and the day when nobody's at home BOOST in the morning and COMFORT in the evening.
|
||
|
||
|
||
I hope this example helps you, don't hesitate to give me your feedbacks !
|
||
|
||
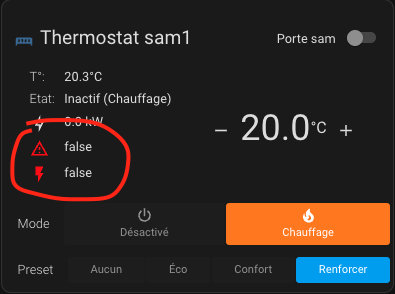
## Even-even better with custom:simple-thermostat front integration
|
||
The ``custom:simple-thermostat`` [here](https://github.com/nervetattoo/simple-thermostat) is a great integration which allow some customisation which fits well with this thermostat.
|
||
You can have something like that very easily 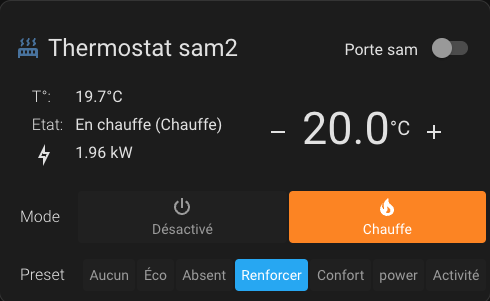
|
||
Example configuration:
|
||
|
||
```
|
||
type: custom:simple-thermostat
|
||
entity: climate.thermostat_sam2
|
||
layout:
|
||
step: row
|
||
label:
|
||
temperature: T°
|
||
state: Etat
|
||
hide:
|
||
state: false
|
||
control:
|
||
hvac:
|
||
_name: Mode
|
||
preset:
|
||
_name: Preset
|
||
sensors:
|
||
- entity: sensor.total_puissance_radiateur_sam2
|
||
icon: mdi:lightning-bolt-outline
|
||
header:
|
||
toggle:
|
||
entity: input_boolean.etat_ouverture_porte_sam
|
||
name: Porte sam
|
||
```
|
||
You can customize this component using the HACS card-mod component to adjust the alert colors. Example for displaying safety and load shedding alerts in red:
|
||
|
||
```
|
||
card_mod:
|
||
style: |
|
||
{% if is_state('binary_sensor.thermostat_chambre_security_state', 'on') %}
|
||
ha-card .body .sensor-heading ha-icon[icon="mdi:alert-outline"] {
|
||
color: red;
|
||
}
|
||
{% endif %}
|
||
{% if is_state('binary_sensor.thermostat_chambre_overpowering_state', 'on') %}
|
||
ha-card .body .sensor-heading ha-icon[icon="mdi:flash"] {
|
||
color: red;
|
||
}
|
||
{% endif %}
|
||
```
|
||
|
||
|
||
## Even better with Apex-chart to tune your Thermostat
|
||
You can get curve like presented in [some results](#some-results) with kind of Apex-chart configuration only using the custom attributes of the thermostat described [here](#custom-attributes):
|
||
|
||
```
|
||
type: custom:apexcharts-card
|
||
header:
|
||
show: true
|
||
title: Tuning chauffage
|
||
show_states: true
|
||
colorize_states: true
|
||
update_interval: 60sec
|
||
graph_span: 4h
|
||
yaxis:
|
||
- id: left
|
||
show: true
|
||
decimals: 2
|
||
- id: right
|
||
decimals: 2
|
||
show: true
|
||
opposite: true
|
||
series:
|
||
- entity: climate.thermostat_mythermostat
|
||
attribute: temperature
|
||
type: line
|
||
name: Target temp
|
||
curve: smooth
|
||
yaxis_id: left
|
||
- entity: climate.thermostat_mythermostat
|
||
attribute: current_temperature
|
||
name: Current temp
|
||
curve: smooth
|
||
yaxis_id: left
|
||
- entity: climate.thermostat_mythermostat
|
||
attribute: on_percent
|
||
name: Power percent
|
||
curve: stepline
|
||
yaxis_id: right
|
||
```
|
||
|
||
## And always better and better with the NOTIFIER daemon app to notify events
|
||
This automation uses the excellent App Daemon named NOTIFIER developed by Horizon Domotique that you will find in demonstration [here](https://www.youtube.com/watch?v=chJylIK0ASo&ab_channel=HorizonDomotique) and the code is [here](https ://github.com/jlpouffier/home-assistant-config/blob/master/appdaemon/apps/notifier.py). It allows you to notify the users of the accommodation when one of the events affecting safety occurs on one of the Versatile Thermostats.
|
||
|
||
This is a great example of using the notifications described here [notification](#notifications).
|
||
|
||
```
|
||
alias: Surveillance Mode Sécurité chauffage
|
||
description: Envoi une notification si un thermostat passe en mode sécurité ou power
|
||
trigger:
|
||
- platform: event
|
||
event_type: versatile_thermostat_security_event
|
||
id: versatile_thermostat_security_event
|
||
- platform: event
|
||
event_type: versatile_thermostat_power_event
|
||
id: versatile_thermostat_power_event
|
||
- platform: event
|
||
event_type: versatile_thermostat_temperature_event
|
||
id: versatile_thermostat_temperature_event
|
||
condition: []
|
||
action:
|
||
- choose:
|
||
- conditions:
|
||
- condition: trigger
|
||
id: versatile_thermostat_security_event
|
||
sequence:
|
||
- event: NOTIFIER
|
||
event_data:
|
||
action: send_to_jmc
|
||
title: >-
|
||
Radiateur {{ trigger.event.data.name }} - {{
|
||
trigger.event.data.type }} Sécurité
|
||
message: >-
|
||
Le radiateur {{ trigger.event.data.name }} est passé en {{
|
||
trigger.event.data.type }} sécurité car le thermomètre ne répond
|
||
plus.\n{{ trigger.event.data }}
|
||
callback:
|
||
- title: Stopper chauffage
|
||
event: stopper_chauffage
|
||
image_url: /media/local/alerte-securite.jpg
|
||
click_url: /lovelace-chauffage/4
|
||
icon: mdi:radiator-off
|
||
tag: radiateur_security_alerte
|
||
persistent: true
|
||
- conditions:
|
||
- condition: trigger
|
||
id: versatile_thermostat_power_event
|
||
sequence:
|
||
- event: NOTIFIER
|
||
event_data:
|
||
action: send_to_jmc
|
||
title: >-
|
||
Radiateur {{ trigger.event.data.name }} - {{
|
||
trigger.event.data.type }} Délestage
|
||
message: >-
|
||
Le radiateur {{ trigger.event.data.name }} est passé en {{
|
||
trigger.event.data.type }} délestage car la puissance max est
|
||
dépassée.\n{{ trigger.event.data }}
|
||
callback:
|
||
- title: Stopper chauffage
|
||
event: stopper_chauffage
|
||
image_url: /media/local/alerte-delestage.jpg
|
||
click_url: /lovelace-chauffage/4
|
||
icon: mdi:radiator-off
|
||
tag: radiateur_power_alerte
|
||
persistent: true
|
||
- conditions:
|
||
- condition: trigger
|
||
id: versatile_thermostat_temperature_event
|
||
sequence:
|
||
- event: NOTIFIER
|
||
event_data:
|
||
action: send_to_jmc
|
||
title: >-
|
||
Le thermomètre du radiateur {{ trigger.event.data.name }} ne
|
||
répond plus
|
||
message: >-
|
||
Le thermomètre du radiateur {{ trigger.event.data.name }} ne
|
||
répond plus depuis longtemps.\n{{ trigger.event.data }}
|
||
image_url: /media/local/thermometre-alerte.jpg
|
||
click_url: /lovelace-chauffage/4
|
||
icon: mdi:radiator-disabled
|
||
tag: radiateur_thermometre_alerte
|
||
persistent: true
|
||
mode: queued
|
||
max: 30
|
||
```
|
||
|
||
# Contributions are welcome!
|
||
|
||
If you want to contribute to this please read the [Contribution guidelines](CONTRIBUTING.md)
|
||
|
||
***
|
||
|
||
[versatile_thermostat]: https://github.com/jmcollin78/versatile_thermostat
|
||
[buymecoffee]: https://www.buymeacoffee.com/jmcollin78
|
||
[buymecoffeebadge]: https://img.shields.io/badge/Buy%20me%20a%20beer-%245-orange?style=for-the-badge&logo=buy-me-a-beer
|
||
[commits-shield]: https://img.shields.io/github/commit-activity/y/jmcollin78/versatile_thermostat.svg?style=for-the-badge
|
||
[commits]: https://github.com/jmcollin78/versatile_thermostat/commits/master
|
||
[hacs]: https://github.com/custom-components/hacs
|
||
[hacs_badge]: https://img.shields.io/badge/HACS-Custom-41BDF5.svg?style=for-the-badge
|
||
[forum-shield]: https://img.shields.io/badge/community-forum-brightgreen.svg?style=for-the-badge
|
||
[forum]: https://community.home-assistant.io/
|
||
[license-shield]: https://img.shields.io/github/license/jmcollin78/versatile_thermostat.svg?style=for-the-badge
|
||
[maintenance-shield]: https://img.shields.io/badge/maintainer-Joakim%20Sørensen%20%40ludeeus-blue.svg?style=for-the-badge
|
||
[releases-shield]: https://img.shields.io/github/release/jmcollin78/versatile_thermostat.svg?style=for-the-badge
|
||
[releases]: https://github.com/jmcollin78/versatile_thermostat/releases
|