Compare commits
6 Commits
5.4.0-beta
...
5.4.1
| Author | SHA1 | Date | |
|---|---|---|---|
|
|
d9fe2bbd55 | ||
|
|
0a50d0fd4e | ||
|
|
c60f23a9ca | ||
|
|
557657a01c | ||
|
|
1f13eb4f37 | ||
|
|
4f349d6f6f |
@@ -10,7 +10,7 @@
|
||||
"postCreateCommand": "./container dev-setup",
|
||||
|
||||
"mounts": [
|
||||
"source=/Users/jmcollin/.ssh,target=/home/vscode/.ssh,type=bind,consistency=cached",
|
||||
"source=${localEnv:HOME}/.ssh,target=/home/vscode/.ssh,type=bind,consistency=cached",
|
||||
// uncomment this to get the versatile-thermostat-ui-card
|
||||
"source=${localEnv:HOME}/SugarSync/Projets/home-assistant/versatile-thermostat-ui-card/dist,target=/workspaces/versatile_thermostat/config/www/community/versatile-thermostat-ui-card,type=bind,consistency=cached"
|
||||
],
|
||||
|
||||
150
README-fr.md
150
README-fr.md
@@ -4,9 +4,9 @@
|
||||
[![hacs][hacs_badge]][hacs]
|
||||
[![BuyMeCoffee][buymecoffeebadge]][buymecoffee]
|
||||
|
||||
|
||||

|
||||
|
||||
>  Cette intégration de thermostat vise à simplifier considérablement vos automatisations autour de la gestion du chauffage. Parce que tous les événements autour du chauffage classiques sont gérés nativement par le thermostat (personne à la maison ?, activité détectée dans une pièce ?, fenêtre ouverte ?, délestage de courant ?), vous n'avez pas à vous encombrer de scripts et d'automatismes compliqués pour gérer vos climats. ;-).
|
||||
|
||||
- [Changements majeurs dans la version 5.0](#changements-majeurs-dans-la-version-50)
|
||||
- [Merci pour la bière buymecoffee](#merci-pour-la-bière-buymecoffee)
|
||||
@@ -24,6 +24,8 @@
|
||||
- [Pour un thermostat de type ```thermostat_over_climate```:](#pour-un-thermostat-de-type-thermostat_over_climate)
|
||||
- [L'auto-régulation](#lauto-régulation)
|
||||
- [L'auto-régulation en mode Expert](#lauto-régulation-en-mode-expert)
|
||||
- [Compensation de la température interne](#compensation-de-la-température-interne)
|
||||
- [Synthèse de l'algorithme d'auto-régulation](#synthèse-de-lalgorithme-dauto-régulation)
|
||||
- [Le mode auto-fan](#le-mode-auto-fan)
|
||||
- [Pour un thermostat de type ```thermostat_over_valve```:](#pour-un-thermostat-de-type-thermostat_over_valve)
|
||||
- [Configurez les coefficients de l'algorithme TPI](#configurez-les-coefficients-de-lalgorithme-tpi)
|
||||
@@ -83,8 +85,12 @@
|
||||
Ce composant personnalisé pour Home Assistant est une mise à niveau et est une réécriture complète du composant "Awesome thermostat" (voir [Github](https://github.com/dadge/awesome_thermostat)) avec l'ajout de fonctionnalités.
|
||||
|
||||
|
||||
>  _*Nouveautés*_
|
||||
> * **Release 5.4** : Ajout du pas de température [#311](https://github.com/jmcollin78/versatile_thermostat/issues/311). Ajout de seuils de régulation pour les `over_valve` pour éviter de trop vider la batterie des TRV [#338](https://github.com/jmcollin78/versatile_thermostat/issues/338)
|
||||
>  _*Nouveautés*_
|
||||
> * **Release 5.4** :
|
||||
> - Ajout du pas de température [#311](https://github.com/jmcollin78/versatile_thermostat/issues/311),
|
||||
> - ajout de seuils de régulation pour les `over_valve` pour éviter de trop vider la batterie des TRV [#338](https://github.com/jmcollin78/versatile_thermostat/issues/338),
|
||||
> - ajout d'une option permettant d'utiliser la température interne d'un TRV pour forcer l' auto-régulation [#348](https://github.com/jmcollin78/versatile_thermostat/issues/348),
|
||||
> - ajout d'une fonction de keep-alive pour les VTherm `over_switch` [#345](https://github.com/jmcollin78/versatile_thermostat/issues/345)
|
||||
> * **Release 5.3** : Ajout d'une fonction de pilotage d'une chaudière centrale [#234](https://github.com/jmcollin78/versatile_thermostat/issues/234) - plus d'infos ici: [Le contrôle d'une chaudière centrale](#le-contrôle-dune-chaudière-centrale). Ajout de la possibilité de désactiver le mode sécurité pour le thermomètre extérieur [#343](https://github.com/jmcollin78/versatile_thermostat/issues/343)
|
||||
> * **Release 5.2** : Ajout d'un `central_mode` permettant de piloter tous les VTherms de façon centralisée [#158](https://github.com/jmcollin78/versatile_thermostat/issues/158).
|
||||
> * **Release 5.1** : Limitation des valeurs envoyées aux valves et au température envoyées au climate sous-jacent.
|
||||
@@ -111,7 +117,7 @@ Ce composant personnalisé pour Home Assistant est une mise à niveau et est une
|
||||
</details>
|
||||
|
||||
# Changements majeurs dans la version 5.0
|
||||

|
||||

|
||||
|
||||
Vous pouvez maintenant définir une configuration centrale qui va vous permettre de mettre en commun sur tous vos VTherms (ou seulement une partie), certains attributs. Pour utiliser cette possibilité, vous devez :
|
||||
1. Créer un VTherm de type "Configuration Centrale",
|
||||
@@ -128,7 +134,7 @@ En conséquence toute la phase de paramètrage d'un VTherm a été profondemment
|
||||
**Note :** les copies d'écran de la configuration d'un VTherm n'ont pas été mises à jour.
|
||||
|
||||
# Merci pour la bière [buymecoffee](https://www.buymeacoffee.com/jmcollin78)
|
||||
Un grand merci à @salabur, @pvince83, @bergoglio, @EPicLURcher, @ecolorado66, @Kriss1670, @maia, @f.maymil, @moutte69, @Jerome, @Gunnar M, @Greg.o, @John Burgess, @abyssmal, @capinfo26, @Helge, @MattG @Mexx62, @Someone, @Lajull, @giopeco pour les bières. Ca fait très plaisir et ça m'encourage à continuer !
|
||||
Un grand merci à @salabur, @pvince83, @bergoglio, @EPicLURcher, @ecolorado66, @Kriss1670, @maia, @f.maymil, @moutte69, @Jerome, @Gunnar M, @Greg.o, @John Burgess, @abyssmal, @capinfo26, @Helge, @MattG @Mexx62, @Someone, @Lajull, @giopeco, @fredericselier, @philpagan pour les bières. Ca fait très plaisir et ça m'encourage à continuer !
|
||||
|
||||
|
||||
# Quand l'utiliser et ne pas l'utiliser
|
||||
@@ -194,7 +200,7 @@ Ce composant nommé __Versatile thermostat__ gère les cas d'utilisation suivant
|
||||
|
||||
-- VTherm = Versatile Thermostat dans la suite de ce document --
|
||||
|
||||
>  _*Notes*_
|
||||
>  _*Notes*_
|
||||
>
|
||||
> Trois façons de configurer les VTherms sont disponibles :
|
||||
> 1. Chaque Versatile Thermostat est entièrement configurée de manière indépendante. Choisissez cette option si vous ne souhaitez avoir aucune configuration ou gestion centrale.
|
||||
@@ -205,7 +211,7 @@ Ce composant nommé __Versatile thermostat__ gère les cas d'utilisation suivant
|
||||
## Création d'un nouveau Versatile Thermostat
|
||||
Cliquez sur le bouton Ajouter une intégration dans la page d'intégration
|
||||
|
||||

|
||||

|
||||
|
||||
La configuration peut être modifiée via la même interface. Sélectionnez simplement le thermostat à modifier, appuyez sur "Configurer" et vous pourrez modifier certains paramètres ou la configuration.
|
||||
|
||||
@@ -213,9 +219,9 @@ Suivez ensuite les étapes de configuration comme suit :
|
||||
|
||||
## Choix des attributs de base
|
||||
|
||||

|
||||

|
||||
|
||||

|
||||

|
||||
|
||||
Donnez les principaux attributs obligatoires :
|
||||
1. un nom (sera le nom de l'intégration et aussi le nom de l'entité climate)
|
||||
@@ -228,14 +234,14 @@ Donnez les principaux attributs obligatoires :
|
||||
9. la possibilité de controler le thermostat de façon centralisée. Cf [controle centralisé](#le-contrôle-centralisé),
|
||||
10. la liste des fonctionnalités qui seront utilisées pour ce thermostat. En fonction de vos choix, les écrans de configuration suivants s'afficheront ou pas.
|
||||
|
||||
>  _*Notes*_
|
||||
>  _*Notes*_
|
||||
> 1. avec les types ```over_switch``` et ```over_valve```, les calculs sont effectués à chaque cycle. Donc en cas de changement de conditions, il faudra attendre le prochain cycle pour voir un changement. Pour cette raison, le cycle ne doit pas être trop long. **5 min est une bonne valeur**,
|
||||
> 2. si le cycle est trop court, le radiateur ne pourra jamais atteindre la température cible. Pour le radiateur à accumulation par exemple il sera sollicité inutilement.
|
||||
|
||||
## Sélectionnez des entités pilotées
|
||||
En fonction de votre choix sur le type de thermostat, vous devrez choisir une ou plusieurs entités de type `switch`, `climate` ou `number`. Seules les entités compatibles avec le type sont présentées.
|
||||
|
||||
>  _*Comment choisir le type*_
|
||||
>  _*Comment choisir le type*_
|
||||
> Le choix du type est important. Même si il toujours possible de le modifier ensuite via l'IHM de configuration, il est préférable de se poser les quelques questions suivantes :
|
||||
> 1. **quel type d'équipement je vais piloter ?** Dans l'ordre voici ce qu'il faut faire :
|
||||
> 1. si vous avez une vanne thermostatique (TRV) commandable dans Home Assistant via une entité de type ```number``` (par exemple une _Shelly TRV_), choisissez le type `over_valve`. C'est le type le plus direct et qui assure la meilleure régulation,
|
||||
@@ -244,18 +250,21 @@ En fonction de votre choix sur le type de thermostat, vous devrez choisir une ou
|
||||
> 2. **quelle type de régulation je veux ?** Si l'équipement piloté possède son propre mécanisme de régulation (clim, certaine vanne TRV) et que cette régulation fonctionne bien, optez pour un ```over_climate```
|
||||
|
||||
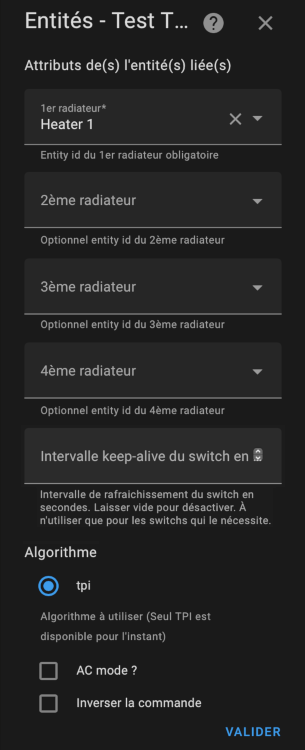
### Pour un thermostat de type ```thermostat_over_switch```
|
||||
|
||||

|
||||
|
||||
Certains équipements nécessitent d'être périodiquement sollicités pour empêcher un arrêt de sécurité. Connu sous le nom de "keep-alive" cette fonction est activable en entrant un nombre de secondes non nul dans le champ d'intervalle keep-alive du thermostat. Pour désactiver la fonction ou en cas de doute, laissez-le vide ou entrez zéro (valeur par défaut).
|
||||
|
||||
L'algorithme à utiliser est aujourd'hui limité à TPI est disponible. Voir [algorithme](#algorithme).
|
||||
Si plusieurs entités de type sont configurées, la thermostat décale les activations afin de minimiser le nombre de switch actif à un instant t. Ca permet une meilleure répartition de la puissance puisque chaque radiateur va s'allumer à son tour.
|
||||
Exemple de déclenchement synchronisé :
|
||||

|
||||

|
||||
|
||||
Il est possible de choisir un thermostat over switch qui commande une climatisation en cochant la case "AC Mode". Dans ce cas, seul le mode refroidissement sera visible.
|
||||
|
||||
Si votre équipement est commandé par un fil pilote avec un diode, vous aurez certainement besoin de cocher la case "Inverser la case". Elle permet de mettre le switch à On lorsqu'on doit étiendre l'équipement et à Off lorsqu'on doit l'allumer.
|
||||
|
||||
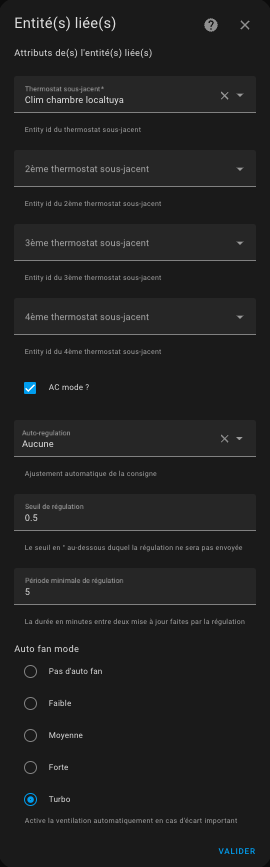
### Pour un thermostat de type ```thermostat_over_climate```:
|
||||
|
||||

|
||||
|
||||
Il est possible de choisir un thermostat over climate qui commande une climatisation réversible en cochant la case "AC Mode". Dans ce cas, selon l'équipement commandé vous aurez accès au chauffage et/ou au réfroidissement.
|
||||
|
||||
@@ -278,7 +287,7 @@ La fonction d'auto-régulation se paramètre avec :
|
||||
|
||||
Ces trois paramètres permettent de moduler la régulation et éviter de multiplier les envois de régulation. Certains équipements comme les TRV, les chaudières n'aiment pas qu'on change la consigne de température trop souvent.
|
||||
|
||||
>  _*Conseil de mise en place*_
|
||||
>  _*Conseil de mise en place*_
|
||||
> 1. Ne démarrez pas tout de suite l'auto-régulation. Regardez comment se passe la régulation naturelle de votre équipement. Si vous constatez que la température de consigne n'est pas atteinte ou qu'elle met trop de temps à être atteinte, démarrez la régulation,
|
||||
> 2. D'abord commencez par une légère auto-régulation et gardez les deux paramètres avec leur valeurs par défaut. Attendez quelques jours et vérifiez si la situation s'est améliorée,
|
||||
> 3. Si ce n'est pas suffisant, passez en auto-régulation Medium, attendez une stabilisation,
|
||||
@@ -365,6 +374,37 @@ et bien sur, configurer le mode auto-régulation du VTherm en mode Expert. Tous
|
||||
|
||||
Pour que les modifications soient prises en compte, il faut soit **relancer totalement Home Assistant** soit juste l'intégration Versatile Thermostat (Outils de dev / Yaml / rechargement de la configuration / Versatile Thermostat).
|
||||
|
||||
#### Compensation de la température interne
|
||||
Quelque fois, il arrive que le thermomètre interne du sous-jacent (TRV, climatisation, ...) soit tellement faux que l' auto-régulation ne suffise pas à réguler.
|
||||
Cela arrive lorsque le thermomètre interne est trop près de la source de chaleur. La température interne monte alors beaucoup plus vite que la température de la pièce, ce qui génère des défauts dans la régulation.
|
||||
Exemple :
|
||||
1. la température de la pièce est 18°, la consigne est à 20°,
|
||||
2. la température interne de l'équipement est de 22°,
|
||||
3. si VTherm envoie 21° comme consigne (= 20° + 1° d'auto-regulation), alors l'équipement ne chauffera pas car sa température interne (22°) est au-dessus de la consigne (21°)
|
||||
|
||||
Pour palier à ça, une nouvelle option facultative a été ajoutée en version 5.4 : 
|
||||
|
||||
Lorsqu'elle est activée, cette fonction ajoutera l'écart entre la température interne et la température de la pièce à la consigne pour forcer le chauffage.
|
||||
Dans l'exemple ci-dessus, l'écart est de +4° (22° - 18°), donc VTherm enverra 25° (21°+4°) à l'équipement le forçant ainsi à chauffer.
|
||||
|
||||
Cet écart est calculé pour chaque sous-jacent car chacun à sa propre température interne. Pensez à un VTherm qui serait relié à 3 TRV chacun avec sa température interne par exemple.
|
||||
|
||||
On obtient alors une auto-régulation bien plus efficace qui évite l'eccueil des gros écarts de température interne défaillante.
|
||||
|
||||
#### Synthèse de l'algorithme d'auto-régulation
|
||||
L'algorithme d'auto-régulation peut être synthétisé comme suit:
|
||||
|
||||
1. initialiser la température cible comme la consigne du VTherm,
|
||||
1. Si l'auto-régulation est activée,
|
||||
1. calcule de la température régulée (valable pour un VTherm),
|
||||
2. prendre cette température comme cible,
|
||||
2. Pour chaque sous-jacent du VTherm,
|
||||
1. Si "utiliser la température interne" est cochée,
|
||||
1. calcule de l'écart (trv internal temp - room temp),
|
||||
2. ajout de l'écart à la température cible,
|
||||
3. envoie de la température cible ( = temp regulee + (temp interne - temp pièce)) au sous-jacent
|
||||
|
||||
|
||||
|
||||
#### Le mode auto-fan
|
||||
Ce mode introduit en 4.3 permet de forcer l'usage de la ventilation si l'écart de température est important. En effet, en activant la ventilation, la répartition se fait plus rapidement ce qui permet de gagner du temps dans l'atteinte de la température cible.
|
||||
@@ -375,7 +415,7 @@ Si votre équipement ne comprend pas le mode Turbo, le mode Forte` sera utilisé
|
||||
Une fois l'écart de température redevenu faible, la ventilation se mettra dans un mode "normal" qui dépend de votre équipement à savoir (dans l'ordre) : `Silence (mute)`, `Auto (auto)`, `Faible (low)`. La première valeur qui est possible pour votre équipement sera choisie.
|
||||
|
||||
### Pour un thermostat de type ```thermostat_over_valve```:
|
||||

|
||||

|
||||
Vous pouvez choisir jusqu'à entité du domaine ```number``` ou ```ìnput_number``` qui vont commander les vannes.
|
||||
L'algorithme à utiliser est aujourd'hui limité à TPI est disponible. Voir [algorithme](#algorithme).
|
||||
|
||||
@@ -385,7 +425,7 @@ Il est possible de choisir un thermostat over valve qui commande une climatisati
|
||||
|
||||
Si vous avez choisi un thermostat de type ```over_switch``` ou ```over_valve``` vous arriverez sur cette page :
|
||||
|
||||
|
||||

|
||||
|
||||
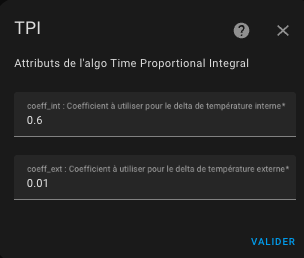
Vous devez donner :
|
||||
1. le coefficient coef_int de l'algorithme TPI,
|
||||
@@ -397,7 +437,7 @@ Pour plus d'informations sur l'algorithme TPI et son réglage, veuillez vous ré
|
||||
## Configurer la température préréglée
|
||||
Cliquez sur 'Valider' sur la page précédente et vous y arriverez :
|
||||
|
||||
|
||||

|
||||
|
||||
Le mode préréglé (preset) vous permet de préconfigurer la température ciblée. Utilisé en conjonction avec Scheduler (voir [scheduler](#even-better-with-scheduler-component) vous aurez un moyen puissant et simple d'optimiser la température par rapport à la consommation électrique de votre maison. Les préréglages gérés sont les suivants :
|
||||
- **Eco** : l'appareil est en mode d'économie d'énergie
|
||||
@@ -408,7 +448,7 @@ Le mode préréglé (preset) vous permet de préconfigurer la température cibl
|
||||
|
||||
**Aucun** est toujours ajouté dans la liste des modes, car c'est un moyen de ne pas utiliser les preset mais une **température manuelle** à la place.
|
||||
|
||||
>  _*Notes*_
|
||||
>  _*Notes*_
|
||||
> 1. En modifiant manuellement la température cible, réglez le préréglage sur Aucun (pas de préréglage). De cette façon, vous pouvez toujours définir une température cible même si aucun préréglage n'est disponible.
|
||||
> 2. Le préréglage standard ``Away`` est un préréglage caché qui n'est pas directement sélectionnable. Versatile Thermostat utilise la gestion de présence ou la gestion de mouvement pour régler automatiquement et dynamiquement la température cible en fonction d'une présence dans le logement ou d'une activité dans la pièce. Voir [gestion de la présence](#configure-the-presence-management).
|
||||
> 3. Si vous utilisez la gestion du délestage, vous verrez un préréglage caché nommé ``power``. Le préréglage de l'élément chauffant est réglé sur « puissance » lorsque des conditions de surpuissance sont rencontrées et que le délestage est actif pour cet élément chauffant. Voir [gestion de l'alimentation](#configure-the-power-management).
|
||||
@@ -423,7 +463,7 @@ La détecttion des ouvertures peut se faire de 2 manières:
|
||||
|
||||
### Le mode capteur
|
||||
En mode capteur, vous devez renseigner les informations suivantes:
|
||||
|
||||

|
||||
|
||||
1. un identifiant d'entité d'un **capteur de fenêtre/porte**. Cela devrait être un binary_sensor ou un input_boolean. L'état de l'entité doit être 'on' lorsque la fenêtre est ouverte ou 'off' lorsqu'elle est fermée
|
||||
2. un **délai en secondes** avant tout changement. Cela permet d'ouvrir rapidement une fenêtre sans arrêter le chauffage.
|
||||
@@ -431,7 +471,7 @@ En mode capteur, vous devez renseigner les informations suivantes:
|
||||
|
||||
### Le mode auto
|
||||
En mode auto, la configuration est la suivante:
|
||||
|
||||

|
||||
|
||||
1. un seuil de détection en degré par minute. Lorsque la température chute au delà de ce seuil, le thermostat s'éteindra. Plus cette valeur est faible et plus la détection sera rapide (en contre-partie d'un risque de faux positif),
|
||||
2. un seuil de fin de détection en degré par minute. Lorsque la chute de température repassera au-dessus cette valeur, le thermostat se remettra dans le mode précédent (mode et preset),
|
||||
@@ -443,14 +483,14 @@ Pour régler les seuils il est conseillé de commencer avec les valeurs de réf
|
||||
- durée max : 60 min.
|
||||
|
||||
Un nouveau capteur "slope" a été ajouté pour tous les thermostats. Il donne la pente de la courbe de température en °C/min (ou °K/min). Cette pente est lissée et filtrée pour éviter les valeurs abérrantes des thermomètres qui viendraient pertuber la mesure.
|
||||
|
||||

|
||||
|
||||
Pour bien régler il est conseillé d'affocher sur un même graphique historique la courbe de température et la pente de la courbe (le "slope") :
|
||||

|
||||

|
||||
|
||||
Et c'est tout ! votre thermostat s'éteindra lorsque les fenêtres seront ouvertes et se rallumera lorsqu'il sera fermé.
|
||||
|
||||
>  _*Notes*_
|
||||
>  _*Notes*_
|
||||
> 1. Si vous souhaitez utiliser **plusieurs capteurs de porte/fenêtre** pour automatiser votre thermostat, créez simplement un groupe avec le comportement habituel (https://www.home-assistant.io/integrations/binary_sensor.group/)
|
||||
> 2. Si vous n'avez pas de capteur de fenêtre/porte dans votre chambre, laissez simplement l'identifiant de l'entité du capteur vide,
|
||||
> 3. **Un seul mode est permis**. On ne peut pas configurer un thermostat avec un capteur et une détection automatique. Les 2 modes risquant de se contredire, il n'est pas possible d'avoir les 2 modes en même temps,
|
||||
@@ -459,7 +499,7 @@ Et c'est tout ! votre thermostat s'éteindra lorsque les fenêtres seront ouvert
|
||||
## Configurer le mode d'activité ou la détection de mouvement
|
||||
Si vous avez choisi la fonctionnalité ```Avec détection de mouvement```, cliquez sur 'Valider' sur la page précédente et vous y arriverez :
|
||||
|
||||
|
||||

|
||||
|
||||
Nous allons maintenant voir comment configurer le nouveau mode Activité.
|
||||
Ce dont nous avons besoin:
|
||||
@@ -479,21 +519,21 @@ Alors imaginons que nous voulions avoir le comportement suivant :
|
||||
|
||||
Pour que cela fonctionne, le thermostat doit être en mode préréglé « Activité ».
|
||||
|
||||
>  _*Notes*_
|
||||
>  _*Notes*_
|
||||
1. Sachez que comme pour les autres modes prédéfinis, ``Activity`` ne sera proposé que s'il est correctement configuré. En d'autres termes, les 4 clés de configuration doivent être définies si vous souhaitez voir l'activité dans l'interface de l'assistant domestique
|
||||
|
||||
## Configurer la gestion de la puissance
|
||||
|
||||
Si vous avez choisi la fonctionnalité ```Avec détection de la puissance```, cliquez sur 'Valider' sur la page précédente et vous arriverez ici :
|
||||
|
||||
|
||||

|
||||
|
||||
Cette fonction vous permet de réguler la consommation électrique de vos radiateurs. Connue sous le nom de délestage, cette fonction vous permet de limiter la consommation électrique de votre appareil de chauffage si des conditions de surpuissance sont détectées. Donnez un **capteur à la consommation électrique actuelle de votre maison**, un **capteur à la puissance max** qu'il ne faut pas dépasser, la **consommation électrique totale des équipements du VTherm** (en étape 1 de la configuration) et l'algorithme ne démarrera pas un radiateur si la puissance maximale sera dépassée après le démarrage du radiateur.
|
||||
|
||||
Notez que toutes les valeurs de puissance doivent avoir les mêmes unités (kW ou W par exemple).
|
||||
Cela vous permet de modifier la puissance maximale au fil du temps à l'aide d'un planificateur ou de ce que vous voulez.
|
||||
|
||||
>  _*Notes*_
|
||||
>  _*Notes*_
|
||||
> 1. En cas de délestage, le radiateur est réglé sur le préréglage nommé ```power```. Il s'agit d'un préréglage caché, vous ne pouvez pas le sélectionner manuellement.
|
||||
> 2. Je l'utilise pour éviter de dépasser la limite de mon contrat d'électricité lorsqu'un véhicule électrique est en charge. Cela crée une sorte d'autorégulation.
|
||||
> 3. Gardez toujours une marge, car la puissance max peut être brièvement dépassée en attendant le calcul du prochain cycle typiquement ou par des équipements non régulés.
|
||||
@@ -504,7 +544,7 @@ Cela vous permet de modifier la puissance maximale au fil du temps à l'aide d'u
|
||||
Si sélectionnée en première page, cette fonction vous permet de modifier dynamiquement la température de tous les préréglages du thermostat configurés lorsque personne n'est à la maison ou lorsque quelqu'un rentre à la maison. Pour cela, vous devez configurer la température qui sera utilisée pour chaque préréglage lorsque la présence est désactivée. Lorsque le capteur de présence s'éteint, ces températures seront utilisées. Lorsqu'il se rallume, la température "normale" configurée pour le préréglage est utilisée. Voir [gestion des préréglages](#configure-the-preset-temperature).
|
||||
Pour configurer la présence remplissez ce formulaire :
|
||||
|
||||
|
||||

|
||||
|
||||
Pour cela, vous devez configurer :
|
||||
1. Un **capteur d'occupation** dont l'état doit être 'on' ou 'home' si quelqu'un est présent ou 'off' ou 'not_home' sinon,
|
||||
@@ -516,7 +556,7 @@ Si le mode AC est utilisé, vous pourrez aussi configurer les températures lors
|
||||
|
||||
ATTENTION : les groupes de personnes ne fonctionnent pas en tant que capteur de présence. Ils ne sont pas reconnus comme un capteur de présence. Vous devez utiliser, un template comme décrit ici [Utilisation d'un groupe de personnes comme capteur de présence](#utilisation-dun-groupe-de-personnes-comme-capteur-de-présence).
|
||||
|
||||
>  _*Notes*_
|
||||
>  _*Notes*_
|
||||
> 1. le changement de température est immédiat et se répercute sur le volet avant. Le calcul prendra en compte la nouvelle température cible au prochain calcul du cycle,
|
||||
> 2. vous pouvez utiliser le capteur direct person.xxxx ou un groupe de capteurs de Home Assistant. Le capteur de présence gère les états ``on`` ou ``home`` comme présents et les états ``off`` ou ``not_home`` comme absents.
|
||||
|
||||
@@ -524,7 +564,7 @@ ATTENTION : les groupes de personnes ne fonctionnent pas en tant que capteur de
|
||||
Ces paramètres permettent d'affiner le réglage du thermostat.
|
||||
Le formulaire de configuration avancée est le suivant :
|
||||
|
||||

|
||||

|
||||
|
||||
Le premier délai (minimal_activation_delay_sec) en secondes est le délai minimum acceptable pour allumer le chauffage. Lorsque le calcul donne un délai de mise sous tension inférieur à cette valeur, le chauffage reste éteint.
|
||||
|
||||
@@ -546,7 +586,7 @@ Par défaut, le thermomètre extérieur peut déclencher une mise en sécurité
|
||||
|
||||
Voir [exemple de réglages](#examples-tuning) pour avoir des exemples de réglage communs
|
||||
|
||||
>  _*Notes*_
|
||||
>  _*Notes*_
|
||||
> 1. Lorsque le capteur de température viendra à la vie et renverra les températures, le préréglage sera restauré à sa valeur précédente,
|
||||
> 2. Attention, deux températures sont nécessaires : la température interne et la température externe et chacune doit donner la température, sinon le thermostat sera en préréglage "security",
|
||||
> 3. Un service est disponible qui permet de régler les 3 paramètres de sécurité. Ca peut servir à adapter la fonction de sécurité à votre usage,
|
||||
@@ -566,7 +606,7 @@ Cette entité se présente sous la forme d'une liste de choix qui contient les c
|
||||
Il est donc possible de contrôler tous les VTherms (que ceux que l'on désigne explicitement) avec un seul contrôle.
|
||||
Exemple de rendu :
|
||||
|
||||

|
||||

|
||||
|
||||
## Le contrôle d'une chaudière centrale
|
||||
Depuis la release 5.3, vous avez la possibilité de contrôler une chaudière centralisée. A partir du moment où il est possible de déclencher ou stopper cette chaudière depuis Home Assistant, alors Versatile Thermostat va pouvoir la commander directement.
|
||||
@@ -584,16 +624,16 @@ Le principe mis en place est globalement le suivant :
|
||||
Vous avez donc en permanence, les informations qui permettent de piloter et régler le déclenchement de la chaudière.
|
||||
|
||||
Toutes ces entités sont rattachés au service de configuration centrale :
|
||||

|
||||

|
||||
|
||||
### Configuration
|
||||
Pour configurer cette fonction, vous devez avoir une configuration centralisée (cf. [Configuration](#configuration)) et cochez la case 'Ajouter une chuadière centrale' :
|
||||
|
||||

|
||||

|
||||
|
||||
Sur la page suivante vous pouvez donner la configuration des services à appeler lors de l'allumage / extinction de la chaudière :
|
||||
|
||||

|
||||

|
||||
|
||||
Les services se configurent comme indiqués dans la page :
|
||||
1. le format général est `entity_id/service_id[/attribut:valeur]` (où `/attribut:valeur` est facultatif),
|
||||
@@ -616,11 +656,11 @@ Exemple:
|
||||
|
||||
Sous "Outils de développement / Service" :
|
||||
|
||||

|
||||

|
||||
|
||||
En mode yaml :
|
||||
|
||||

|
||||

|
||||
|
||||
Le service à configurer est alors le suivant: `climate.empty_thermostast/climate.set_hvac_mode/hvac_mode:heat` (notez la suppression du blanc dans `hvac_mode:heat`)
|
||||
|
||||
@@ -665,7 +705,7 @@ context:
|
||||
|
||||
### Avertissement
|
||||
|
||||
>  _*Notes*_
|
||||
>  _*Notes*_
|
||||
> Le contrôle par du logiciel ou du matériel de type domotique d'une chaudière centrale peut induire des risques pour son bon fonctionnement. Assurez-vous avant d'utiliser ces fonctions, que votre chaudière possède bien des fonctions de sécurité et que celles-ci fonctionnent. Allumer une chaudière si tous les robinets sont fermés peut générer de la sur-pression par exemple.
|
||||
|
||||
## Synthèse des paramètres
|
||||
@@ -689,6 +729,7 @@ context:
|
||||
| ``heater_entity2_id`` | 2ème radiateur | X | - | - | - |
|
||||
| ``heater_entity3_id`` | 3ème radiateur | X | - | - | - |
|
||||
| ``heater_entity4_id`` | 4ème radiateur | X | - | - | - |
|
||||
| ``heater_keep_alive`` | Intervalle de rafraichissement du switch | X | - | - | - |
|
||||
| ``proportional_function`` | Algorithme | X | - | - | - |
|
||||
| ``climate_entity1_id`` | Thermostat sous-jacent | - | X | - | - |
|
||||
| ``climate_entity2_id`` | 2ème thermostat sous-jacent | - | X | - | - |
|
||||
@@ -737,6 +778,7 @@ context:
|
||||
| ``auto_regulation_period_min`` | La période minimale d'auto-régulation | - | X | - | - |
|
||||
| ``inverse_switch_command`` | Inverse la commande du switch (pour switch avec fil pilote) | X | - | - | - |
|
||||
| ``auto_fan_mode`` | Mode de ventilation automatique | - | X | - | - |
|
||||
| ``auto_regulation_use_device_temp`` | Utilisation de la température interne du sous-jacent | - | X | - | - |
|
||||
| ``add_central_boiler_control`` | Ajout du controle d'une chaudière centrale | - | - | - | X |
|
||||
| ``central_boiler_activation_service`` | Service d'activation de la chaudière | - | - | - | X |
|
||||
| ``central_boiler_deactivation_service`` | Service de desactivation de la chaudière | - | - | - | X |
|
||||
@@ -816,7 +858,7 @@ Voir quelques situations à [examples](#some-results).
|
||||
|
||||
Avec le thermostat sont disponibles des capteurs qui permettent de visualiser les alertes et l'état interne du thermostat. Ils sont disponibles dans les entités de l'appareil associé au thermostat :
|
||||
|
||||

|
||||

|
||||
|
||||
Dans l'ordre, il y a :
|
||||
1. l'entité principale climate de commande du thermostat,
|
||||
@@ -849,7 +891,7 @@ frontend:
|
||||
```
|
||||
et choisissez le thème ```versatile_thermostat_theme``` dans la configuration du panel. Vous obtiendrez quelque-chose qui va ressembler à ça :
|
||||
|
||||
|
||||

|
||||
|
||||
# Services
|
||||
|
||||
@@ -895,7 +937,7 @@ target:
|
||||
entity_id: climate.my_thermostat
|
||||
```
|
||||
|
||||
>  _*Notes*_
|
||||
>  _*Notes*_
|
||||
- après un redémarrage, les préréglages sont réinitialisés à la température configurée. Si vous souhaitez que votre changement soit permanent, vous devez modifier le préréglage de la température dans la configuration de l'intégration.
|
||||
|
||||
## Modifier les paramètres de sécurité
|
||||
@@ -950,7 +992,7 @@ Vous pouvez très facilement capter ses évènements dans une automatisation par
|
||||
# Attributs personnalisés
|
||||
|
||||
Pour régler l'algorithme, vous avez accès à tout le contexte vu et calculé par le thermostat via des attributs dédiés. Vous pouvez voir (et utiliser) ces attributs dans l'IHM "Outils de développement / états" de HA. Entrez votre thermostat et vous verrez quelque chose comme ceci :
|
||||
|
||||

|
||||
|
||||
Les attributs personnalisés sont les suivants :
|
||||
|
||||
@@ -1001,23 +1043,23 @@ Les attributs personnalisés sont les suivants :
|
||||
# Quelques résultats
|
||||
|
||||
**Convergence de la température vers la cible configurée par preset:**
|
||||

|
||||

|
||||
|
||||
[Cycle de marche/arrêt calculé par l'intégration :](https://)
|
||||

|
||||

|
||||
|
||||
**Coef_int trop élevé (oscillations autour de la cible)**
|
||||
|
||||

|
||||
|
||||
**Évolution du calcul de l'algorithme**
|
||||
|
||||

|
||||
Voir le code de ce composant [[ci-dessous](#even-better-with-apex-chart-to-tune-your-thermostat)]
|
||||
|
||||
**Thermostat finement réglé**
|
||||
Merci [impuR_Shozz](https://forum.hacf.fr/u/impur_shozz/summary) !
|
||||
On peut voir une stabilité autour de la température cible (consigne) et lorsqu'à cible le on_percent (puissance) est proche de 0,3 ce qui semble une très bonne valeur.
|
||||
|
||||
|
||||

|
||||
|
||||
Enjoy !
|
||||
|
||||
@@ -1056,7 +1098,7 @@ J'espère que cet exemple vous aidera, n'hésitez pas à me faire part de vos re
|
||||
|
||||
## Encore bien mieux avec la custom:simple-thermostat front integration
|
||||
Le ``custom:simple-thermostat`` [ici](https://github.com/nervetattoo/simple-thermostat) est une excellente intégration qui permet une certaine personnalisation qui s'adapte bien à ce thermostat.
|
||||
Vous pouvez avoir quelque chose comme ça très facilement 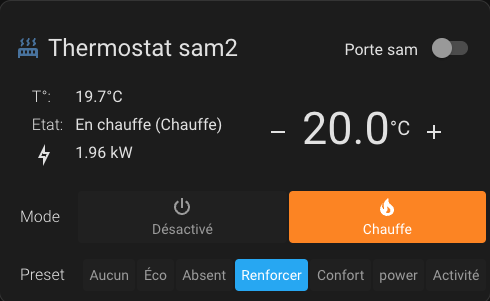
|
||||
Vous pouvez avoir quelque chose comme ça très facilement 
|
||||
Exemple de configuration :
|
||||
|
||||
```
|
||||
@@ -1099,7 +1141,7 @@ Vous pouvez personnaliser ce composant à l'aide du composant HACS card-mod pour
|
||||
}
|
||||
{% endif %}
|
||||
```
|
||||
|
||||

|
||||
|
||||
## Toujours mieux avec Plotly pour régler votre thermostat
|
||||
Vous pouvez obtenir une courbe comme celle présentée dans [some results](#some-results) avec une sorte de configuration de graphique Plotly uniquement en utilisant les attributs personnalisés du thermostat décrits [ici](#custom-attributes) :
|
||||
@@ -1172,7 +1214,7 @@ Remplacez les valeurs entre [[ ]] par les votres.
|
||||
|
||||
Exemple de courbes obtenues avec Plotly :
|
||||
|
||||

|
||||

|
||||
|
||||
## Et toujours de mieux en mieux avec l'AappDaemon NOTIFIER pour notifier les évènements
|
||||
Cette automatisation utilise l'excellente App Daemon nommée NOTIFIER développée par Horizon Domotique que vous trouverez en démonstration [ici](https://www.youtube.com/watch?v=chJylIK0ASo&ab_channel=HorizonDomotique) et le code est [ici](https://github.com/jlpouffier/home-assistant-config/blob/master/appdaemon/apps/notifier.py). Elle permet de notifier les utilisateurs du logement lorsqu'un des évènements touchant à la sécurité survient sur un des Versatile Thermostats.
|
||||
@@ -1366,11 +1408,11 @@ Tous ces paramètres se règlent dans la dernière page de la configuration du V
|
||||
Le premier symptôme est une température anormalement basse avec un temps de chauffe faible à chaque cycle et régulier.
|
||||
Exemple:
|
||||
|
||||
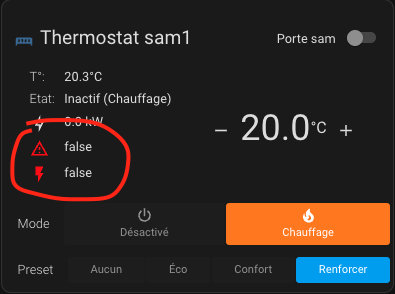
[security mode](https://github.com/jmcollin78/versatile_thermostat/blob/main/images/security-mode-symptome1.png?raw=true)
|
||||
[security mode](images/security-mode-symptome1.png)
|
||||
|
||||
Si vous avez installé la carte [Versatile Thermostat UI Card](https://github.com/jmcollin78/versatile-thermostat-ui-card), le VTherm en question aura cette forme là :
|
||||
|
||||
[security mode UI Card](https://github.com/jmcollin78/versatile_thermostat/blob/main/images/security-mode-symptome2.png?raw=true)
|
||||
[security mode UI Card](images/security-mode-symptome2.png)
|
||||
|
||||
Vous pouvez aussi vérifier dans les attributs du VTherm les dates de réception des différentes dates. **Les attributs sont disponibles dans les Outils de développement / Etats**.
|
||||
|
||||
|
||||
155
README.md
155
README.md
@@ -4,9 +4,9 @@
|
||||
[![hacs][hacs_badge]][hacs]
|
||||
[![BuyMeCoffee][buymecoffeebadge]][buymecoffee]
|
||||
|
||||

|
||||

|
||||
|
||||
>  This thermostat integration aims to drastically simplify your automations around climate management. Because all classical events in climate are natively handled by the thermostat (nobody at home ?, activity detected in a room ?, window open ?, power shedding ?), you don't have to build over complicated scripts and automations to manage your climates ;-).
|
||||
|
||||
- [Major changes in version 5.0](#major-changes-in-version-50)
|
||||
- [Thanks for the beer buymecoffee](#thanks-for-the-beer-buymecoffee)
|
||||
@@ -24,6 +24,8 @@
|
||||
- [For a thermostat of type ```thermostat_over_climate```:](#for-a-thermostat-of-type-thermostat_over_climate)
|
||||
- [Self-regulation](#self-regulation)
|
||||
- [Self-regulation in Expert mode](#self-regulation-in-expert-mode)
|
||||
- [Internal temperature compensation](#internal-temperature-compensation)
|
||||
- [synthesis of the self-regulation algorithm](#synthesis-of-the-self-regulation-algorithm)
|
||||
- [Auto-fan mode](#auto-fan-mode)
|
||||
- [For a thermostat of type ```thermostat_over_valve```:](#for-a-thermostat-of-type-thermostat_over_valve)
|
||||
- [Configure the TPI algorithm coefficients](#configure-the-tpi-algorithm-coefficients)
|
||||
@@ -41,7 +43,7 @@
|
||||
- [How to find the right service?](#how-to-find-the-right-service)
|
||||
- [The events](#the-events)
|
||||
- [Warning](#warning)
|
||||
- [Parameters synthesis](#parameters-synthesis)
|
||||
- [Parameter summary](#parameter-summary)
|
||||
- [Examples tuning](#examples-tuning)
|
||||
- [Electrical heater](#electrical-heater)
|
||||
- [Central heating (gaz or fuel heating system)](#central-heating-gaz-or-fuel-heating-system)
|
||||
@@ -83,8 +85,12 @@
|
||||
|
||||
This custom component for Home Assistant is an upgrade and is a complete rewrite of the component "Awesome thermostat" (see [Github](https://github.com/dadge/awesome_thermostat)) with addition of features.
|
||||
|
||||
> _*News*_
|
||||
> * **Release 5.4**: Added a temperature step [#311](https://github.com/jmcollin78/versatile_thermostat/issues/311). Added some regulation thresholdfor `over_valve` VTherm in order to avoid drowing the battery of TRV devices [#338](https://github.com/jmcollin78/versatile_thermostat/issues/338).
|
||||
> _*News*_
|
||||
> * **Release 5.4**:
|
||||
> - Added temperature step [#311](https://github.com/jmcollin78/versatile_thermostat/issues/311),
|
||||
> - addition of regulation thresholds for the `over_valve` to avoid draining the TRV battery too much [#338](https://github.com/jmcollin78/versatile_thermostat/issues/338),
|
||||
> - added an option allowing the internal temperature of a TRV to be used to force self-regulation [#348](https://github.com/jmcollin78/versatile_thermostat/issues/348),
|
||||
> - added a keep-alive function for VTherm `over_switch` [#345](https://github.com/jmcollin78/versatile_thermostat/issues/345)
|
||||
> * **Release 5.3**: Added a central boiler control function [#234](https://github.com/jmcollin78/versatile_thermostat/issues/234) - more information here: [Controlling a central boiler](#controlling-a-central-boiler). Added the ability to disable security mode for outdoor thermometer [#343](https://github.com/jmcollin78/versatile_thermostat/issues/343)
|
||||
> * **Release 5.2**: Added a `central_mode` allowing all VTherms to be controlled centrally [#158](https://github.com/jmcollin78/versatile_thermostat/issues/158).
|
||||
> * **Release 5.1**: Limitation of the values sent to the valves and the temperature sent to the underlying climate.
|
||||
@@ -111,7 +117,7 @@ This custom component for Home Assistant is an upgrade and is a complete rewrite
|
||||
</details>
|
||||
|
||||
# Major changes in version 5.0
|
||||

|
||||

|
||||
|
||||
You can now define a central configuration which will allow you to share certain attributes on all your VTherms (or only part of them). To use this possibility, you must:
|
||||
1. Create a VTherm of type “Central Configuration”,
|
||||
@@ -128,7 +134,7 @@ Consequently, the entire configuration phase of a VTherm has been profoundly mod
|
||||
**Note:** the VTherm configuration screenshots have not been updated.
|
||||
|
||||
# Thanks for the beer [buymecoffee](https://www.buymeacoffee.com/jmcollin78)
|
||||
Many thanks to @salabur, @pvince83, @bergoglio, @EPicLURcher, @ecolorado66, @Kriss1670, @maia, @f.maymil, @moutte69, @Jerome, @Gunnar M, @Greg.o, @John Burgess, @abyssmal, @capinfo26, @Helge, @MattG, @MattG, @Mexx62, @Someone, @Lajull, @giopeco for the beers. It's very nice and encourages me to continue!
|
||||
Many thanks to @salabur, @pvince83, @bergoglio, @EPicLURcher, @ecolorado66, @Kriss1670, @maia, @f.maymil, @moutte69, @Jerome, @Gunnar M, @Greg.o, @John Burgess, @abyssmal, @capinfo26, @Helge, @MattG, @MattG, @Mexx62, @Someone, @Lajull, @giopeco, @fredericselier, @philpagan for the beers. It's very nice and encourages me to continue!
|
||||
|
||||
# When to use / not use
|
||||
This thermostat can control 3 types of equipment:
|
||||
@@ -194,7 +200,7 @@ This component named __Versatile thermostat__ manage the following use cases :
|
||||
|
||||
-- VTherm = Versatile Thermostat in the remainder of this document --
|
||||
|
||||
>  _*Notes*_
|
||||
>  _*Notes*_
|
||||
>
|
||||
> Three ways to configure VTherms are available:
|
||||
> 1. Each Versatile Thermostat is completely independently configured. Choose this option if you do not want to have any central configuration or management.
|
||||
@@ -204,7 +210,7 @@ This component named __Versatile thermostat__ manage the following use cases :
|
||||
|
||||
## Creation of a new Versatile Thermostat
|
||||
Click on Add integration button in the integration page
|
||||

|
||||

|
||||
|
||||
The configuration can be change through the same interface. Simply select the thermostat to change, hit "Configure" and you will be able to change some parameters or configuration.
|
||||
|
||||
@@ -212,9 +218,9 @@ Then follow the configurations steps as follow:
|
||||
|
||||
## Minimal configuration update
|
||||
|
||||

|
||||

|
||||
|
||||

|
||||

|
||||
|
||||
Give the main mandatory attributes:
|
||||
1. a name (will be the name of the integration and also the name of the climate entity)
|
||||
@@ -227,14 +233,14 @@ Give the main mandatory attributes:
|
||||
9. the possibility of controlling the thermostat centrally. Cf [centralized control](#centralized-control),
|
||||
10. the list of features that will be used for this thermostat. Depending on your choices, the following configuration screens will appear or not.
|
||||
|
||||
>  _*Notes*_
|
||||
>  _*Notes*_
|
||||
> 1. With the ```thermostat_over_switch``` type, calculation are done at each cycle. So in case of conditions change, you will have to wait for the next cycle to see a change. For this reason, the cycle should not be too long. **5 min is a good value**,
|
||||
> 2. if the cycle is too short, the heater could never reach the target temperature. For the storage radiator for example it will be used unnecessarily.
|
||||
|
||||
## Select the driven entity
|
||||
Depending on your choice of thermostat type, you will need to choose one or more `switch`, `climate` or `number` type entities. Only entities compatible with the type are presented.
|
||||
|
||||
>  _*How to choose the type*_
|
||||
>  _*How to choose the type*_
|
||||
> The choice of type is important. Even if it is always possible to modify it afterwards via the configuration HMI, it is preferable to ask yourself the following few questions:
|
||||
> 1. **what type of equipment am I going to pilot?** In order, here is what to do:
|
||||
> 1. if you have a thermostatic valve (TRV) that can be controlled in Home Assistant via a ```number``` type entity (for example a _Shelly TRV_), choose the `over_valve` type. It is the most direct type and which ensures the best regulation,
|
||||
@@ -244,18 +250,21 @@ Depending on your choice of thermostat type, you will need to choose one or more
|
||||
It is possible to choose an over switch thermostat which controls air conditioning by checking the "AC Mode" box. In this case, only the cooling mode will be visible.
|
||||
|
||||
### For a ```thermostat_over_switch``` type thermostat
|
||||

|
||||

|
||||
|
||||
Some heater switches require regular "keep-alive messages" to prevent them from triggering a failsafe switch off. This feature can be enabled through the switch keep-alive interval configuration field.
|
||||
|
||||
The algorithm to use is currently limited to TPI is available. See [algorithm](#algorithm).
|
||||
If several type entities are configured, the thermostat shifts the activations in order to minimize the number of switches active at a time t. This allows for better power distribution since each radiator will turn on in turn.
|
||||
Example of synchronized triggering:
|
||||

|
||||

|
||||
|
||||
It is possible to choose an over switch thermostat which controls air conditioning by checking the "AC Mode" box. In this case, only the cooling mode will be visible.
|
||||
|
||||
If your equipment is controlled by a pilot wire with a diode, you will certainly need to check the "Invert Check" box. It allows you to set the switch to On when you need to turn the equipment off and to Off when you need to turn it on.
|
||||
|
||||
### For a thermostat of type ```thermostat_over_climate```:
|
||||

|
||||

|
||||
|
||||
It is possible to choose an over climate thermostat which controls reversible air conditioning by checking the “AC Mode” box. In this case, depending on the equipment ordered, you will have access to heating and/or cooling.
|
||||
|
||||
@@ -278,7 +287,7 @@ The self-regulation function is configured with:
|
||||
|
||||
These three parameters make it possible to modulate the regulation and avoid multiplying the regulation sendings. Some equipment such as TRVs and boilers do not like the temperature setpoint to be changed too often.
|
||||
|
||||
>  _*Implementation tip*_
|
||||
>  _*Implementation tip*_
|
||||
> 1. Do not start self-regulation straight away. Watch how the natural regulation of your equipment works. If you notice that the set temperature is not reached or that it is taking too long to be reached, start the regulation,
|
||||
> 2. First start with a slight self-regulation and keep both parameters at their default values. Wait a few days and check if the situation has improved,
|
||||
> 3. If this is not sufficient, switch to Medium self-regulation, wait for stabilization,
|
||||
@@ -363,6 +372,36 @@ and of course, configure the VTherm's self-regulation mode in **Expert** mode. A
|
||||
|
||||
For the changes to be taken into account, you must either **completely restart Home Assistant** or just the **Versatile Thermostat integration** (Dev tools / Yaml / reloading the configuration / Versatile Thermostat).
|
||||
|
||||
#### Internal temperature compensation
|
||||
Sometimes, it happens that the internal thermometer of the underlying (TRV, air conditioning, etc.) is so wrong that self-regulation is not enough to regulate.
|
||||
This happens when the internal thermometer is too close to the heat source. The internal temperature then rises much faster than the room temperature, which generates faults in the regulation.
|
||||
Example :
|
||||
1. the room temperature is 18°, the setpoint is 20°,
|
||||
2. the internal temperature of the equipment is 22°,
|
||||
3. if VTherm sends 21° as setpoint (= 20° + 1° auto-regulation), then the equipment will not heat because its internal temperature (22°) is above the setpoint (21°)
|
||||
|
||||
To overcome this, a new optional option was added in version 5.4: 
|
||||
|
||||
When enabled, this function will add the difference between the internal temperature and the room temperature to the setpoint to force heating.
|
||||
In the example above, the difference is +4° (22° - 18°), so VTherm will send 25° (21°+4°) to the equipment forcing it to heat up.
|
||||
|
||||
This difference is calculated for each underlying because each has its own internal temperature. Think of a VTherm which would be connected to 3 TRVs each with its internal temperature for example.
|
||||
|
||||
We then obtain much more effective self-regulation which avoids the pitfall of large variations in faulty internal temperature.
|
||||
|
||||
#### synthesis of the self-regulation algorithm
|
||||
The self-regulation algorithm can be summarized as follows:
|
||||
|
||||
1. initialize the target temperature as the VTherm setpoint,
|
||||
1. If self-regulation is activated,
|
||||
1. calculates the regulated temperature (valid for a VTherm),
|
||||
2. take this temperature as a target,
|
||||
2. For each underlying of the VTherm,
|
||||
1. If "use internal temperature" is checked,
|
||||
1. calculates the offset (trv internal temp - room temp),
|
||||
2. Adding the offset to the target temperature,
|
||||
3. sends the target temperature (= regulated temp + (internal temp - room temp)) to the underlying
|
||||
|
||||
#### Auto-fan mode
|
||||
This mode introduced in 4.3 makes it possible to force the use of ventilation if the temperature difference is significant. In fact, by activating ventilation, distribution occurs more quickly, which saves time in reaching the target temperature.
|
||||
You can choose which ventilation you want to activate between the following settings: Low, Medium, High, Turbo.
|
||||
@@ -372,7 +411,7 @@ If your equipment does not include Turbo mode, Forte` mode will be used as a rep
|
||||
Once the temperature difference becomes low again, the ventilation will go into a "normal" mode which depends on your equipment, namely (in order): `Silence (mute)`, `Auto (auto)`, `Low (low)`. The first value that is possible for your equipment will be chosen.
|
||||
|
||||
### For a thermostat of type ```thermostat_over_valve```:
|
||||

|
||||

|
||||
You can choose up to domain entity ```number``` or ```ìnput_number``` which will control the valves.
|
||||
The algorithm to use is currently limited to TPI is available. See [algorithm](#algorithm).
|
||||
|
||||
@@ -380,13 +419,13 @@ It is possible to choose an over valve thermostat which controls air conditionin
|
||||
|
||||
## Configure the TPI algorithm coefficients
|
||||
click on 'Validate' on the previous page, and if you choose a ```over_switch``` or ```over_valve``` thermostat and you will get there:
|
||||

|
||||

|
||||
|
||||
For more informations on the TPI algorithm and tuned please refer to [algorithm](#algorithm).
|
||||
|
||||
## Configure the preset temperature
|
||||
Click on 'Validate' on the previous page and you will get there:
|
||||

|
||||

|
||||
|
||||
The preset mode allows you to pre-configurate targeted temperature. Used in conjonction with Scheduler (see [scheduler](#even-better-with-scheduler-component) you will have a powerfull and simple way to optimize the temperature vs electrical consumption of your hous. Preset handled are the following :
|
||||
- **Eco** : device is running an energy-saving mode
|
||||
@@ -397,7 +436,7 @@ The preset mode allows you to pre-configurate targeted temperature. Used in conj
|
||||
|
||||
**None** is always added in the list of modes, as it is a way to not use the presets modes but a **manual temperature** instead.
|
||||
|
||||
>  _*Notes*_
|
||||
>  _*Notes*_
|
||||
> 1. Changing manually the target temperature, set the preset to None (no preset). This way you can always set a target temperature even if no preset are available.
|
||||
> 2. standard ``Away`` preset is a hidden preset which is not directly selectable. Versatile Thermostat uses the presence management or movement management to set automatically and dynamically the target temperature depending on a presence in the home or an activity in the room. See [presence management](#configure-the-presence-management).
|
||||
> 3. if you uses the power shedding management, you will see a hidden preset named ``power``. The heater preset is set to ``power`` when overpowering conditions are encountered and shedding is active for this heater. See [power management](#configure-the-power-management).
|
||||
@@ -412,14 +451,14 @@ The detection of openings can be done in 2 ways:
|
||||
|
||||
### The sensor mode
|
||||
In sensor mode, you must fill in the following information:
|
||||

|
||||

|
||||
|
||||
1. an entity ID of a **window/door sensor**. It should be a binary_sensor or an input_boolean. The state of the entity must be 'on' when the window is open or 'off' when it is closed
|
||||
2. a **delay in seconds** before any change. This allows a window to be opened quickly without stopping the heating.
|
||||
|
||||
### Auto mode
|
||||
In auto mode, the configuration is as follows:
|
||||

|
||||

|
||||
|
||||
1. a detection threshold in degrees per minute. When the temperature drops below this threshold, the thermostat will turn off. The lower this value, the faster the detection will be (in return for a risk of false positives),
|
||||
2. an end of detection threshold in degrees per minute. When the temperature drop goes above this value, the thermostat will go back to the previous mode (mode and preset),
|
||||
@@ -431,14 +470,14 @@ To set the thresholds it is advisable to start with the reference values a
|
||||
- maximum duration: 60 min.
|
||||
|
||||
A new "slope" sensor has been added for all thermostats. It gives the slope of the temperature curve in °C/min (or °K/min). This slope is smoothed and filtered to avoid aberrant values from the thermometers which would interfere with the measurement.
|
||||

|
||||

|
||||
|
||||
To properly adjust it is advisable to display on the same historical graph the temperature curve and the slope of the curve (the "slope"):
|
||||

|
||||

|
||||
|
||||
And that's all ! your thermostat will turn off when the windows are open and turn back on when closed.
|
||||
|
||||
>  _*Notes*_
|
||||
>  _*Notes*_
|
||||
> 1. If you want to use **multiple door/window sensors** to automate your thermostat, just create a group with the usual behavior (https://www.home-assistant.io/integrations/binary_sensor.group/)
|
||||
> 2. If you don't have a window/door sensor in your room, just leave the sensor entity id blank,
|
||||
> 3. **Only one mode is allowed**. You cannot configure a thermostat with a sensor and automatic detection. The 2 modes may contradict each other, it is not possible to have the 2 modes at the same time,
|
||||
@@ -446,7 +485,7 @@ And that's all ! your thermostat will turn off when the windows are open and tur
|
||||
|
||||
## Configure the activity mode or motion detection
|
||||
If you choose the ```Motion management``` feature, lick on 'Validate' on the previous page and you will get there:
|
||||

|
||||

|
||||
|
||||
We will now see how to configure the new Activity mode.
|
||||
What we need:
|
||||
@@ -465,13 +504,13 @@ What we need:
|
||||
|
||||
For this to work, the climate thermostat should be in ``Activity`` preset mode.
|
||||
|
||||
>  _*Notes*_
|
||||
>  _*Notes*_
|
||||
> 1. Be aware that as for the others preset modes, ``Activity`` will only be proposed if it's correctly configure. In other words, the 4 configuration keys have to be set if you want to see Activity in home assistant Interface
|
||||
|
||||
## Configure the power management
|
||||
|
||||
If you choose the ```Power management``` feature, click on 'Validate' on the previous page and you will get there:
|
||||

|
||||

|
||||
|
||||
This feature allows you to regulate the power consumption of your radiators. Known as shedding, this feature allows you to limit the electrical power consumption of your heater if overpowering conditions are detected. Give a **sensor to the current power consumption of your house**, a **sensor to the max power** that should not be exceeded, the **power consumption of your heaters linked to the VTherm** (in the first step of the configuration) and the algorithm will not start a radiator if the max power will be exceeded after radiator starts.
|
||||
|
||||
@@ -479,7 +518,7 @@ This feature allows you to regulate the power consumption of your radiators. Kno
|
||||
Note that all power values should have the same units (kW or W for example).
|
||||
This allows you to change the max power along time using a Scheduler or whatever you like.
|
||||
|
||||
>  _*Notes*_
|
||||
>  _*Notes*_
|
||||
> 1. When shedding is encountered, the heater is set to the preset named ``power``. This is a hidden preset, you cannot select it manually.
|
||||
> 2. I use this to avoid exceeded the limit of my electrical power contract when an electrical vehicle is charging. This makes a kind of auto-regulation.
|
||||
> 3. Always keep a margin, because max power can be briefly exceeded while waiting for the next cycle calculation typically or by not regulated equipement.
|
||||
@@ -490,7 +529,7 @@ This allows you to change the max power along time using a Scheduler or whatever
|
||||
If selected on the first page, this feature allows you to dynamically change the temperature of all configured thermostat presets when no one is home or when someone comes home. To do this, you must configure the temperature that will be used for each preset when presence is disabled. When the presence sensor turns off, these temperatures will be used. When it turns back on, the "normal" temperature configured for the preset is used. See [preset management](#configure-the-preset-temperature).
|
||||
To configure presence, complete this form:
|
||||
|
||||

|
||||

|
||||
|
||||
To do this, you must configure:
|
||||
1. An **occupancy sensor** whose state must be 'on' or 'home' if someone is present or 'off' or 'not_home' otherwise,
|
||||
@@ -502,7 +541,7 @@ If AC mode is used, you will also be able to configure temperatures when the equ
|
||||
|
||||
ATTENTION: groups of people do not function as a presence sensor. They are not recognized as a presence sensor. You must use a template as described here [Using a group of people as a presence sensor](#using-a-group-of-people-as-a-presence-sensor).
|
||||
|
||||
>  _*Notes*_
|
||||
>  _*Notes*_
|
||||
> 1. the change in temperature is immediate and is reflected on the front shutter. The calculation will take into account the new target temperature at the next calculation of the cycle,
|
||||
> 2. you can use the person.xxxx direct sensor or a group of Home Assistant sensors. The presence sensor manages the ``on`` or ``home`` states as present and the ``off`` or ``not_home`` states as absent.
|
||||
|
||||
@@ -510,7 +549,7 @@ ATTENTION: groups of people do not function as a presence sensor. They are not r
|
||||
Those parameters allows to fine tune the thermostat.
|
||||
The advanced configuration form is the following:
|
||||
|
||||

|
||||

|
||||
|
||||
The first delay (minimal_activation_delay_sec) in sec in the minimum delay acceptable for turning on the heater. When calculation gives a power on delay below this value, the heater will stays off.
|
||||
|
||||
@@ -532,7 +571,7 @@ By default, the outdoor thermometer can trigger a trip if it no longer sends a v
|
||||
|
||||
See [example tuning](#examples-tuning) for common tuning examples
|
||||
|
||||
> _*Notes*_
|
||||
> _*Notes*_
|
||||
> 1. When the temperature sensor comes to life and returns the temperatures, the preset will be restored to its previous value,
|
||||
> 2. Attention, two temperatures are needed: internal temperature and external temperature and each must give the temperature, otherwise the thermostat will be in "safety" preset,
|
||||
> 3. A service is available that allows you to set the 3 safety parameters. This can be used to adapt the safety function to your use.
|
||||
@@ -552,7 +591,7 @@ This entity is presented in the form of a list of choices which contains the fol
|
||||
It is therefore possible to control all VTherms (only those explicitly designated) with a single control.
|
||||
Example rendering:
|
||||
|
||||

|
||||

|
||||
|
||||
## Control of a central boiler
|
||||
Since release 5.3, you have the possibility of controlling a centralized boiler. From the moment it is possible to start or stop this boiler from Home Assistant, then Versatile Thermostat will be able to control it directly.
|
||||
@@ -570,16 +609,16 @@ The principle put in place is generally as follows:
|
||||
You therefore always have the information which allows you to control and adjust the activation of the boiler.
|
||||
|
||||
All these entities are attached to the central configuration service:
|
||||

|
||||

|
||||
|
||||
### Setup
|
||||
To configure this function, you must have a centralized configuration (see [Configuration](#configuration)) and check the 'Add a central boiler' box:
|
||||
|
||||

|
||||

|
||||
|
||||
On the following page you can configure the services to be called when switching the boiler on/off:
|
||||
|
||||

|
||||

|
||||
|
||||
The services are configured as indicated on the page:
|
||||
1. the general format is `entity_id/service_id[/attribute:value]` (where `/attribute:value` is optional),
|
||||
@@ -602,11 +641,11 @@ Example:
|
||||
|
||||
Under "Development Tools / Service":
|
||||
|
||||

|
||||

|
||||
|
||||
In yaml mode:
|
||||
|
||||

|
||||

|
||||
|
||||
The service to configure is then the following: `climate.empty_thermostast/climate.set_hvac_mode/hvac_mode:heat` (note the removal of the blank in `hvac_mode:heat`)
|
||||
|
||||
@@ -651,12 +690,12 @@ context:
|
||||
|
||||
### Warning
|
||||
|
||||
>  _*Notes*_
|
||||
>  _*Notes*_
|
||||
> Controlling a central boiler using software or hardware such as home automation can pose risks to its proper functioning. Before using these functions, make sure that your boiler has safety functions and that they are working. Turning on a boiler if all the taps are closed can generate excess pressure, for example.
|
||||
|
||||
## Parameters synthesis
|
||||
## Parameter summary
|
||||
|
||||
| Paramètre | Libellé | "over switch" | "over climate" | "over valve" | "central configuration" |
|
||||
| Parameter | Description | "over switch" | "over climate" | "over valve" | "central configuration" |
|
||||
| ----------------------------------------- | ----------------------------------------------------------------------------- | ------------- | ------------------- | ------------ | ----------------------- |
|
||||
| ``name`` | Name | X | X | X | - |
|
||||
| ``thermostat_type`` | Thermostat type | X | X | X | - |
|
||||
@@ -675,6 +714,7 @@ context:
|
||||
| ``heater_entity2_id`` | 2nd heater switch | X | - | - | - |
|
||||
| ``heater_entity3_id`` | 3rd heater switch | X | - | - | - |
|
||||
| ``heater_entity4_id`` | 4th heater switch | X | - | - | - |
|
||||
| ``heater_keep_alive`` | Switch keep-alive interval | X | - | - | - |
|
||||
| ``proportional_function`` | Algorithm | X | - | X | - |
|
||||
| ``climate_entity1_id`` | 1rst underlying climate | - | X | - | - |
|
||||
| ``climate_entity2_id`` | 2nd underlying climate | - | X | - | - |
|
||||
@@ -724,6 +764,7 @@ context:
|
||||
| ``auto_regulation_period_min`` | La période minimale d'auto-régulation | - | X | - | - |
|
||||
| ``inverse_switch_command`` | Inverse the switch command (for pilot wire switch) | X | - | - | - |
|
||||
| ``auto_fan_mode`` | Auto fan mode | - | X | - | - |
|
||||
| ``auto_regulation_use_device_temp`` | Use the internal temperature of the underlying device | - | X | - | - |
|
||||
| ``add_central_boiler_control`` | Add the control of a central boiler | - | - | - | X |
|
||||
| ``central_boiler_activation_service`` | Activation service of the boiler | - | - | - | X |
|
||||
| ``central_boiler_deactivation_service`` | Deactivaiton service of the boiler | - | - | - | X |
|
||||
@@ -804,7 +845,7 @@ See some situations at [examples](#some-results).
|
||||
|
||||
With the thermostat are available sensors that allow you to view the alerts and the internal status of the thermostat. They are available in the entities of the device associated with the thermostat:
|
||||
|
||||

|
||||

|
||||
|
||||
In order, there are:
|
||||
1. the main climate thermostat command entity,
|
||||
@@ -837,7 +878,7 @@ frontend:
|
||||
```
|
||||
and choose the ```versatile_thermostat_theme``` theme in the panel configuration. You will get something that will look like this:
|
||||
|
||||

|
||||

|
||||
|
||||
# Services
|
||||
|
||||
@@ -883,7 +924,7 @@ target:
|
||||
entity_id: climate.my_thermostat
|
||||
```
|
||||
|
||||
>  _*Notes*_
|
||||
>  _*Notes*_
|
||||
- after a restart the preset are resetted to the configured temperature. If you want your change to be permanent you should modify the temperature preset into the confguration of the integration.
|
||||
|
||||
## Change safety settings
|
||||
@@ -936,7 +977,7 @@ You can very easily capture its events in an automation, for example to notify u
|
||||
# Custom attributes
|
||||
|
||||
To tune the algorithm you have access to all context seen and calculted by the thermostat through dedicated attributes. You can see (and use) those attributes in the "Development tools / states" HMI of HA. Enter your thermostat and you will see something like this:
|
||||

|
||||

|
||||
|
||||
Custom attributes are the following:
|
||||
|
||||
@@ -987,23 +1028,23 @@ Custom attributes are the following:
|
||||
# Some results
|
||||
|
||||
**Convergence of temperature to target configured by preset:**
|
||||

|
||||

|
||||
|
||||
[Cycle of on/off calculated by the integration:](https://)
|
||||

|
||||

|
||||
|
||||
**Coef_int too high (oscillations around the target)**
|
||||

|
||||

|
||||
|
||||
**Algorithm calculation evolution**
|
||||

|
||||

|
||||
See the code of this component [[below](#even-better-with-apex-chart-to-tune-your-thermostat)]
|
||||
|
||||
**Fine tuned thermostat**
|
||||
Thank's [impuR_Shozz](https://forum.hacf.fr/u/impur_shozz/summary) !
|
||||
We can see stability around the target temperature (consigne) and when at target the on_percent (puissance) is near 0.3 which seems a very good value.
|
||||
|
||||

|
||||

|
||||
|
||||
Enjoy !
|
||||
|
||||
@@ -1042,7 +1083,7 @@ I hope this example helps you, don't hesitate to give me your feedbacks !
|
||||
|
||||
## Even-even better with custom:simple-thermostat front integration
|
||||
The ``custom:simple-thermostat`` [here](https://github.com/nervetattoo/simple-thermostat) is a great integration which allow some customisation which fits well with this thermostat.
|
||||
You can have something like that very easily 
|
||||
You can have something like that very easily 
|
||||
Example configuration:
|
||||
|
||||
```
|
||||
@@ -1084,7 +1125,7 @@ You can customize this component using the HACS card-mod component to adjust the
|
||||
}
|
||||
{% endif %}
|
||||
```
|
||||

|
||||

|
||||
|
||||
## Even better with Plotly to tune your Thermostat
|
||||
You can get curve like presented in [some results](#some-results) with kind of Plotly configuration only using the custom attributes of the thermostat described [here](#custom-attributes):
|
||||
@@ -1157,7 +1198,7 @@ Replace values in [[ ]] by yours.
|
||||
|
||||
Example of graph obtained with Plotly :
|
||||
|
||||

|
||||

|
||||
|
||||
|
||||
## And always better and better with the NOTIFIER daemon app to notify events
|
||||
@@ -1350,11 +1391,11 @@ All these parameters are adjusted on the last page of the VTherm configuration:
|
||||
The first symptom is an abnormally low temperature with a slow and regular heating time in each cycle.
|
||||
Example:
|
||||
|
||||
[safety mode](https://github.com/jmcollin78/versatile_thermostat/blob/main/images/security-mode-symptome1.png?raw=true)
|
||||
[safety mode](images/security-mode-symptome1.png)
|
||||
|
||||
If you installed the [Versatile Thermostat UI Card](https://github.com/jmcollin78/versatile-thermostat-ui-card), the VTherm in question will have this shape:
|
||||
|
||||
[safety mode UI Card](https://github.com/jmcollin78/versatile_thermostat/blob/main/images/security-mode-symptome2.png?raw=true)
|
||||
[safety mode UI Card](images/security-mode-symptome2.png)
|
||||
|
||||
You can also check in the VTherm attributes the dates of receipt of the different dates. Attributes are available in Development Tools / Reports.
|
||||
|
||||
|
||||
7
copy-to-forum.txt
Normal file
7
copy-to-forum.txt
Normal file
@@ -0,0 +1,7 @@
|
||||
Before copying to forum you need to replace relative images by this command into VSCode:
|
||||
|
||||
Search :
|
||||
\(images/(.*).png\)
|
||||
|
||||
Replace with:
|
||||
(https://github.com/jmcollin78/versatile_thermostat/blob/main/images/$1.png?raw=true)
|
||||
@@ -1233,9 +1233,9 @@ class BaseThermostat(ClimateEntity, RestoreEntity):
|
||||
)
|
||||
|
||||
# If AC is on maybe we have to change the temperature in force mode, but not in frost mode (there is no Frost protection possible in AC mode)
|
||||
if self._hvac_mode == HVACMode.COOL:
|
||||
if self._hvac_mode == HVACMode.COOL and self.preset_mode != PRESET_NONE:
|
||||
if self.preset_mode != PRESET_FROST_PROTECTION:
|
||||
await self._async_set_preset_mode_internal(self._attr_preset_mode, True)
|
||||
await self._async_set_preset_mode_internal(self.preset_mode, True)
|
||||
else:
|
||||
await self._async_set_preset_mode_internal(PRESET_ECO, True, False)
|
||||
|
||||
|
||||
@@ -98,6 +98,7 @@ STEP_THERMOSTAT_SWITCH = vol.Schema( # pylint: disable=invalid-name
|
||||
vol.Optional(CONF_HEATER_4): selector.EntitySelector(
|
||||
selector.EntitySelectorConfig(domain=[SWITCH_DOMAIN, INPUT_BOOLEAN_DOMAIN]),
|
||||
),
|
||||
vol.Optional(CONF_HEATER_KEEP_ALIVE): cv.positive_int,
|
||||
vol.Required(CONF_PROP_FUNCTION, default=PROPORTIONAL_FUNCTION_TPI): vol.In(
|
||||
[
|
||||
PROPORTIONAL_FUNCTION_TPI,
|
||||
@@ -143,6 +144,7 @@ STEP_THERMOSTAT_CLIMATE = vol.Schema( # pylint: disable=invalid-name
|
||||
mode="dropdown",
|
||||
)
|
||||
),
|
||||
vol.Optional(CONF_AUTO_REGULATION_USE_DEVICE_TEMP, default=False): cv.boolean,
|
||||
}
|
||||
)
|
||||
|
||||
|
||||
@@ -51,6 +51,7 @@ CONF_HEATER = "heater_entity_id"
|
||||
CONF_HEATER_2 = "heater_entity2_id"
|
||||
CONF_HEATER_3 = "heater_entity3_id"
|
||||
CONF_HEATER_4 = "heater_entity4_id"
|
||||
CONF_HEATER_KEEP_ALIVE = "heater_keep_alive"
|
||||
CONF_TEMP_SENSOR = "temperature_sensor_entity_id"
|
||||
CONF_EXTERNAL_TEMP_SENSOR = "external_temperature_sensor_entity_id"
|
||||
CONF_POWER_SENSOR = "power_sensor_entity_id"
|
||||
@@ -105,6 +106,7 @@ CONF_AUTO_REGULATION_STRONG = "auto_regulation_strong"
|
||||
CONF_AUTO_REGULATION_EXPERT = "auto_regulation_expert"
|
||||
CONF_AUTO_REGULATION_DTEMP = "auto_regulation_dtemp"
|
||||
CONF_AUTO_REGULATION_PERIOD_MIN = "auto_regulation_periode_min"
|
||||
CONF_AUTO_REGULATION_USE_DEVICE_TEMP = "auto_regulation_use_device_temp"
|
||||
CONF_INVERSE_SWITCH = "inverse_switch_command"
|
||||
CONF_AUTO_FAN_MODE = "auto_fan_mode"
|
||||
CONF_AUTO_FAN_NONE = "auto_fan_none"
|
||||
@@ -211,6 +213,7 @@ ALL_CONF = (
|
||||
CONF_HEATER_2,
|
||||
CONF_HEATER_3,
|
||||
CONF_HEATER_4,
|
||||
CONF_HEATER_KEEP_ALIVE,
|
||||
CONF_TEMP_SENSOR,
|
||||
CONF_EXTERNAL_TEMP_SENSOR,
|
||||
CONF_POWER_SENSOR,
|
||||
@@ -255,6 +258,7 @@ ALL_CONF = (
|
||||
CONF_AUTO_REGULATION_MODE,
|
||||
CONF_AUTO_REGULATION_DTEMP,
|
||||
CONF_AUTO_REGULATION_PERIOD_MIN,
|
||||
CONF_AUTO_REGULATION_USE_DEVICE_TEMP,
|
||||
CONF_INVERSE_SWITCH,
|
||||
CONF_AUTO_FAN_MODE,
|
||||
CONF_USE_MAIN_CENTRAL_CONFIG,
|
||||
|
||||
54
custom_components/versatile_thermostat/keep_alive.py
Normal file
54
custom_components/versatile_thermostat/keep_alive.py
Normal file
@@ -0,0 +1,54 @@
|
||||
"""Building blocks for the heater switch keep-alive feature.
|
||||
|
||||
The heater switch keep-alive feature consists of regularly refreshing the state
|
||||
of directly controlled switches at a configurable interval (regularly turning the
|
||||
switch 'on' or 'off' again even if it is already turned 'on' or 'off'), just like
|
||||
the keep_alive setting of Home Assistant's Generic Thermostat integration:
|
||||
https://www.home-assistant.io/integrations/generic_thermostat/
|
||||
"""
|
||||
|
||||
import logging
|
||||
from collections.abc import Awaitable, Callable
|
||||
from datetime import timedelta, datetime
|
||||
|
||||
from homeassistant.core import HomeAssistant, CALLBACK_TYPE
|
||||
from homeassistant.helpers.event import async_track_time_interval
|
||||
|
||||
|
||||
_LOGGER = logging.getLogger(__name__)
|
||||
|
||||
|
||||
class IntervalCaller:
|
||||
"""Repeatedly call a given async action function at a given regular interval.
|
||||
|
||||
Convenience wrapper around Home Assistant's `async_track_time_interval` function.
|
||||
"""
|
||||
|
||||
def __init__(self, hass: HomeAssistant, interval_sec: int) -> None:
|
||||
self._hass = hass
|
||||
self._interval_sec = interval_sec
|
||||
self._remove_handle: CALLBACK_TYPE | None = None
|
||||
|
||||
def cancel(self):
|
||||
"""Cancel the regular calls to the action function."""
|
||||
if self._remove_handle:
|
||||
self._remove_handle()
|
||||
self._remove_handle = None
|
||||
|
||||
def set_async_action(self, action: Callable[[], Awaitable[None]]):
|
||||
"""Set the async action function to be called at regular intervals."""
|
||||
if not self._interval_sec:
|
||||
return
|
||||
self.cancel()
|
||||
|
||||
async def callback(_time: datetime):
|
||||
try:
|
||||
_LOGGER.debug("Calling keep-alive action")
|
||||
await action()
|
||||
except Exception as e: # pylint: disable=broad-exception-caught
|
||||
_LOGGER.error(e)
|
||||
self.cancel()
|
||||
|
||||
self._remove_handle = async_track_time_interval(
|
||||
self._hass, callback, timedelta(seconds=self._interval_sec)
|
||||
)
|
||||
@@ -14,6 +14,6 @@
|
||||
"quality_scale": "silver",
|
||||
"requirements": [],
|
||||
"ssdp": [],
|
||||
"version": "5.4.0",
|
||||
"version": "5.4.1",
|
||||
"zeroconf": []
|
||||
}
|
||||
@@ -47,16 +47,16 @@ class PITemperatureRegulator:
|
||||
def set_target_temp(self, target_temp):
|
||||
"""Set the new target_temp"""
|
||||
self.target_temp = target_temp
|
||||
# Do not reset the accumulated error
|
||||
# Discussion #191. After a target change we should reset the accumulated error which is certainly wrong now.
|
||||
if self.accumulated_error < 0:
|
||||
self.accumulated_error = 0
|
||||
# Discussion #384. Finally don't reset the accumulated error but smoothly reset it if the sign is inversed
|
||||
# if self.accumulated_error < 0:
|
||||
# self.accumulated_error = 0
|
||||
|
||||
def calculate_regulated_temperature(
|
||||
self, internal_temp: float, external_temp: float
|
||||
self, room_temp: float, external_temp: float
|
||||
): # pylint: disable=unused-argument
|
||||
"""Calculate a new target_temp given some temperature"""
|
||||
if internal_temp is None:
|
||||
if room_temp is None:
|
||||
_LOGGER.warning(
|
||||
"Temporarily skipping the self-regulation algorithm while the configured sensor for room temperature is unavailable"
|
||||
)
|
||||
@@ -68,9 +68,14 @@ class PITemperatureRegulator:
|
||||
return self.target_temp
|
||||
|
||||
# Calculate the error factor (P)
|
||||
error = self.target_temp - internal_temp
|
||||
error = self.target_temp - room_temp
|
||||
|
||||
# Calculate the sum of error (I)
|
||||
# Discussion #384. Finally don't reset the accumulated error but smoothly reset it if the sign is inversed
|
||||
# If the error have change its sign, reset smoothly the accumulated error
|
||||
if error * self.accumulated_error < 0:
|
||||
self.accumulated_error = self.accumulated_error / 2.0
|
||||
|
||||
self.accumulated_error += error
|
||||
|
||||
# Capping of the error
|
||||
@@ -83,19 +88,12 @@ class PITemperatureRegulator:
|
||||
offset = self.kp * error + self.ki * self.accumulated_error
|
||||
|
||||
# Calculate the exterior offset
|
||||
# For Maia tests - use the internal_temp vs external_temp and not target_temp - external_temp
|
||||
offset_ext = self.k_ext * (internal_temp - external_temp)
|
||||
offset_ext = self.k_ext * (room_temp - external_temp)
|
||||
|
||||
# Capping of offset_ext
|
||||
# Capping of offset
|
||||
total_offset = offset + offset_ext
|
||||
total_offset = min(self.offset_max, max(-self.offset_max, total_offset))
|
||||
|
||||
# If temperature is near the target_temp, reset the accumulated_error
|
||||
# Issue #199 - don't reset the accumulation error
|
||||
# if abs(error) < self.stabilization_threshold:
|
||||
# _LOGGER.debug("Stabilisation")
|
||||
# self.accumulated_error = 0
|
||||
|
||||
result = round(self.target_temp + total_offset, 1)
|
||||
|
||||
_LOGGER.debug(
|
||||
|
||||
@@ -46,6 +46,7 @@
|
||||
"heater_entity2_id": "2nd heater switch",
|
||||
"heater_entity3_id": "3rd heater switch",
|
||||
"heater_entity4_id": "4th heater switch",
|
||||
"heater_keep_alive": "Switch keep-alive interval in seconds",
|
||||
"proportional_function": "Algorithm",
|
||||
"climate_entity_id": "1st underlying climate",
|
||||
"climate_entity2_id": "2nd underlying climate",
|
||||
@@ -59,6 +60,7 @@
|
||||
"auto_regulation_mode": "Self-regulation",
|
||||
"auto_regulation_dtemp": "Regulation threshold",
|
||||
"auto_regulation_periode_min": "Regulation minimal period",
|
||||
"auto_regulation_use_device_temp": "Use internal temperature of the underlying",
|
||||
"inverse_switch_command": "Inverse switch command",
|
||||
"auto_fan_mode": " Auto fan mode"
|
||||
},
|
||||
@@ -67,6 +69,7 @@
|
||||
"heater_entity2_id": "Optional 2nd Heater entity id. Leave empty if not used",
|
||||
"heater_entity3_id": "Optional 3rd Heater entity id. Leave empty if not used",
|
||||
"heater_entity4_id": "Optional 4th Heater entity id. Leave empty if not used",
|
||||
"heater_keep_alive": "Optional heater switch state refresh interval. Leave empty if not required.",
|
||||
"proportional_function": "Algorithm to use (TPI is the only one for now)",
|
||||
"climate_entity_id": "Underlying climate entity id",
|
||||
"climate_entity2_id": "2nd underlying climate entity id",
|
||||
@@ -80,6 +83,7 @@
|
||||
"auto_regulation_mode": "Auto adjustment of the target temperature",
|
||||
"auto_regulation_dtemp": "The threshold in ° (or % for valve) under which the temperature change will not be sent",
|
||||
"auto_regulation_periode_min": "Duration in minutes between two regulation update",
|
||||
"auto_regulation_use_device_temp": "Use the eventual internal temperature sensor of the underlying to speedup the self-regulation",
|
||||
"inverse_switch_command": "For switch with pilot wire and diode you may need to inverse the command",
|
||||
"auto_fan_mode": " Automatically activate fan when huge heating/cooling is necessary"
|
||||
}
|
||||
@@ -281,6 +285,7 @@
|
||||
"heater_entity2_id": "2nd heater switch",
|
||||
"heater_entity3_id": "3rd heater switch",
|
||||
"heater_entity4_id": "4th heater switch",
|
||||
"heater_keep_alive": "Switch keep-alive interval in seconds",
|
||||
"proportional_function": "Algorithm",
|
||||
"climate_entity_id": "1st underlying climate",
|
||||
"climate_entity2_id": "2nd underlying climate",
|
||||
@@ -294,6 +299,7 @@
|
||||
"auto_regulation_mode": "Self-regulation",
|
||||
"auto_regulation_dtemp": "Regulation threshold",
|
||||
"auto_regulation_periode_min": "Regulation minimal period",
|
||||
"auto_regulation_use_device_temp": "Use internal temperature of the underlying",
|
||||
"inverse_switch_command": "Inverse switch command",
|
||||
"auto_fan_mode": " Auto fan mode"
|
||||
},
|
||||
@@ -302,6 +308,7 @@
|
||||
"heater_entity2_id": "Optional 2nd Heater entity id. Leave empty if not used",
|
||||
"heater_entity3_id": "Optional 3rd Heater entity id. Leave empty if not used",
|
||||
"heater_entity4_id": "Optional 4th Heater entity id. Leave empty if not used",
|
||||
"heater_keep_alive": "Optional heater switch state refresh interval. Leave empty if not required.",
|
||||
"proportional_function": "Algorithm to use (TPI is the only one for now)",
|
||||
"climate_entity_id": "Underlying climate entity id",
|
||||
"climate_entity2_id": "2nd underlying climate entity id",
|
||||
@@ -315,6 +322,7 @@
|
||||
"auto_regulation_mode": "Auto adjustment of the target temperature",
|
||||
"auto_regulation_dtemp": "The threshold in ° (or % for valve) under which the temperature change will not be sent",
|
||||
"auto_regulation_periode_min": "Duration in minutes between two regulation update",
|
||||
"auto_regulation_use_device_temp": "Use the eventual internal temperature sensor of the underlying to speedup the self-regulation",
|
||||
"inverse_switch_command": "For switch with pilot wire and diode you may need to invert the command",
|
||||
"auto_fan_mode": " Automatically activate fan when huge heating/cooling is necessary"
|
||||
}
|
||||
|
||||
@@ -36,6 +36,7 @@ from .const import (
|
||||
CONF_AUTO_REGULATION_EXPERT,
|
||||
CONF_AUTO_REGULATION_DTEMP,
|
||||
CONF_AUTO_REGULATION_PERIOD_MIN,
|
||||
CONF_AUTO_REGULATION_USE_DEVICE_TEMP,
|
||||
CONF_AUTO_FAN_MODE,
|
||||
CONF_AUTO_FAN_NONE,
|
||||
CONF_AUTO_FAN_LOW,
|
||||
@@ -90,6 +91,7 @@ class ThermostatOverClimate(BaseThermostat):
|
||||
"current_auto_fan_mode",
|
||||
"auto_activated_fan_mode",
|
||||
"auto_deactivated_fan_mode",
|
||||
"auto_regulation_use_device_temp",
|
||||
}
|
||||
)
|
||||
)
|
||||
@@ -192,8 +194,42 @@ class ThermostatOverClimate(BaseThermostat):
|
||||
|
||||
self._last_regulation_change = now
|
||||
for under in self._underlyings:
|
||||
# issue 348 - use device temperature if configured as offset
|
||||
offset_temp = 0
|
||||
device_temp = 0
|
||||
if (
|
||||
# regulation can use the device_temp
|
||||
self.auto_regulation_use_device_temp
|
||||
# and we have access to the device temp
|
||||
and (device_temp := under.underlying_current_temperature) is not None
|
||||
# and target is not reach (ie we need regulation)
|
||||
and (
|
||||
(
|
||||
self.hvac_mode == HVACMode.COOL
|
||||
and self.target_temperature < self.current_temperature
|
||||
)
|
||||
or (
|
||||
self.hvac_mode == HVACMode.HEAT
|
||||
and self.target_temperature > self.current_temperature
|
||||
)
|
||||
)
|
||||
):
|
||||
offset_temp = device_temp - self.current_temperature
|
||||
|
||||
target_temp = self.regulated_target_temp + offset_temp
|
||||
|
||||
_LOGGER.debug(
|
||||
"%s - The device offset temp for regulation is %.2f - internal temp is %.2f. New target is %.2f",
|
||||
self,
|
||||
offset_temp,
|
||||
device_temp,
|
||||
target_temp,
|
||||
)
|
||||
|
||||
await under.set_temperature(
|
||||
self.regulated_target_temp, self._attr_max_temp, self._attr_min_temp
|
||||
target_temp,
|
||||
self._attr_max_temp,
|
||||
self._attr_min_temp,
|
||||
)
|
||||
|
||||
async def _send_auto_fan_mode(self):
|
||||
@@ -284,6 +320,10 @@ class ThermostatOverClimate(BaseThermostat):
|
||||
else CONF_AUTO_FAN_NONE
|
||||
)
|
||||
|
||||
self._auto_regulation_use_device_temp = config_entry.get(
|
||||
CONF_AUTO_REGULATION_USE_DEVICE_TEMP, False
|
||||
)
|
||||
|
||||
def choose_auto_regulation_mode(self, auto_regulation_mode: str):
|
||||
"""Choose or change the regulation mode"""
|
||||
self._auto_regulation_mode = auto_regulation_mode
|
||||
@@ -492,6 +532,10 @@ class ThermostatOverClimate(BaseThermostat):
|
||||
"auto_deactivated_fan_mode"
|
||||
] = self._auto_deactivated_fan_mode
|
||||
|
||||
self._attr_extra_state_attributes[
|
||||
"auto_regulation_use_device_temp"
|
||||
] = self.auto_regulation_use_device_temp
|
||||
|
||||
self.async_write_ha_state()
|
||||
_LOGGER.debug(
|
||||
"%s - Calling update_custom_attributes: %s",
|
||||
@@ -770,6 +814,11 @@ class ThermostatOverClimate(BaseThermostat):
|
||||
"""Get the auto fan mode"""
|
||||
return self._auto_fan_mode
|
||||
|
||||
@property
|
||||
def auto_regulation_use_device_temp(self) -> bool | None:
|
||||
"""Returns the value of parameter auto_regulation_use_device_temp"""
|
||||
return self._auto_regulation_use_device_temp
|
||||
|
||||
@property
|
||||
def regulated_target_temp(self) -> float | None:
|
||||
"""Get the regulated target temperature"""
|
||||
|
||||
@@ -15,6 +15,7 @@ from .const import (
|
||||
CONF_HEATER_2,
|
||||
CONF_HEATER_3,
|
||||
CONF_HEATER_4,
|
||||
CONF_HEATER_KEEP_ALIVE,
|
||||
CONF_INVERSE_SWITCH,
|
||||
overrides,
|
||||
)
|
||||
@@ -105,6 +106,7 @@ class ThermostatOverSwitch(BaseThermostat):
|
||||
thermostat=self,
|
||||
switch_entity_id=switch,
|
||||
initial_delay_sec=idx * delta_cycle,
|
||||
keep_alive_sec=config_entry.get(CONF_HEATER_KEEP_ALIVE, 0),
|
||||
)
|
||||
)
|
||||
|
||||
@@ -125,6 +127,7 @@ class ThermostatOverSwitch(BaseThermostat):
|
||||
self.hass, [switch.entity_id], self._async_switch_changed
|
||||
)
|
||||
)
|
||||
switch.startup()
|
||||
|
||||
self.hass.create_task(self.async_control_heating())
|
||||
|
||||
|
||||
@@ -46,6 +46,7 @@
|
||||
"heater_entity2_id": "2nd heater switch",
|
||||
"heater_entity3_id": "3rd heater switch",
|
||||
"heater_entity4_id": "4th heater switch",
|
||||
"heater_keep_alive": "Switch keep-alive interval in seconds",
|
||||
"proportional_function": "Algorithm",
|
||||
"climate_entity_id": "1st underlying climate",
|
||||
"climate_entity2_id": "2nd underlying climate",
|
||||
@@ -59,6 +60,7 @@
|
||||
"auto_regulation_mode": "Self-regulation",
|
||||
"auto_regulation_dtemp": "Regulation threshold",
|
||||
"auto_regulation_periode_min": "Regulation minimal period",
|
||||
"auto_regulation_use_device_temp": "Use internal temperature of the underlying",
|
||||
"inverse_switch_command": "Inverse switch command",
|
||||
"auto_fan_mode": " Auto fan mode"
|
||||
},
|
||||
@@ -67,6 +69,7 @@
|
||||
"heater_entity2_id": "Optional 2nd Heater entity id. Leave empty if not used",
|
||||
"heater_entity3_id": "Optional 3rd Heater entity id. Leave empty if not used",
|
||||
"heater_entity4_id": "Optional 4th Heater entity id. Leave empty if not used",
|
||||
"heater_keep_alive": "Optional heater switch state refresh interval. Leave empty if not required.",
|
||||
"proportional_function": "Algorithm to use (TPI is the only one for now)",
|
||||
"climate_entity_id": "Underlying climate entity id",
|
||||
"climate_entity2_id": "2nd underlying climate entity id",
|
||||
@@ -80,6 +83,7 @@
|
||||
"auto_regulation_mode": "Auto adjustment of the target temperature",
|
||||
"auto_regulation_dtemp": "The threshold in ° (or % for valve) under which the temperature change will not be sent",
|
||||
"auto_regulation_periode_min": "Duration in minutes between two regulation update",
|
||||
"auto_regulation_use_device_temp": "Use the eventual internal temperature sensor of the underlying to speedup the self-regulation",
|
||||
"inverse_switch_command": "For switch with pilot wire and diode you may need to inverse the command",
|
||||
"auto_fan_mode": " Automatically activate fan when huge heating/cooling is necessary"
|
||||
}
|
||||
@@ -281,6 +285,7 @@
|
||||
"heater_entity2_id": "2nd heater switch",
|
||||
"heater_entity3_id": "3rd heater switch",
|
||||
"heater_entity4_id": "4th heater switch",
|
||||
"heater_keep_alive": "Switch keep-alive interval in seconds",
|
||||
"proportional_function": "Algorithm",
|
||||
"climate_entity_id": "1st underlying climate",
|
||||
"climate_entity2_id": "2nd underlying climate",
|
||||
@@ -294,6 +299,7 @@
|
||||
"auto_regulation_mode": "Self-regulation",
|
||||
"auto_regulation_dtemp": "Regulation threshold",
|
||||
"auto_regulation_periode_min": "Regulation minimal period",
|
||||
"auto_regulation_use_device_temp": "Use internal temperature of the underlying",
|
||||
"inverse_switch_command": "Inverse switch command",
|
||||
"auto_fan_mode": " Auto fan mode"
|
||||
},
|
||||
@@ -302,6 +308,7 @@
|
||||
"heater_entity2_id": "Optional 2nd Heater entity id. Leave empty if not used",
|
||||
"heater_entity3_id": "Optional 3rd Heater entity id. Leave empty if not used",
|
||||
"heater_entity4_id": "Optional 4th Heater entity id. Leave empty if not used",
|
||||
"heater_keep_alive": "Optional heater switch state refresh interval. Leave empty if not required.",
|
||||
"proportional_function": "Algorithm to use (TPI is the only one for now)",
|
||||
"climate_entity_id": "Underlying climate entity id",
|
||||
"climate_entity2_id": "2nd underlying climate entity id",
|
||||
@@ -315,6 +322,7 @@
|
||||
"auto_regulation_mode": "Auto adjustment of the target temperature",
|
||||
"auto_regulation_dtemp": "The threshold in ° (or % for valve) under which the temperature change will not be sent",
|
||||
"auto_regulation_periode_min": "Duration in minutes between two regulation update",
|
||||
"auto_regulation_use_device_temp": "Use the eventual internal temperature sensor of the underlying to speedup the self-regulation",
|
||||
"inverse_switch_command": "For switch with pilot wire and diode you may need to invert the command",
|
||||
"auto_fan_mode": " Automatically activate fan when huge heating/cooling is necessary"
|
||||
}
|
||||
|
||||
@@ -46,6 +46,7 @@
|
||||
"heater_entity2_id": "2ème radiateur",
|
||||
"heater_entity3_id": "3ème radiateur",
|
||||
"heater_entity4_id": "4ème radiateur",
|
||||
"heater_keep_alive": "keep-alive (sec)",
|
||||
"proportional_function": "Algorithme",
|
||||
"climate_entity_id": "Thermostat sous-jacent",
|
||||
"climate_entity2_id": "2ème thermostat sous-jacent",
|
||||
@@ -59,6 +60,7 @@
|
||||
"auto_regulation_mode": "Auto-régulation",
|
||||
"auto_regulation_dtemp": "Seuil de régulation",
|
||||
"auto_regulation_periode_min": "Période minimale de régulation",
|
||||
"auto_regulation_use_device_temp": "Utiliser la température interne du sous-jacent",
|
||||
"inverse_switch_command": "Inverser la commande",
|
||||
"auto_fan_mode": " Auto ventilation mode"
|
||||
},
|
||||
@@ -67,6 +69,7 @@
|
||||
"heater_entity2_id": "Optionnel entity id du 2ème radiateur",
|
||||
"heater_entity3_id": "Optionnel entity id du 3ème radiateur",
|
||||
"heater_entity4_id": "Optionnel entity id du 4ème radiateur",
|
||||
"heater_keep_alive": "Intervalle de rafraichissement du switch en secondes. Laisser vide pour désactiver. À n'utiliser que pour les switchs qui le nécessite.",
|
||||
"proportional_function": "Algorithme à utiliser (Seul TPI est disponible pour l'instant)",
|
||||
"climate_entity_id": "Entity id du thermostat sous-jacent",
|
||||
"climate_entity2_id": "Entity id du 2ème thermostat sous-jacent",
|
||||
@@ -80,6 +83,7 @@
|
||||
"auto_regulation_mode": "Ajustement automatique de la température cible",
|
||||
"auto_regulation_dtemp": "Le seuil en ° (ou % pour les valves) en-dessous duquel la régulation ne sera pas envoyée",
|
||||
"auto_regulation_periode_min": "La durée en minutes entre deux mise à jour faites par la régulation",
|
||||
"auto_regulation_use_device_temp": "Utiliser la temperature interne du sous-jacent pour accélérer l'auto-régulation",
|
||||
"inverse_switch_command": "Inverse la commande du switch pour une installation avec fil pilote et diode",
|
||||
"auto_fan_mode": "Active la ventilation automatiquement en cas d'écart important"
|
||||
}
|
||||
@@ -293,6 +297,7 @@
|
||||
"heater_entity2_id": "2ème radiateur",
|
||||
"heater_entity3_id": "3ème radiateur",
|
||||
"heater_entity4_id": "4ème radiateur",
|
||||
"heater_keep_alive": "Keep-alive (sec)",
|
||||
"proportional_function": "Algorithme",
|
||||
"climate_entity_id": "Thermostat sous-jacent",
|
||||
"climate_entity2_id": "2ème thermostat sous-jacent",
|
||||
@@ -306,6 +311,7 @@
|
||||
"auto_regulation_mode": "Auto-regulation",
|
||||
"auto_regulation_dtemp": "Seuil de régulation",
|
||||
"auto_regulation_periode_min": "Période minimale de régulation",
|
||||
"auto_regulation_use_device_temp": "Utiliser la température interne du sous-jacent",
|
||||
"inverse_switch_command": "Inverser la commande",
|
||||
"auto_fan_mode": " Auto fan mode"
|
||||
},
|
||||
@@ -314,6 +320,7 @@
|
||||
"heater_entity2_id": "Optionnel entity id du 2ème radiateur",
|
||||
"heater_entity3_id": "Optionnel entity id du 3ème radiateur",
|
||||
"heater_entity4_id": "Optionnel entity id du 4ème radiateur",
|
||||
"heater_keep_alive": "Intervalle de rafraichissement du switch en secondes. Laisser vide pour désactiver. À n'utiliser que pour les switchs qui le nécessite.",
|
||||
"proportional_function": "Algorithme à utiliser (Seul TPI est disponible pour l'instant)",
|
||||
"climate_entity_id": "Entity id du thermostat sous-jacent",
|
||||
"climate_entity2_id": "Entity id du 2ème thermostat sous-jacent",
|
||||
@@ -327,6 +334,7 @@
|
||||
"auto_regulation_mode": "Ajustement automatique de la consigne",
|
||||
"auto_regulation_dtemp": "Le seuil en ° (ou % pour les valves) en-dessous duquel la régulation ne sera pas envoyée",
|
||||
"auto_regulation_periode_min": "La durée en minutes entre deux mise à jour faites par la régulation",
|
||||
"auto_regulation_use_device_temp": "Utiliser la temperature interne du sous-jacent pour accélérer l'auto-régulation",
|
||||
"inverse_switch_command": "Inverse la commande du switch pour une installation avec fil pilote et diode",
|
||||
"auto_fan_mode": "Active la ventilation automatiquement en cas d'écart important"
|
||||
}
|
||||
|
||||
@@ -29,6 +29,7 @@
|
||||
"heater_entity2_id": "Secondo riscaldatore",
|
||||
"heater_entity3_id": "Terzo riscaldatore",
|
||||
"heater_entity4_id": "Quarto riscaldatore",
|
||||
"heater_keep_alive": "Intervallo keep-alive dell'interruttore in secondi",
|
||||
"proportional_function": "Algoritmo",
|
||||
"climate_entity_id": "Primo termostato",
|
||||
"climate_entity2_id": "Secondo termostato",
|
||||
@@ -48,6 +49,7 @@
|
||||
"heater_entity2_id": "Entity id del secondo riscaldatore facoltativo. Lasciare vuoto se non utilizzato",
|
||||
"heater_entity3_id": "Entity id del terzo riscaldatore facoltativo. Lasciare vuoto se non utilizzato",
|
||||
"heater_entity4_id": "Entity id del quarto riscaldatore facoltativo. Lasciare vuoto se non utilizzato",
|
||||
"heater_keep_alive": "Frequenza di aggiornamento dell'interruttore (facoltativo). Lasciare vuoto se non richiesto.",
|
||||
"proportional_function": "Algoritmo da utilizzare (il TPI per adesso è l'unico)",
|
||||
"climate_entity_id": "Entity id del primo termostato",
|
||||
"climate_entity2_id": "Entity id del secondo termostato",
|
||||
@@ -191,6 +193,7 @@
|
||||
"heater_entity2_id": "Secondo riscaldatore",
|
||||
"heater_entity3_id": "Terzo riscaldatore",
|
||||
"heater_entity4_id": "Quarto riscaldatore",
|
||||
"heater_keep_alive": "Intervallo keep-alive dell'interruttore in secondi",
|
||||
"proportional_function": "Algoritmo",
|
||||
"climate_entity_id": "Primo termostato",
|
||||
"climate_entity2_id": "Secondo termostato",
|
||||
@@ -210,6 +213,7 @@
|
||||
"heater_entity2_id": "Entity id del secondo riscaldatore facoltativo. Lasciare vuoto se non utilizzato",
|
||||
"heater_entity3_id": "Entity id del terzo riscaldatore facoltativo. Lasciare vuoto se non utilizzato",
|
||||
"heater_entity4_id": "Entity id del quarto riscaldatore facoltativo. Lasciare vuoto se non utilizzato",
|
||||
"heater_keep_alive": "Frequenza di aggiornamento dell'interruttore (facoltativo). Lasciare vuoto se non richiesto.",
|
||||
"proportional_function": "Algoritmo da utilizzare (il TPI per adesso è l'unico)",
|
||||
"climate_entity_id": "Entity id del primo termostato",
|
||||
"climate_entity2_id": "Entity id del secondo termostato",
|
||||
|
||||
@@ -32,6 +32,7 @@ from homeassistant.helpers.entity_component import EntityComponent
|
||||
from homeassistant.helpers.event import async_call_later
|
||||
|
||||
from .const import UnknownEntity, overrides
|
||||
from .keep_alive import IntervalCaller
|
||||
|
||||
_LOGGER = logging.getLogger(__name__)
|
||||
|
||||
@@ -187,6 +188,7 @@ class UnderlyingSwitch(UnderlyingEntity):
|
||||
thermostat: Any,
|
||||
switch_entity_id: str,
|
||||
initial_delay_sec: int,
|
||||
keep_alive_sec: int,
|
||||
) -> None:
|
||||
"""Initialize the underlying switch"""
|
||||
|
||||
@@ -202,6 +204,7 @@ class UnderlyingSwitch(UnderlyingEntity):
|
||||
self._on_time_sec = 0
|
||||
self._off_time_sec = 0
|
||||
self._hvac_mode = None
|
||||
self._keep_alive = IntervalCaller(hass, keep_alive_sec)
|
||||
|
||||
@property
|
||||
def initial_delay_sec(self):
|
||||
@@ -214,6 +217,13 @@ class UnderlyingSwitch(UnderlyingEntity):
|
||||
"""Tells if the switch command should be inversed"""
|
||||
return self._thermostat.is_inversed
|
||||
|
||||
@overrides
|
||||
def startup(self):
|
||||
super().startup()
|
||||
self._keep_alive.set_async_action(
|
||||
self.turn_on if self.is_device_active else self.turn_off
|
||||
)
|
||||
|
||||
# @overrides this breaks some unit tests TypeError: object MagicMock can't be used in 'await' expression
|
||||
async def set_hvac_mode(self, hvac_mode: HVACMode) -> bool:
|
||||
"""Set the HVACmode. Returns true if something have change"""
|
||||
@@ -245,12 +255,13 @@ class UnderlyingSwitch(UnderlyingEntity):
|
||||
domain = self._entity_id.split(".")[0]
|
||||
# This may fails if called after shutdown
|
||||
try:
|
||||
data = {ATTR_ENTITY_ID: self._entity_id}
|
||||
await self._hass.services.async_call(
|
||||
domain,
|
||||
command,
|
||||
data,
|
||||
)
|
||||
try:
|
||||
data = {ATTR_ENTITY_ID: self._entity_id}
|
||||
await self._hass.services.async_call(domain, command, data)
|
||||
self._keep_alive.set_async_action(self.turn_off)
|
||||
except Exception:
|
||||
self._keep_alive.cancel()
|
||||
raise
|
||||
except ServiceNotFound as err:
|
||||
_LOGGER.error(err)
|
||||
|
||||
@@ -260,12 +271,13 @@ class UnderlyingSwitch(UnderlyingEntity):
|
||||
command = SERVICE_TURN_ON if not self.is_inversed else SERVICE_TURN_OFF
|
||||
domain = self._entity_id.split(".")[0]
|
||||
try:
|
||||
data = {ATTR_ENTITY_ID: self._entity_id}
|
||||
await self._hass.services.async_call(
|
||||
domain,
|
||||
command,
|
||||
data,
|
||||
)
|
||||
try:
|
||||
data = {ATTR_ENTITY_ID: self._entity_id}
|
||||
await self._hass.services.async_call(domain, command, data)
|
||||
self._keep_alive.set_async_action(self.turn_on)
|
||||
except Exception:
|
||||
self._keep_alive.cancel()
|
||||
raise
|
||||
except ServiceNotFound as err:
|
||||
_LOGGER.error(err)
|
||||
|
||||
@@ -422,6 +434,7 @@ class UnderlyingSwitch(UnderlyingEntity):
|
||||
def remove_entity(self):
|
||||
"""Remove the entity after stopping its cycle"""
|
||||
self._cancel_cycle()
|
||||
self._keep_alive.cancel()
|
||||
|
||||
|
||||
class UnderlyingClimate(UnderlyingEntity):
|
||||
@@ -567,6 +580,7 @@ class UnderlyingClimate(UnderlyingEntity):
|
||||
"""Set the target temperature"""
|
||||
if not self.is_initialized:
|
||||
return
|
||||
|
||||
data = {
|
||||
ATTR_ENTITY_ID: self._entity_id,
|
||||
"temperature": self.cap_sent_value(temperature),
|
||||
@@ -671,6 +685,18 @@ class UnderlyingClimate(UnderlyingEntity):
|
||||
return False
|
||||
return self._underlying_climate.is_aux_heat
|
||||
|
||||
@property
|
||||
def underlying_current_temperature(self) -> float | None:
|
||||
"""Get the underlying current_temperature if it exists
|
||||
and if initialized"""
|
||||
if not self.is_initialized:
|
||||
return None
|
||||
|
||||
if not hasattr(self._underlying_climate, "current_temperature"):
|
||||
return None
|
||||
|
||||
return self._underlying_climate.current_temperature
|
||||
|
||||
def turn_aux_heat_on(self) -> None:
|
||||
"""Turn auxiliary heater on."""
|
||||
if not self.is_initialized:
|
||||
|
||||
Binary file not shown.
|
Before Width: | Height: | Size: 30 KiB After Width: | Height: | Size: 50 KiB |
BIN
images/config-use-internal-temp.png
Normal file
BIN
images/config-use-internal-temp.png
Normal file
Binary file not shown.
|
After Width: | Height: | Size: 4.8 KiB |
BIN
images/en/config-linked-entity.png
Normal file
BIN
images/en/config-linked-entity.png
Normal file
Binary file not shown.
|
After Width: | Height: | Size: 50 KiB |
@@ -51,6 +51,7 @@ from .const import ( # pylint: disable=unused-import
|
||||
MOCK_TH_OVER_CLIMATE_MAIN_CONFIG,
|
||||
MOCK_TH_OVER_CLIMATE_CENTRAL_MAIN_CONFIG,
|
||||
MOCK_TH_OVER_CLIMATE_TYPE_CONFIG,
|
||||
MOCK_TH_OVER_CLIMATE_TYPE_USE_DEVICE_TEMP_CONFIG,
|
||||
MOCK_TH_OVER_CLIMATE_TYPE_AC_CONFIG,
|
||||
MOCK_TH_OVER_CLIMATE_TYPE_NOT_REGULATED_CONFIG,
|
||||
MOCK_TH_OVER_SWITCH_TPI_CONFIG,
|
||||
@@ -110,6 +111,15 @@ PARTIAL_CLIMATE_CONFIG = (
|
||||
| MOCK_ADVANCED_CONFIG
|
||||
)
|
||||
|
||||
PARTIAL_CLIMATE_CONFIG_USE_DEVICE_TEMP = (
|
||||
MOCK_TH_OVER_CLIMATE_USER_CONFIG
|
||||
| MOCK_TH_OVER_CLIMATE_MAIN_CONFIG
|
||||
| MOCK_TH_OVER_CLIMATE_CENTRAL_MAIN_CONFIG
|
||||
| MOCK_TH_OVER_CLIMATE_TYPE_USE_DEVICE_TEMP_CONFIG
|
||||
| MOCK_PRESETS_CONFIG
|
||||
| MOCK_ADVANCED_CONFIG
|
||||
)
|
||||
|
||||
PARTIAL_CLIMATE_NOT_REGULATED_CONFIG = (
|
||||
MOCK_TH_OVER_CLIMATE_USER_CONFIG
|
||||
| MOCK_TH_OVER_CLIMATE_MAIN_CONFIG
|
||||
@@ -313,6 +323,10 @@ class MockClimate(ClimateEntity):
|
||||
"""Set the HVACaction"""
|
||||
self._attr_hvac_action = hvac_action
|
||||
|
||||
def set_current_temperature(self, current_temperature):
|
||||
"""Set the current_temperature"""
|
||||
self._attr_current_temperature = current_temperature
|
||||
|
||||
|
||||
class MockUnavailableClimate(ClimateEntity):
|
||||
"""A Mock Climate class used for Underlying climate mode"""
|
||||
|
||||
@@ -74,6 +74,7 @@ MOCK_TH_OVER_SWITCH_CENTRAL_MAIN_CONFIG = {
|
||||
|
||||
MOCK_TH_OVER_SWITCH_TYPE_CONFIG = {
|
||||
CONF_HEATER: "switch.mock_switch",
|
||||
CONF_HEATER_KEEP_ALIVE: 0,
|
||||
CONF_PROP_FUNCTION: PROPORTIONAL_FUNCTION_TPI,
|
||||
CONF_AC_MODE: False,
|
||||
CONF_INVERSE_SWITCH: False,
|
||||
@@ -91,6 +92,7 @@ MOCK_TH_OVER_4SWITCH_TYPE_CONFIG = {
|
||||
CONF_HEATER_2: "switch.mock_4switch1",
|
||||
CONF_HEATER_3: "switch.mock_4switch2",
|
||||
CONF_HEATER_4: "switch.mock_4switch3",
|
||||
CONF_HEATER_KEEP_ALIVE: 0,
|
||||
CONF_PROP_FUNCTION: PROPORTIONAL_FUNCTION_TPI,
|
||||
CONF_AC_MODE: False,
|
||||
CONF_INVERSE_SWITCH: False,
|
||||
@@ -108,6 +110,17 @@ MOCK_TH_OVER_CLIMATE_TYPE_CONFIG = {
|
||||
CONF_AUTO_REGULATION_DTEMP: 0.5,
|
||||
CONF_AUTO_REGULATION_PERIOD_MIN: 2,
|
||||
CONF_AUTO_FAN_MODE: CONF_AUTO_FAN_HIGH,
|
||||
CONF_AUTO_REGULATION_USE_DEVICE_TEMP: False,
|
||||
}
|
||||
|
||||
MOCK_TH_OVER_CLIMATE_TYPE_USE_DEVICE_TEMP_CONFIG = {
|
||||
CONF_CLIMATE: "climate.mock_climate",
|
||||
CONF_AC_MODE: False,
|
||||
CONF_AUTO_REGULATION_MODE: CONF_AUTO_REGULATION_STRONG,
|
||||
CONF_AUTO_REGULATION_DTEMP: 0.1,
|
||||
CONF_AUTO_REGULATION_PERIOD_MIN: 2,
|
||||
CONF_AUTO_FAN_MODE: CONF_AUTO_FAN_HIGH,
|
||||
CONF_AUTO_REGULATION_USE_DEVICE_TEMP: True,
|
||||
}
|
||||
|
||||
MOCK_TH_OVER_CLIMATE_TYPE_NOT_REGULATED_CONFIG = {
|
||||
|
||||
@@ -1,7 +1,7 @@
|
||||
# pylint: disable=wildcard-import, unused-wildcard-import, protected-access, unused-argument, line-too-long
|
||||
|
||||
""" Test the normal start of a Thermostat """
|
||||
from unittest.mock import patch # , call
|
||||
from unittest.mock import patch, call
|
||||
from datetime import datetime, timedelta
|
||||
|
||||
from homeassistant.core import HomeAssistant
|
||||
@@ -71,6 +71,7 @@ async def test_over_climate_regulation(
|
||||
assert entity.name == "TheOverClimateMockName"
|
||||
assert entity.is_over_climate is True
|
||||
assert entity.is_regulated is True
|
||||
assert entity.auto_regulation_use_device_temp is False
|
||||
assert entity.hvac_mode is HVACMode.OFF
|
||||
assert entity.hvac_action is HVACAction.OFF
|
||||
assert entity.target_temperature == entity.min_temp
|
||||
@@ -126,9 +127,7 @@ async def test_over_climate_regulation(
|
||||
|
||||
# the regulated temperature should be under
|
||||
assert entity.regulated_target_temp < entity.target_temperature
|
||||
assert (
|
||||
entity.regulated_target_temp == 18 - 2
|
||||
) # normally 0.6 but round_to_nearest gives 0.5
|
||||
assert entity.regulated_target_temp == 18 - 2.5
|
||||
|
||||
|
||||
@pytest.mark.parametrize("expected_lingering_tasks", [True])
|
||||
@@ -374,3 +373,169 @@ async def test_over_climate_regulation_limitations(
|
||||
assert (
|
||||
entity.regulated_target_temp == 17 + 1.5
|
||||
) # 0.7 without round_to_nearest
|
||||
|
||||
|
||||
@pytest.mark.parametrize("expected_lingering_tasks", [True])
|
||||
@pytest.mark.parametrize("expected_lingering_timers", [True])
|
||||
async def test_over_climate_regulation_use_device_temp(
|
||||
hass: HomeAssistant, skip_hass_states_is_state, skip_send_event
|
||||
):
|
||||
"""Test the regulation of an over climate thermostat"""
|
||||
|
||||
entry = MockConfigEntry(
|
||||
domain=DOMAIN,
|
||||
title="TheOverClimateMockName",
|
||||
unique_id="uniqueId",
|
||||
# This is include a medium regulation
|
||||
data=PARTIAL_CLIMATE_CONFIG_USE_DEVICE_TEMP,
|
||||
)
|
||||
|
||||
tz = get_tz(hass) # pylint: disable=invalid-name
|
||||
now: datetime = datetime.now(tz=tz)
|
||||
|
||||
fake_underlying_climate = MockClimate(hass, "mockUniqueId", "MockClimateName", {})
|
||||
|
||||
assert fake_underlying_climate.current_temperature == 15
|
||||
|
||||
# Creates the regulated VTherm over climate
|
||||
# change temperature so that the heating will start
|
||||
event_timestamp = now - timedelta(minutes=10)
|
||||
|
||||
with patch(
|
||||
"custom_components.versatile_thermostat.commons.NowClass.get_now",
|
||||
return_value=event_timestamp,
|
||||
), patch(
|
||||
"custom_components.versatile_thermostat.underlyings.UnderlyingClimate.find_underlying_climate",
|
||||
return_value=fake_underlying_climate,
|
||||
):
|
||||
entity: ThermostatOverClimate = await create_thermostat(
|
||||
hass, entry, "climate.theoverclimatemockname"
|
||||
)
|
||||
assert entity
|
||||
assert isinstance(entity, ThermostatOverClimate)
|
||||
|
||||
assert entity.name == "TheOverClimateMockName"
|
||||
assert entity.is_over_climate is True
|
||||
assert entity.is_regulated is True
|
||||
assert entity.auto_regulation_use_device_temp is True
|
||||
|
||||
# 1. Activate the heating by changing HVACMode and temperature
|
||||
# Select a hvacmode, presence and preset
|
||||
await entity.async_set_hvac_mode(HVACMode.HEAT)
|
||||
assert entity.hvac_mode is HVACMode.HEAT
|
||||
assert entity.regulated_target_temp == entity.min_temp
|
||||
|
||||
await send_temperature_change_event(entity, 18, event_timestamp)
|
||||
await send_ext_temperature_change_event(entity, 10, event_timestamp)
|
||||
|
||||
# 2. set manual target temp (at now - 7) -> no regulation should occurs
|
||||
# room temp is 18
|
||||
# target is 16
|
||||
# internal heater temp is 15
|
||||
fake_underlying_climate.set_current_temperature(15)
|
||||
event_timestamp = now - timedelta(minutes=7)
|
||||
with patch(
|
||||
"custom_components.versatile_thermostat.commons.NowClass.get_now",
|
||||
return_value=event_timestamp,
|
||||
), patch("homeassistant.core.ServiceRegistry.async_call") as mock_service_call:
|
||||
await entity.async_set_temperature(temperature=16)
|
||||
|
||||
fake_underlying_climate.set_hvac_action(
|
||||
HVACAction.HEATING
|
||||
) # simulate under heating
|
||||
assert entity.hvac_action == HVACAction.HEATING
|
||||
assert entity.preset_mode == PRESET_NONE # Manual mode
|
||||
|
||||
# the regulated temperature should be higher
|
||||
assert entity.regulated_target_temp < entity.target_temperature
|
||||
# The calcul is the following: 16 + (16 - 18) x 0.4 (strong) + 0 x ki - 1 (device offset)
|
||||
assert (
|
||||
entity.regulated_target_temp == 15
|
||||
) # round(16 + (16 - 18) * 0.4 + 0 * 0.08)
|
||||
assert entity.hvac_action == HVACAction.HEATING
|
||||
|
||||
mock_service_call.assert_has_calls(
|
||||
[
|
||||
call.service_call(
|
||||
"climate",
|
||||
"set_temperature",
|
||||
{
|
||||
"entity_id": "climate.mock_climate",
|
||||
# because device offset is -3 but not used because target is reach
|
||||
"temperature": 15.0,
|
||||
"target_temp_high": 30,
|
||||
"target_temp_low": 15,
|
||||
},
|
||||
),
|
||||
]
|
||||
)
|
||||
|
||||
# 3. change temperature so that the regulated temperature should slow down
|
||||
# HVACMODE.HEAT
|
||||
# room temp is 15
|
||||
# target is 18
|
||||
# internal heater temp is 20
|
||||
fake_underlying_climate.set_current_temperature(20)
|
||||
await entity.async_set_temperature(temperature=18)
|
||||
await send_ext_temperature_change_event(entity, 9, event_timestamp)
|
||||
|
||||
event_timestamp = now - timedelta(minutes=5)
|
||||
with patch(
|
||||
"custom_components.versatile_thermostat.commons.NowClass.get_now",
|
||||
return_value=event_timestamp,
|
||||
), patch("homeassistant.core.ServiceRegistry.async_call") as mock_service_call:
|
||||
await send_temperature_change_event(entity, 15, event_timestamp)
|
||||
|
||||
# the regulated temperature should be under (device offset is -2)
|
||||
assert entity.regulated_target_temp > entity.target_temperature
|
||||
assert entity.regulated_target_temp == 19.4 # 18 + 1.4
|
||||
|
||||
mock_service_call.assert_has_calls(
|
||||
[
|
||||
call.service_call(
|
||||
"climate",
|
||||
"set_temperature",
|
||||
{
|
||||
"entity_id": "climate.mock_climate",
|
||||
"temperature": 24.4, # 19.4 + 5
|
||||
"target_temp_high": 30,
|
||||
"target_temp_low": 15,
|
||||
},
|
||||
),
|
||||
]
|
||||
)
|
||||
|
||||
# 4. In cool mode
|
||||
# room temp is 25
|
||||
# target is 23
|
||||
# internal heater temp is 27
|
||||
await entity.async_set_hvac_mode(HVACMode.COOL)
|
||||
await entity.async_set_temperature(temperature=23)
|
||||
fake_underlying_climate.set_current_temperature(27)
|
||||
await send_ext_temperature_change_event(entity, 30, event_timestamp)
|
||||
|
||||
event_timestamp = now - timedelta(minutes=3)
|
||||
with patch(
|
||||
"custom_components.versatile_thermostat.commons.NowClass.get_now",
|
||||
return_value=event_timestamp,
|
||||
), patch("homeassistant.core.ServiceRegistry.async_call") as mock_service_call:
|
||||
await send_temperature_change_event(entity, 25, event_timestamp)
|
||||
|
||||
# the regulated temperature should be upper (device offset is +2)
|
||||
assert entity.regulated_target_temp < entity.target_temperature
|
||||
assert entity.regulated_target_temp == 22.4
|
||||
|
||||
mock_service_call.assert_has_calls(
|
||||
[
|
||||
call.service_call(
|
||||
"climate",
|
||||
"set_temperature",
|
||||
{
|
||||
"entity_id": "climate.mock_climate",
|
||||
"temperature": 24.4, # 22.4 + 2° of offset
|
||||
"target_temp_high": 30,
|
||||
"target_temp_low": 15,
|
||||
},
|
||||
),
|
||||
]
|
||||
)
|
||||
|
||||
@@ -525,6 +525,7 @@ async def test_user_config_flow_over_4_switches(
|
||||
CONF_HEATER_2: "switch.mock_switch2",
|
||||
CONF_HEATER_3: "switch.mock_switch3",
|
||||
CONF_HEATER_4: "switch.mock_switch4",
|
||||
CONF_HEATER_KEEP_ALIVE: 0,
|
||||
CONF_PROP_FUNCTION: PROPORTIONAL_FUNCTION_TPI,
|
||||
CONF_AC_MODE: False,
|
||||
CONF_INVERSE_SWITCH: False,
|
||||
|
||||
@@ -260,6 +260,7 @@ async def test_multiple_switchs(
|
||||
CONF_HEATER_2: "switch.mock_switch2",
|
||||
CONF_HEATER_3: "switch.mock_switch3",
|
||||
CONF_HEATER_4: "switch.mock_switch4",
|
||||
CONF_HEATER_KEEP_ALIVE: 0,
|
||||
CONF_MINIMAL_ACTIVATION_DELAY: 30,
|
||||
CONF_SECURITY_DELAY_MIN: 5,
|
||||
CONF_SECURITY_MIN_ON_PERCENT: 0.3,
|
||||
@@ -746,6 +747,7 @@ async def test_multiple_switch_power_management(
|
||||
CONF_HEATER_2: "switch.mock_switch2",
|
||||
CONF_HEATER_3: "switch.mock_switch3",
|
||||
CONF_HEATER_4: "switch.mock_switch4",
|
||||
CONF_HEATER_KEEP_ALIVE: 0,
|
||||
CONF_MINIMAL_ACTIVATION_DELAY: 30,
|
||||
CONF_SECURITY_DELAY_MIN: 5,
|
||||
CONF_SECURITY_MIN_ON_PERCENT: 0.3,
|
||||
|
||||
@@ -42,15 +42,15 @@ def test_pi_algorithm_basics():
|
||||
assert the_algo.calculate_regulated_temperature(18.7, 10) == 21.6 # +1.7
|
||||
assert the_algo.calculate_regulated_temperature(19, 10) == 21.6 # +1.7
|
||||
assert the_algo.calculate_regulated_temperature(20, 10) == 21.5 # +1.5
|
||||
assert the_algo.calculate_regulated_temperature(21, 10) == 21.3 # +0.8
|
||||
assert the_algo.calculate_regulated_temperature(21, 10) == 21.3 # +0.7
|
||||
assert the_algo.calculate_regulated_temperature(20, 10) == 21.4 # +0.7
|
||||
assert the_algo.calculate_regulated_temperature(21, 10) == 21.1 # error change sign
|
||||
assert the_algo.calculate_regulated_temperature(21, 10) == 20.9
|
||||
assert the_algo.calculate_regulated_temperature(20, 10) == 21.0
|
||||
|
||||
# Test temperature external
|
||||
assert the_algo.calculate_regulated_temperature(20, 12) == 21.2 # +0.8
|
||||
assert the_algo.calculate_regulated_temperature(20, 15) == 20.9 # +0.5
|
||||
assert the_algo.calculate_regulated_temperature(20, 18) == 20.6 # +0.2
|
||||
assert the_algo.calculate_regulated_temperature(20, 20) == 20.4 # =
|
||||
assert the_algo.calculate_regulated_temperature(20, 12) == 20.8
|
||||
assert the_algo.calculate_regulated_temperature(20, 15) == 20.5
|
||||
assert the_algo.calculate_regulated_temperature(20, 18) == 20.2 # +0.2
|
||||
assert the_algo.calculate_regulated_temperature(20, 20) == 20 # =
|
||||
|
||||
|
||||
def test_pi_algorithm_light():
|
||||
@@ -78,15 +78,15 @@ def test_pi_algorithm_light():
|
||||
assert the_algo.calculate_regulated_temperature(18.7, 10) == 21.6 # +1.7
|
||||
assert the_algo.calculate_regulated_temperature(19, 10) == 21.6 # +1.7
|
||||
assert the_algo.calculate_regulated_temperature(20, 10) == 21.5 # +1.5
|
||||
assert the_algo.calculate_regulated_temperature(21, 10) == 21.3 # +0.8
|
||||
assert the_algo.calculate_regulated_temperature(21, 10) == 21.3 # +0.7
|
||||
assert the_algo.calculate_regulated_temperature(20, 10) == 21.4 # +0.7
|
||||
assert the_algo.calculate_regulated_temperature(21, 10) == 21.1 # Error sign change
|
||||
assert the_algo.calculate_regulated_temperature(21, 10) == 20.9
|
||||
assert the_algo.calculate_regulated_temperature(20, 10) == 21
|
||||
|
||||
# Test temperature external
|
||||
assert the_algo.calculate_regulated_temperature(20, 12) == 21.2 # +0.8
|
||||
assert the_algo.calculate_regulated_temperature(20, 15) == 20.9 # +0.5
|
||||
assert the_algo.calculate_regulated_temperature(20, 18) == 20.6 # +0.2
|
||||
assert the_algo.calculate_regulated_temperature(20, 20) == 20.4 # =
|
||||
assert the_algo.calculate_regulated_temperature(20, 12) == 20.8 # +0.8
|
||||
assert the_algo.calculate_regulated_temperature(20, 15) == 20.5 # +0.5
|
||||
assert the_algo.calculate_regulated_temperature(20, 18) == 20.2 # +0.2
|
||||
assert the_algo.calculate_regulated_temperature(20, 20) == 20.0 # =
|
||||
|
||||
|
||||
def test_pi_algorithm_medium():
|
||||
@@ -114,20 +114,20 @@ def test_pi_algorithm_medium():
|
||||
assert the_algo.calculate_regulated_temperature(18.7, 10) == 22.4
|
||||
assert the_algo.calculate_regulated_temperature(19, 10) == 22.3
|
||||
assert the_algo.calculate_regulated_temperature(20, 10) == 21.9
|
||||
assert the_algo.calculate_regulated_temperature(21, 10) == 21.4
|
||||
assert the_algo.calculate_regulated_temperature(21, 10) == 21.3
|
||||
assert the_algo.calculate_regulated_temperature(20, 10) == 21.7
|
||||
assert the_algo.calculate_regulated_temperature(21, 10) == 21.0 # error sign change
|
||||
assert the_algo.calculate_regulated_temperature(21, 10) == 20.7
|
||||
assert the_algo.calculate_regulated_temperature(20, 10) == 21.1
|
||||
|
||||
# Test temperature external
|
||||
assert the_algo.calculate_regulated_temperature(20, 8) == 21.9
|
||||
assert the_algo.calculate_regulated_temperature(20, 6) == 22.1
|
||||
assert the_algo.calculate_regulated_temperature(20, 4) == 22.3
|
||||
assert the_algo.calculate_regulated_temperature(20, 2) == 22.5
|
||||
assert the_algo.calculate_regulated_temperature(20, 0) == 22.7
|
||||
assert the_algo.calculate_regulated_temperature(20, -2) == 22.9
|
||||
assert the_algo.calculate_regulated_temperature(20, -4) == 23.0
|
||||
assert the_algo.calculate_regulated_temperature(20, -6) == 23.0
|
||||
assert the_algo.calculate_regulated_temperature(20, -8) == 23.0
|
||||
assert the_algo.calculate_regulated_temperature(20, 8) == 21.3
|
||||
assert the_algo.calculate_regulated_temperature(20, 6) == 21.5
|
||||
assert the_algo.calculate_regulated_temperature(20, 4) == 21.7
|
||||
assert the_algo.calculate_regulated_temperature(20, 2) == 21.9
|
||||
assert the_algo.calculate_regulated_temperature(20, 0) == 22.1
|
||||
assert the_algo.calculate_regulated_temperature(20, -2) == 22.3
|
||||
assert the_algo.calculate_regulated_temperature(20, -4) == 22.5
|
||||
assert the_algo.calculate_regulated_temperature(20, -6) == 22.7
|
||||
assert the_algo.calculate_regulated_temperature(20, -8) == 22.9
|
||||
|
||||
# to reset the accumulated erro
|
||||
the_algo.set_target_temp(20)
|
||||
@@ -173,22 +173,22 @@ def test_pi_algorithm_strong():
|
||||
assert the_algo.calculate_regulated_temperature(18.7, 10) == 24
|
||||
assert the_algo.calculate_regulated_temperature(19, 10) == 24
|
||||
assert the_algo.calculate_regulated_temperature(20, 10) == 23.9
|
||||
assert the_algo.calculate_regulated_temperature(21, 10) == 23.3
|
||||
assert the_algo.calculate_regulated_temperature(21, 10) == 23.1
|
||||
assert the_algo.calculate_regulated_temperature(21, 10) == 22.9
|
||||
assert the_algo.calculate_regulated_temperature(21, 10) == 22.7
|
||||
assert the_algo.calculate_regulated_temperature(21, 10) == 22.5
|
||||
assert the_algo.calculate_regulated_temperature(21, 10) == 22.3
|
||||
assert the_algo.calculate_regulated_temperature(21, 10) == 22.1
|
||||
assert the_algo.calculate_regulated_temperature(21, 10) == 22.3 # error sign change
|
||||
assert the_algo.calculate_regulated_temperature(21, 10) == 21.8
|
||||
assert the_algo.calculate_regulated_temperature(21, 10) == 21.5
|
||||
assert the_algo.calculate_regulated_temperature(21, 10) == 21.3
|
||||
assert the_algo.calculate_regulated_temperature(21, 10) == 21.1
|
||||
assert the_algo.calculate_regulated_temperature(21, 10) == 20.9
|
||||
assert the_algo.calculate_regulated_temperature(21, 10) == 20.7
|
||||
|
||||
# Test temperature external
|
||||
assert the_algo.calculate_regulated_temperature(20, 8) == 22.9
|
||||
assert the_algo.calculate_regulated_temperature(20, 6) == 23.3
|
||||
assert the_algo.calculate_regulated_temperature(20, 4) == 23.7
|
||||
assert the_algo.calculate_regulated_temperature(20, 2) == 24
|
||||
assert the_algo.calculate_regulated_temperature(20, 0) == 24
|
||||
assert the_algo.calculate_regulated_temperature(20, -2) == 24
|
||||
assert the_algo.calculate_regulated_temperature(20, -4) == 24
|
||||
assert the_algo.calculate_regulated_temperature(20, 8) == 21.5
|
||||
assert the_algo.calculate_regulated_temperature(20, 6) == 21.9
|
||||
assert the_algo.calculate_regulated_temperature(20, 4) == 22.3
|
||||
assert the_algo.calculate_regulated_temperature(20, 2) == 22.7
|
||||
assert the_algo.calculate_regulated_temperature(20, 0) == 23.1
|
||||
assert the_algo.calculate_regulated_temperature(20, -2) == 23.5
|
||||
assert the_algo.calculate_regulated_temperature(20, -4) == 23.9
|
||||
assert the_algo.calculate_regulated_temperature(20, -6) == 24
|
||||
assert the_algo.calculate_regulated_temperature(20, -8) == 24
|
||||
|
||||
|
||||
@@ -264,6 +264,7 @@ async def test_over_switch_deactivate_preset(
|
||||
CONF_HEATER_2: None,
|
||||
CONF_HEATER_3: None,
|
||||
CONF_HEATER_4: None,
|
||||
CONF_HEATER_KEEP_ALIVE: 0,
|
||||
CONF_SECURITY_DELAY_MIN: 10,
|
||||
CONF_MINIMAL_ACTIVATION_DELAY: 10,
|
||||
},
|
||||
|
||||
256
tests/test_switch_keep_alive.py
Normal file
256
tests/test_switch_keep_alive.py
Normal file
@@ -0,0 +1,256 @@
|
||||
"""Test the switch keep-alive feature."""
|
||||
import logging
|
||||
from collections.abc import AsyncGenerator, Callable, Awaitable
|
||||
from dataclasses import dataclass
|
||||
from unittest.mock import ANY, _Call, call, patch
|
||||
from datetime import datetime, timedelta
|
||||
from typing import cast
|
||||
|
||||
from custom_components.versatile_thermostat.thermostat_switch import (
|
||||
ThermostatOverSwitch,
|
||||
)
|
||||
from .commons import * # pylint: disable=wildcard-import, unused-wildcard-import
|
||||
|
||||
logging.getLogger().setLevel(logging.DEBUG)
|
||||
|
||||
|
||||
@pytest.fixture
|
||||
def config_entry() -> MockConfigEntry:
|
||||
"""Return common test data"""
|
||||
return MockConfigEntry(
|
||||
domain=DOMAIN,
|
||||
title="TheOverSwitchMockName",
|
||||
unique_id="uniqueId",
|
||||
data={
|
||||
CONF_NAME: "TheOverSwitchMockName",
|
||||
CONF_THERMOSTAT_TYPE: CONF_THERMOSTAT_SWITCH,
|
||||
CONF_TEMP_SENSOR: "sensor.mock_temp_sensor",
|
||||
CONF_CYCLE_MIN: 5,
|
||||
CONF_TEMP_MIN: 15,
|
||||
CONF_TEMP_MAX: 30,
|
||||
CONF_USE_WINDOW_FEATURE: False,
|
||||
CONF_USE_MOTION_FEATURE: False,
|
||||
CONF_USE_POWER_FEATURE: False,
|
||||
CONF_USE_PRESENCE_FEATURE: False,
|
||||
CONF_HEATER: "switch.mock_switch",
|
||||
CONF_HEATER_KEEP_ALIVE: 1,
|
||||
CONF_PROP_FUNCTION: PROPORTIONAL_FUNCTION_TPI,
|
||||
CONF_TPI_COEF_INT: 0.3,
|
||||
CONF_TPI_COEF_EXT: 0.01,
|
||||
CONF_MINIMAL_ACTIVATION_DELAY: 30,
|
||||
CONF_SECURITY_DELAY_MIN: 5,
|
||||
CONF_SECURITY_MIN_ON_PERCENT: 0.1,
|
||||
},
|
||||
)
|
||||
|
||||
|
||||
@dataclass
|
||||
class CommonMocks:
|
||||
"""Common mocked objects used by most test cases"""
|
||||
|
||||
config_entry: MockConfigEntry
|
||||
hass: HomeAssistant
|
||||
thermostat: ThermostatOverSwitch
|
||||
mock_is_state: MagicMock
|
||||
mock_service_call: MagicMock
|
||||
mock_async_track_time_interval: MagicMock
|
||||
mock_send_event: MagicMock
|
||||
|
||||
|
||||
# pylint: disable=redefined-outer-name, line-too-long, protected-access
|
||||
@pytest.fixture
|
||||
async def common_mocks(
|
||||
config_entry: MockConfigEntry,
|
||||
hass: HomeAssistant,
|
||||
) -> AsyncGenerator[CommonMocks, None]:
|
||||
"""Create and destroy a ThermostatOverSwitch as a test fixture"""
|
||||
# fmt: off
|
||||
with patch("homeassistant.core.ServiceRegistry.async_call") as mock_service_call, \
|
||||
patch("homeassistant.core.StateMachine.is_state", return_value=False) as mock_is_state, \
|
||||
patch("custom_components.versatile_thermostat.base_thermostat.BaseThermostat.send_event") as mock_send_event, \
|
||||
patch("custom_components.versatile_thermostat.keep_alive.async_track_time_interval") as mock_async_track_time_interval:
|
||||
# fmt: on
|
||||
thermostat = cast(ThermostatOverSwitch, await create_thermostat(
|
||||
hass, config_entry, "climate.theoverswitchmockname"
|
||||
))
|
||||
yield CommonMocks(
|
||||
config_entry=config_entry,
|
||||
hass=hass,
|
||||
thermostat=thermostat,
|
||||
mock_is_state=mock_is_state,
|
||||
mock_service_call=mock_service_call,
|
||||
mock_async_track_time_interval=mock_async_track_time_interval,
|
||||
mock_send_event=mock_send_event,
|
||||
)
|
||||
# Clean the entity
|
||||
thermostat.remove_thermostat()
|
||||
|
||||
|
||||
class TestKeepAlive:
|
||||
"""Tests for the switch keep-alive feature"""
|
||||
|
||||
# pylint: disable=attribute-defined-outside-init
|
||||
def setup_method(self):
|
||||
"""Initialise test case data before the execution of each test case method."""
|
||||
self._prev_service_calls: list[_Call] = []
|
||||
self._prev_atti_call_count = 0 # atti: async_time_track_interval
|
||||
self._prev_atti_callback: Callable[[datetime], Awaitable[None]] | None = None
|
||||
|
||||
def _assert_service_call(
|
||||
self, cm: CommonMocks, expected_additional_calls: list[_Call]
|
||||
):
|
||||
"""Assert that hass.services.async_call() was called with the expected arguments,
|
||||
cumulatively over the course of long test cases."""
|
||||
self._prev_service_calls.extend(expected_additional_calls)
|
||||
cm.mock_service_call.assert_has_calls(self._prev_service_calls)
|
||||
|
||||
def _assert_async_mock_track_time_interval(
|
||||
self, cm: CommonMocks, expected_additional_calls: int
|
||||
):
|
||||
"""Assert that async_track_time_interval() was called the expected number of times
|
||||
with the expected arguments, cumulatively over the course of long test cases."""
|
||||
self._prev_atti_call_count += expected_additional_calls
|
||||
assert (
|
||||
cm.mock_async_track_time_interval.call_count == self._prev_atti_call_count
|
||||
)
|
||||
interval = timedelta(seconds=cm.config_entry.data[CONF_HEATER_KEEP_ALIVE])
|
||||
cm.mock_async_track_time_interval.assert_called_with(cm.hass, ANY, interval)
|
||||
keep_alive_callback = cm.mock_async_track_time_interval.call_args.args[1]
|
||||
assert callable(keep_alive_callback)
|
||||
self._prev_atti_callback = keep_alive_callback
|
||||
|
||||
async def _assert_multipe_keep_alive_callback_calls(
|
||||
self, cm: CommonMocks, n_calls: int
|
||||
):
|
||||
"""Call the keep-alive callback a few times as if `async_track_time_interval()` had
|
||||
done it, and assert that this triggers further calls to `async_track_time_interval()`.
|
||||
"""
|
||||
old_callback = self._prev_atti_callback
|
||||
assert (
|
||||
old_callback
|
||||
), "The keep-alive callback should have been called before, but it wasn't."
|
||||
interval = timedelta(seconds=cm.config_entry.data[CONF_HEATER_KEEP_ALIVE])
|
||||
for _ in range(n_calls):
|
||||
await old_callback(datetime.fromtimestamp(0))
|
||||
self._prev_atti_call_count += 1
|
||||
assert (
|
||||
cm.mock_async_track_time_interval.call_count
|
||||
== self._prev_atti_call_count
|
||||
)
|
||||
cm.mock_async_track_time_interval.assert_called_with(cm.hass, ANY, interval)
|
||||
new_callback = cm.mock_async_track_time_interval.call_args.args[1]
|
||||
assert new_callback is not old_callback
|
||||
assert new_callback.__qualname__ == old_callback.__qualname__
|
||||
old_callback = new_callback
|
||||
|
||||
self._prev_atti_callback = old_callback
|
||||
|
||||
@pytest.mark.parametrize("expected_lingering_tasks", [True])
|
||||
@pytest.mark.parametrize("expected_lingering_timers", [True])
|
||||
async def test_switch_keep_alive_startup(self, common_mocks: CommonMocks):
|
||||
"""Test that switch keep-alive service calls are made at startup time."""
|
||||
|
||||
thermostat = common_mocks.thermostat
|
||||
await thermostat.async_set_hvac_mode(HVACMode.HEAT)
|
||||
assert thermostat.hvac_mode is HVACMode.HEAT
|
||||
assert thermostat.target_temperature == 15
|
||||
assert thermostat.is_device_active is False
|
||||
|
||||
# When the keep-alive feature is enabled, regular calls to the switch
|
||||
# turn_on / turn_off methods are _scheduled_ at start up.
|
||||
self._assert_async_mock_track_time_interval(common_mocks, 1)
|
||||
|
||||
# Those keep-alive calls are scheduled but until the callback is called,
|
||||
# no service calls are made to the SERVICE_TURN_OFF home assistant service.
|
||||
self._assert_service_call(common_mocks, [])
|
||||
|
||||
# Call the keep-alive callback a few times (as if `async_track_time_interval`
|
||||
# had done it) and assert that the callback function is replaced each time.
|
||||
await self._assert_multipe_keep_alive_callback_calls(common_mocks, 2)
|
||||
|
||||
# Every time the keep-alive callback is called, the home assistant switch
|
||||
# turn on/off service should be called too.
|
||||
self._assert_service_call(
|
||||
common_mocks,
|
||||
[
|
||||
call("switch", SERVICE_TURN_OFF, {"entity_id": "switch.mock_switch"}),
|
||||
call("switch", SERVICE_TURN_OFF, {"entity_id": "switch.mock_switch"}),
|
||||
],
|
||||
)
|
||||
|
||||
@pytest.mark.parametrize("expected_lingering_tasks", [True])
|
||||
@pytest.mark.parametrize("expected_lingering_timers", [True])
|
||||
async def test_switch_keep_alive(self, common_mocks: CommonMocks):
|
||||
"""Test that switch keep-alive service calls are made during thermostat operation."""
|
||||
|
||||
hass = common_mocks.hass
|
||||
thermostat = common_mocks.thermostat
|
||||
|
||||
await thermostat.async_set_hvac_mode(HVACMode.HEAT)
|
||||
assert thermostat.hvac_mode is HVACMode.HEAT
|
||||
assert thermostat.target_temperature == 15
|
||||
assert thermostat.is_device_active is False
|
||||
|
||||
tz = get_tz(hass) # pylint: disable=invalid-name
|
||||
now = datetime.now(tz)
|
||||
event_timestamp = now - timedelta(minutes=4)
|
||||
|
||||
# 1. Decrease the temperature to activate the heater switch
|
||||
|
||||
await send_temperature_change_event(thermostat, 14, event_timestamp)
|
||||
|
||||
# async_track_time_interval() should have been called twice: once at startup
|
||||
# while the switch was turned off, and once when the switch was turned on.
|
||||
self._assert_async_mock_track_time_interval(common_mocks, 2)
|
||||
|
||||
# The keep-alive callback hasn't been called yet, so the only service
|
||||
# call so far is to SERVICE_TURN_ON as a result of the switch turn_on()
|
||||
# method being called when the target temperature increased.
|
||||
self._assert_service_call(
|
||||
common_mocks,
|
||||
[call("switch", SERVICE_TURN_ON, {"entity_id": "switch.mock_switch"})],
|
||||
)
|
||||
|
||||
# Call the keep-alive callback a few times (as if `async_track_time_interval`
|
||||
# had done it) and assert that the callback function is replaced each time.
|
||||
await self._assert_multipe_keep_alive_callback_calls(common_mocks, 2)
|
||||
|
||||
# Every time the keep-alive callback is called, the home assistant switch
|
||||
# turn on/off service should be called too.
|
||||
self._assert_service_call(
|
||||
common_mocks,
|
||||
[
|
||||
call("switch", SERVICE_TURN_ON, {"entity_id": "switch.mock_switch"}),
|
||||
call("switch", SERVICE_TURN_ON, {"entity_id": "switch.mock_switch"}),
|
||||
],
|
||||
)
|
||||
|
||||
# 2. Increase the temperature to deactivate the heater switch
|
||||
|
||||
await send_temperature_change_event(thermostat, 20, event_timestamp)
|
||||
|
||||
# Simulate the end of the TPI heating cycle
|
||||
await thermostat._underlyings[0].turn_off() # pylint: disable=protected-access
|
||||
|
||||
# turn_off() should have triggered a call to `async_track_time_interval()`
|
||||
self._assert_async_mock_track_time_interval(common_mocks, 1)
|
||||
|
||||
# turn_off() should have triggered a call to the SERVICE_TURN_OFF service.
|
||||
self._assert_service_call(
|
||||
common_mocks,
|
||||
[call("switch", SERVICE_TURN_OFF, {"entity_id": "switch.mock_switch"})],
|
||||
)
|
||||
|
||||
# Call the keep-alive callback a few times (as if `async_track_time_interval`
|
||||
# had done it) and assert that the callback function is replaced each time.
|
||||
await self._assert_multipe_keep_alive_callback_calls(common_mocks, 2)
|
||||
|
||||
# Every time the keep-alive callback is called, the home assistant switch
|
||||
# turn on/off service should be called too.
|
||||
self._assert_service_call(
|
||||
common_mocks,
|
||||
[
|
||||
call("switch", SERVICE_TURN_OFF, {"entity_id": "switch.mock_switch"}),
|
||||
call("switch", SERVICE_TURN_OFF, {"entity_id": "switch.mock_switch"}),
|
||||
],
|
||||
)
|
||||
Reference in New Issue
Block a user