25 KiB
![]()
![]()
![]()
![]()
This thermostat integration aims to drastically simplify your automations around climate management. Because all classical events in climate are natively handled by the thermostat (nobody at home ?, activity detected in a room ?, window open ?, power shedding ?), you don't have to build over complicated scripts and automations to manage your climates ;-).

- When to use / not use
- Why another thermostat implementation ?
- How to install this incredible Versatile Thermostat ?
- Configuration
- Algorithm
- Services
- Custom attributes
- Some results
- Even better
- Contributions are welcome!
Component developed by using the amazing development template [blueprint].
This custom component for Home Assistant is an upgrade and is a complete rewrite of the component "Awesome thermostat" (see Github) with addition of features.
When to use / not use
This thermostat aims to command a heater which works only in on/off mode. The minimal needed configuration to use this thermostat is:
- an equipement like a heater (a switch),
- a temperature sensor for the room (or an input_number),
- an external temperature sensor (think of the meteo integration if you don't have one)
Because this integration aims to command the heater considering the preset configured and the room temperature, those informations are mandatory.
Why another thermostat implementation ?
For my personnal usage, I needed to add a couple of features and also to update the behavior that implemented in the previous component "Awesome thermostat". This component named Versatile thermostat manage the following use cases :
- Configuration through standard integration GUI (using Config Entry flow),
- Full uses of presets mode,
- Unset the preset mode when the temperature is manually defined on a thermostat,
- Turn off/on a thermostat when a door or windows is opened/closed after a certain delay,
- Change preset when an activity is detected or not in a room for a defined time,
- Use a TPI (Time Proportional Interval) algorithm thank's to [Argonaute] algorithm ,
- Add power shedding management or regulation to avoid exceeding a defined total power. When max power is exceeded, a hidden 'power' preset is set on the climate entity. When power goes below the max, the previous preset is restored.
- Add home presence management. This feature allows you to dynamically change the temperature of preset considering a occupancy sensor of your home.
- Add services to interact with the thermostat from others integration: you can force the presence / un-presence using a service, and you can dynamically change the temperature of the presets.
How to install this incredible Versatile Thermostat ?
HACS installation (recommended)
- Install HACS. That way you get updates automatically.
- Add this Github repository as custom repository in HACS settings.
- search and install "Versatile Thermostat" in HACS and click
install. - Restart Home Assistant,
- Then you can add an Versatile Thermostat integration in the integration page. You add as many Versatile Thermostat that you need (typically one per heater that should be managed)
Manual installation
- Using the tool of choice open the directory (folder) for your HA configuration (where you find
configuration.yaml). - If you do not have a
custom_componentsdirectory (folder) there, you need to create it. - In the
custom_componentsdirectory (folder) create a new folder calledversatile_thermostat. - Download all the files from the
custom_components/versatile_thermostat/directory (folder) in this repository. - Place the files you downloaded in the new directory (folder) you created.
- Restart Home Assistant
- Configure new Versatile Thermostat integration
Configuration
Note: no configuration in configuration.yaml is needed because all configuration is done through the standard GUI when adding the integration.
Click on Add integration button in the integration page

The configuration can be change through the same interface. Simply select the thermostat to change, hit "Configure" and you will be able to change some parameters or configuration. Don't forget to reload (dot menu / reload) to take the new configuration into account.
Then follow the configurations steps as follow:
Minimal configuration update

Give the main mandatory attributes:
- a name (will be the integration name and also the climate entity name)
- an equipment entity id which represent the heater. This equipment should be able to switch on or off,
- a temporature sensor entity id which gives the temperature of the room in which the heater is installed,
- a temperature sensor entity giving the external temperature. If don't have any external sensor, you can use the local meteo integration
- a cycle duration in minutes. At each cycle, the heater will be turned on then off for a calculated period in order to reach the targeted temperature (see preset below),
- Algorithm to use. Today only the TPI algorithm is available. See algorithm
Configure the TPI algorithm coefficients
Click on 'Validate' on the previous page and you will get there:

For more informations on the TPI algorithm and tuned please refer to algorithm.
Configure the preset temperature
Click on 'Validate' on the previous page and you will get there:

The preset mode allows you to pre-configurate targeted temperature. Used in conjonction with Scheduler (see scheduler you will have a powerfull and simple way to optimize the temperature vs electrical consumption of your hous. Preset handled are the following :
- Eco : device is running an energy-saving mode
- Comfort : device is in comfort mode
- Boost : device turn all valve full up
None is always added in the list of modes, as it is a way to not use the presets modes but a manual temperature instead.
Configure the doors/windows turning on/off the thermostats
Click on 'Validate' on the previous page and you will get there:

Give the following attributes:
- an entity id of a window/door sensor. This should be a binary_sensor or a input_boolean. The state of the entity should be 'on' when the window is open or 'off' when closed
- a delay in seconds before any change. This allow to quickly open a window without stopping the heater.
And that's it ! your thermostat will turn off when the windows is open and be turned back on when it's closed afer the delay.
Configure the activity mode or motion detection
Click on 'Validate' on the previous page and you will get there:

We will now see how to configure the new Activity mode. What we need:
- a motion sensor. The entity id of a motion sensor. Motion sensor states should be 'on' (motion detected) or 'off' (no motion detected)
- a motion delay (in seconds) duration defining how long we wait for motion confirmation before considering the motion
- a target "motion" preset. We will used the temperature of this preset when an activity is detected.
- a target "no motion" preset. We will used the temperature of this second preset when no activity is detected.
So imagine we want to have the following behavior :
- we have room with a thermostat set in activity mode, the "motion" mode chosen is comfort (21.5C), the "no motion" mode chosen is Eco (18.5 C) and the motion delay is 5 min.
- the room is empty for a while (no activity detected), the temperature of this room is 18.5 C
- somebody enters into the room, an activity is detected the temperature is set to 21.5 C
- the person leaves the room, after 5 min the temperature is set back to 18.5 C
For this to work, the climate thermostat should be in Activity preset mode.
Activitywill only be proposed if it's correctly configure. In other words, the 4 configuration keys have to be set if you want to see Activity in home assistant Interface
Configure the power management
Click on 'Validate' on the previous page and you will get there:
This feature allows you to regulate the power consumption of your radiators. Known as shedding, this feature allows you to limit the electrical power consumption of your heater if overpowering conditions are detected. Give a sensor to the current power consumption of your house, a sensor to the max power that should not be exceeded, the power consumption of your heater and the algorithm will not start a radiator if the max power will be exceeded after radiator starts.

Note that all power values should have the same units (kW or W for example). This allows you to change the max power along time using a Scheduler or whatever you like.
power. This is a hidden preset, you cannot select it manually. 2. I use this to avoid exceeded the limit of my electrical power contract when an electrical vehicle is charging. This makes a kind of auto-regulation. 3. Always keep a margin, because max power can be briefly exceeded while waiting for the next cycle calculation typically or by not regulated equipement. 4. If you don't want to use this feature, just leave the entities id empty
Configure the presence or occupancy
This feature allows you to dynamically changes the temperature of all configured Versatile thermostat's presets when nobody is at home or when someone comes back home. For this, you have to configure the temperature that will be used for each preset when presence is off. When the occupancy sensor turns to off, those tempoeratures will be used. When it turns on again the "normal" temperature configured for the preset is used. See preset management.
For this you need to configure:
- A occupancy sensor which state should be 'on' or 'home' if someone is present or 'off' or 'not_home' else,
- The temperature used in Eco preset when absent,
- The temperature used in Comfort preset when absent,
- The temperature used in Boost preset when absent
onorhomestates as present andoffornot_homestate as absent.
Algorithm
This integration uses a proportional algorithm. A Proportional algorithm is useful to avoid the oscillation around the target temperature. This algorithm is based on a cycle which alternate heating and stop heating. The proportion of heating vs not heating is determined by the difference between the temperature and the target temperature. Bigger the difference is and bigger is the proportion of heating inside the cycle.
This algorithm make the temperature converge and stop oscillating.
TPI algorithm
The TPI algorithm consist in the calculation at each cycle of a percentage of On state vs Off state for the heater using the target temperature, the current temperature in the room and the current external temperature.
The percentage is calculated with this formula:
on_percent = coef_int * (target temperature - current temperature) + coef_ext * (target temperature - external temperature)
Then make 0 <= on_percent <= 1
Defaults values for coef_int and coef_ext are respectively: 0.6 and 0.01. Those defaults values are suitable for a standard well isolated room.
To tune those coefficients keep in mind that:
- if target temperature is not reach after stable situation, you have to augment the
coef_ext(theon_percentis too high), - if target temperature is exceeded after stable situation, you have to decrease the
coef_ext(theon_percentis too low), - if reaching the target temperature is too slow, you can increase the
coef_intto give more power to the heater, - if reaching the target temperature is too fast and some oscillations appears around the target, you can decrease the
coef_intto give less power to the heater
See some situations at examples.
Services
This custom implementation offers some specific services to facilitate integration with others Home Assisstant components.
Force the presence / occupancy
This service allows you to force the presence status independantly of the presence sensor. This can be useful if you want to manage the presence through a service and not through a sensor. For example, you could use your alarm to force the absence when it is switched on.
The code to call this service is the following:
service: versatile_thermostat.set_presence
data:
    presence: "off"
target:
    entity_id: climate.my_thermostat
Change the temperature of presets
This services is useful if you want to dynamically change the preset temperature. Instead of changing preset, some use-case need to change the temperature of the preset. So you can keep the Scheduler unchanged to manage the preset and adjust the temperature of the preset. If the changed preset is currently selectionned, the modification of the target temperature is immediate and will be taken into account at the next calculation cycle.
You can change the one or the both temperature (when present or when absent) of each preset.
Use the following code the set the temperature of the preset:
service: versatile_thermostat.set_preset_temperature
data:
    preset: boost
    temperature: 17.8
    temperature_away: 15
target:
    entity_id: climate.my_thermostat
Custom attributes
To tune the algorithm you have access to all context seen and calculted by the thermostat through dedicated attributes. You can see (and use) those attributes in the "Development tools / states" HMI of HA. Enter your thermostat and you will see something like this:

Custom attributes are the following:
| Attribute | Meaning |
|---|---|
hvac_modes |
The list of modes supported by the thermostat |
min_temp |
The minimal temperature |
max_temp |
The maximal temperature |
preset_modes |
The presets visible for this thermostat. Hidden presets are not showed here |
current_temperature |
The current temperature as reported by the sensor |
temperature |
The target temperature |
hvac_action |
The action currently running by the heater. Can be idle, heating |
preset_mode |
The currently selected preset. Can be one of the 'preset_modes' or a hidden preset like power |
[eco/comfort/boost]_temp |
The temperature configured for the preset xxx |
[eco/comfort/boost]_away_temp |
The temperature configured for the preset xxx when presence is off or not_home |
power_temp |
The temperature used when shedding is detected |
on_percent |
The percentage on calculated by the TPI algorithm |
on_time_sec |
The On period in sec. Should be on_percent * cycle_min |
off_time_sec |
The Off period in sec. Should be (1 - on_percent) * cycle_min |
cycle_min |
The calculation cycle in minutes |
function |
The algorithm used for cycle calculation |
tpi_coef_int |
The coef_int of the TPI algorithm |
tpi_coef_ext |
The coef_ext of the TPI algorithm |
saved_preset_mode |
The last preset used before automatic switch of the preset |
saved_target_temp |
The last temperature used before automatic switching |
window_state |
The last known state of the window sensor. None if window is not configured |
motion_state |
The last known state of the motion sensor. None if motion is not configured |
overpowering_state |
The last known state of the overpowering sensor. None if power management is not configured |
presence_state |
The last known state of the presence sensor. None if presence management is not configured |
last_update_datetime |
The date and time in ISO8866 format of this state |
friendly_name |
The name of the thermostat |
supported_features |
A combination of all features supported by this thermostat. See official climate integration documentation for more informations |
Some results
Convergence of temperature to target configured by preset:

Cycle of on/off calculated by the integration:

Coef_int too high (oscillations around the target)

Algorithm calculation evolution

Enjoy !
Even better
Even Better with Scheduler Component !
In order to enjoy the full power of Versatile Thermostat, I invite you to use it with https://github.com/nielsfaber/scheduler-component Indeed, the scheduler component porpose a management of the climate base on the preset modes. This feature has limited interest with the generic thermostat but it becomes highly powerfull with Awesome thermostat :
Starting here, I assume you have installed Awesome Thermostat and Scheduler Component.
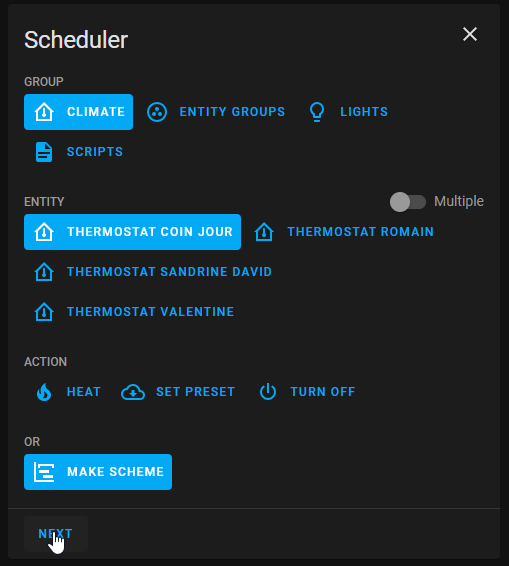
In Scheduler, add a schedule :

Choose "climate" group, choose one (or multiple) entity/ies, select "MAKE SCHEME" and click next : (it is possible to choose "SET PRESET", but I prefer to use "MAKE SCHEME")
Set your mode scheme and save :

In this example I set ECO mode during the night and the day when nobody's at home BOOST in the morning and COMFORT in the evening.
I hope this example helps you, don't hesitate to give me your feedbacks !
Even-even better with custom:simple-thermostat front integration
The custom:simple-thermostat here is a great integration which allow some customisation which fits well with this thermostat.
You can have something like that very easily  Example configuration:
      type: custom:simple-thermostat
      entity: climate.thermostat_sam2
      layout:
        step: row
      label:
        temperature: T°
        state: Etat
      hide:
        state: false
      control:
        hvac:
          _name: Mode
        preset:
          _name: Preset
      sensors:
        - entity: sensor.total_puissance_radiateur_sam2
          icon: mdi:lightning-bolt-outline
      header:
        toggle:
          entity: input_boolean.etat_ouverture_porte_sam
          name: Porte sam
Even better with Apex-chart to tune your Thermostat
You can get curve like presented in some results with kind of Apex-chart configuration only using the custom attributes of the thermostat described here:
type: custom:apexcharts-card
header:
  show: true
  title: Tuning chauffage
  show_states: true
  colorize_states: true
update_interval: 60sec
graph_span: 4h
yaxis:
  - id: left
    show: true
    decimals: 2
  - id: right
    decimals: 2
    show: true
    opposite: true
series:
  - entity: climate.thermostat_mythermostat
    attribute: temperature
    type: line
    name: Target temp
    curve: smooth
    yaxis_id: left
  - entity: climate.thermostat_mythermostat
    attribute: current_temperature
    name: Current temp
    curve: smooth
    yaxis_id: left
  - entity: climate.thermostat_mythermostat
    attribute: on_percent
    name: Power percent
    curve: stepline
    yaxis_id: right
Contributions are welcome!
If you want to contribute to this please read the Contribution guidelines