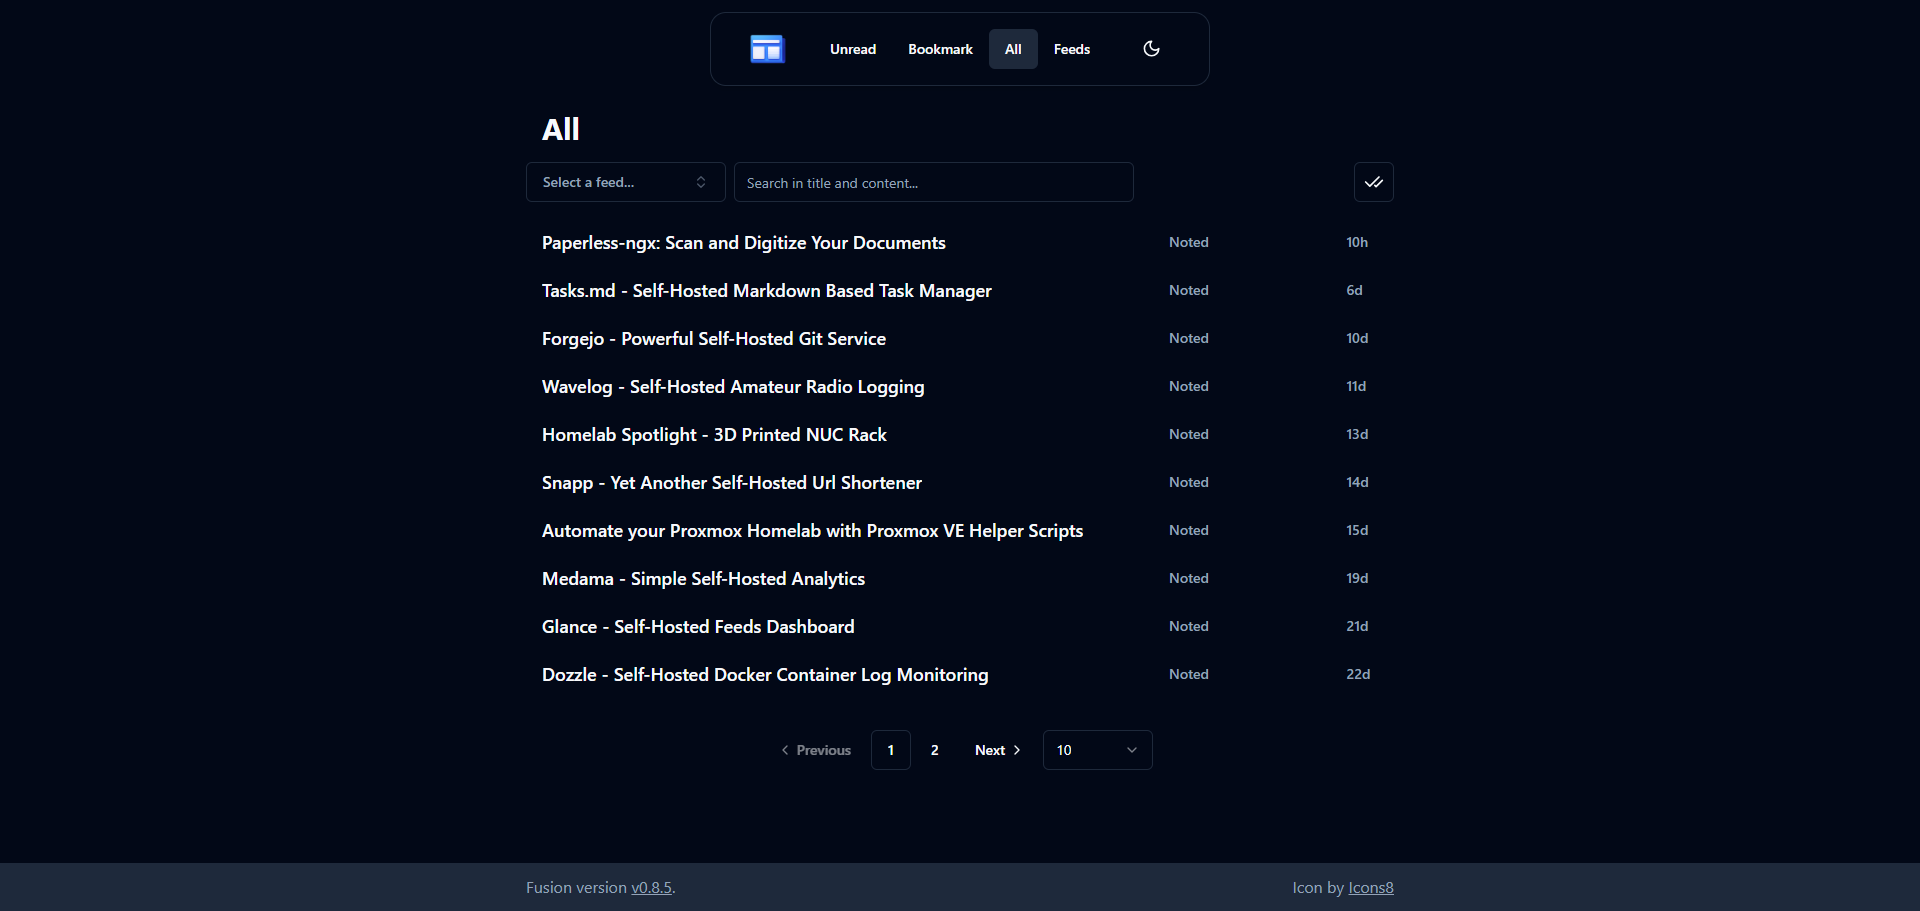

So you're looking for a way to stay on top of the latest news and updates from your favorite websites and blogs, without having to constantly visit each one individually? Well, let me tell you, RSS feeds are where it's at. By subscribing to an RSS feed, you can get all the latest content delivered right to your doorstep (or rather, your browser), in a single stream of information.
But, let's be real, not all RSS readers are created equal. Some are clunky, some are confusing, and some just plain don't work well. That's why I'm excited to introduce you to Fusion, the RSS reader that's been flying under the radar, but is definitely worth checking out if you're looking for a better way to manage your online feeds.
• Organize: Group feeds by categories, bookmark favorite items, and search for specific topics
• Feed types: Supports RSS, Atom, and JSON feed formats with import and export options
• Customization: Responsive design with light/dark mode options and Progressive Web App (PWA) capabilities
• Self-hosted simplicity: Lightweight and designed to be self-hosted, making it easy to deploy and manage
• Technical details: Built with Golang and SQLite for fast performance and efficient storage, with a single binary deployment option
• Easy deployment: Includes a pre-built Docker image for quick setup and testing
• Resource-friendly: Uses approximately 80MB of memory, perfect for running on most devices or servers
To install Fusion on your server, use this Docker Compose stack, which makes the process easy to follow. If you're new to self-hosting, don't worry, we have guides available to help you get started with self-hosting. For information on the latest features and updates, refer to the Fusion releases.
services:
    fusion:
        ports:
            - 8080:8080
        volumes:
            - /docker/fusion:/data
        environment:
            - PASSWORD=changeme
        image: rook1e404/fusion
To customize the deployment, simply adjust the port number located on the left side of the colon (:), if necessary (e.g., change 8080:8080 to 8085:8080). Additionally, it's a good idea to modify the password for added security. Once you've made these changes, deploy the container and access the web interface to log in with your new credentials.
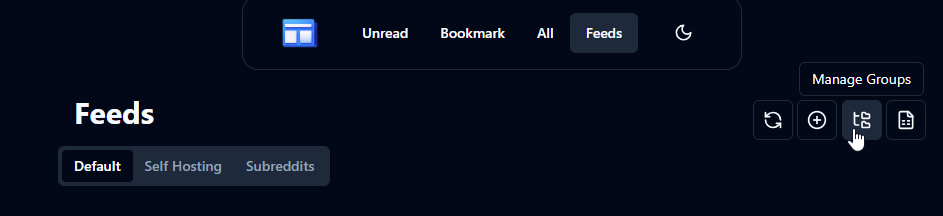
First, I added a group called Subreddits because I want to start adding Subreddits I follow as RSS feeds. Under "Feeds", there is a small icon that has two folders. Click that to add a group.
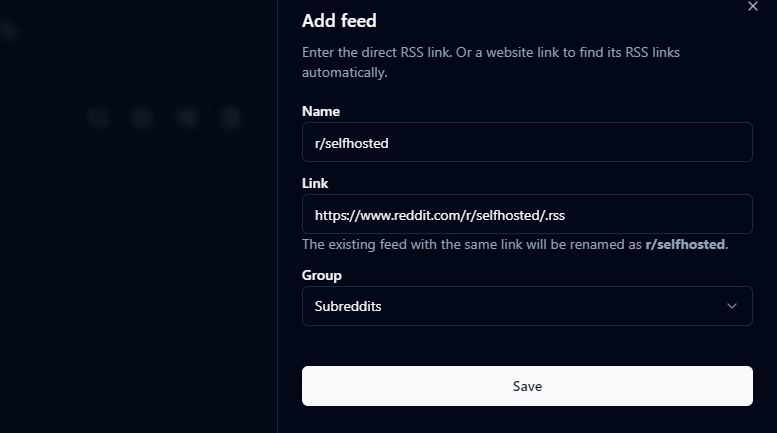
To start adding feeds, navigate to the "Feeds" menu at the top and click on it. From there, you will see a plus icon where you can enter the RSS URL and give your feed a name. For this example, let's add the r/selfhosted Subreddit by appending .rss to its URL. In this case, that would be https://www.reddit.com/r/selfhosted/.rss. Simply copy and paste this URL into the "Link" field.
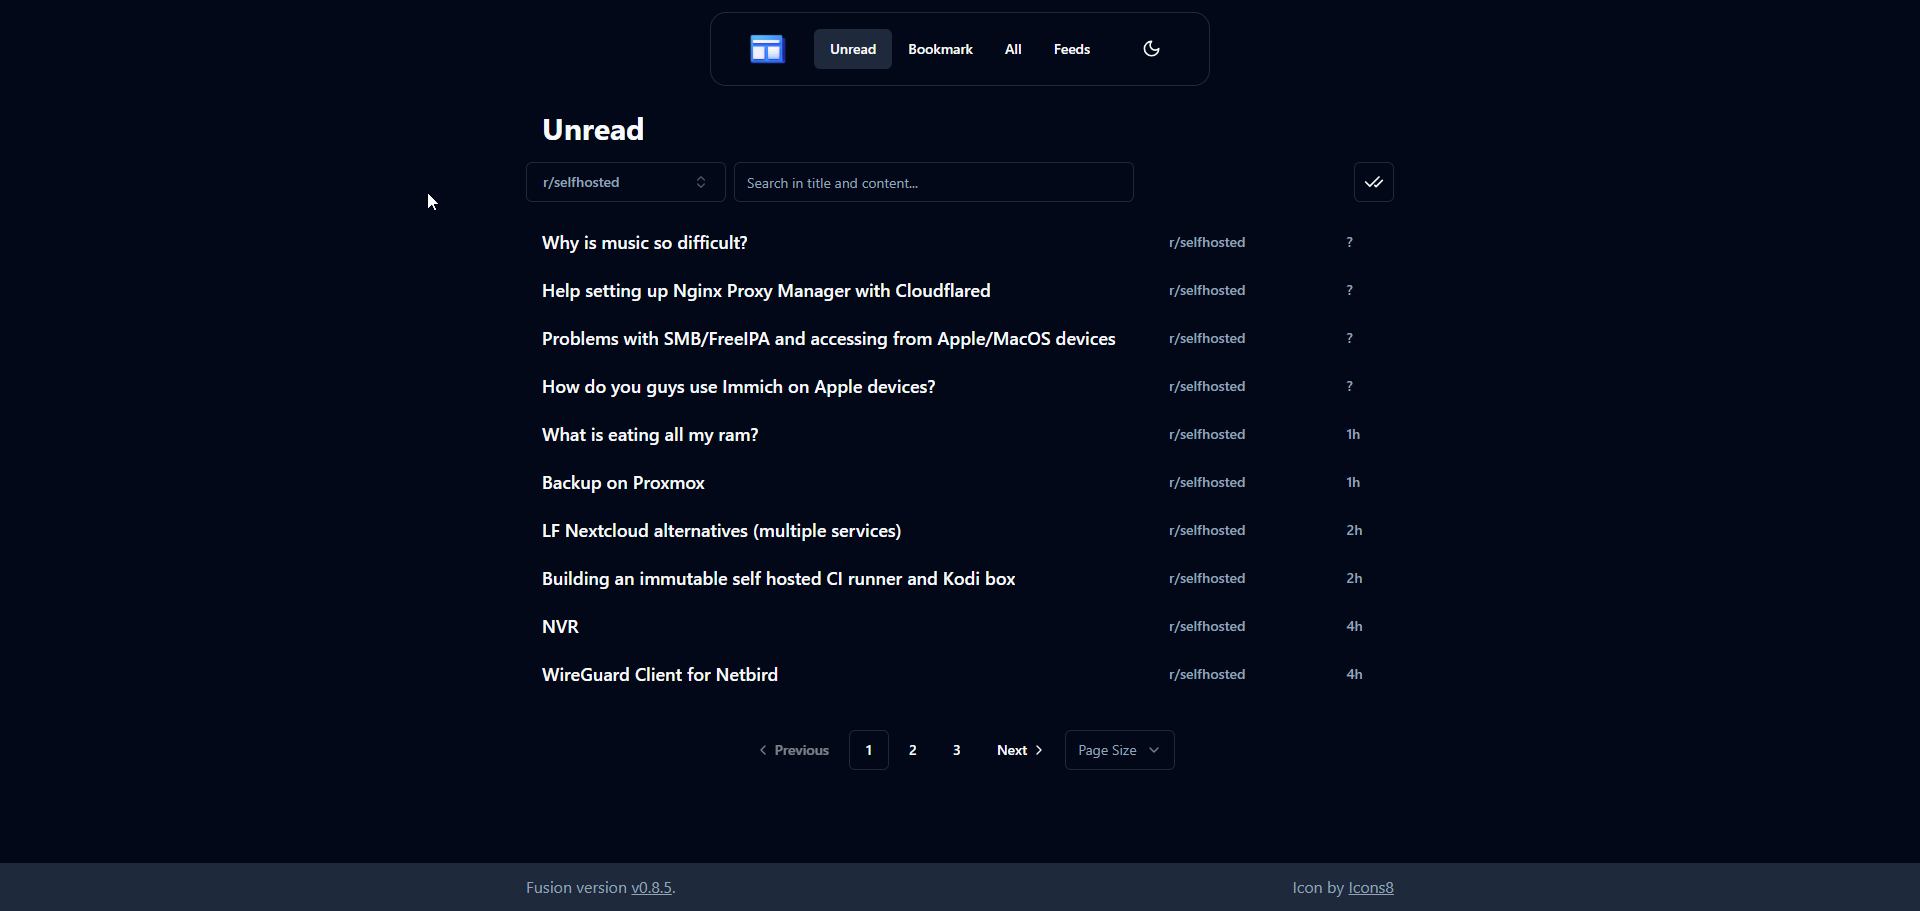
After adding a new feed, click "Save" and then revisit the "Unread" tab to start exploring the fresh content. With multiple feeds, you can filter items by website or blog using the dropdown menu. Once you've read an article, mark it as read and it will be removed from the "Unread" tab. However, you can still access it in the "All" tab or bookmark your favorite articles to store them under the "Bookmarks" tab for future reference.
Fusion's simplicity and good looks make it shine. It's easy to set up and start using, making it a top choice for RSS feed management. Having reviewed many self-hosted RSS reader options, I highly recommend Fusion as one of the best.

Fusion has quickly gained traction within the self-hosted community, and we're excited to see its popularity grow.
For any support related questions or inquiries, please refer to the official Fusion Github repo. Give Fusion a star on its Github repo, it's a small gesture that goes a long way in supporting open-source initiatives like this one!
";s:7:"attribs";a:0:{}s:8:"xml_base";s:0:"";s:17:"xml_base_explicit";b:0;s:8:"xml_lang";s:0:"";}}}}}i:1;a:6:{s:4:"data";s:0:"";s:7:"attribs";a:0:{}s:8:"xml_base";s:0:"";s:17:"xml_base_explicit";b:0;s:8:"xml_lang";s:0:"";s:5:"child";a:4:{s:0:"";a:6:{s:5:"title";a:1:{i:0;a:5:{s:4:"data";s:48:"Paperless-ngx: Scan and Digitize Your Documents";s:7:"attribs";a:0:{}s:8:"xml_base";s:0:"";s:17:"xml_base_explicit";b:0;s:8:"xml_lang";s:0:"";}}s:11:"description";a:1:{i:0;a:5:{s:4:"data";s:201:"Keep your papers under control! With Paperless-ngx, you can easily convert your physical documents and receipts into digital files on your own server. Plus, access them on the go with a native iOS app.";s:7:"attribs";a:0:{}s:8:"xml_base";s:0:"";s:17:"xml_base_explicit";b:0;s:8:"xml_lang";s:0:"";}}s:4:"link";a:1:{i:0;a:5:{s:4:"data";s:32:"https://noted.lol/paperless-ngx/";s:7:"attribs";a:0:{}s:8:"xml_base";s:0:"";s:17:"xml_base_explicit";b:0;s:8:"xml_lang";s:0:"";}}s:4:"guid";a:1:{i:0;a:5:{s:4:"data";s:24:"66c4afb000ed580001bc6b6c";s:7:"attribs";a:1:{s:0:"";a:1:{s:11:"isPermaLink";s:5:"false";}}s:8:"xml_base";s:0:"";s:17:"xml_base_explicit";b:0;s:8:"xml_lang";s:0:"";}}s:8:"category";a:2:{i:0;a:5:{s:4:"data";s:27:"Slef Hosted Document Viewer";s:7:"attribs";a:0:{}s:8:"xml_base";s:0:"";s:17:"xml_base_explicit";b:0;s:8:"xml_lang";s:0:"";}i:1;a:5:{s:4:"data";s:22:"Self Hosted File Hosts";s:7:"attribs";a:0:{}s:8:"xml_base";s:0:"";s:17:"xml_base_explicit";b:0;s:8:"xml_lang";s:0:"";}}s:7:"pubDate";a:1:{i:0;a:5:{s:4:"data";s:29:"Thu, 22 Aug 2024 12:39:54 GMT";s:7:"attribs";a:0:{}s:8:"xml_base";s:0:"";s:17:"xml_base_explicit";b:0;s:8:"xml_lang";s:0:"";}}}s:32:"http://purl.org/dc/elements/1.1/";a:1:{s:7:"creator";a:1:{i:0;a:5:{s:4:"data";s:6:"Jeremy";s:7:"attribs";a:0:{}s:8:"xml_base";s:0:"";s:17:"xml_base_explicit";b:0;s:8:"xml_lang";s:0:"";}}}s:29:"http://search.yahoo.com/mrss/";a:1:{s:7:"content";a:1:{i:0;a:5:{s:4:"data";s:0:"";s:7:"attribs";a:1:{s:0:"";a:2:{s:3:"url";s:76:"https://noted.lol/content/images/2024/08/self-hosted-paperless-ngx-noted.jpg";s:6:"medium";s:5:"image";}}s:8:"xml_base";s:0:"";s:17:"xml_base_explicit";b:0;s:8:"xml_lang";s:0:"";}}}s:40:"http://purl.org/rss/1.0/modules/content/";a:1:{s:7:"encoded";a:1:{i:0;a:5:{s:4:"data";s:16300:"
For many of us, scanned documents and files are a common reality, but finding a reliable and secure way to store and organize them can be a challenge. As data security concerns grow, users are seeking alternatives to cloud-based storage solutions that come with modern scanners. Self-hosted options like Paperless-ngx provide a reliable and secure way to manage digital documents. By running your own instance of Paperless-ngx on a local server or virtual machine, you gain full control over your data, ensuring it remains private and secure.
Paperless-ngx helps you switch from storing physical documents to digital ones, making it easy to find what you need online. Paperless-ngx was built as a new version of Paperless and its previous updates (Paperless-ng), so that a team of people can work together to improve and support the project. And for those wondering, the "ng" in Paperless-ngx stands for "next generation".
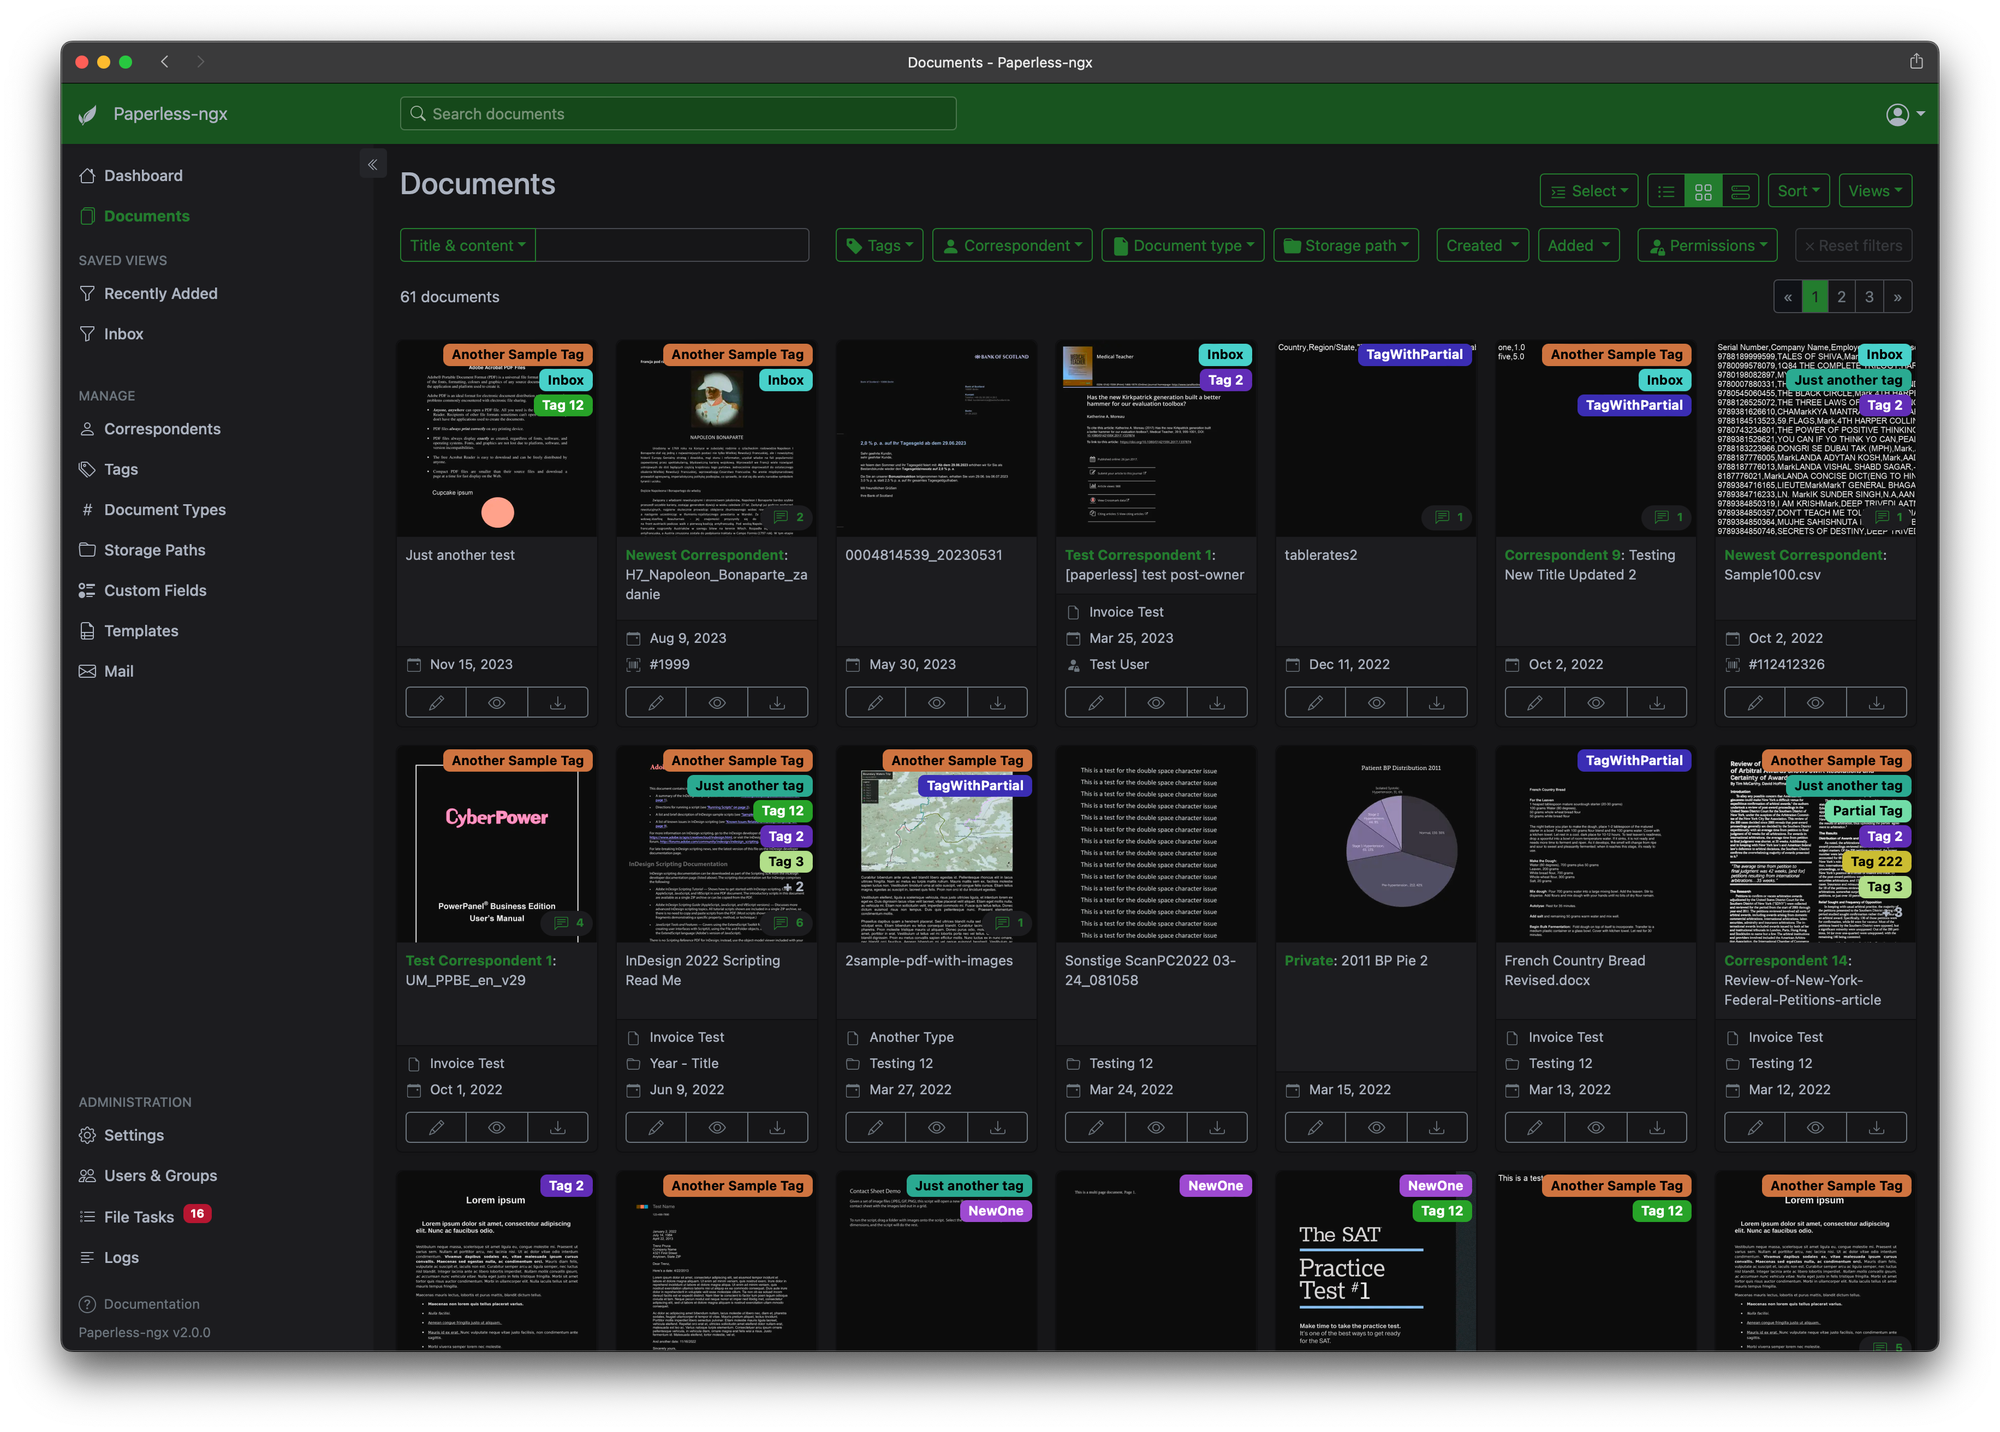
With the Paperless-ngx tagging feature, you can label each document with relevant keywords, making it easy to find what you need later. You can also categorize your documents by type or correspondent, keeping everything organized and easily accessible.
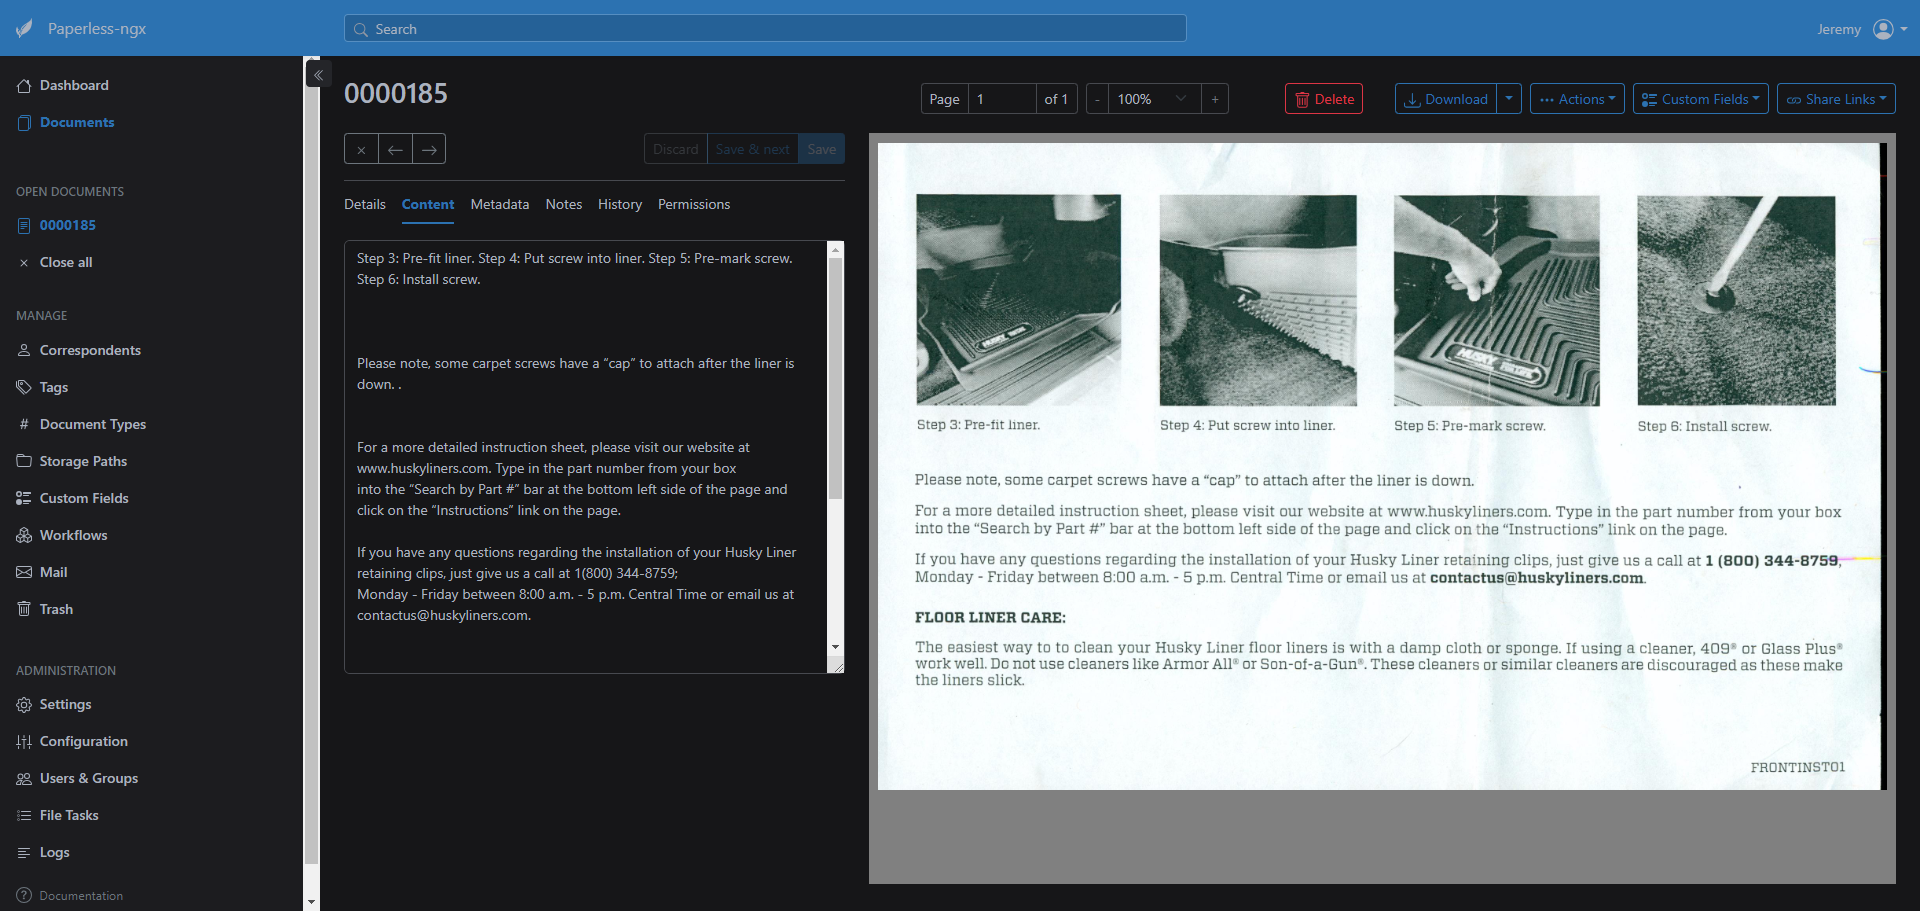
Paperless-ngx also includes advanced features like OCR (Optical Character Recognition) to make your scanned documents searchable. This means you can quickly find specific words or phrases within a document, without having to manually scroll through it. Plus, it supports multiple file formats, including PDFs, images, and Office files, so you can store all your important documents in one place. And with machine learning powered automatic tagging, you can let the app do the work for you. Just scan your documents and let Paperless-ngx organize them for you... if you trust it to. 😉
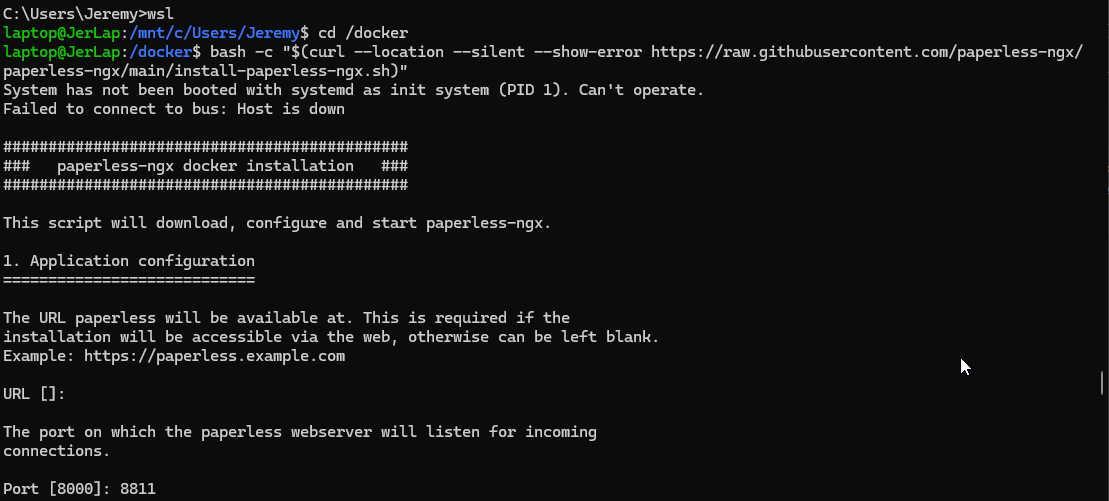
The Paperless-ngx installation script makes it easy to set up your instance. It asks for some basic settings, downloads necessary files, pulls the Docker image, starts Paperless, and even creates a user account.
Need assistance? Check out our resources for getting started with self-hosting and setting up Docker.
$ bash -c "$(curl --location --silent --show-error https://raw.githubusercontent.com/paperless-ngx/paperless-ngx/main/install-paperless-ngx.sh)"The bash script cannot be run as root and you will need permission to write to the current directory.
Paperless-ngx uses Tika and Gotenberg to parse metadata and convert Office documents (like .doc, .xlsx, and .odt) and emails (.eml). To use this feature, you'll need to set up separate servers for Tika and Gotenberg, configure their endpoints, and enable the feature. Fortunately, Paperless-ngx provides ready made Docker Compose examples that simplify the setup process and offer multiple database options with or without Gotenberg and Tika.
However, the installation script above also lets you choose to use Tika and Gotenberg, which I highly recommend. You can customize settings like port, database, URL, username, and password all from this bash script. It does the work for you making setup simple. Once it's complete, visit your server or computer's IP address and port number to begin using Paperless-ngx.
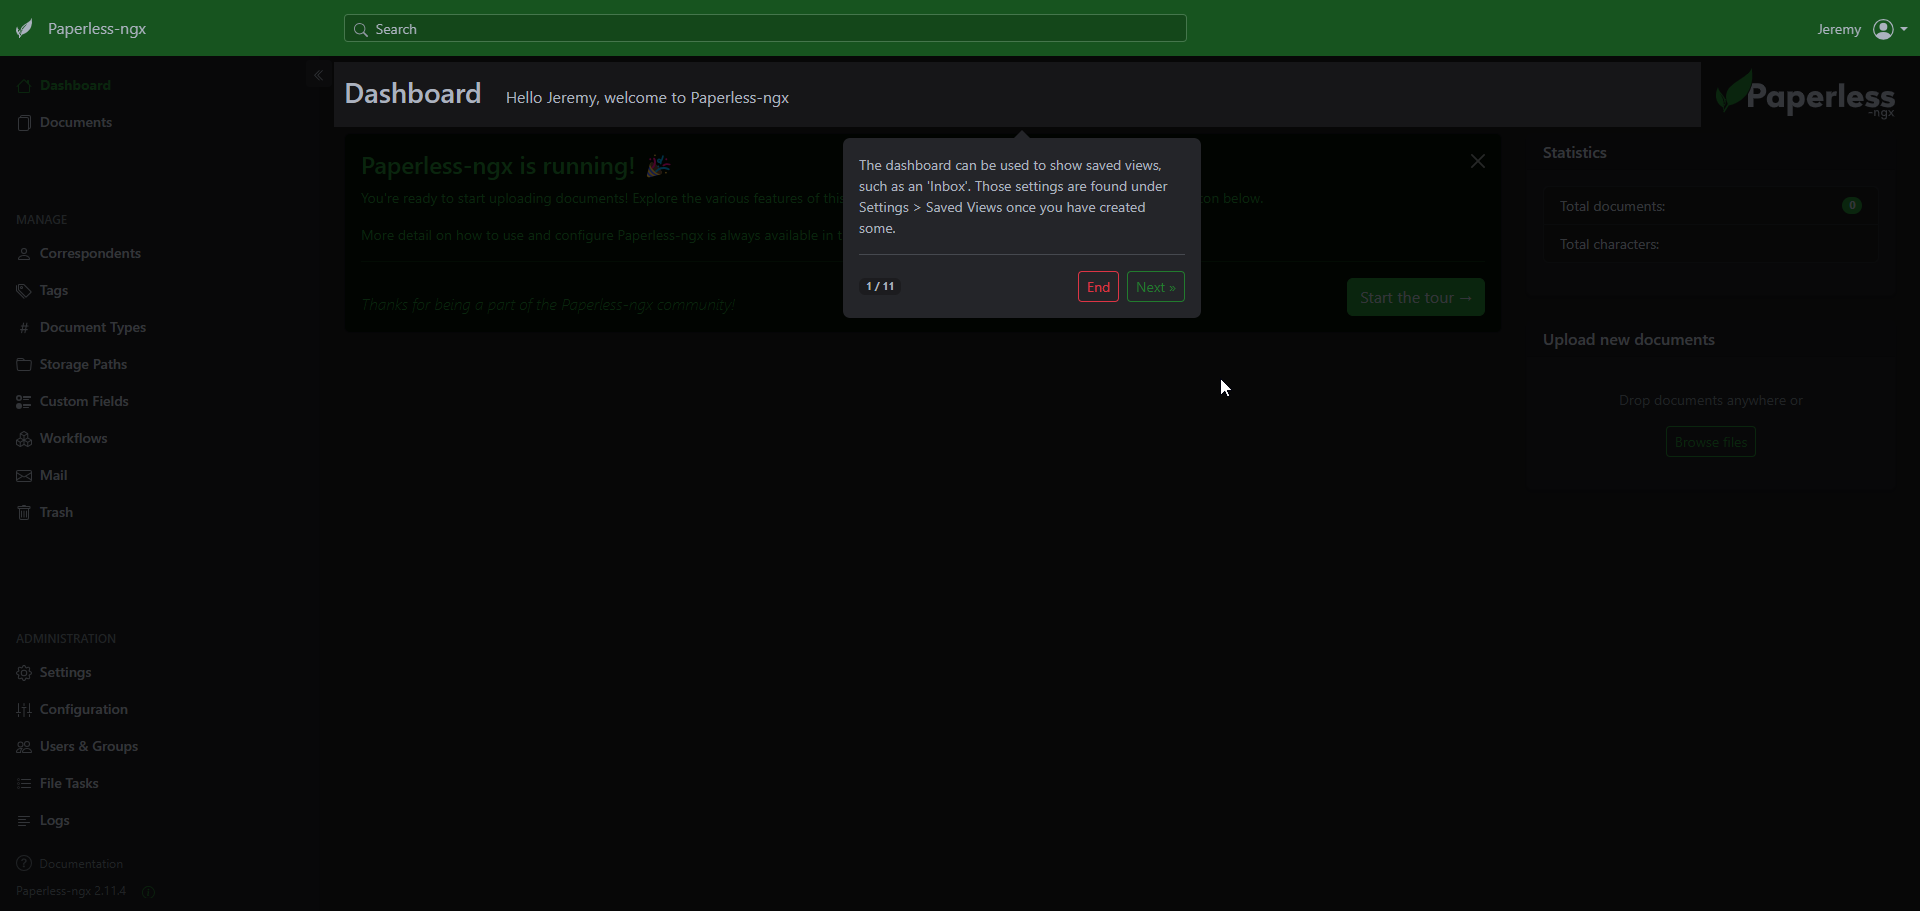
Sign in with your chosen username and password. To get the most out of Paperless-ngx, I suggest taking the built-in tour to learn about its core features. Simply click the "Start the tour" button to begin exploring!
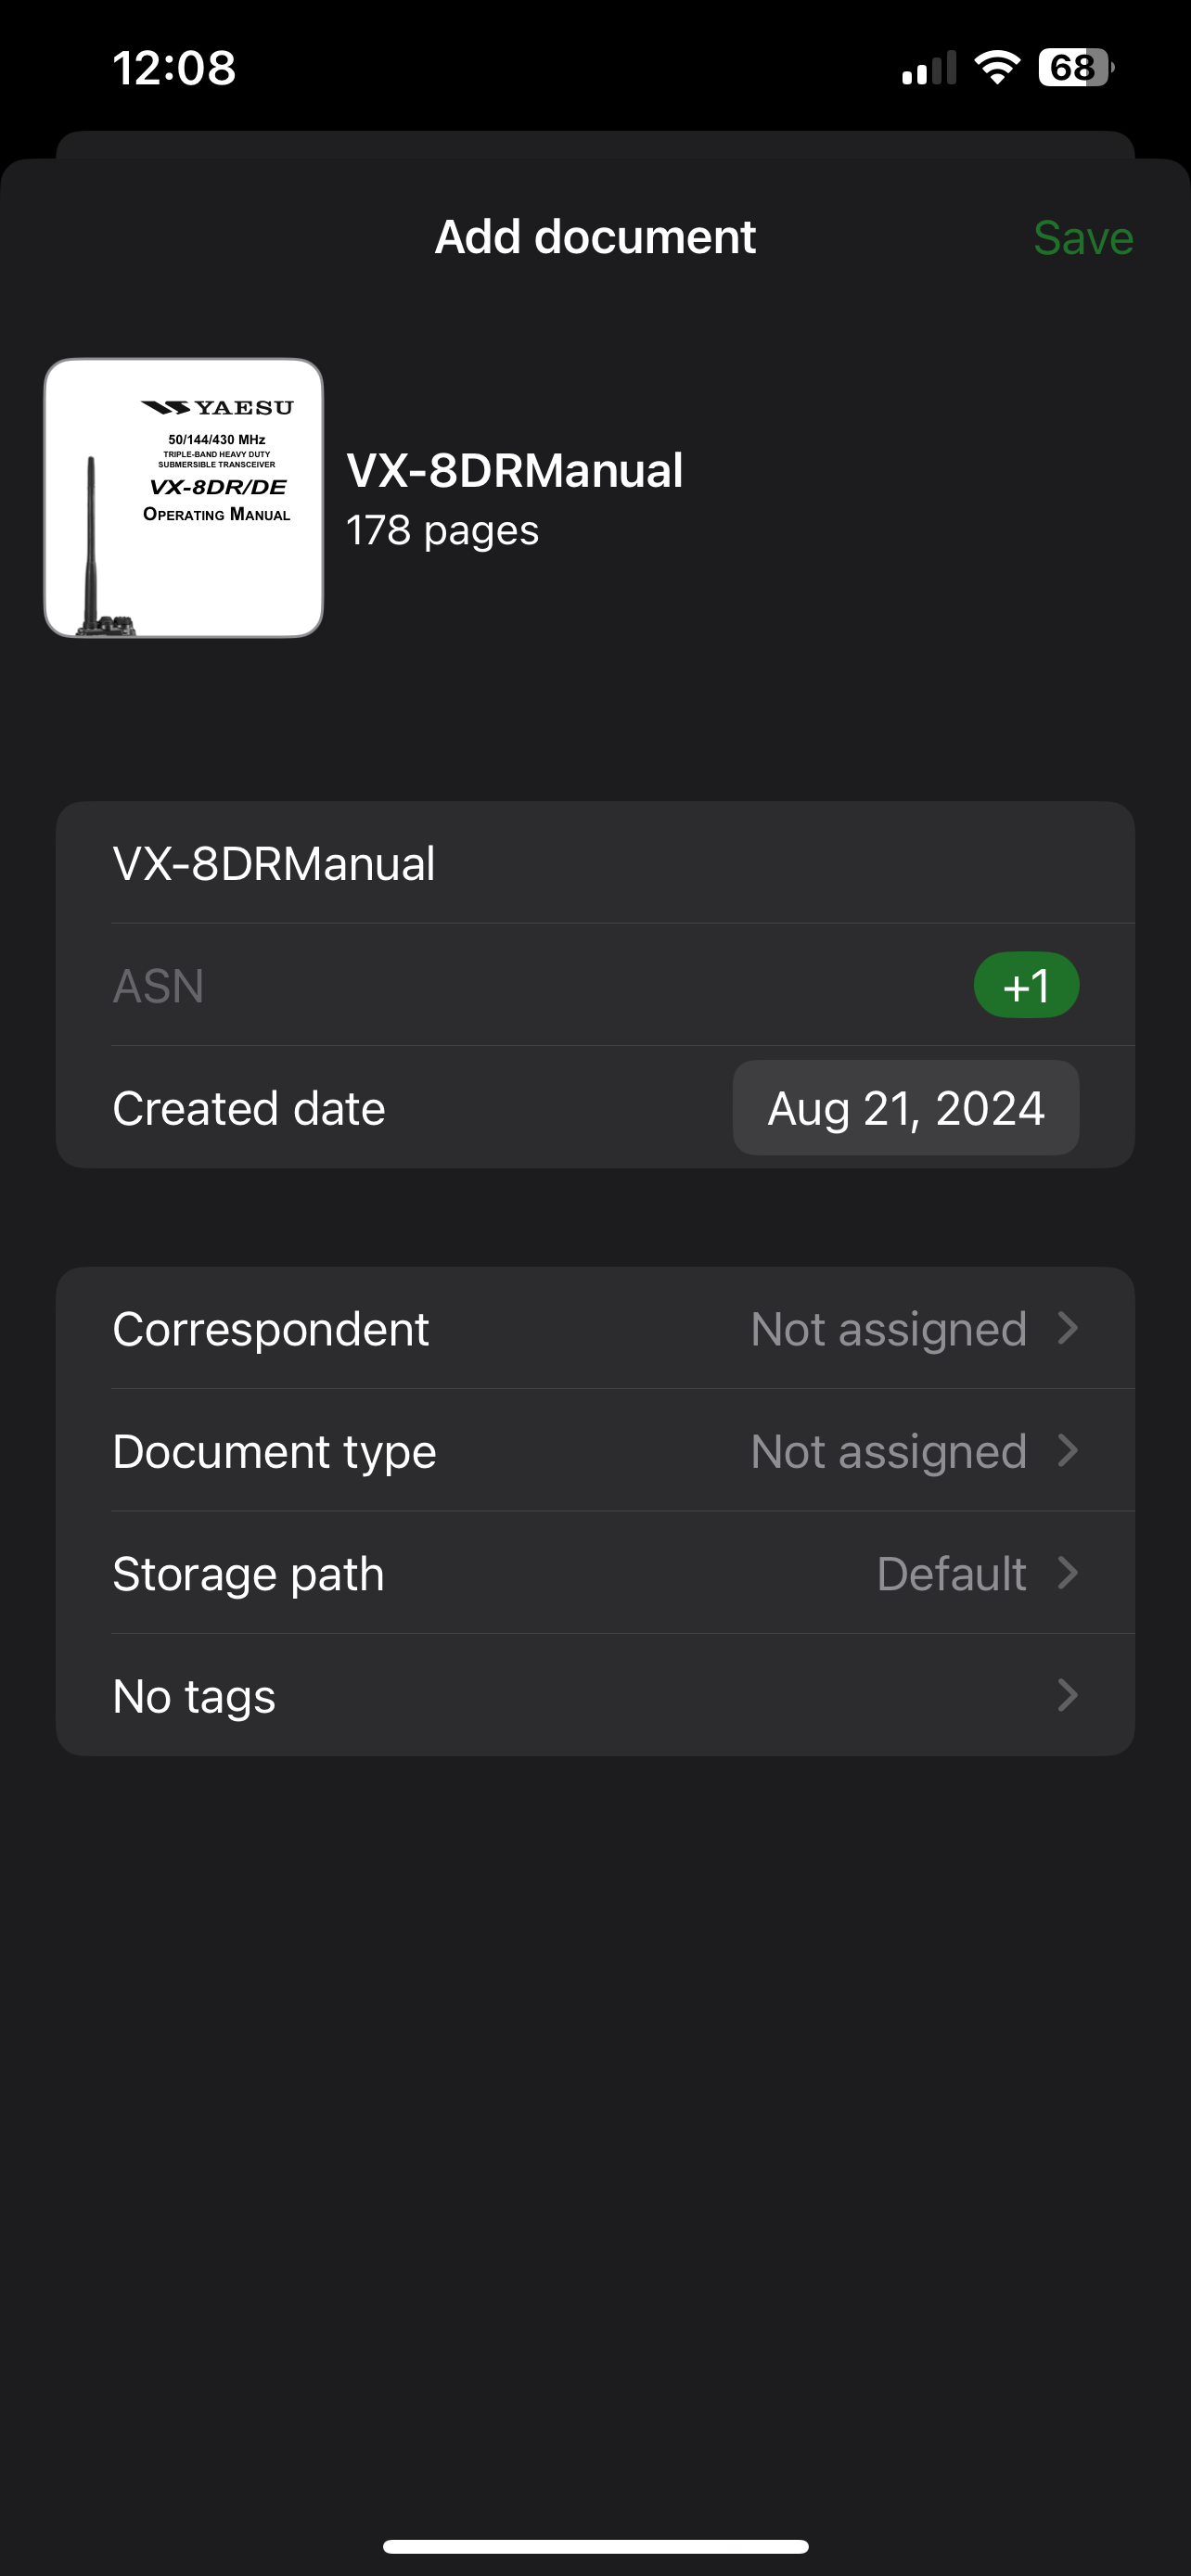
This part is up to personal preference. Some people might prefer traditional methods and buy a scanner, while I like using my iPhone with the Swift Paperless app. The Swift Paperless app offers more features than just scanning documents. It's free, highly rated, and lets me control every aspect of Paperless-ngx, including adding tags, document type, and correspondents before uploading scanned documents to the server. (these settings can also be changed after the scan is completed) I can also create new scans or import documents and photos from my device. Lastly, there's no annoying nag screens asking for donations... nowhere in the app. You can see what people have to say about it here on the Paperless-ngx discussions. You can also sponsor the iOS app here on the Github Repo.
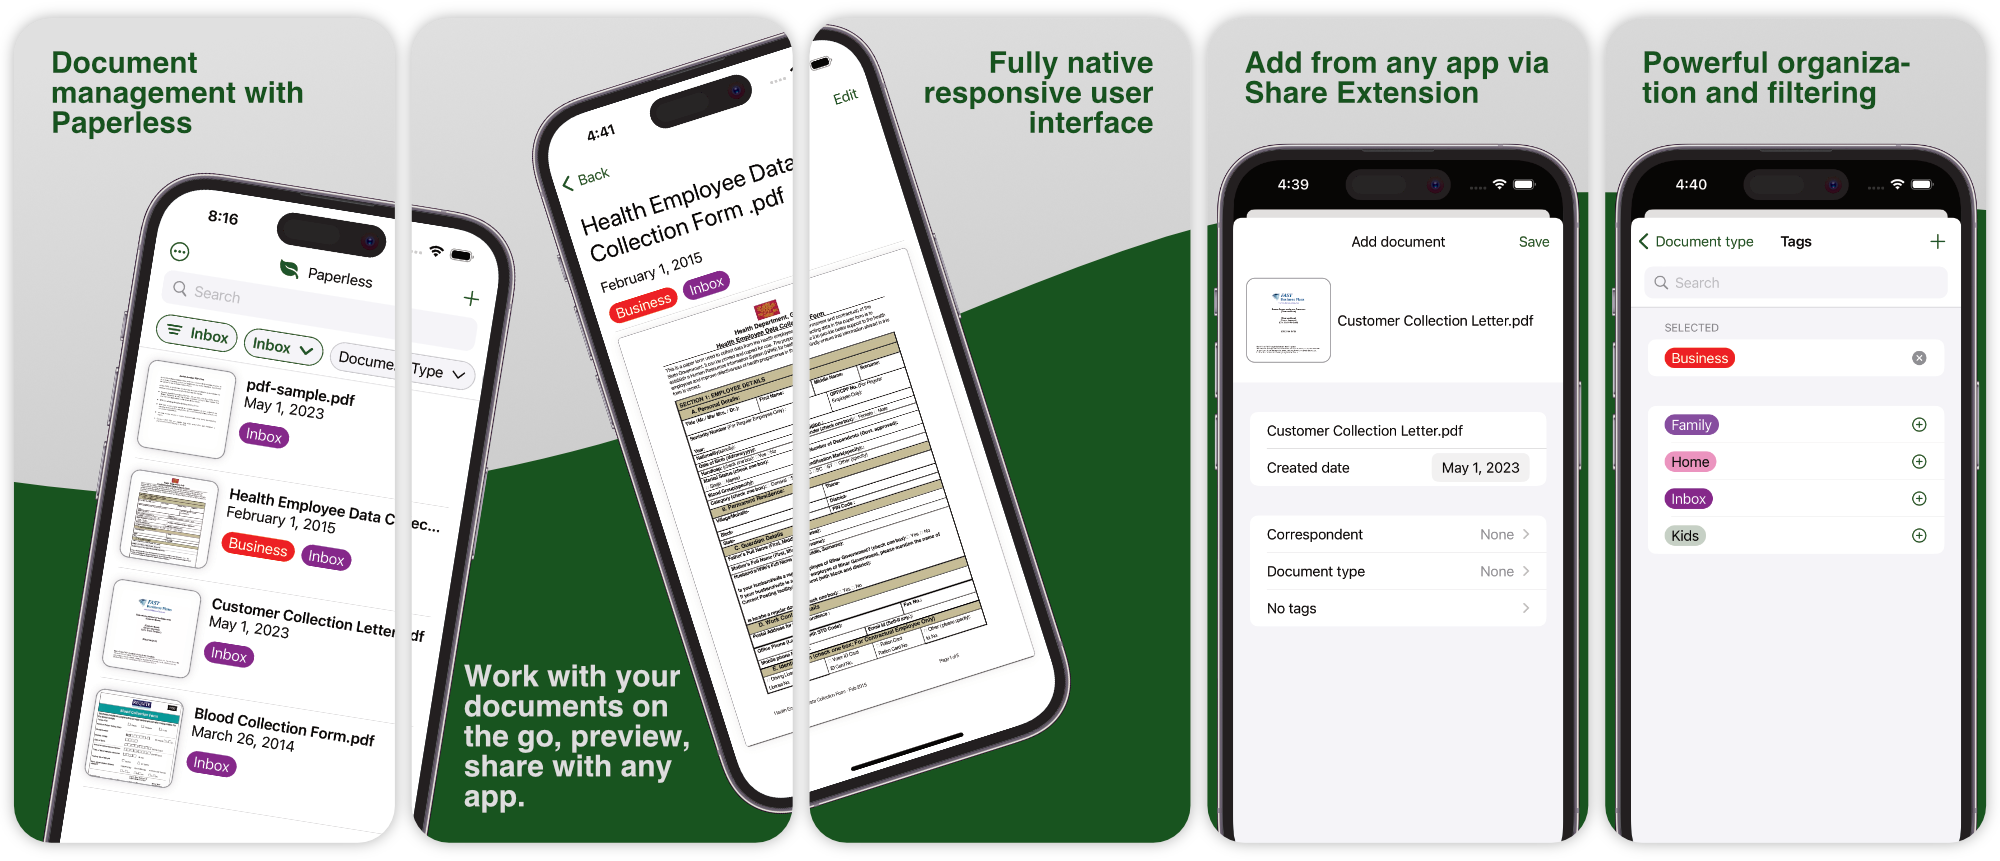
While I've tried other iOS iPhone scanning apps, none have met my needs as well as Swift Paperless. Those apps are more general-purpose scanning tools, whereas Swift Paperless was designed specifically for Paperless-ngx. Its tailored features make it the perfect fit for my use case.
You can simply log into your Paperless-ngx server and have access to all of your documents. From there you can begin scanning or importing new documents or even edit existing docs.
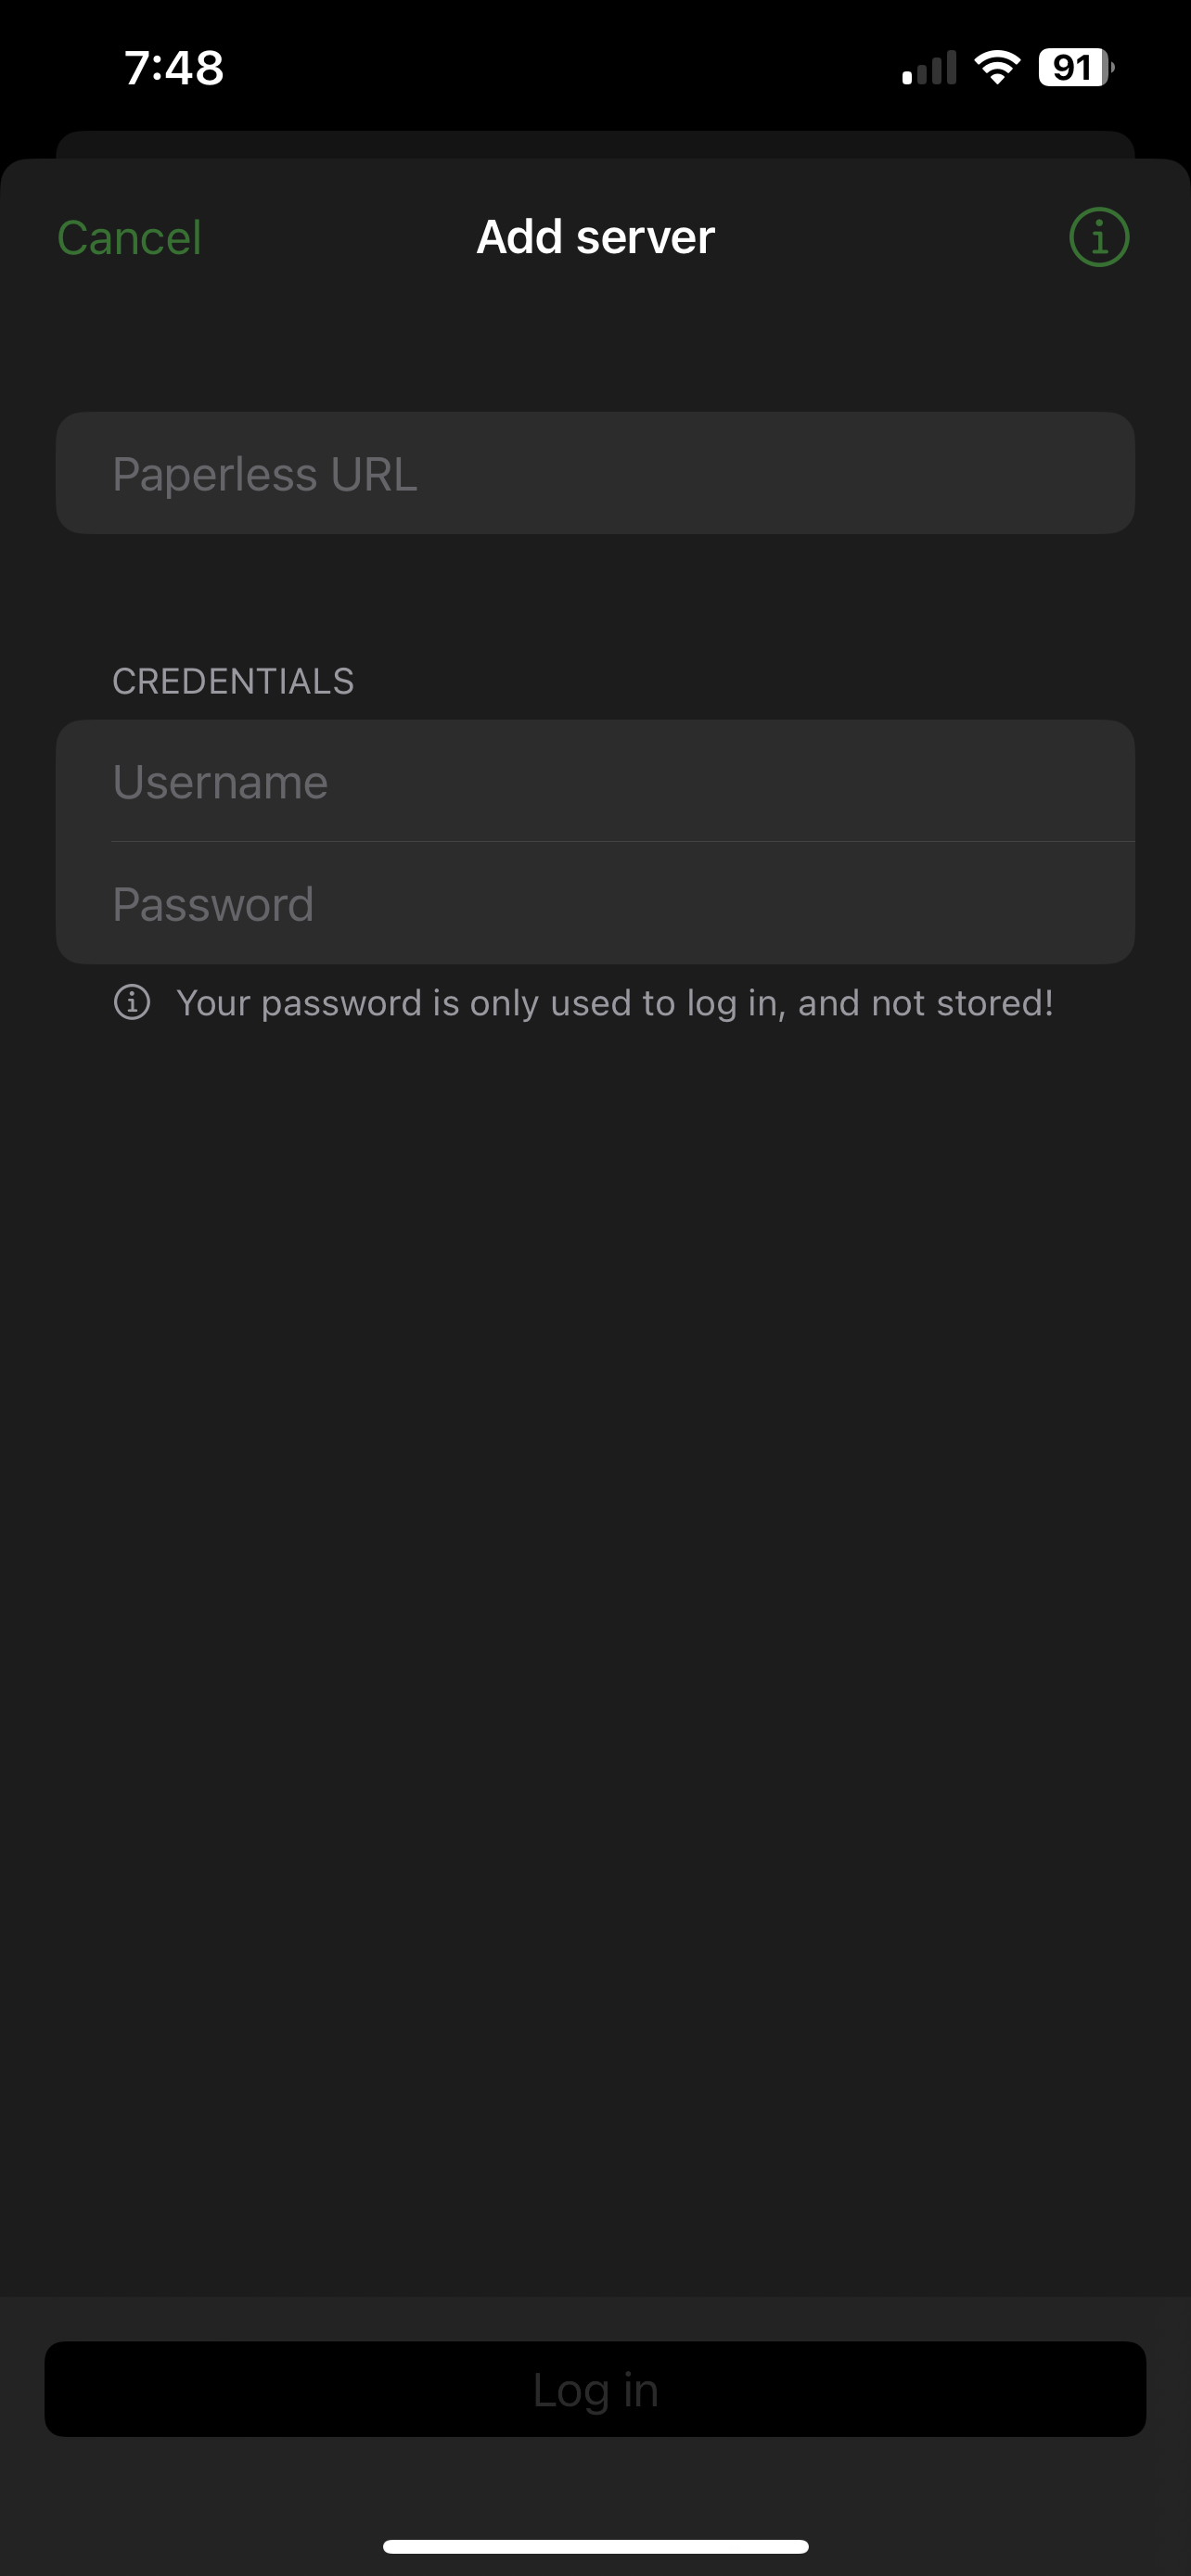
To connect, I used my local Paperless-ngx server, keeping it private and not exposing it through Cloudflare. This allowed me to simply enter the server's IP address and port in the Swift Paperless app.
If you do decide to expose your self-hosted Paperless-ngx server to the internet, exercise caution. This is particularly important when storing sensitive documents containing personal details such as social security numbers, phone numbers, or birth certificates.
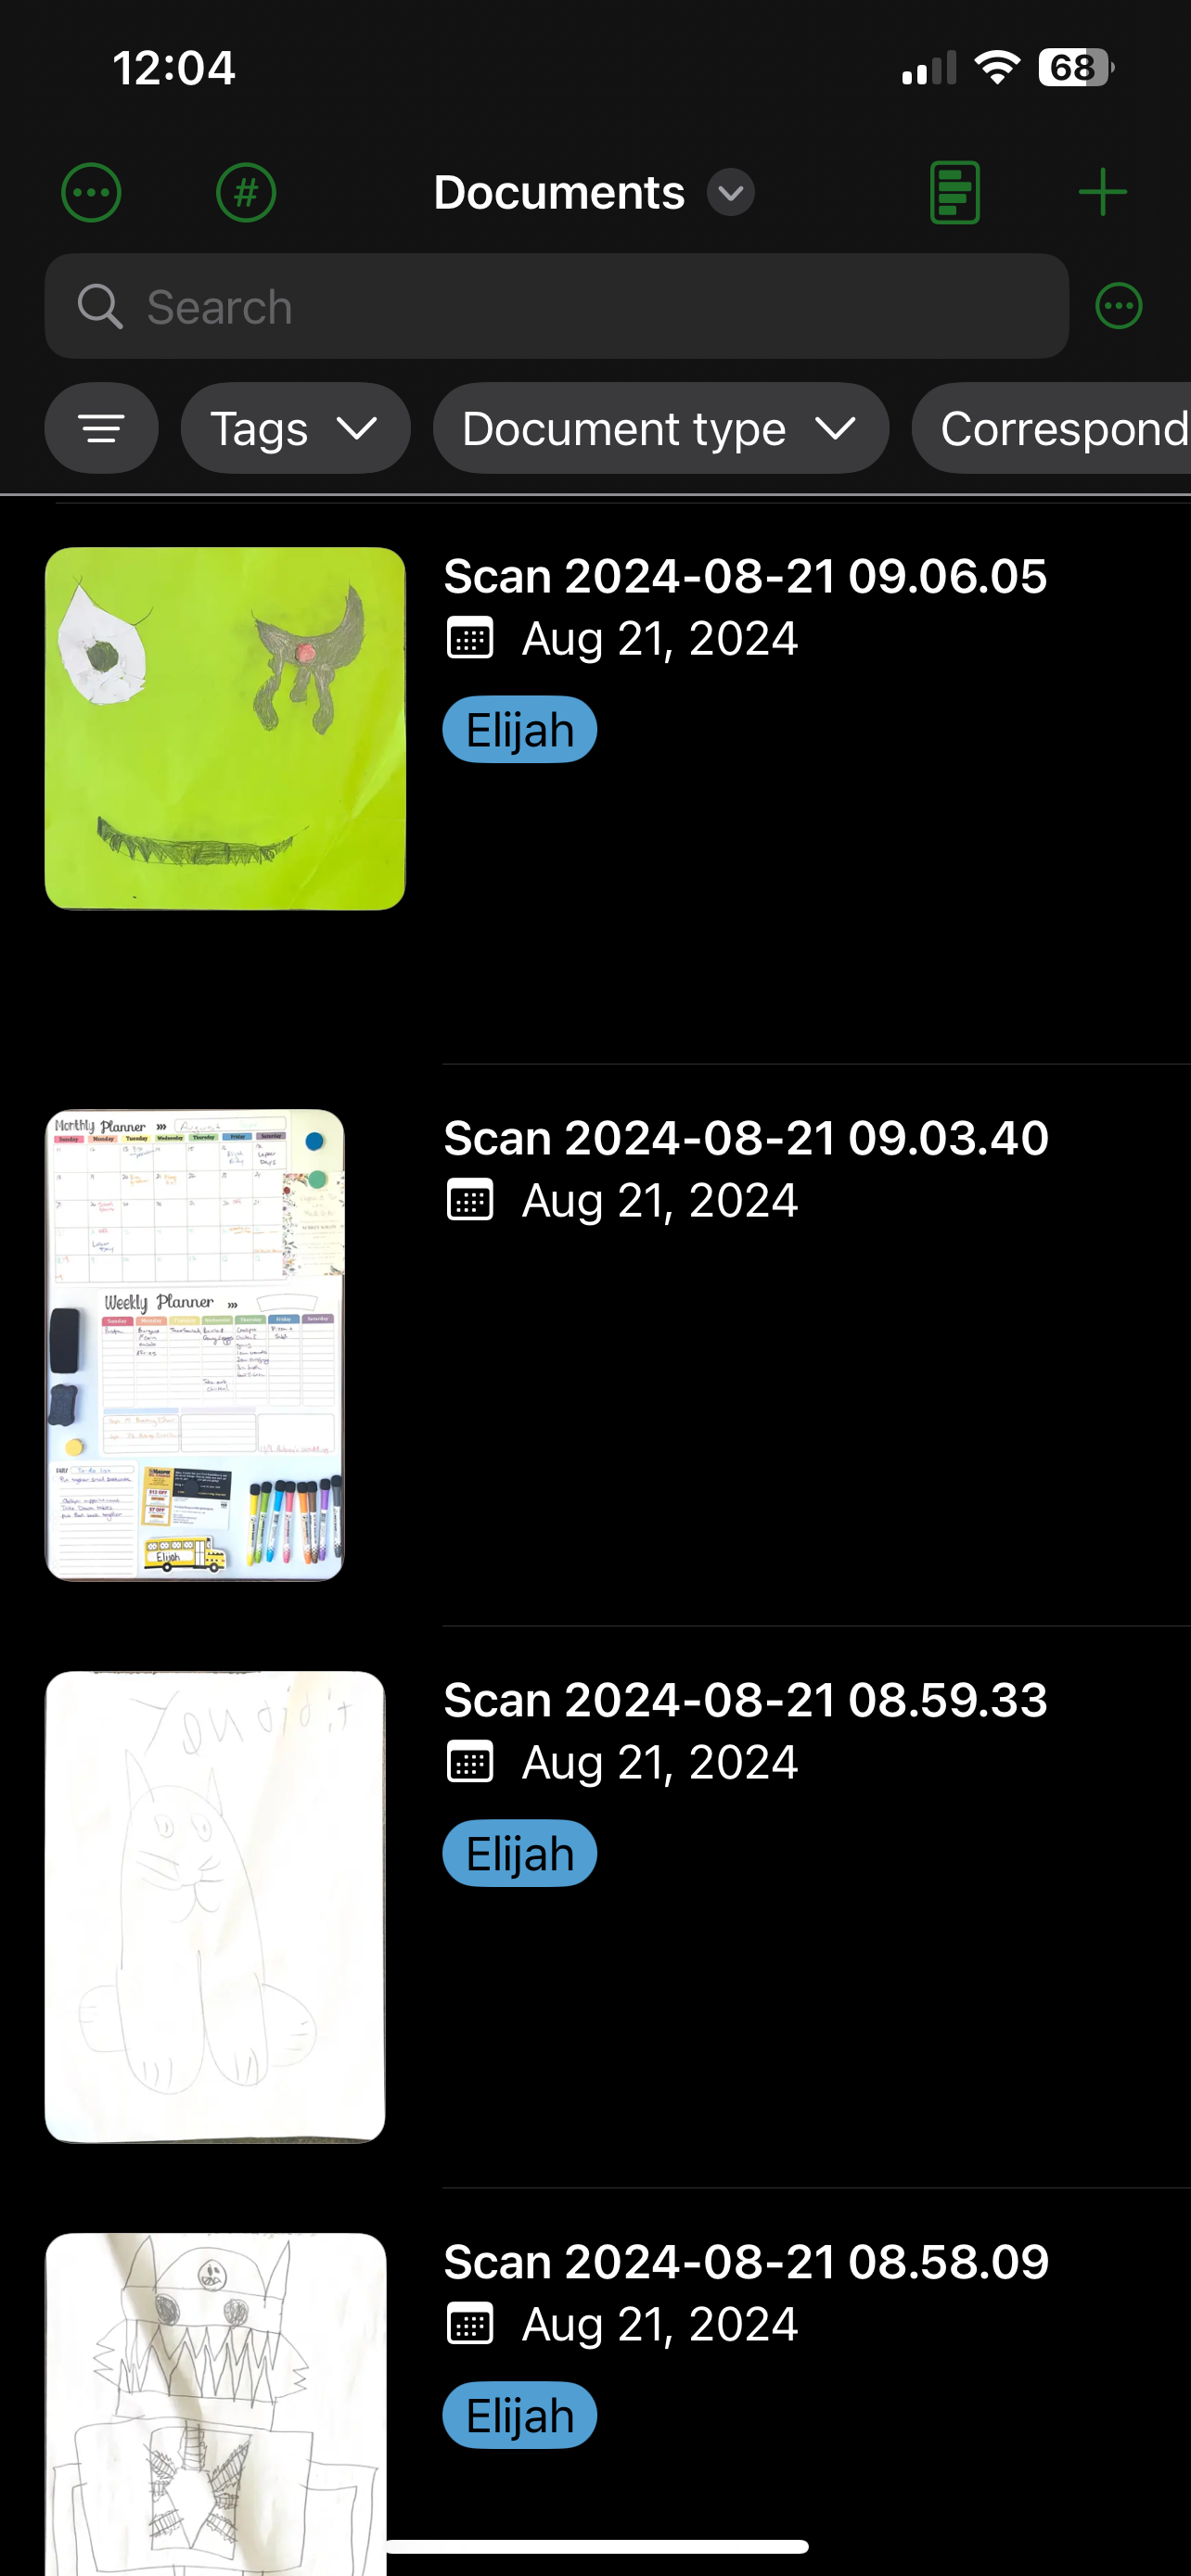
I've been using Paperless for 2 years, and since its fork to ngx, my experience has been revolutionary! I've digitized important papers, receipts, manuals, and even sentimental cards, giving them new life. With the iOS app, scanning and organizing documents is seamless: open, scan, tag, and send - effortless!
I've relied heavily on the search function to dig up old receipts, remembering key details like dates or prices. My ultimate dream is to integrate Paperless-ngx with Ollama, allowing me to simply ask questions about my documents and receive instant answers directly on my self-hosted server through Open WebUI. I'm sure there'll be a solution soon enough, if not already out there.
For support related questions or inquiries, please refer to the Paperless-ngx Github repo. Drop by and give the project a star at the very least!
";s:7:"attribs";a:0:{}s:8:"xml_base";s:0:"";s:17:"xml_base_explicit";b:0;s:8:"xml_lang";s:0:"";}}}}}i:2;a:6:{s:4:"data";s:0:"";s:7:"attribs";a:0:{}s:8:"xml_base";s:0:"";s:17:"xml_base_explicit";b:0;s:8:"xml_lang";s:0:"";s:5:"child";a:4:{s:0:"";a:6:{s:5:"title";a:1:{i:0;a:5:{s:4:"data";s:50:"Tasks.md - Self-Hosted Markdown Based Task Manager";s:7:"attribs";a:0:{}s:8:"xml_base";s:0:"";s:17:"xml_base_explicit";b:0;s:8:"xml_lang";s:0:"";}}s:11:"description";a:1:{i:0;a:5:{s:4:"data";s:42:"Stupid simple self-hosted task management.";s:7:"attribs";a:0:{}s:8:"xml_base";s:0:"";s:17:"xml_base_explicit";b:0;s:8:"xml_lang";s:0:"";}}s:4:"link";a:1:{i:0;a:5:{s:4:"data";s:27:"https://noted.lol/tasks-md/";s:7:"attribs";a:0:{}s:8:"xml_base";s:0:"";s:17:"xml_base_explicit";b:0;s:8:"xml_lang";s:0:"";}}s:4:"guid";a:1:{i:0;a:5:{s:4:"data";s:24:"66a3a7971df9fc000145532e";s:7:"attribs";a:1:{s:0:"";a:1:{s:11:"isPermaLink";s:5:"false";}}s:8:"xml_base";s:0:"";s:17:"xml_base_explicit";b:0;s:8:"xml_lang";s:0:"";}}s:8:"category";a:2:{i:0;a:5:{s:4:"data";s:36:"Self Hosted To-do/Project Management";s:7:"attribs";a:0:{}s:8:"xml_base";s:0:"";s:17:"xml_base_explicit";b:0;s:8:"xml_lang";s:0:"";}i:1;a:5:{s:4:"data";s:28:"Self Hosted Note Taking apps";s:7:"attribs";a:0:{}s:8:"xml_base";s:0:"";s:17:"xml_base_explicit";b:0;s:8:"xml_lang";s:0:"";}}s:7:"pubDate";a:1:{i:0;a:5:{s:4:"data";s:29:"Fri, 16 Aug 2024 14:08:14 GMT";s:7:"attribs";a:0:{}s:8:"xml_base";s:0:"";s:17:"xml_base_explicit";b:0;s:8:"xml_lang";s:0:"";}}}s:32:"http://purl.org/dc/elements/1.1/";a:1:{s:7:"creator";a:1:{i:0;a:5:{s:4:"data";s:6:"Jeremy";s:7:"attribs";a:0:{}s:8:"xml_base";s:0:"";s:17:"xml_base_explicit";b:0;s:8:"xml_lang";s:0:"";}}}s:29:"http://search.yahoo.com/mrss/";a:1:{s:7:"content";a:1:{i:0;a:5:{s:4:"data";s:0:"";s:7:"attribs";a:1:{s:0:"";a:2:{s:3:"url";s:71:"https://noted.lol/content/images/2024/08/tasks.md-self-hosted-noted.jpg";s:6:"medium";s:5:"image";}}s:8:"xml_base";s:0:"";s:17:"xml_base_explicit";b:0;s:8:"xml_lang";s:0:"";}}}s:40:"http://purl.org/rss/1.0/modules/content/";a:1:{s:7:"encoded";a:1:{i:0;a:5:{s:4:"data";s:6489:"
I'm completely honest when I say that organization just doesn't come naturally to me. Notes are scattered all over the place, reminders are stuck to random surfaces, and my calendars feel like wishful thinking rather than actual planning tools. It's as if my brain is a black hole for tasks and deadlines and anything that goes in seems to get sucked down and never makes it back out again! And let's be real, cloud-based solutions can be intimidating too. I get that they're supposed to make life easier, but I'm just not comfortable entrusting my entire life to some company's servers. So, what I really need is a self-hosted solution that lets me get organized (or at least pretend to!). And that's exactly what Tasks.md is, the perfect antidote to my organizational chaos!
Tasks.md is a self-hosted, Markdown file-based task management board.
Design & Interface
Content Creation
Installation & Customization
Flexibility & Integration
To install Tasks.md on your server, use this Docker Compose stack, which makes the process easy to follow. If you're new to self-hosting, don't worry, we have guides available to help you get started with self-hosting. For information on the latest features and updates, refer to the Tasks.md releases.
version: "3"
services:
  tasks.md:
    image: baldissaramatheus/tasks.md
    container_name: tasks.md
    environment:
      - PUID=1000
      - PGID=1000
      - Title=Noted Tasks
    volumes:
      - /path/to/tasks:/tasks
      - /path/to/config:/config
    restart: unless-stopped
    ports:
      - 3333:8080
Let's begin! Set up your task management system by adding lanes and cards. Organizing can be a enjoyable experience with Tasks.md.
Easily organize your tasks by dragging and dropping cards into different lanes. This simple feature makes task management a seamless experience.
Tasks.md offers an effortless approach to organization. Each lane you create serves as a corresponding directory on your filesystem, making it easy to navigate and manage. Additionally, each task is represented by a file, providing a clear and structured system for tracking and managing your tasks.
If you're looking for Kanban-style task management software, Tasks.md is an excellent choice. It offers a minimalist approach that even those new to task management can easily use. For those who prioritize simplicity, Tasks.md is a great option that gets the job done without overwhelming features. Give it a try and discover how simple it is to manage your tasks!
Swing by the Tasks.md GitHub repo and give it a star. If you have questions or would like to suggest new features, visit the issue tracker to get involved. Your feedback is important in helping to improve Tasks.md.
";s:7:"attribs";a:0:{}s:8:"xml_base";s:0:"";s:17:"xml_base_explicit";b:0;s:8:"xml_lang";s:0:"";}}}}}i:3;a:6:{s:4:"data";s:0:"";s:7:"attribs";a:0:{}s:8:"xml_base";s:0:"";s:17:"xml_base_explicit";b:0;s:8:"xml_lang";s:0:"";s:5:"child";a:4:{s:0:"";a:6:{s:5:"title";a:1:{i:0;a:5:{s:4:"data";s:42:"Forgejo - Powerful Self-Hosted Git Service";s:7:"attribs";a:0:{}s:8:"xml_base";s:0:"";s:17:"xml_base_explicit";b:0;s:8:"xml_lang";s:0:"";}}s:11:"description";a:1:{i:0;a:5:{s:4:"data";s:84:"Safely self-host your code with Forgejo and take control of your project management.";s:7:"attribs";a:0:{}s:8:"xml_base";s:0:"";s:17:"xml_base_explicit";b:0;s:8:"xml_lang";s:0:"";}}s:4:"link";a:1:{i:0;a:5:{s:4:"data";s:26:"https://noted.lol/forgejo/";s:7:"attribs";a:0:{}s:8:"xml_base";s:0:"";s:17:"xml_base_explicit";b:0;s:8:"xml_lang";s:0:"";}}s:4:"guid";a:1:{i:0;a:5:{s:4:"data";s:24:"66af7f1c1df9fc0001455f88";s:7:"attribs";a:1:{s:0:"";a:1:{s:11:"isPermaLink";s:5:"false";}}s:8:"xml_base";s:0:"";s:17:"xml_base_explicit";b:0;s:8:"xml_lang";s:0:"";}}s:8:"category";a:1:{i:0;a:5:{s:4:"data";s:15:"Self Hosted Git";s:7:"attribs";a:0:{}s:8:"xml_base";s:0:"";s:17:"xml_base_explicit";b:0;s:8:"xml_lang";s:0:"";}}s:7:"pubDate";a:1:{i:0;a:5:{s:4:"data";s:29:"Mon, 12 Aug 2024 15:02:12 GMT";s:7:"attribs";a:0:{}s:8:"xml_base";s:0:"";s:17:"xml_base_explicit";b:0;s:8:"xml_lang";s:0:"";}}}s:32:"http://purl.org/dc/elements/1.1/";a:1:{s:7:"creator";a:1:{i:0;a:5:{s:4:"data";s:6:"Jeremy";s:7:"attribs";a:0:{}s:8:"xml_base";s:0:"";s:17:"xml_base_explicit";b:0;s:8:"xml_lang";s:0:"";}}}s:29:"http://search.yahoo.com/mrss/";a:1:{s:7:"content";a:1:{i:0;a:5:{s:4:"data";s:0:"";s:7:"attribs";a:1:{s:0:"";a:2:{s:3:"url";s:58:"https://noted.lol/content/images/2024/08/forgejo-noted.jpg";s:6:"medium";s:5:"image";}}s:8:"xml_base";s:0:"";s:17:"xml_base_explicit";b:0;s:8:"xml_lang";s:0:"";}}}s:40:"http://purl.org/rss/1.0/modules/content/";a:1:{s:7:"encoded";a:1:{i:0;a:5:{s:4:"data";s:7737:"
Having a centralized platform to manage code repositories and collaborate with team members has become increasingly essential. With modern software development often involving multiple moving parts, maintaining control over your project's direction can be a challenge. This is where self-hosted solutions like Forgejo come into play, providing a single, unified space for teams to work together seamlessly.
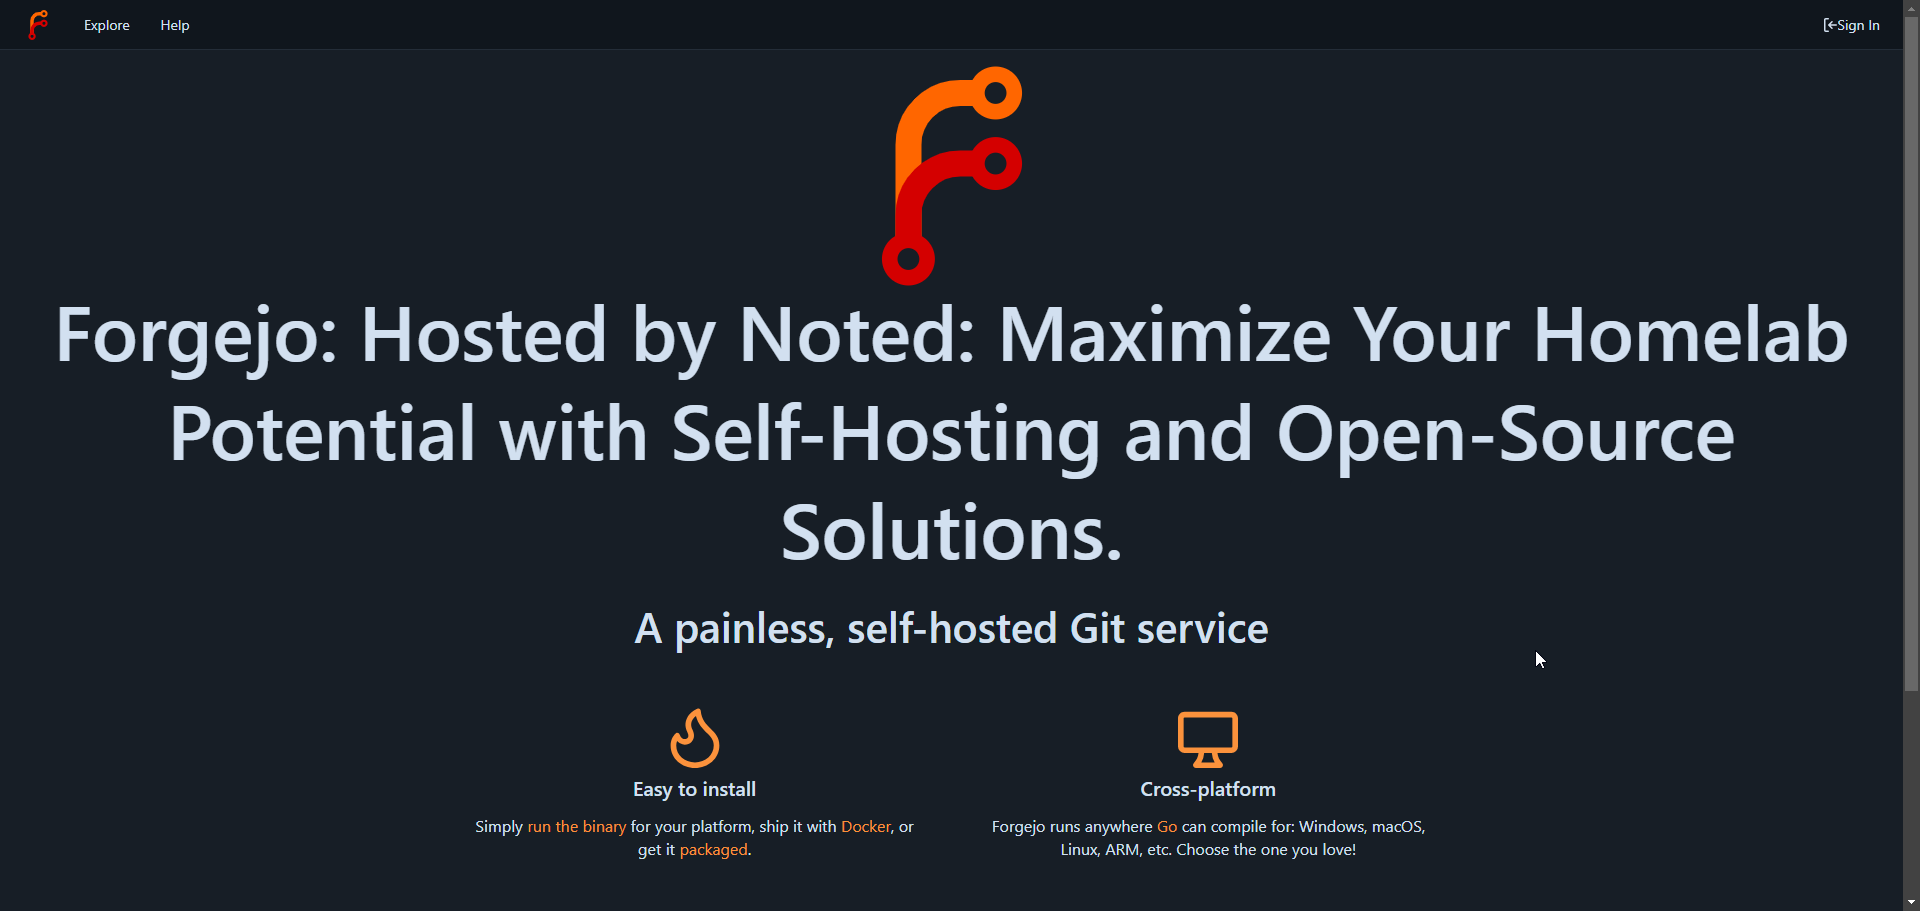
Forgejo is a self-hosted Git service that empowers developers to manage their projects without relying on proprietary tools. By self-hosting Forgejo, you'll gain control over your environment, allowing you to customize it to fit your team's needs. You can integrate Forgejo with other tools and services to streamline your workflow, ensure the integrity of your software development process, and collaborate seamlessly with your team members. With Forgejo, you'll have a lightweight, scalable, and secure platform that meets your unique project requirements.
Brought to you by the collaborative efforts of Codeberg e.V., Forgejo is a community-driven project that prioritizes freedom and transparency. As a fully open-source solution, it can be trusted to always remain free from proprietary influences. Users have the flexibility to create an account on any instance, or download and self-host their own copy for maximum control and customization. With a focus on security, scalability, federation, and privacy, Forgejo is designed to empower developers like you to work together seamlessly.
• Easy Setup: Forgejo can be installed in minutes with a simple binary installer or using Docker for maximum flexibility.
• Wide Compatibility: Forgejo runs on Windows, macOS, Linux, ARM, and more making it accessible across a range of platforms.
• Efficient Performance: Forgejo's lightweight design ensures that it can run smoothly even on resource constrained devices like Raspberry Pi.
• Community-Driven: As an open-source project, Forgejo allows the community to contribute to its development, shape its future, and benefit from collective expertise.
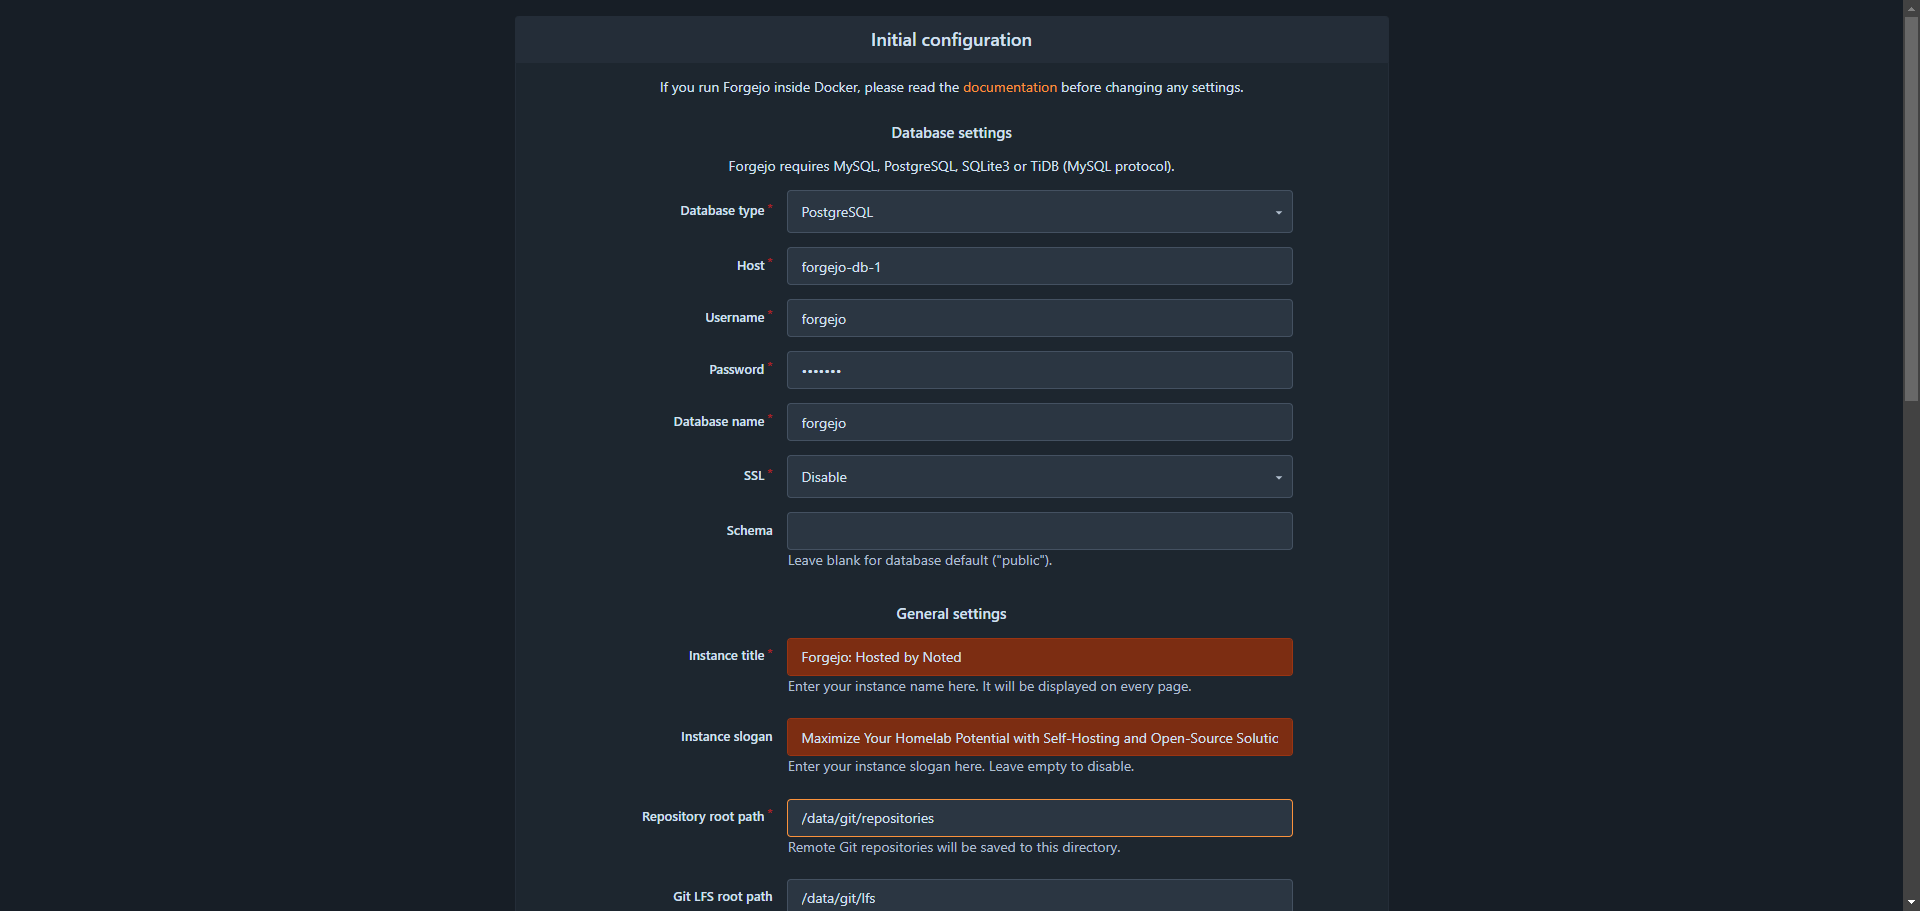
To ensure a secure installation, when using Docker to install Forgejo, make sure to set up your Cloudflare tunnel or Nginx domain beforehand. This is necessary for the installation process, and once complete, you can access the web interface by pointing your domain to port 3000.
This Docker Compose stack can be used to install Forgejo on your server. If you need help, see our guides about getting started with self-hosting. Refer to the Forgejo releases for the most recent version.
version: "3"

networks:
  forgejo:
    external: false

services:
  server:
    image: codeberg.org/forgejo/forgejo:8.0.1
    container_name: forgejo
    environment:
      - USER_UID=1000
      - USER_GID=1000
      - FORGEJO__database__DB_TYPE=postgres
      - FORGEJO__database__HOST=db:5432
      - FORGEJO__database__NAME=forgejo
      - FORGEJO__database__USER=forgejo
      - FORGEJO__database__PASSWD=forgejo
    restart: always
    networks:
      - forgejo
    volumes:
      - /docker/forgejo/data:/data
      - /etc/timezone:/etc/timezone:ro
      - /etc/localtime:/etc/localtime:ro
    ports:
      - "3000:3000"
      - "222:22"
    depends_on:
      - db

  db:
    image: postgres:14
    restart: always
    environment:
      - POSTGRES_USER=forgejo
      - POSTGRES_PASSWORD=forgejo
      - POSTGRES_DB=forgejo
    networks:
      - forgejo
    volumes:
      - /docker/forgejo/postgres:/var/lib/postgresql/data
For added security, when deploying Forgejo in production environments, it is strongly recommended to modify the default database username and password. In our demonstration setup, we'll utilize the default credentials for simplicity, but please update these settings before going live.
After setting up the Docker Compose stack, navigate to your designated domain to access the Forgejo installation page. Fill out the required information to complete the installation process.
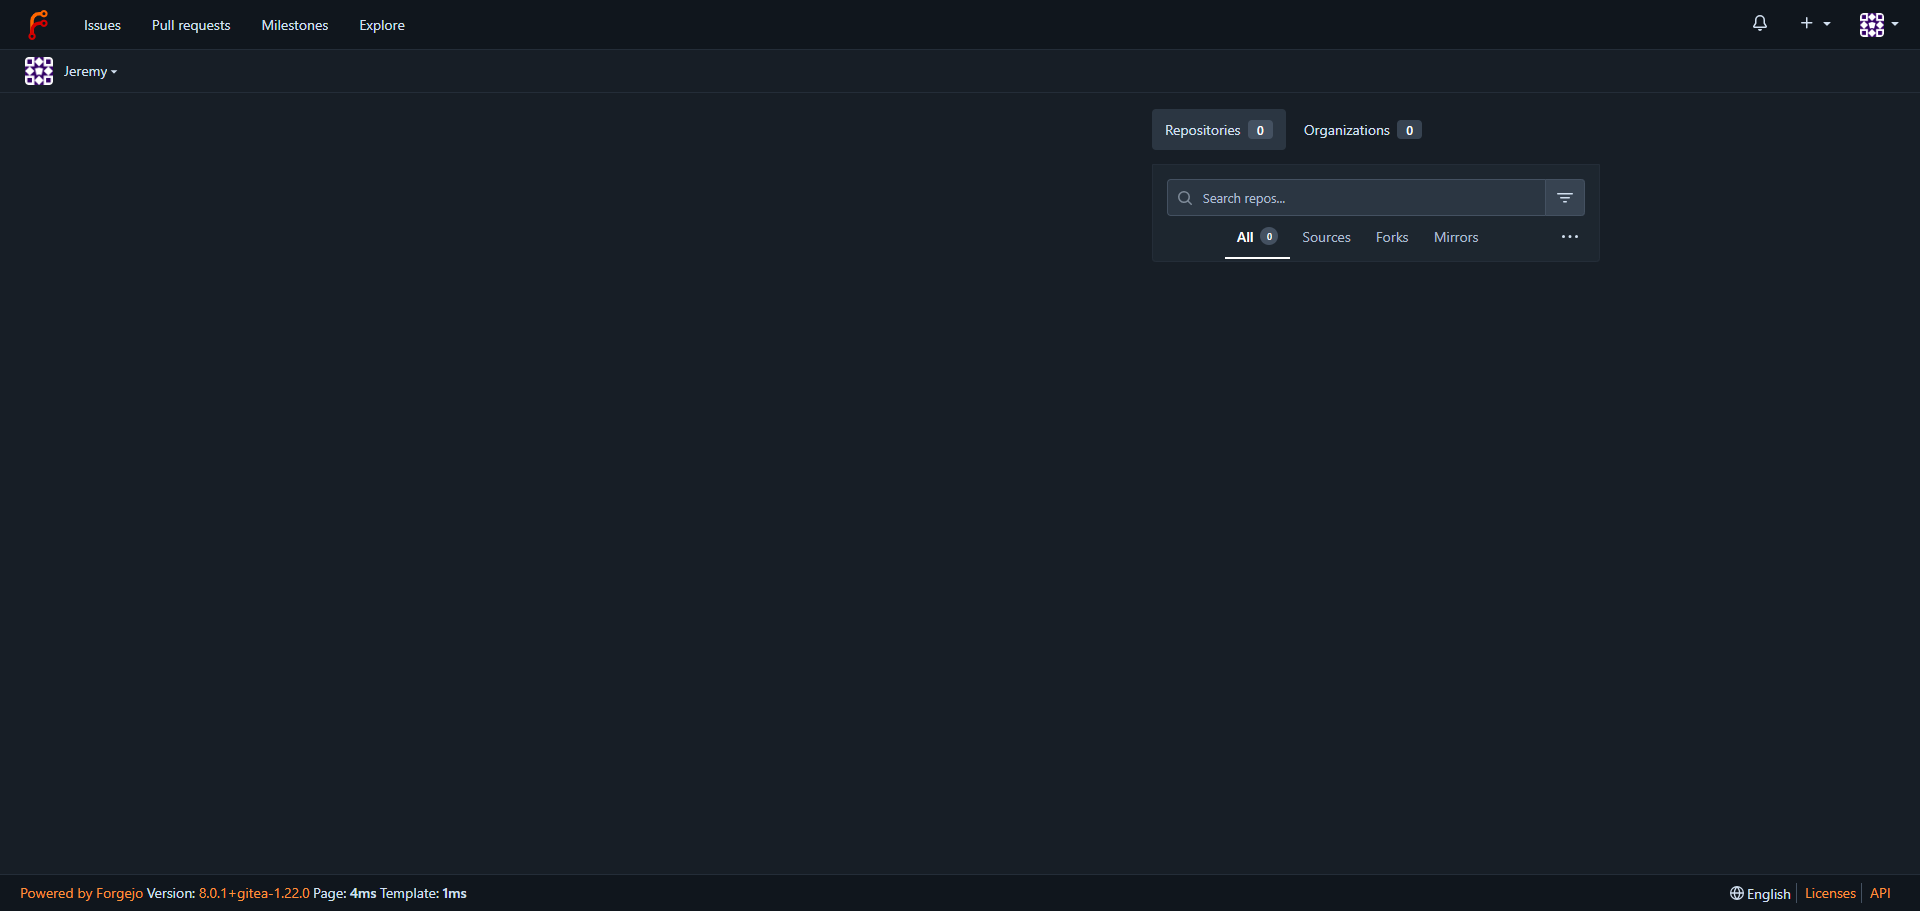
After completing the installation form, click the "Install" button to initiate the process. Once the installation is complete, you'll be automatically redirected to the main Forgejo dashboard. From here, you can start creating new repositories, organizations, or performing migrations to get started with managing your Git workflow.
As you begin your experience with Forgejo, remember that you're not just installing a Git service - you're joining a community committed to open-source principles. By choosing Forgejo, you're supporting a project that values transparency, collaboration, and the freedom to code without restrictions. With its flexible architecture and modular design, Forgejo enables you to tailor your Git workflow to meet your unique needs, while also contributing to the development of a platform that is truly yours.
";s:7:"attribs";a:0:{}s:8:"xml_base";s:0:"";s:17:"xml_base_explicit";b:0;s:8:"xml_lang";s:0:"";}}}}}i:4;a:6:{s:4:"data";s:0:"";s:7:"attribs";a:0:{}s:8:"xml_base";s:0:"";s:17:"xml_base_explicit";b:0;s:8:"xml_lang";s:0:"";s:5:"child";a:4:{s:0:"";a:6:{s:5:"title";a:1:{i:0;a:5:{s:4:"data";s:43:"Wavelog - Self-Hosted Amateur Radio Logging";s:7:"attribs";a:0:{}s:8:"xml_base";s:0:"";s:17:"xml_base_explicit";b:0;s:8:"xml_lang";s:0:"";}}s:11:"description";a:1:{i:0;a:5:{s:4:"data";s:98:"Self-hosted online amateur radio logging software to record and track your contacts from anywhere!";s:7:"attribs";a:0:{}s:8:"xml_base";s:0:"";s:17:"xml_base_explicit";b:0;s:8:"xml_lang";s:0:"";}}s:4:"link";a:1:{i:0;a:5:{s:4:"data";s:26:"https://noted.lol/wavelog/";s:7:"attribs";a:0:{}s:8:"xml_base";s:0:"";s:17:"xml_base_explicit";b:0;s:8:"xml_lang";s:0:"";}}s:4:"guid";a:1:{i:0;a:5:{s:4:"data";s:24:"66b76aad00ed580001bc6555";s:7:"attribs";a:1:{s:0:"";a:1:{s:11:"isPermaLink";s:5:"false";}}s:8:"xml_base";s:0:"";s:17:"xml_base_explicit";b:0;s:8:"xml_lang";s:0:"";}}s:8:"category";a:1:{i:0;a:5:{s:4:"data";s:12:"Self Hosting";s:7:"attribs";a:0:{}s:8:"xml_base";s:0:"";s:17:"xml_base_explicit";b:0;s:8:"xml_lang";s:0:"";}}s:7:"pubDate";a:1:{i:0;a:5:{s:4:"data";s:29:"Sun, 11 Aug 2024 13:16:00 GMT";s:7:"attribs";a:0:{}s:8:"xml_base";s:0:"";s:17:"xml_base_explicit";b:0;s:8:"xml_lang";s:0:"";}}}s:32:"http://purl.org/dc/elements/1.1/";a:1:{s:7:"creator";a:1:{i:0;a:5:{s:4:"data";s:6:"Jeremy";s:7:"attribs";a:0:{}s:8:"xml_base";s:0:"";s:17:"xml_base_explicit";b:0;s:8:"xml_lang";s:0:"";}}}s:29:"http://search.yahoo.com/mrss/";a:1:{s:7:"content";a:1:{i:0;a:5:{s:4:"data";s:0:"";s:7:"attribs";a:1:{s:0:"";a:2:{s:3:"url";s:70:"https://noted.lol/content/images/2024/08/wavelog-self-hosted-noted.jpg";s:6:"medium";s:5:"image";}}s:8:"xml_base";s:0:"";s:17:"xml_base_explicit";b:0;s:8:"xml_lang";s:0:"";}}}s:40:"http://purl.org/rss/1.0/modules/content/";a:1:{s:7:"encoded";a:1:{i:0;a:5:{s:4:"data";s:10924:"
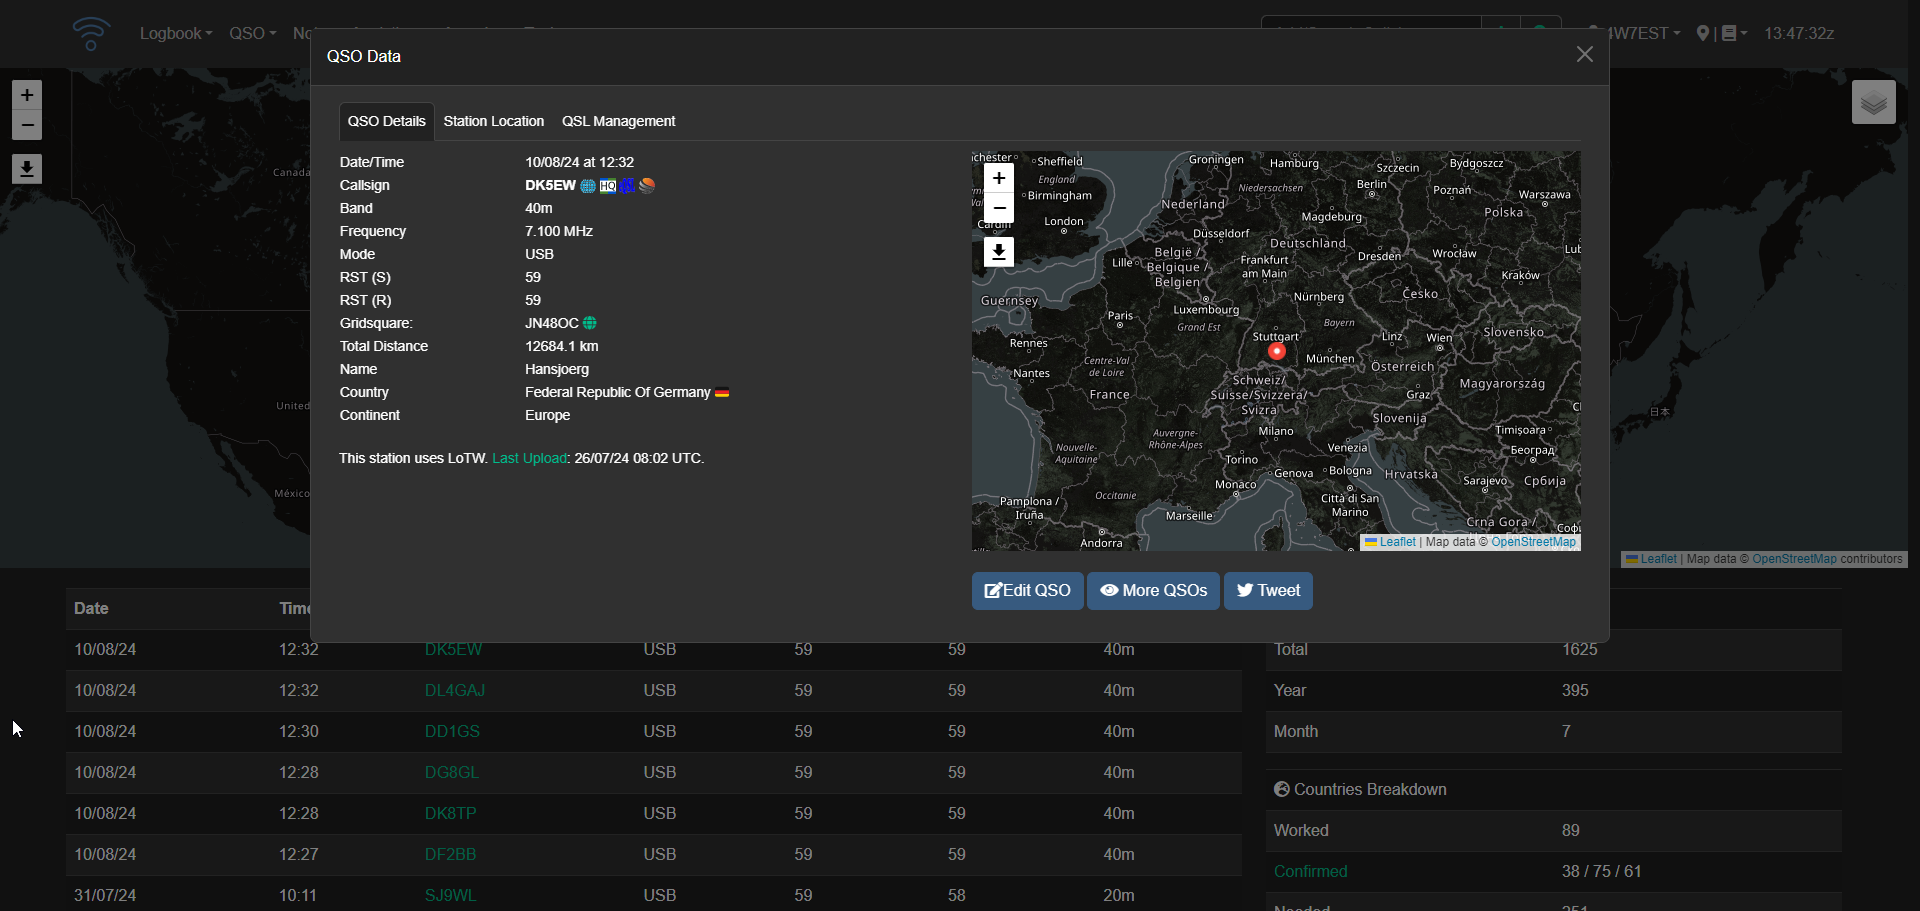
Amateur radio is a hobby where people around the world communicate with each other using special radios and frequencies. Ham radio operators, as they're called, love the thrill of making new contacts and sharing stories from all over the globe. But keeping track of those contacts can be a challenge. That's where Wavelog comes in! By self-hosting your contact logs on Wavelog, you avoid relying on third-party services and enjoy a more personalized experience.
Wavelog is a self-hosted PHP application that lets you log your amateur radio contacts from anywhere, as long as you have a web browser and an internet connection.
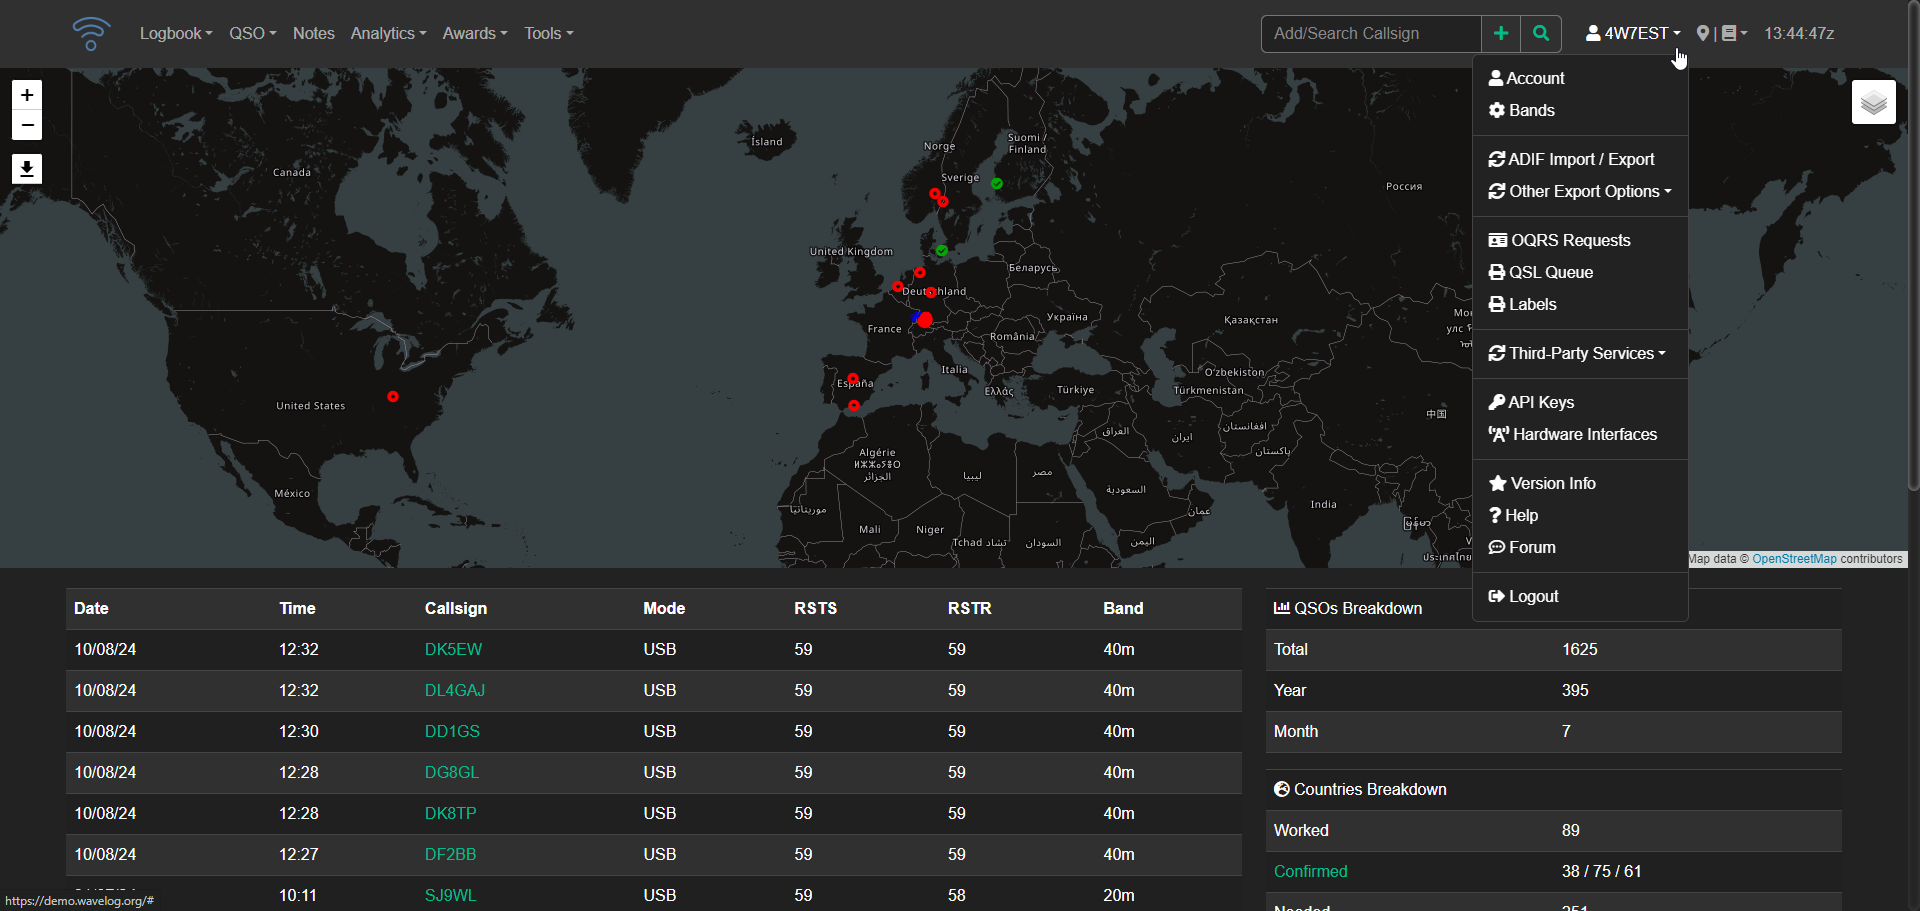
Wavelog's development began as a spin-off of Cloudlog in late 2023, driven by four core developers (DF2ET, DJ7NT, HB9HIL, and LA8AJA). Since its initial release on February 1, 2024, Wavelog has made significant progress in stability and functionality. As an open-source project developed by radio amateurs for fellow enthusiasts, Wavelog's code is the result of dedicated effort to continuously improve this great software. With a focus on simplicity, powerful tools, and transparency, Wavelog offers web-based logging accessible from anywhere worldwide. Whether hosted on a professional server, rented space, or a RaspberryPi at home, Wavelog enables you to manage your logbook whenever and wherever you want.
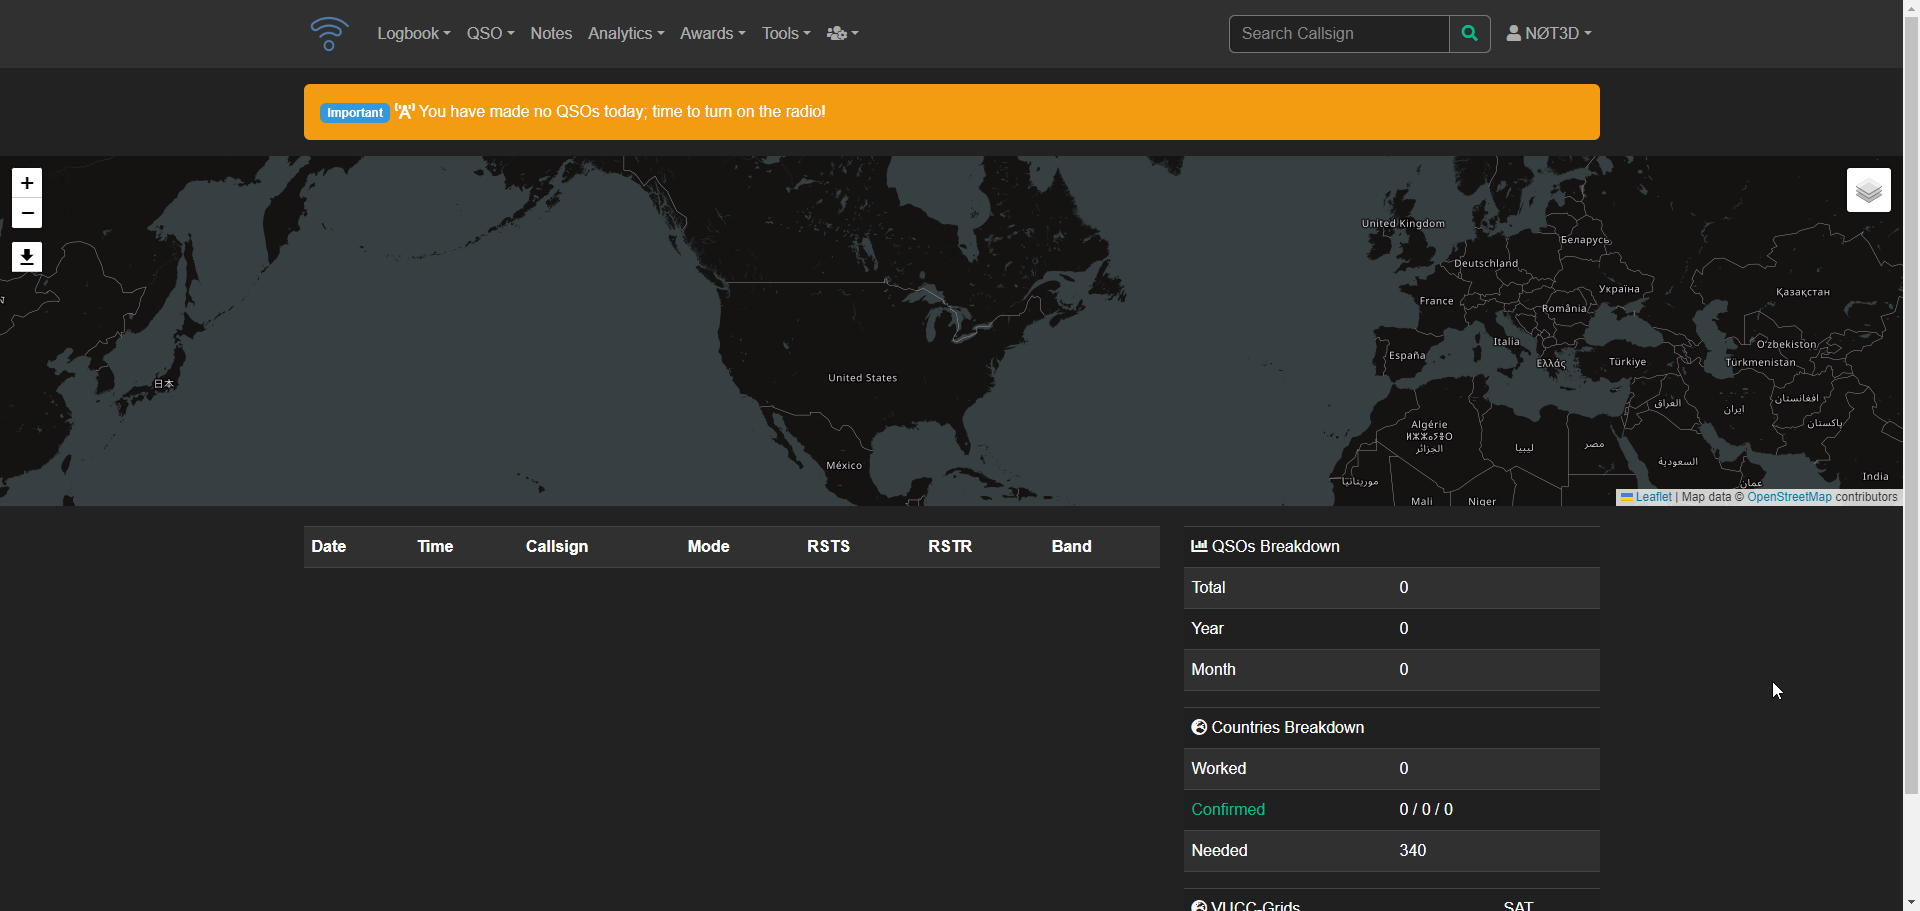
Wavelog offers a simple web interface for logging contacts. Additionally, the WLGate tool allows you to log contacts from WSJT-X or send CAT data from your radio directly to your Wavelog account. Supports: Windows, Mac, and Linux.
Wavelog includes advanced mapping features that enable you to easily create custom maps of your contacts. You can also export and share your QSOs as maps, or automatically include them in your QRZ.com bio.
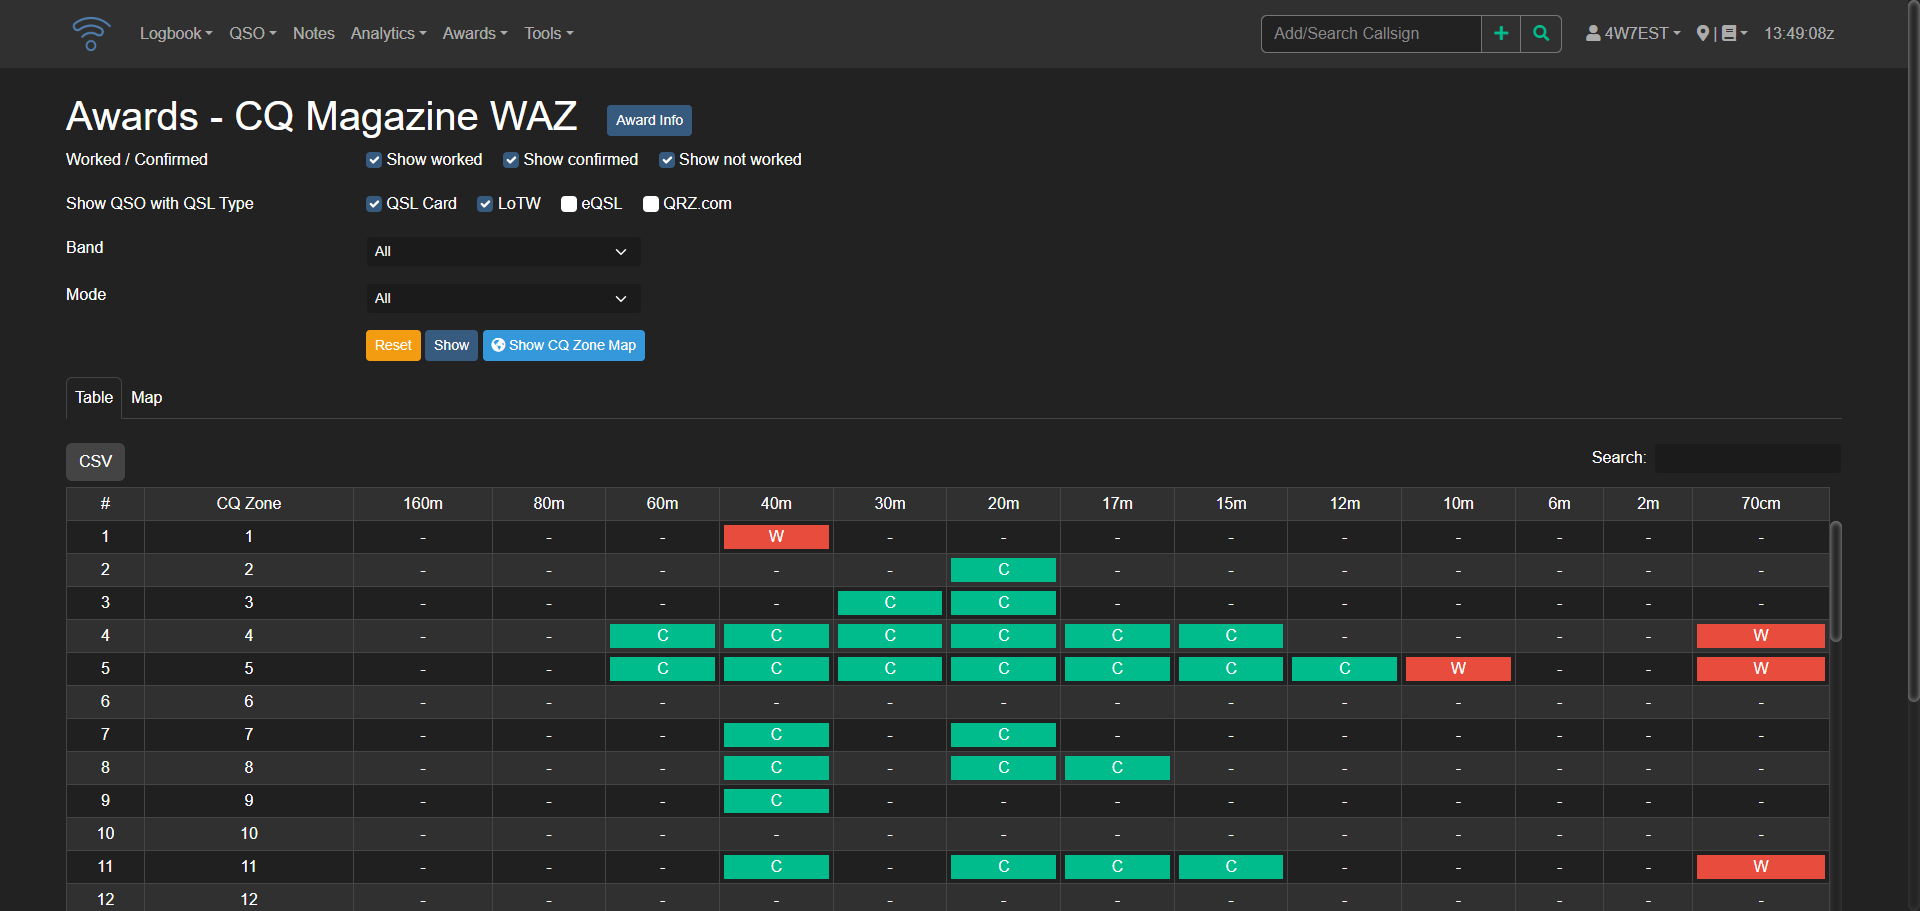
Wavelog also provides in-depth analytics to help you understand your ham radio activities. Some examples of what you can track and analyze include:
And many more insights to help you refine your amateur radio experience.
Wavelog also assists in analyzing your data, providing insights on how close you are to achieving your next award certificate. Currently, over 20 international award programs have been integrated into Wavelog, with more to come.
Wavelog supports seamless integration with popular third-party services, including:
Your logged contacts are automatically confirmed with eQSL and LoTW, and you can also view and upload scanned eQSL cards directly within the Wavelog web interface.
Wavelog is available in partial translation across 16 languages, thanks to the collaborative efforts of developers and the community. Some languages still require further refinement, but the software's global reach is a testament to the power of teamwork. Anyone interested in contributing to Wavelog's translations can join the platform and get involved.
This Docker Compose stack can be used to install Wavelog on your server. If you need help, see our guides about getting started with self-hosting.
---
services:
  wavelog-db:
    image: mariadb:11.3
    container_name: wavelog-db
    environment:
      MARIADB_RANDOM_ROOT_PASSWORD: yes
      MARIADB_DATABASE: wavelog
      MARIADB_USER: wavelog
      MARIADB_PASSWORD: wavelog # <- Insert a strong password here
    volumes:
      - wavelog-dbdata:/var/lib/mysql
    restart: unless-stopped

  wavelog-main:
    container_name: wavelog-main
    image: ghcr.io/wavelog/wavelog:latest
    depends_on:
      - wavelog-db
    environment:
      CI_ENV: docker
    volumes:
      - wavelog-config:/var/www/html/application/config/docker
      - wavelog-uploads:/var/www/html/uploads
      - wavelog-userdata:/var/www/html/userdata
    ports:
      - "8086:80"
    restart: unless-stopped

volumes:
  wavelog-dbdata:
  wavelog-uploads:
  wavelog-userdata:
  wavelog-config:
Access Wavelog by visiting the server's IP address on port 8086, where you'll initiate the pre check process.
To ensure Wavelog functions properly, you might need to adjust the permissions for three volumes within the wavelog-main container by running a CHMOD command. This allows the application to create and write files in these directories as needed.
If you leave everything in the Docker Compose as default, (as I did for testing purposes) this is what you will enter for the database section.
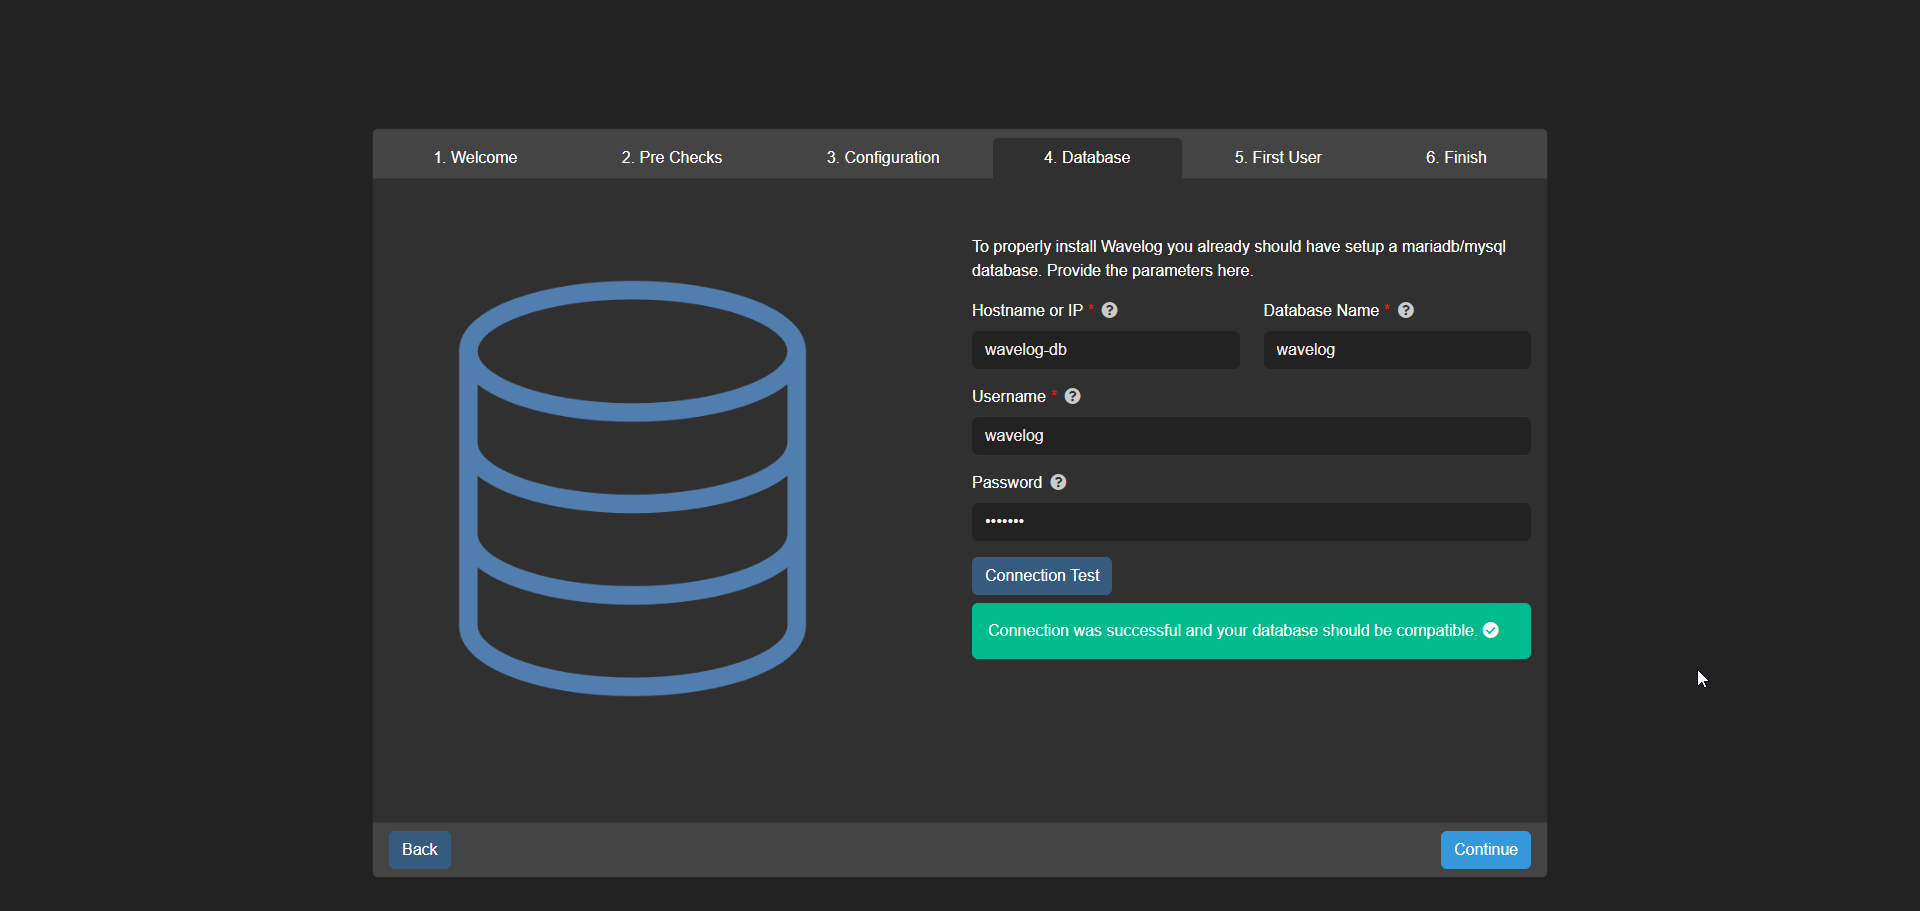
If you plan to deploy Wavelog through Cloudflare or a reverse proxy, it's strongly recommended that you update the Docker Compose configuration file to customize these settings.
If everything went well, you should see green checkmarks across the board.
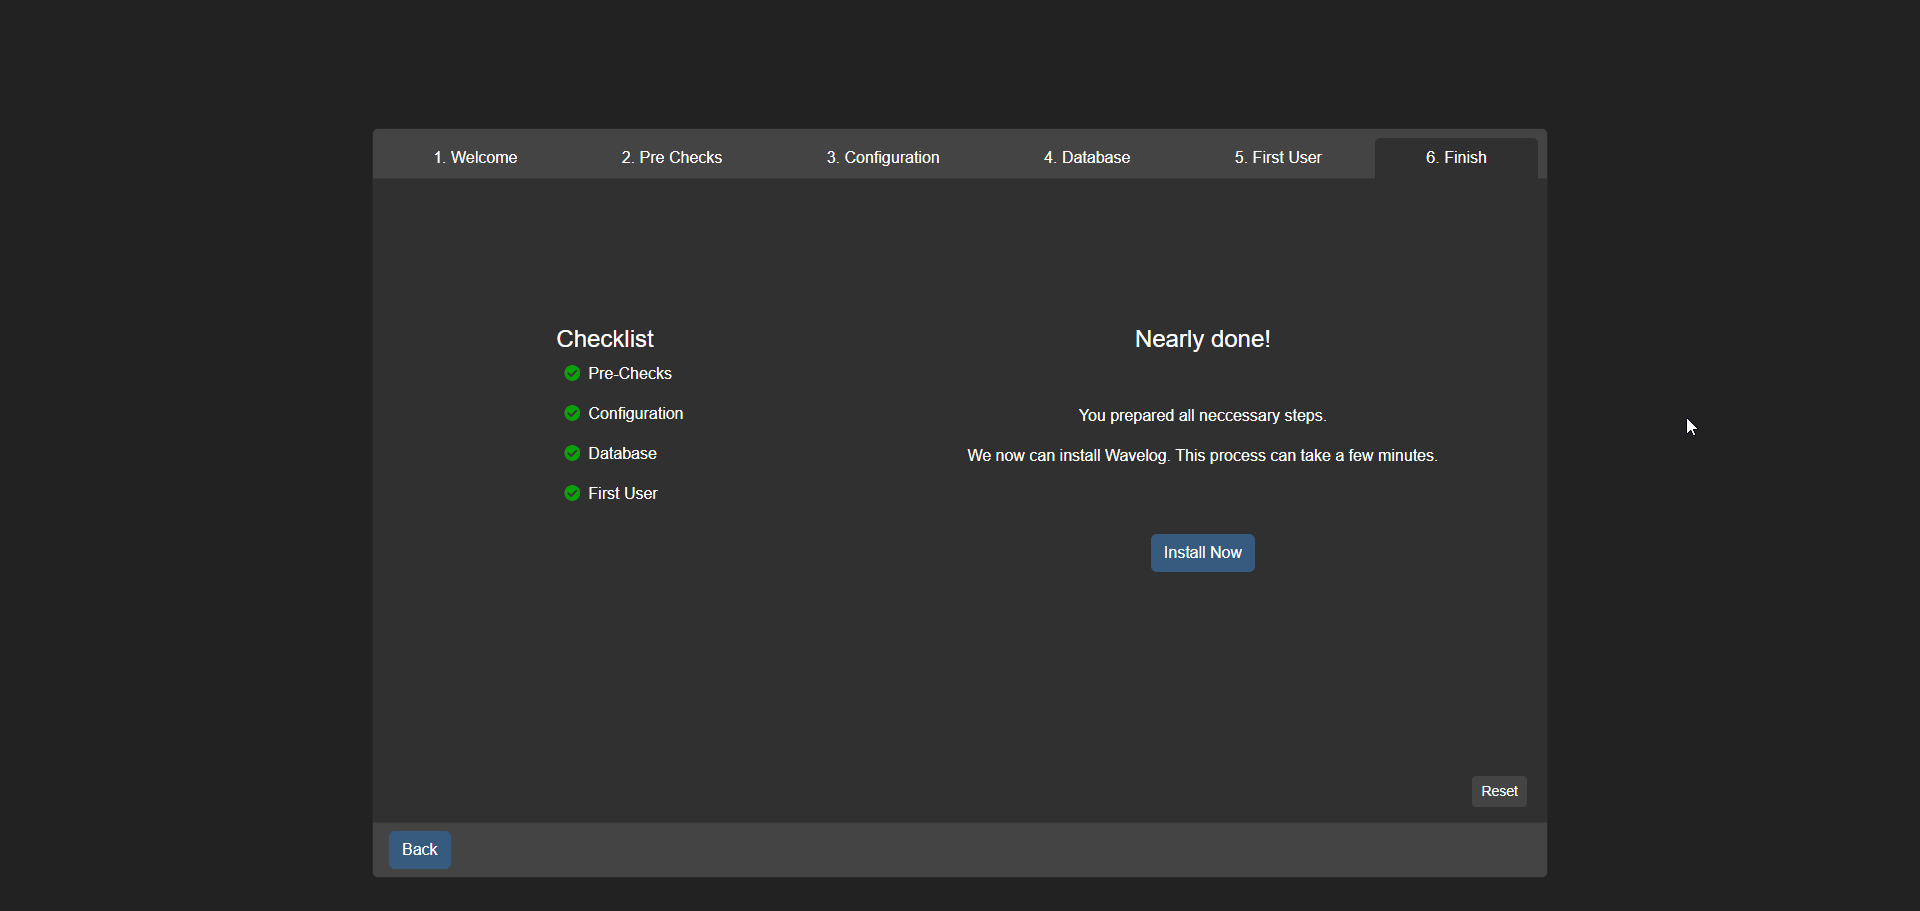
Once you've completed the pre check process, simply click 'Install Now' to finalize the setup and start using Wavelog for logging your amateur radio contacts.
Wavelog is more than just a tool for logging amateur radio contacts, it's a way to store and manage your QSOs exactly as you like, without relying on external services. By using Wavelog, you're getting a self-hosted solution that lets you keep your data private and customized to your needs. And with its open-source foundation, you have the power to shape the software's future and make it an even better fit for your ham radio journey.
Swing by the Wavelog Github repo and give it a star. Be sure to direct any support questions or feature requests on the issue tracker there.
";s:7:"attribs";a:0:{}s:8:"xml_base";s:0:"";s:17:"xml_base_explicit";b:0;s:8:"xml_lang";s:0:"";}}}}}i:5;a:6:{s:4:"data";s:0:"";s:7:"attribs";a:0:{}s:8:"xml_base";s:0:"";s:17:"xml_base_explicit";b:0;s:8:"xml_lang";s:0:"";s:5:"child";a:4:{s:0:"";a:6:{s:5:"title";a:1:{i:0;a:5:{s:4:"data";s:39:"Homelab Spotlight - 3D Printed NUC Rack";s:7:"attribs";a:0:{}s:8:"xml_base";s:0:"";s:17:"xml_base_explicit";b:0;s:8:"xml_lang";s:0:"";}}s:11:"description";a:1:{i:0;a:5:{s:4:"data";s:92:"Homelab Spotlight makes a come back with Reddit user u/NeyPalm and their 6 NUC rack cluster!";s:7:"attribs";a:0:{}s:8:"xml_base";s:0:"";s:17:"xml_base_explicit";b:0;s:8:"xml_lang";s:0:"";}}s:4:"link";a:1:{i:0;a:5:{s:4:"data";s:38:"https://noted.lol/3d-printed-nuc-rack/";s:7:"attribs";a:0:{}s:8:"xml_base";s:0:"";s:17:"xml_base_explicit";b:0;s:8:"xml_lang";s:0:"";}}s:4:"guid";a:1:{i:0;a:5:{s:4:"data";s:24:"66abef5b1df9fc0001455e5e";s:7:"attribs";a:1:{s:0:"";a:1:{s:11:"isPermaLink";s:5:"false";}}s:8:"xml_base";s:0:"";s:17:"xml_base_explicit";b:0;s:8:"xml_lang";s:0:"";}}s:8:"category";a:1:{i:0;a:5:{s:4:"data";s:17:"Homelab Spotlight";s:7:"attribs";a:0:{}s:8:"xml_base";s:0:"";s:17:"xml_base_explicit";b:0;s:8:"xml_lang";s:0:"";}}s:7:"pubDate";a:1:{i:0;a:5:{s:4:"data";s:29:"Fri, 09 Aug 2024 17:46:49 GMT";s:7:"attribs";a:0:{}s:8:"xml_base";s:0:"";s:17:"xml_base_explicit";b:0;s:8:"xml_lang";s:0:"";}}}s:32:"http://purl.org/dc/elements/1.1/";a:1:{s:7:"creator";a:1:{i:0;a:5:{s:4:"data";s:6:"Jeremy";s:7:"attribs";a:0:{}s:8:"xml_base";s:0:"";s:17:"xml_base_explicit";b:0;s:8:"xml_lang";s:0:"";}}}s:29:"http://search.yahoo.com/mrss/";a:1:{s:7:"content";a:1:{i:0;a:5:{s:4:"data";s:0:"";s:7:"attribs";a:1:{s:0:"";a:2:{s:3:"url";s:82:"https://noted.lol/content/images/2024/08/3d-printed-nuc-rack-homelab-spotlight.jpg";s:6:"medium";s:5:"image";}}s:8:"xml_base";s:0:"";s:17:"xml_base_explicit";b:0;s:8:"xml_lang";s:0:"";}}}s:40:"http://purl.org/rss/1.0/modules/content/";a:1:{s:7:"encoded";a:1:{i:0;a:5:{s:4:"data";s:5934:"
I recently had the opportunity to conduct a Q&A session with Reddit user u/NeyPalm. After I saw their impressive homelab setup posted on r/homelab, I knew I had to share it with all of you. The level of detail and expertise on display is truly remarkable, and I think many people would benefit from seeing how they've put together this system.
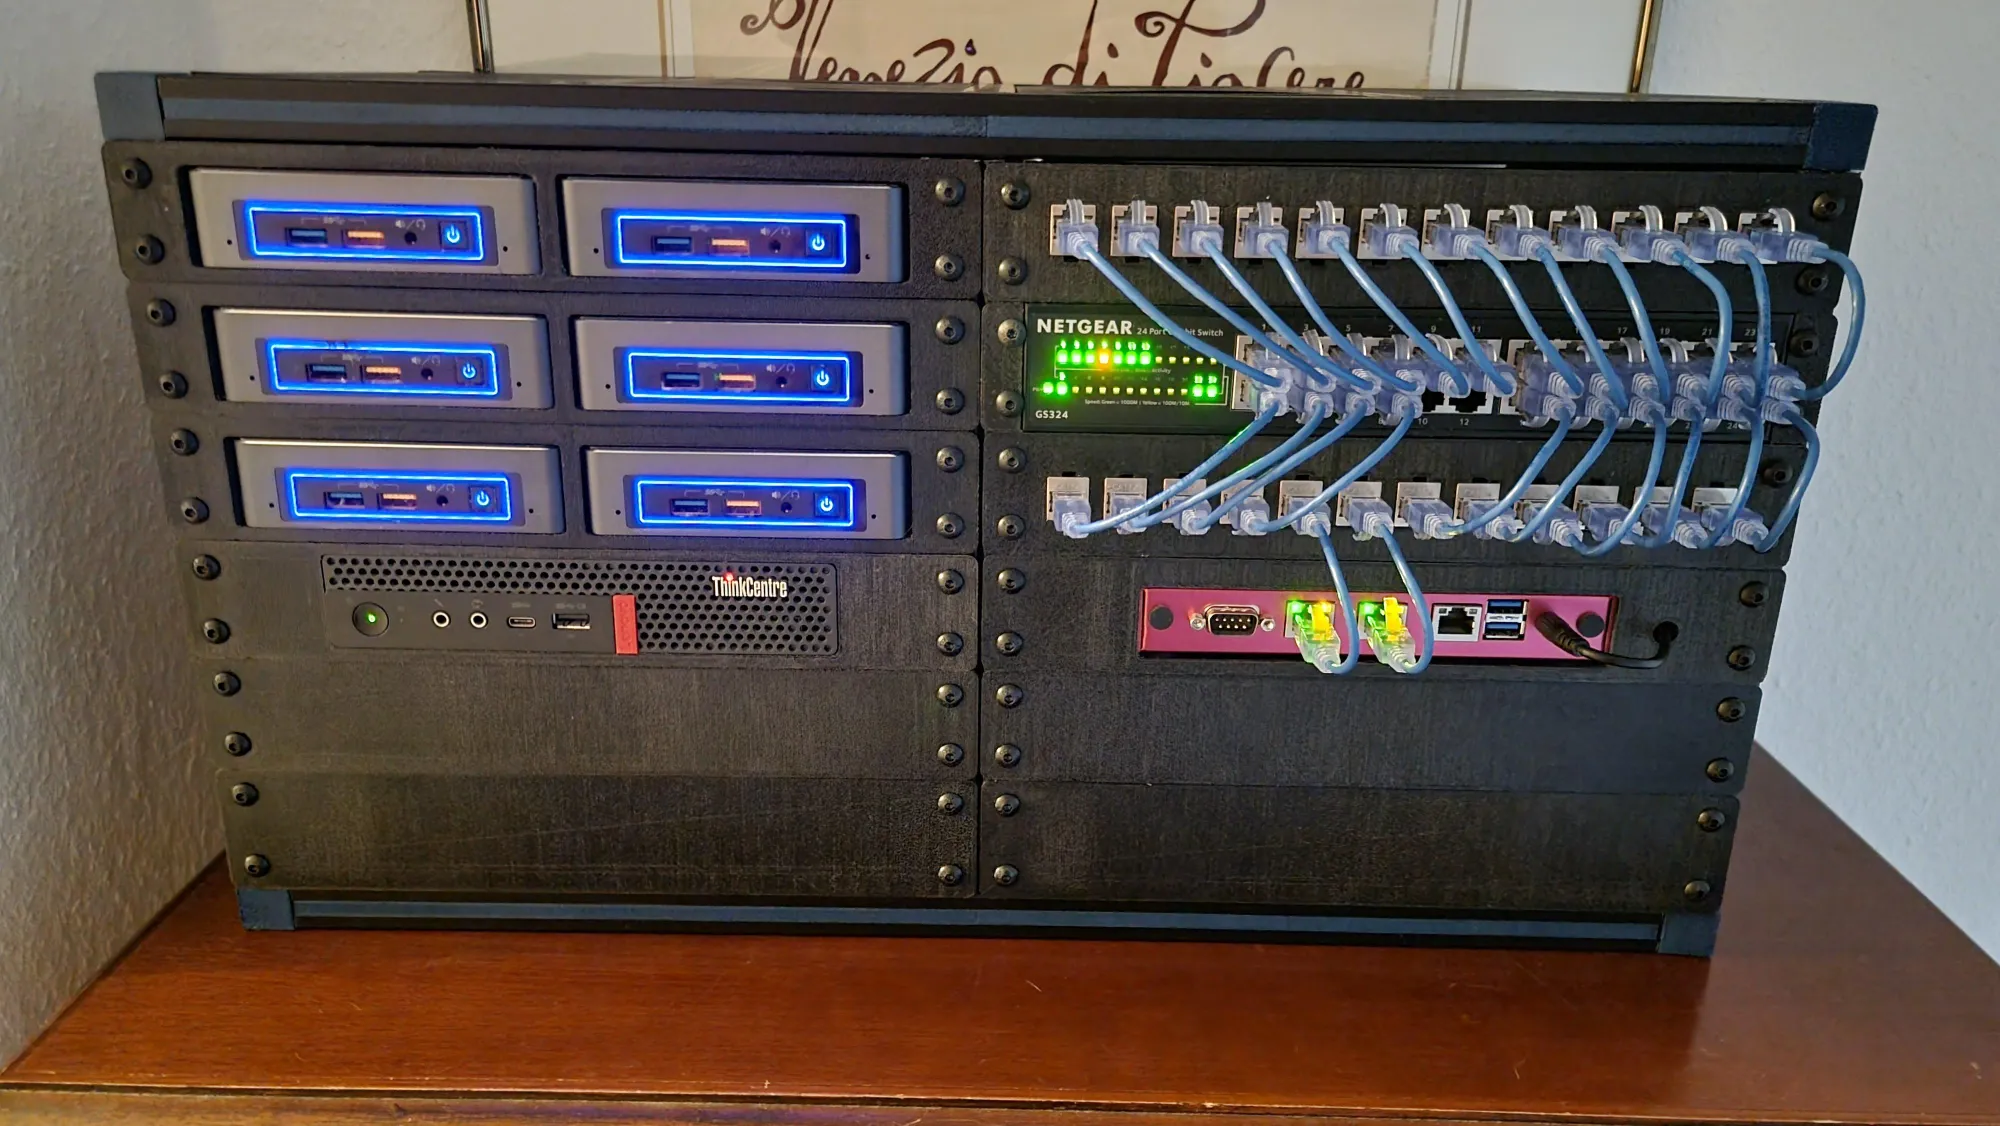
Tell us about the hardware in this homelab setup.
My Homelab is only for my in-house IT and is intended as a playground for further training, testing services and simplifying everyday life.
Specs: 6x NUC7i3BNK each with 16GB RAM, Thinkcentre M720q 32GB, Netgear GS324 Switch 24 Port and a PC Engines APU 2D4 16GB Ram Firewall
The Thinkcentre is my ProxMox on which all services run. I also use the APU2 board as a firewall/router and the NUC Cluster as a Kubernetes playground.
What inspired you to build the 3D rack and for what purpose? It sure looks awesome! But was it just for aesthetics?
I wanted to have (almost) all my IT in one place. However, I had the problem that some things didn't fit into a 10inch rack and I decided to build a custom rack because I don't have the space for a 19inch rack. Besides, building it is certainly as much fun as using it afterwards. Aesthetics of course also play a big role, as it's quite open in my house and everyone can see it.

What 3D printer do you use?
I'm using a Anycubic Vyper. Its a 245x245 and it was pretty challenging to fit some parts on the bed. The panels are 28cm long, it was a tight fit diagonal.
Can you share any files or links for the 3D project?
I have shared some files under the following link: https://www.thingiverse.com/thing:6593228 Please note that these files were created for exactly my setup with custom sizes that are not standard.
What self-hosted applications are you running on this setup?
I used the NUC cluster to learn about Kubernetes, more precisely to build a barebones cluster and to train myself further for work. The Lenovo ThinkCentre runs Proxmox with some services like Docker, Plex with Debrid/Servarr Stack, Pihole, Bookstack and some Unix machines for testing. The PC Engines APU2 board is my router, it ran for Pfsense some time, but I have now switched to OPNsense because I had some problems with PFsense and because i didnt like.
Have you added anything to it since the Reddit post? Any new photos you'd like to share?
The rack is currently being rebuilt. I no longer have any use for the NUC cluster and some of these machines are being replaced with other ThinkCentres to build a ProxMox cluster so that I have more computing power available and build redundancy. As I still have space available, I have other options in the pipeline that I can't say anything more about at the moment.

I'm really impressed by this homelab setup! It's one of the coolest I've seen in a while. If you're not already inspired to build your own, I don't know what would be! And speaking of inspiration, wouldn't this make an amazing first post for someone starting a blog? Hint hint u/NeyPalm. 🙂
";s:7:"attribs";a:0:{}s:8:"xml_base";s:0:"";s:17:"xml_base_explicit";b:0;s:8:"xml_lang";s:0:"";}}}}}i:6;a:6:{s:4:"data";s:0:"";s:7:"attribs";a:0:{}s:8:"xml_base";s:0:"";s:17:"xml_base_explicit";b:0;s:8:"xml_lang";s:0:"";s:5:"child";a:4:{s:0:"";a:6:{s:5:"title";a:1:{i:0;a:5:{s:4:"data";s:45:"Snapp - Yet Another Self-Hosted Url Shortener";s:7:"attribs";a:0:{}s:8:"xml_base";s:0:"";s:17:"xml_base_explicit";b:0;s:8:"xml_lang";s:0:"";}}s:11:"description";a:1:{i:0;a:5:{s:4:"data";s:69:"Snapp empowers you to effortlessly create and manage shortened links.";s:7:"attribs";a:0:{}s:8:"xml_base";s:0:"";s:17:"xml_base_explicit";b:0;s:8:"xml_lang";s:0:"";}}s:4:"link";a:1:{i:0;a:5:{s:4:"data";s:24:"https://noted.lol/snapp/";s:7:"attribs";a:0:{}s:8:"xml_base";s:0:"";s:17:"xml_base_explicit";b:0;s:8:"xml_lang";s:0:"";}}s:4:"guid";a:1:{i:0;a:5:{s:4:"data";s:24:"669ff5dccaf0210001ac6379";s:7:"attribs";a:1:{s:0:"";a:1:{s:11:"isPermaLink";s:5:"false";}}s:8:"xml_base";s:0:"";s:17:"xml_base_explicit";b:0;s:8:"xml_lang";s:0:"";}}s:8:"category";a:1:{i:0;a:5:{s:4:"data";s:26:"Self Hosted URL Shorteners";s:7:"attribs";a:0:{}s:8:"xml_base";s:0:"";s:17:"xml_base_explicit";b:0;s:8:"xml_lang";s:0:"";}}s:7:"pubDate";a:1:{i:0;a:5:{s:4:"data";s:29:"Thu, 08 Aug 2024 14:49:00 GMT";s:7:"attribs";a:0:{}s:8:"xml_base";s:0:"";s:17:"xml_base_explicit";b:0;s:8:"xml_lang";s:0:"";}}}s:32:"http://purl.org/dc/elements/1.1/";a:1:{s:7:"creator";a:1:{i:0;a:5:{s:4:"data";s:6:"Jeremy";s:7:"attribs";a:0:{}s:8:"xml_base";s:0:"";s:17:"xml_base_explicit";b:0;s:8:"xml_lang";s:0:"";}}}s:29:"http://search.yahoo.com/mrss/";a:1:{s:7:"content";a:1:{i:0;a:5:{s:4:"data";s:0:"";s:7:"attribs";a:1:{s:0:"";a:2:{s:3:"url";s:91:"https://noted.lol/content/images/2024/07/snapp-self-hosted-url-shortener-main-noted.lol.jpg";s:6:"medium";s:5:"image";}}s:8:"xml_base";s:0:"";s:17:"xml_base_explicit";b:0;s:8:"xml_lang";s:0:"";}}}s:40:"http://purl.org/rss/1.0/modules/content/";a:1:{s:7:"encoded";a:1:{i:0;a:5:{s:4:"data";s:6019:"
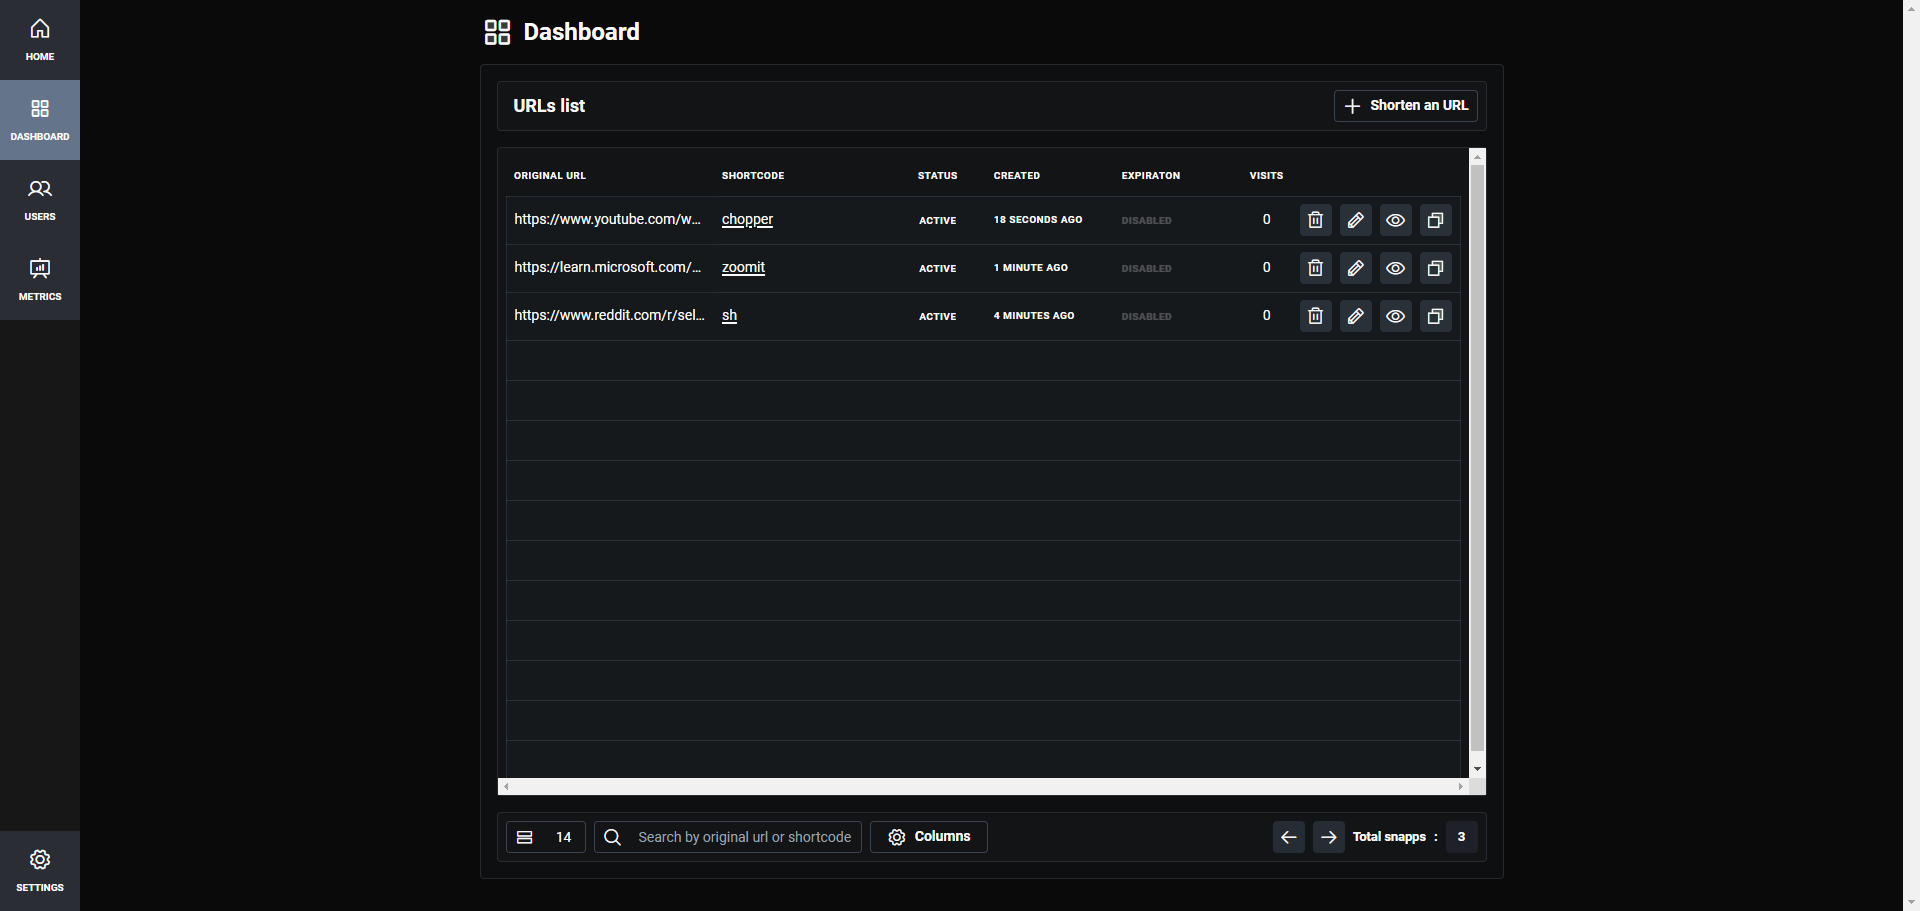
Introducing Snapp, a reliable self-hosted URL shortener, crafted to simplify link collecting and sharing.
Snapp is your self-hostable URL shortening service. Effortlessly shorten links, and with Snapp's self-hosting capability, you have complete control. Create concise, shareable links on your terms with Snapp's user-friendly platform.
Snapp was created with an emphasis on privacy and control. With Snapp, you get to personalize your link endings, monitor how many times your links are clicked, and for an extra layer of security, you can set expiration dates on your links.
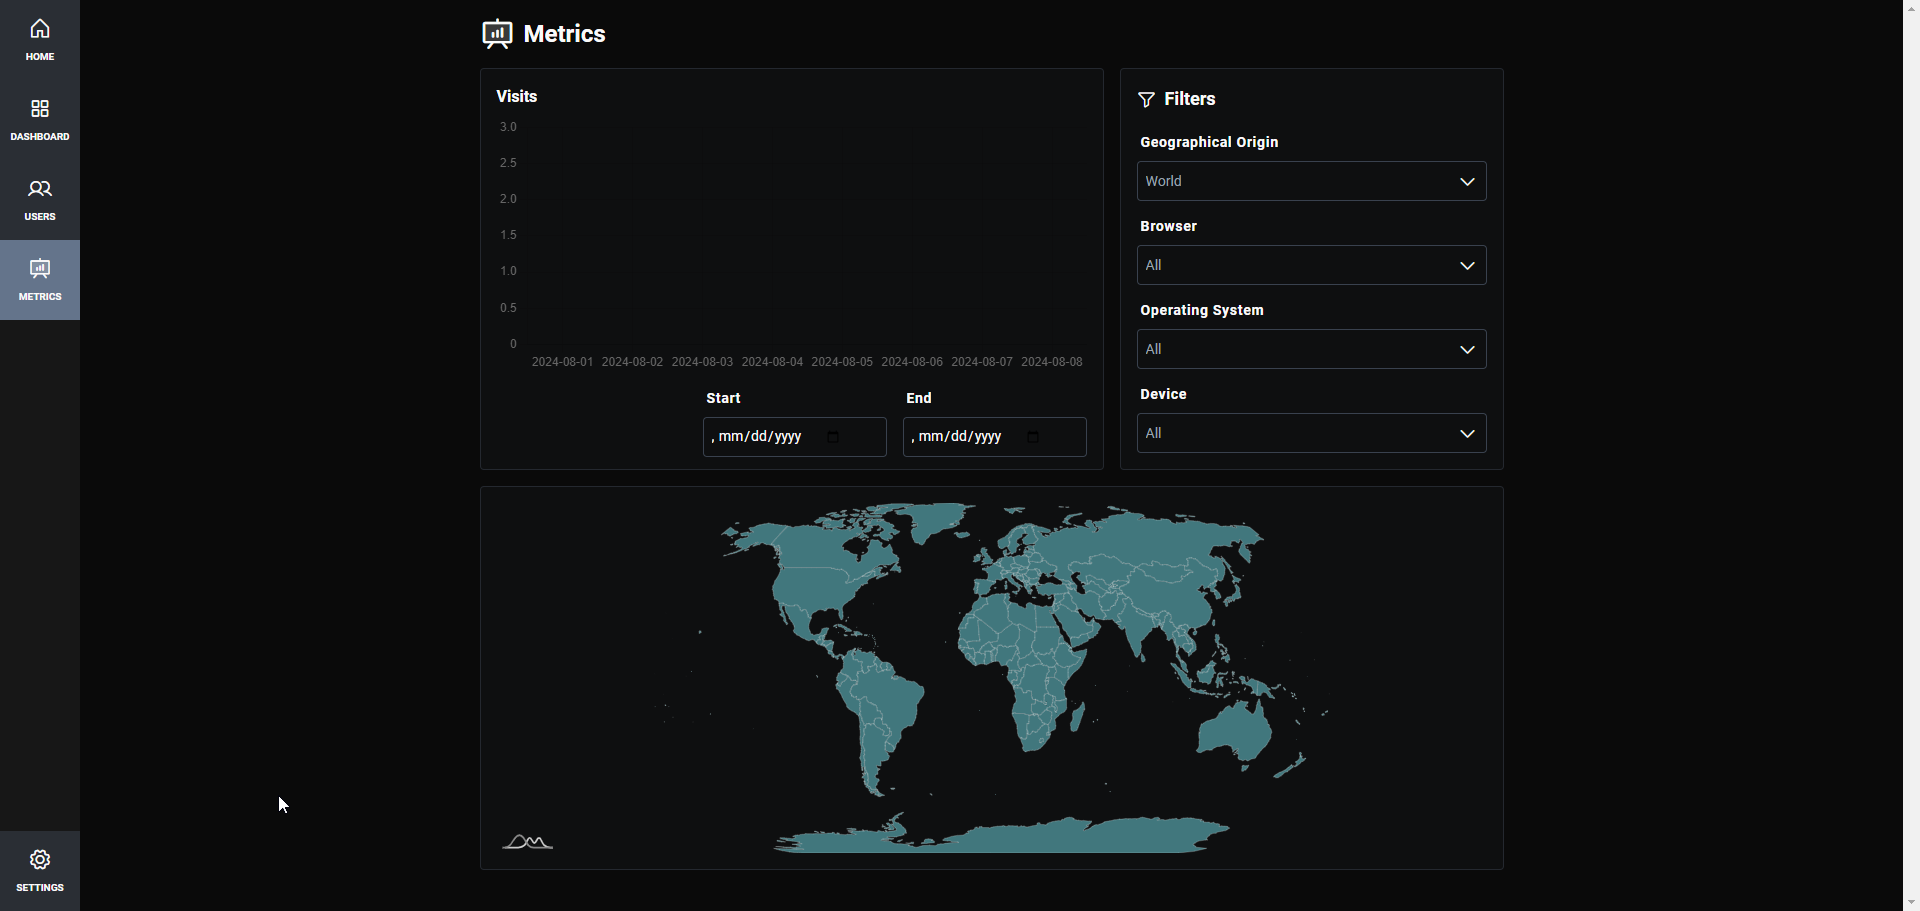
Snapp started as a way for the developer to learn Svelte, Svelte5 Runes, and Tabler, which form the core of Snapp's functionality.
Snapp's easy installation using Docker allows you to get it up and running in seconds on your homelab or cloud host. If you need help, see our guides about getting started with self-hosting.
Use the following Docker run command to install Snapp on your system.
services:
  snapp:
    image: uraniadev/snapp:0.8
    ports:
      - 3000:3000
    environment:
      DATABASE_URL: 'file:./db.sqlite'
      DATABASE_PROVIDER: sqlite # mysql | sqlite | pg
      TOKEN_SECRET: # openssl rand -base64 32
ORIGIN: https://example.comNote: SQLite database is located in /app/prisma/{DATABASE_URL} if you want to mount it
If ENV variables ADMIN_USERNAME and ADMIN_PASSWORD are not set it defaults to:
  username: admin
  password: password
To get started, simply update the origin and public URL to your domain or local IP, and then access it through your web browser.
You can then begin adding links to be shortened.
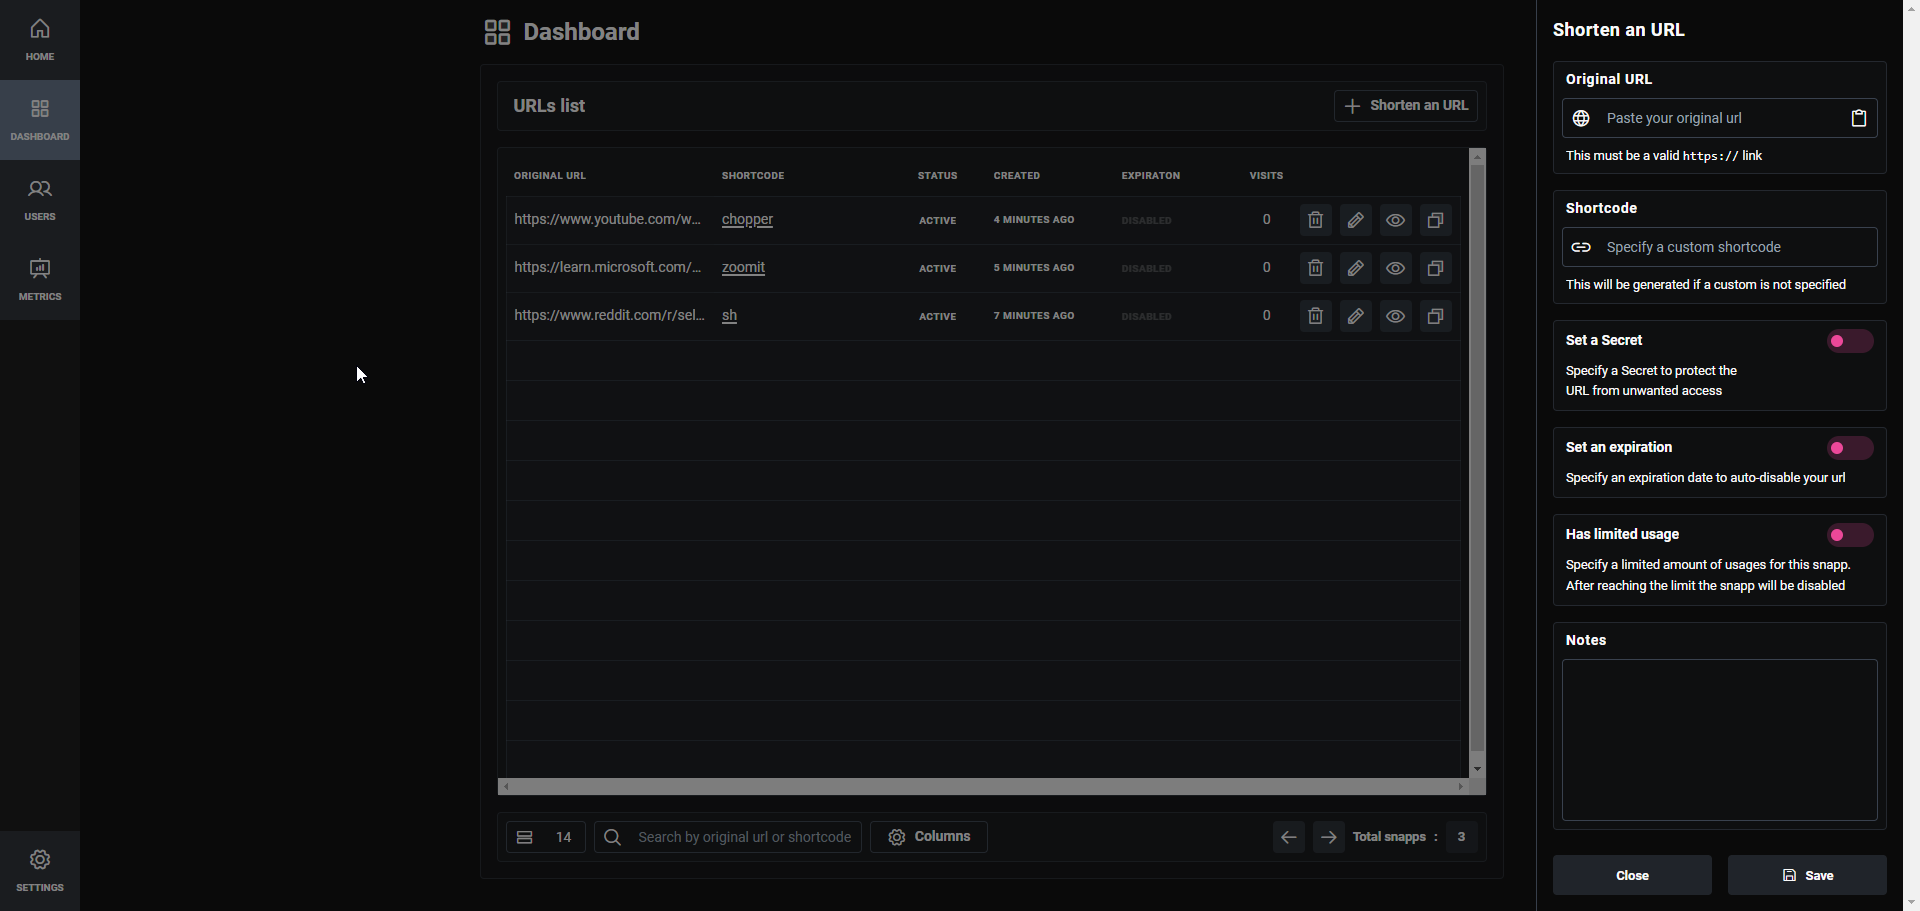
Snapp is user-friendly and functions smoothly right away. I encountered a minor hiccup where the initial URL page didn't generate the custom short code on the first try. Instead, it gave it a random one so I had to edit the link and save it once more for it to work. Aside from that, it operates effectively, and I suggest you try it out! If you like using Snapp, don't forget to visit the Snapp GitHub repository and show your support with a star!
";s:7:"attribs";a:0:{}s:8:"xml_base";s:0:"";s:17:"xml_base_explicit";b:0;s:8:"xml_lang";s:0:"";}}}}}i:7;a:6:{s:4:"data";s:0:"";s:7:"attribs";a:0:{}s:8:"xml_base";s:0:"";s:17:"xml_base_explicit";b:0;s:8:"xml_lang";s:0:"";s:5:"child";a:4:{s:0:"";a:6:{s:5:"title";a:1:{i:0;a:5:{s:4:"data";s:60:"Automate your Proxmox Homelab with Proxmox VE Helper Scripts";s:7:"attribs";a:0:{}s:8:"xml_base";s:0:"";s:17:"xml_base_explicit";b:0;s:8:"xml_lang";s:0:"";}}s:11:"description";a:1:{i:0;a:5:{s:4:"data";s:53:"Super cool scripts for Promox VE that automate tasks.";s:7:"attribs";a:0:{}s:8:"xml_base";s:0:"";s:17:"xml_base_explicit";b:0;s:8:"xml_lang";s:0:"";}}s:4:"link";a:1:{i:0;a:5:{s:4:"data";s:44:"https://noted.lol/proxmox-ve-helper-scripts/";s:7:"attribs";a:0:{}s:8:"xml_base";s:0:"";s:17:"xml_base_explicit";b:0;s:8:"xml_lang";s:0:"";}}s:4:"guid";a:1:{i:0;a:5:{s:4:"data";s:24:"66af7cc11df9fc0001455f78";s:7:"attribs";a:1:{s:0:"";a:1:{s:11:"isPermaLink";s:5:"false";}}s:8:"xml_base";s:0:"";s:17:"xml_base_explicit";b:0;s:8:"xml_lang";s:0:"";}}s:8:"category";a:1:{i:0;a:5:{s:4:"data";s:12:"Homelab Tips";s:7:"attribs";a:0:{}s:8:"xml_base";s:0:"";s:17:"xml_base_explicit";b:0;s:8:"xml_lang";s:0:"";}}s:7:"pubDate";a:1:{i:0;a:5:{s:4:"data";s:29:"Wed, 07 Aug 2024 17:10:36 GMT";s:7:"attribs";a:0:{}s:8:"xml_base";s:0:"";s:17:"xml_base_explicit";b:0;s:8:"xml_lang";s:0:"";}}}s:32:"http://purl.org/dc/elements/1.1/";a:1:{s:7:"creator";a:1:{i:0;a:5:{s:4:"data";s:6:"Jeremy";s:7:"attribs";a:0:{}s:8:"xml_base";s:0:"";s:17:"xml_base_explicit";b:0;s:8:"xml_lang";s:0:"";}}}s:29:"http://search.yahoo.com/mrss/";a:1:{s:7:"content";a:1:{i:0;a:5:{s:4:"data";s:0:"";s:7:"attribs";a:1:{s:0:"";a:2:{s:3:"url";s:78:"https://noted.lol/content/images/2024/08/proxmox-helper-scripts-main-noted.jpg";s:6:"medium";s:5:"image";}}s:8:"xml_base";s:0:"";s:17:"xml_base_explicit";b:0;s:8:"xml_lang";s:0:"";}}}s:40:"http://purl.org/rss/1.0/modules/content/";a:1:{s:7:"encoded";a:1:{i:0;a:5:{s:4:"data";s:9587:"
For those who use Proxmox VE as part of their home lab setup, these helper scripts can be a valuable asset. By streamlining the process of setting up and deploying applications and tools, they make it possible to get started with new projects and experiments more quickly and efficiently.
The Proxmox VE Helper Scripts were developed to simplify the process of deploying self-hosted applications and tools using Promox Virtual Environment. These scripts have gained popularity among users, particularly those who create and share their own homelab setups online. Notably, they've been featured by popular YouTuber TechnoTim, a well-known figure in the homelab community. With over 12,000 stars on GitHub, these scripts are highly respected for making it easier to set up and manage virtual environments.
The Proxmox VE Helper Scripts repository offers a vast collection of nearly 200 pre-configured applications and tools, each accessible via a one line bash script that handles installation, updates, and configuration.
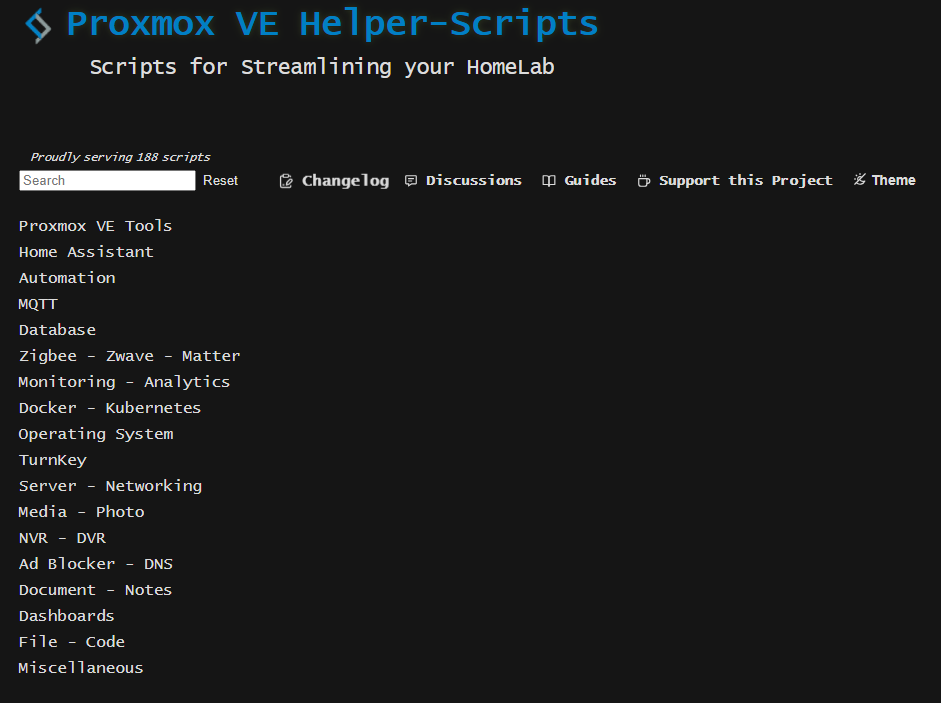
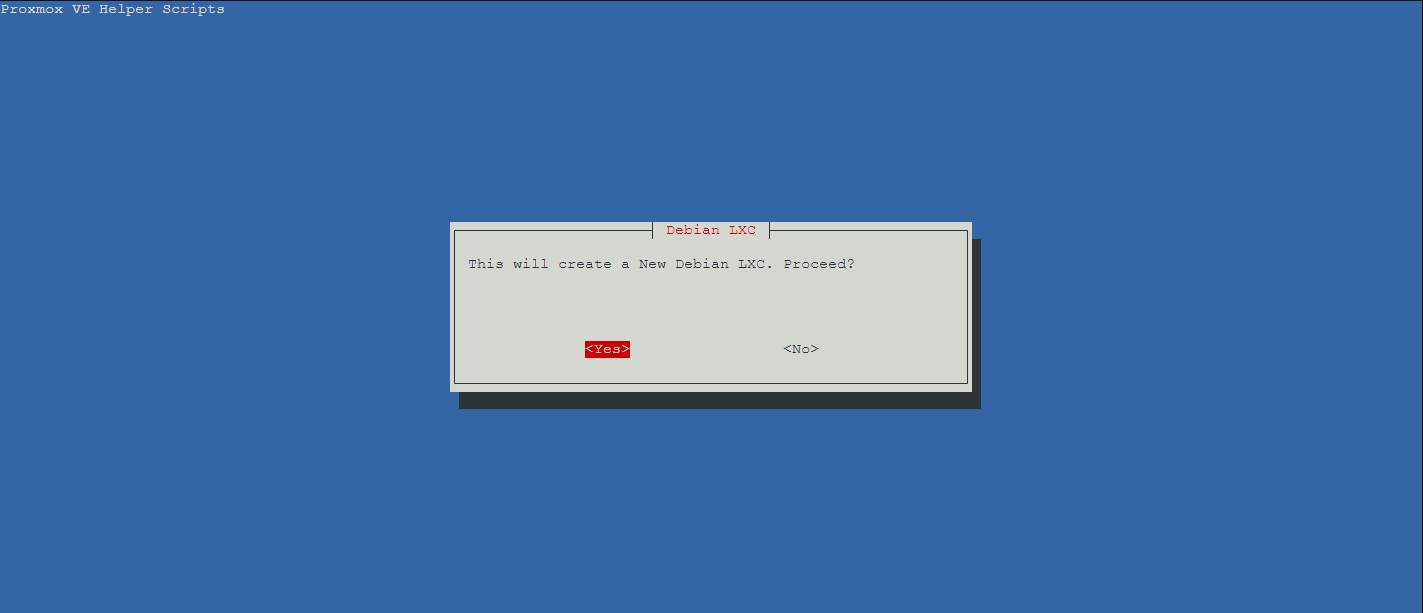
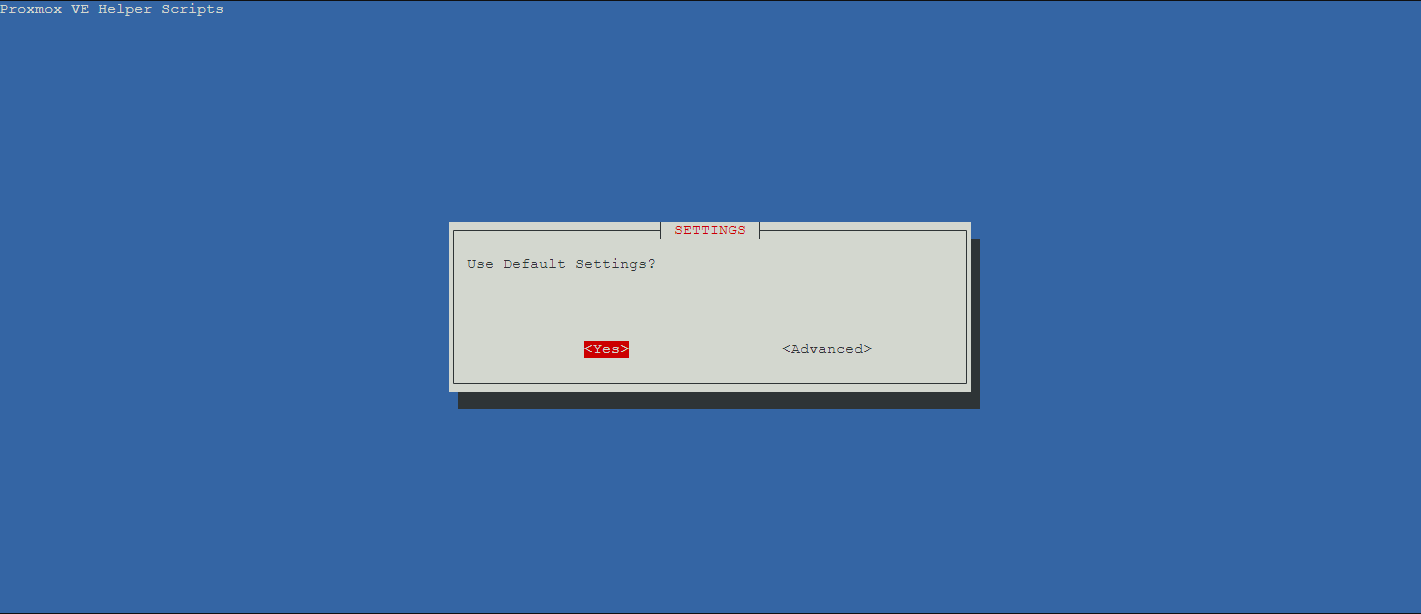
You can use these scripts to create a Linux container or virtual machine by making choices interactively. You'll see options in a window that helps you set up your container or virtual machine.
There are two ways to do this: one is simple and uses default settings, and the other lets you customize those defaults if you want to. When you make your selections, the script will gather and check your input to create the final setup for your container or virtual machine.
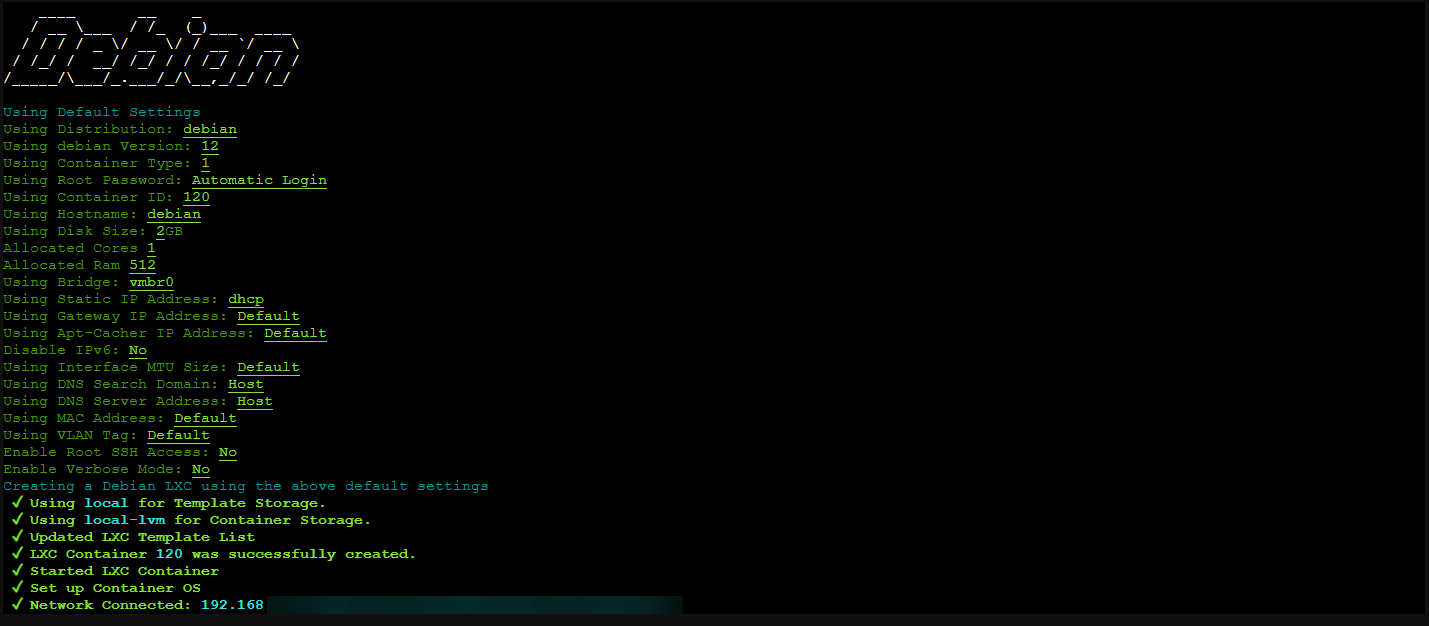
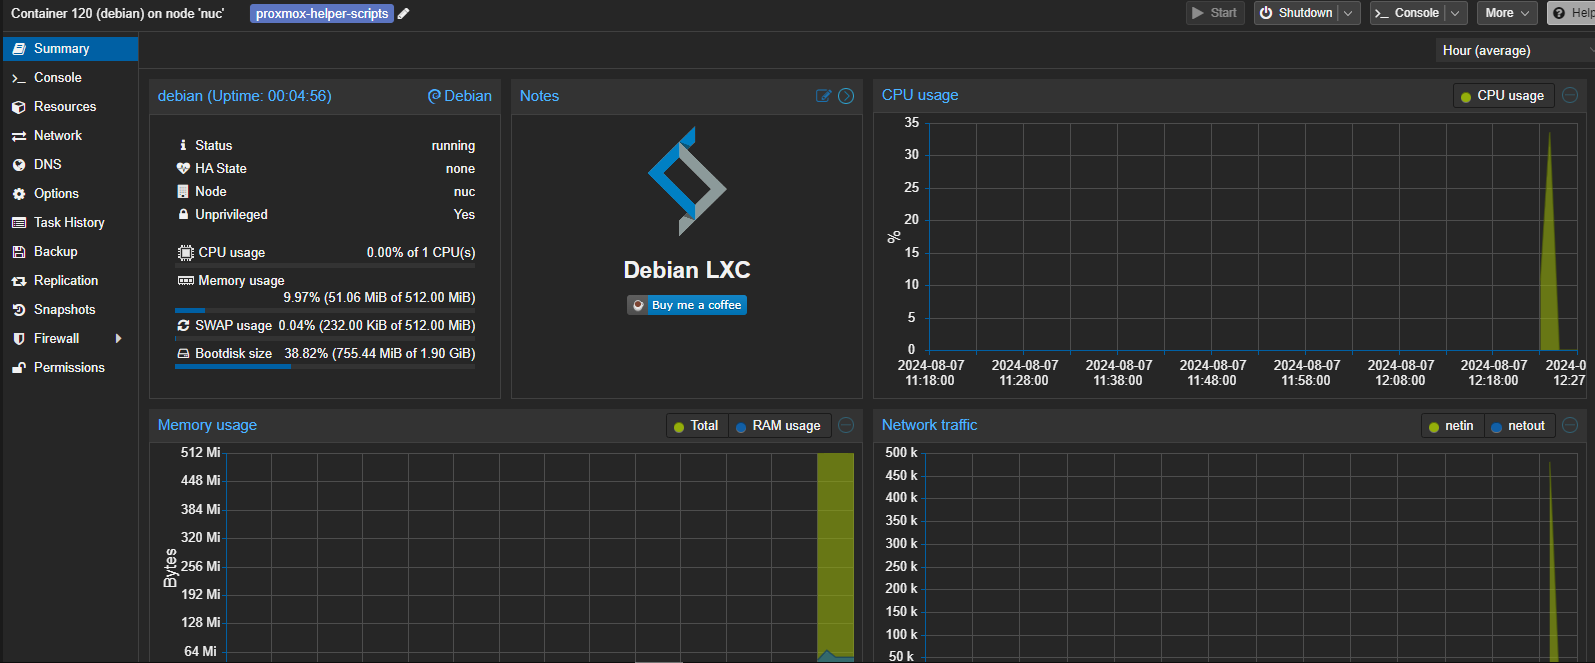
As someone who uses Proxmox VE in my own homelab, I can attest to the value of these helper scripts firsthand. By leveraging them to quickly deploy applications and tools, I've been able to save myself hours of setup time using them.
Be sure to check out the Proxmox Helper Scripts Github for more details and be sure to give it a star!
Proxmox VE is a popular choice for those looking to sel-host their own applications and services at home. As an open-source solution, it offers a lot of flexibility and customization options. And as it's completely free to use, it's a great option for anyone who wants to experiment with virtualization or build a small-scale cloud infrastructure.
If you'd like to learn more about Proxmox, see the following articles:


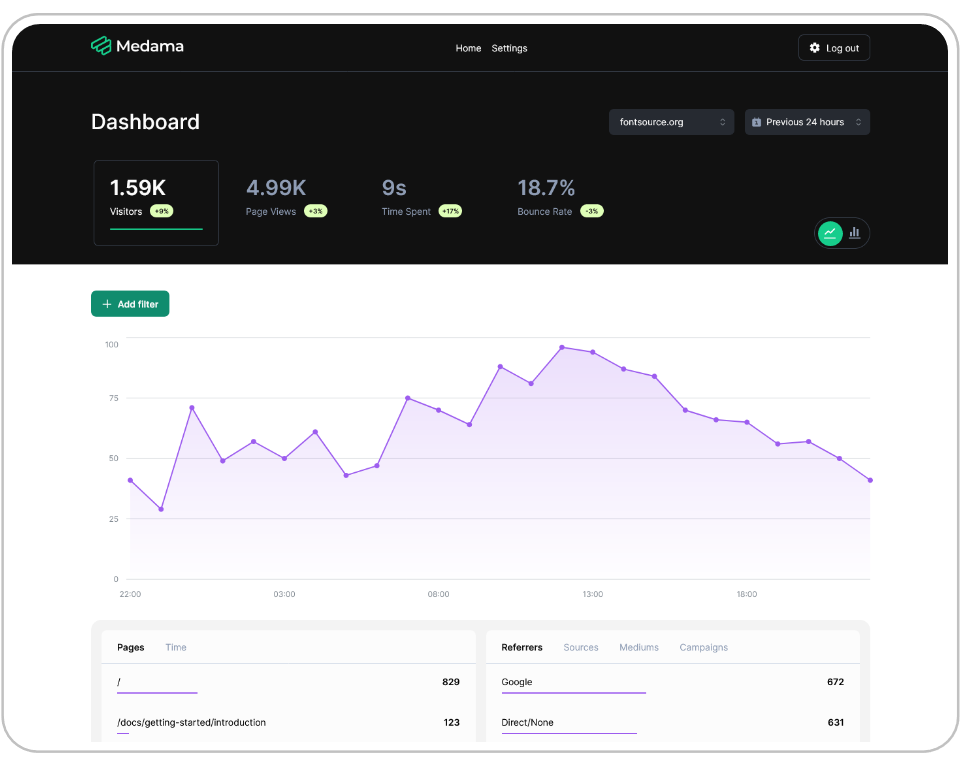
Setting up self-hosted analytics can sometimes be a pain. Some solutions are complicated and require technical expertise. But Medama Analytics is a breath of fresh air. Its easy installation process means you can start tracking your data quickly, without getting overwhelmed by technical details.
As an open-source project, Medama Analytics offers self-hostable, cookie-free website analytics that puts privacy first. With a lightweight tracker that's less than 1KB in size, it provides valuable insights while minimizing data collection.
Medama Analytics offers a range of tools to help users gain insights into their online presence. Real-time analytics provide instant feedback on website performance and user interactions. Meanwhile, Medama's focus on privacy ensures that data is collected without cookies, IP addresses, or other identifying information. The platform also features an OpenAPI-based server for easy integration with existing dashboards, as well as a self-hostable setup that can be deployed on virtual machines with modest memory requirements.
This Docker Compose stack can be used to install Medama on your server. If you need help, see our guides about getting started with self-hosting.
version: '3'
services:
    medama:
        image: ghcr.io/medama-io/medama:latest
        ports:
            - "8080:8080"
        volumes:
            - medama-data:/app/data
volumes:
    medama-data:
For login purposes, only localhost and HTTPS connections are accepted. Logging in via an insecure HTTP connection will result in failure.

To start using Medama, login then add your website. Next, grab the tracking code from the docs since it's not currently available in the backend.
<script defer src="https://[your-public-api-hostname].com/script.js"></script>If you need more ways to install Medama, please see the Medama documentation. There is also a single binary installation option.
It's odd that I had to search for the tracking snippet, while many other analytics platforms provide it automatically. You'd think it would be a standard feature.
Overall, Medama is a solid choice for analytics due to its ease of use and simplicity. The fact that you can quickly install it using Docker and start viewing stats right away on one page is a major plus. While it's still a relatively new solution, we may see some exciting developments in the future, including potentially enhanced tracking capabilities within the backend.
See more about Medama on the Medama Github repo. Don't forget to show your appreciation by giving the project a star!
";s:7:"attribs";a:0:{}s:8:"xml_base";s:0:"";s:17:"xml_base_explicit";b:0;s:8:"xml_lang";s:0:"";}}}}}i:9;a:6:{s:4:"data";s:0:"";s:7:"attribs";a:0:{}s:8:"xml_base";s:0:"";s:17:"xml_base_explicit";b:0;s:8:"xml_lang";s:0:"";s:5:"child";a:4:{s:0:"";a:6:{s:5:"title";a:1:{i:0;a:5:{s:4:"data";s:36:"Glance - Self-Hosted Feeds Dashboard";s:7:"attribs";a:0:{}s:8:"xml_base";s:0:"";s:17:"xml_base_explicit";b:0;s:8:"xml_lang";s:0:"";}}s:11:"description";a:1:{i:0;a:5:{s:4:"data";s:75:"Organize all of your feeds and more using the self-hosted Glance dashboard.";s:7:"attribs";a:0:{}s:8:"xml_base";s:0:"";s:17:"xml_base_explicit";b:0;s:8:"xml_lang";s:0:"";}}s:4:"link";a:1:{i:0;a:5:{s:4:"data";s:25:"https://noted.lol/glance/";s:7:"attribs";a:0:{}s:8:"xml_base";s:0:"";s:17:"xml_base_explicit";b:0;s:8:"xml_lang";s:0:"";}}s:4:"guid";a:1:{i:0;a:5:{s:4:"data";s:24:"66a924911df9fc0001455c3c";s:7:"attribs";a:1:{s:0:"";a:1:{s:11:"isPermaLink";s:5:"false";}}s:8:"xml_base";s:0:"";s:17:"xml_base_explicit";b:0;s:8:"xml_lang";s:0:"";}}s:8:"category";a:1:{i:0;a:5:{s:4:"data";s:22:"Self Hosted Dashboards";s:7:"attribs";a:0:{}s:8:"xml_base";s:0:"";s:17:"xml_base_explicit";b:0;s:8:"xml_lang";s:0:"";}}s:7:"pubDate";a:1:{i:0;a:5:{s:4:"data";s:29:"Thu, 01 Aug 2024 13:41:00 GMT";s:7:"attribs";a:0:{}s:8:"xml_base";s:0:"";s:17:"xml_base_explicit";b:0;s:8:"xml_lang";s:0:"";}}}s:32:"http://purl.org/dc/elements/1.1/";a:1:{s:7:"creator";a:1:{i:0;a:5:{s:4:"data";s:6:"Jeremy";s:7:"attribs";a:0:{}s:8:"xml_base";s:0:"";s:17:"xml_base_explicit";b:0;s:8:"xml_lang";s:0:"";}}}s:29:"http://search.yahoo.com/mrss/";a:1:{s:7:"content";a:1:{i:0;a:5:{s:4:"data";s:0:"";s:7:"attribs";a:1:{s:0:"";a:2:{s:3:"url";s:79:"https://noted.lol/content/images/2024/07/glance-self-hosted-dashboard-noted.jpg";s:6:"medium";s:5:"image";}}s:8:"xml_base";s:0:"";s:17:"xml_base_explicit";b:0;s:8:"xml_lang";s:0:"";}}}s:40:"http://purl.org/rss/1.0/modules/content/";a:1:{s:7:"encoded";a:1:{i:0;a:5:{s:4:"data";s:7843:"
Self-hosted dashboards have become popular, allowing people to collect and visualize important information. By hosting a dashboard on your own server or cloud storage, you can customize the layout and content to fit your needs, ensuring that the data most relevant to you is always accessible. Meet the latest addition to the self-hosted dashboard family, Glance.
Glance is a dashboard tool that allows you to aggregate your favorite feeds in one place. You have complete control over the content and can easily monitor multiple sources of information without being tied to a specific platform or service. By self-hosting Glance, you can create a personalized feed reader that's tailored to your interests and needs, allowing you to focus on the information and updates that are most important to you.
Glance offers instant access to your favorite online sources, including blogs and websites via RSS feeds, subreddits, stocks, YouTube videos, GitHub repos, Twitch streams, custom links, app monitoring and more. You can customize your feed by adding or removing sources as you see fit, ensuring that the information you need is always at your fingertips. Also, Glance allows you to incorporate widgets for displaying current time, calendar, and weather updates providing a detailed and organized dashboard that suits your individual needs and preferences.
This Docker Compose stack can be used to install Glance on your server. If you need help, see our guides about getting started with self-hosting.
services:
  glance:
    image: glanceapp/glance
    volumes:
      - /glance/glance.yml:/app/glance.yml
      - /etc/timezone:/etc/timezone:ro
      - /etc/localtime:/etc/localtime:ro
    ports:
      - 8080:8080
    restart: unless-stopped
Before getting started with Docker, first create a config file for your Glance setup by creating a new glance.yml file in the /glance directory. Copy the provided Glance template into this file and save it. Once complete, you can proceed to run the Docker Compose stack to install Glance.
Customize Glance's appearance by choosing from a variety of Glance theme colors. There are a selection of examples to get you started, and you can also create your own custom color scheme.
Simply add the theme snippet to the beginning of your config file
theme:
  background-color: 225 14 15
  primary-color: 157 47 65
  contrast-multiplier: 1.1
I highly recommend that you start with the preconfigured template to get familiar with Glance's layout and formatting options. The Glance configuration documentation is also extremely helpful, providing detailed explanations of each widget's functionality and different styles you can use. As you become more comfortable, you can use this knowledge to create your own custom design, tailored to your specific needs and preferences like I did. This is my community public edition of Glance.
Here is the glance.yml for for the above example.
To be honest, when I first installed Glance, I had a tough time customizing it. The template gives a great starting point, but I found myself repeatedly breaking and rebuilding my feed to get everything just the way I wanted. It was actually quite time consuming and I spent several hours getting things set up to my liking. Be prepared to spend time fine-tuning your Glance setup to achieve the exact level of customization that suits your unique needs and preferences.
See more about Glance on the Glance Github repo. Don't forget to show your appreciation by giving the project a star!
";s:7:"attribs";a:0:{}s:8:"xml_base";s:0:"";s:17:"xml_base_explicit";b:0;s:8:"xml_lang";s:0:"";}}}}}i:10;a:6:{s:4:"data";s:0:"";s:7:"attribs";a:0:{}s:8:"xml_base";s:0:"";s:17:"xml_base_explicit";b:0;s:8:"xml_lang";s:0:"";s:5:"child";a:4:{s:0:"";a:6:{s:5:"title";a:1:{i:0;a:5:{s:4:"data";s:52:"Dozzle - Self-Hosted Docker Container Log Monitoring";s:7:"attribs";a:0:{}s:8:"xml_base";s:0:"";s:17:"xml_base_explicit";b:0;s:8:"xml_lang";s:0:"";}}s:11:"description";a:1:{i:0;a:5:{s:4:"data";s:137:"Monitor your Docker containers in real-time with live log outputs directly from the source, all within the self-hosted Dozzle log viewer.";s:7:"attribs";a:0:{}s:8:"xml_base";s:0:"";s:17:"xml_base_explicit";b:0;s:8:"xml_lang";s:0:"";}}s:4:"link";a:1:{i:0;a:5:{s:4:"data";s:25:"https://noted.lol/dozzle/";s:7:"attribs";a:0:{}s:8:"xml_base";s:0:"";s:17:"xml_base_explicit";b:0;s:8:"xml_lang";s:0:"";}}s:4:"guid";a:1:{i:0;a:5:{s:4:"data";s:24:"66a1265d1df9fc0001454a4c";s:7:"attribs";a:1:{s:0:"";a:1:{s:11:"isPermaLink";s:5:"false";}}s:8:"xml_base";s:0:"";s:17:"xml_base_explicit";b:0;s:8:"xml_lang";s:0:"";}}s:8:"category";a:1:{i:0;a:5:{s:4:"data";s:19:"Self Hosted Logging";s:7:"attribs";a:0:{}s:8:"xml_base";s:0:"";s:17:"xml_base_explicit";b:0;s:8:"xml_lang";s:0:"";}}s:7:"pubDate";a:1:{i:0;a:5:{s:4:"data";s:29:"Wed, 31 Jul 2024 11:35:07 GMT";s:7:"attribs";a:0:{}s:8:"xml_base";s:0:"";s:17:"xml_base_explicit";b:0;s:8:"xml_lang";s:0:"";}}}s:32:"http://purl.org/dc/elements/1.1/";a:1:{s:7:"creator";a:1:{i:0;a:5:{s:4:"data";s:6:"Jeremy";s:7:"attribs";a:0:{}s:8:"xml_base";s:0:"";s:17:"xml_base_explicit";b:0;s:8:"xml_lang";s:0:"";}}}s:29:"http://search.yahoo.com/mrss/";a:1:{s:7:"content";a:1:{i:0;a:5:{s:4:"data";s:0:"";s:7:"attribs";a:1:{s:0:"";a:2:{s:3:"url";s:69:"https://noted.lol/content/images/2024/07/dozzle-self-hosted-noted.jpg";s:6:"medium";s:5:"image";}}s:8:"xml_base";s:0:"";s:17:"xml_base_explicit";b:0;s:8:"xml_lang";s:0:"";}}}s:40:"http://purl.org/rss/1.0/modules/content/";a:1:{s:7:"encoded";a:1:{i:0;a:5:{s:4:"data";s:8490:"
When you're working with Docker containers, keeping track of what's happening inside them can be a real challenge. Containers are great for building and deploying applications, but they can also produce a lot of log data that needs to be monitored and analyzed. This is especially true when you have multiple containers running simultaneously, or when you're dealing with complex distributed systems. Without a way to easily access and understand the logs from your containers, troubleshooting issues can become a time-consuming and frustrating process. That's why it's important to have a reliable and efficient logging solution that allows you to see what's happening inside your containers in real-time like Dozzle.
Dozzle is a powerful tool for monitoring and troubleshooting your Docker containers and services. With Dozzle, you can view logs from your containers and services in real-time, making it easier to diagnose issues when they arise. It also supports Docker Swarm, which allows you to monitor logs from multiple nodes at once. Plus, with multi-host support, you can connect to multiple remote hosts directly from the interface. And the best part? Dozzle doesn't require a database or any extra configuration - just stream logs directly from your containers and services. With its lightweight design and intuitive interface, Dozzle makes it easy to get started and start troubleshooting right away.
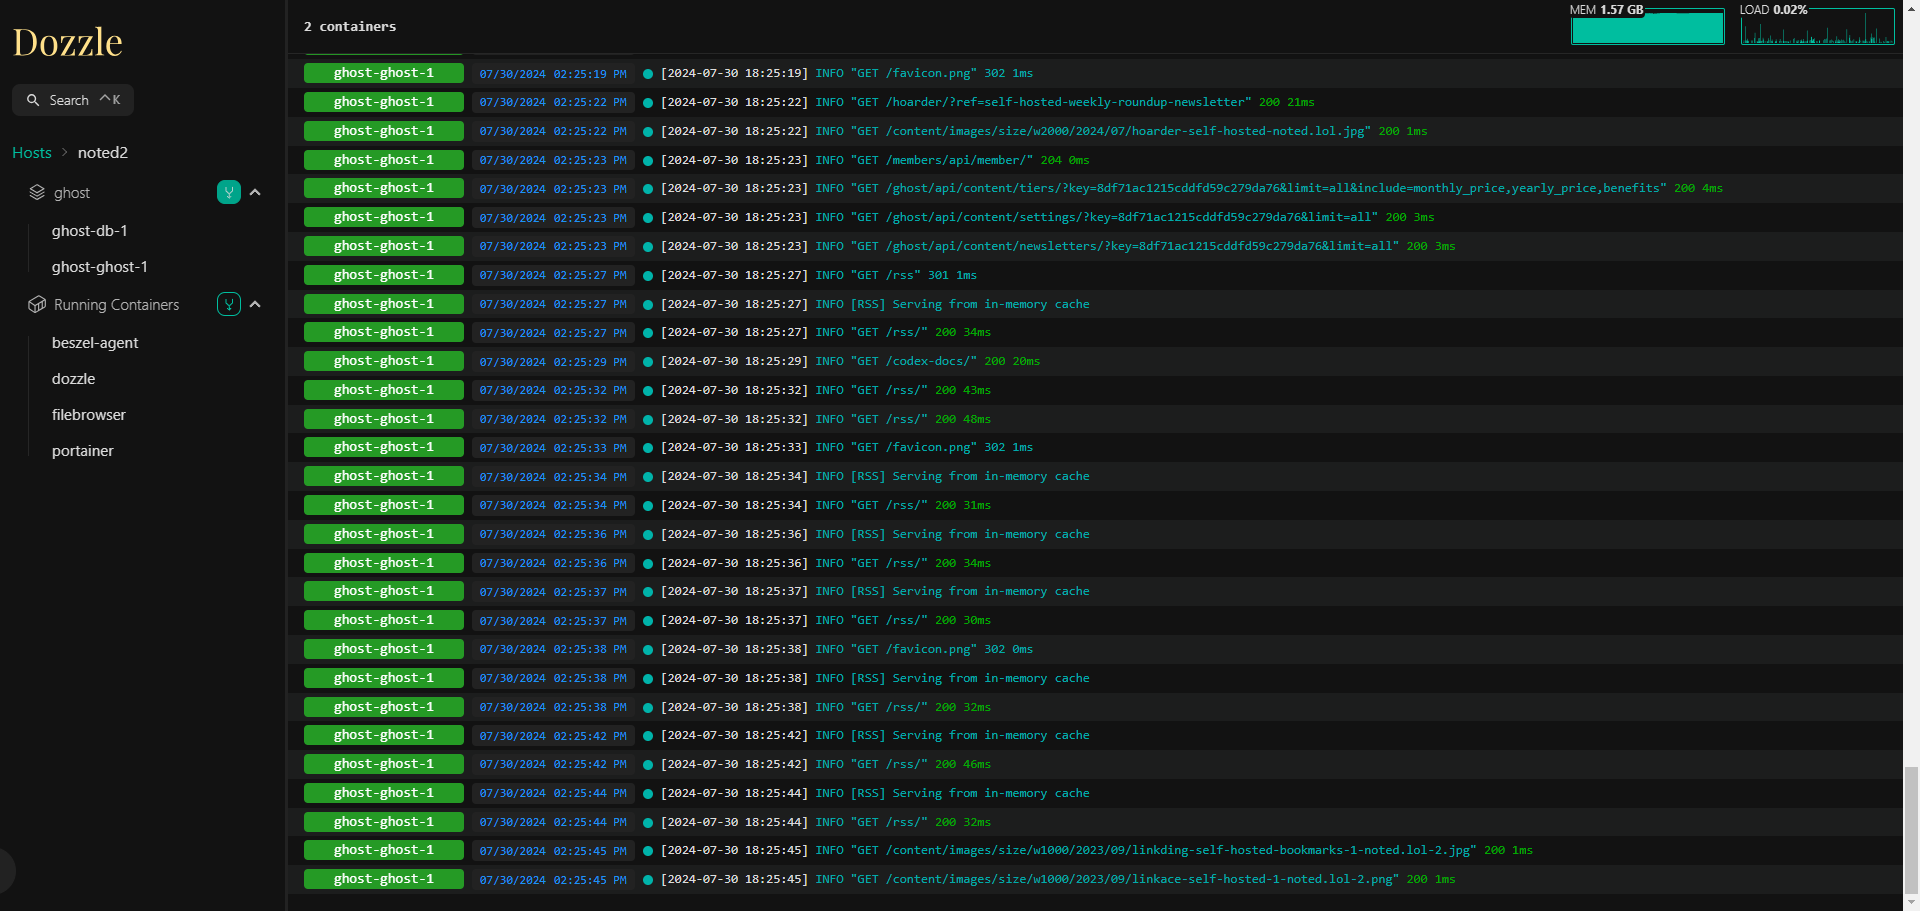
Dozzle offers several features that make it easy to work with container logs. The intelligent fuzzy search allows you to quickly find specific containers, even if you only remember part of their name. You can also use regex to search for log entries matching certain patterns. Also, Dozzle has a small memory footprint and supports split-screen viewing of multiple logs at once. It's possible to download logs from the interface as well, which is useful for offline analysis. Dozzle provides live stats on memory and CPU usage, giving you a better understanding of your container performance. Finally, multi-user authentication with support for proxy forward authorization ensures that only authorized users can access the log data.
This Docker Compose stack can be used to install Dozzle on your server. If you need help, see our guides about getting started with self-hosting.
version: "3"
services:
  dozzle:
    container_name: dozzle
    image: amir20/dozzle:latest
    volumes:
      - /var/run/docker.sock:/var/run/docker.sock
    ports:
      - 8888:8080
Dozzle offers compatibility with multiple container runtimes, including automatic API negotiation for most Docker configurations. Plus, it also works seamlessly with Colima and Podman.
For those who need more control over their logging setup, self-hosted solutions are the way to go, allowing you to keep your log data private, secure, and under your own control, all while providing unparalleled flexibility and customization options. Ultimately, a solution like Dozzle is ideal for anyone looking to streamline their Docker log viewing experience.
See more about Dozzle on the Dozzle Github repo. Don't forget to show your appreciation by giving the project a star!
";s:7:"attribs";a:0:{}s:8:"xml_base";s:0:"";s:17:"xml_base_explicit";b:0;s:8:"xml_lang";s:0:"";}}}}}i:11;a:6:{s:4:"data";s:0:"";s:7:"attribs";a:0:{}s:8:"xml_base";s:0:"";s:17:"xml_base_explicit";b:0;s:8:"xml_lang";s:0:"";s:5:"child";a:4:{s:0:"";a:6:{s:5:"title";a:1:{i:0;a:5:{s:4:"data";s:66:"Docmost - Self -Hosted Collaborative Wiki and Documentation Portal";s:7:"attribs";a:0:{}s:8:"xml_base";s:0:"";s:17:"xml_base_explicit";b:0;s:8:"xml_lang";s:0:"";}}s:11:"description";a:1:{i:0;a:5:{s:4:"data";s:66:"Simplify your documentation using the self-hosted Docmost wiki app";s:7:"attribs";a:0:{}s:8:"xml_base";s:0:"";s:17:"xml_base_explicit";b:0;s:8:"xml_lang";s:0:"";}}s:4:"link";a:1:{i:0;a:5:{s:4:"data";s:26:"https://noted.lol/docmost/";s:7:"attribs";a:0:{}s:8:"xml_base";s:0:"";s:17:"xml_base_explicit";b:0;s:8:"xml_lang";s:0:"";}}s:4:"guid";a:1:{i:0;a:5:{s:4:"data";s:24:"66a3a3a31df9fc000145531f";s:7:"attribs";a:1:{s:0:"";a:1:{s:11:"isPermaLink";s:5:"false";}}s:8:"xml_base";s:0:"";s:17:"xml_base_explicit";b:0;s:8:"xml_lang";s:0:"";}}s:8:"category";a:3:{i:0;a:5:{s:4:"data";s:17:"Self Hosted Wikis";s:7:"attribs";a:0:{}s:8:"xml_base";s:0:"";s:17:"xml_base_explicit";b:0;s:8:"xml_lang";s:0:"";}i:1;a:5:{s:4:"data";s:28:"Self Hosted Note Taking apps";s:7:"attribs";a:0:{}s:8:"xml_base";s:0:"";s:17:"xml_base_explicit";b:0;s:8:"xml_lang";s:0:"";}i:2;a:5:{s:4:"data";s:25:"Self Hosted Documentation";s:7:"attribs";a:0:{}s:8:"xml_base";s:0:"";s:17:"xml_base_explicit";b:0;s:8:"xml_lang";s:0:"";}}s:7:"pubDate";a:1:{i:0;a:5:{s:4:"data";s:29:"Tue, 30 Jul 2024 14:21:27 GMT";s:7:"attribs";a:0:{}s:8:"xml_base";s:0:"";s:17:"xml_base_explicit";b:0;s:8:"xml_lang";s:0:"";}}}s:32:"http://purl.org/dc/elements/1.1/";a:1:{s:7:"creator";a:1:{i:0;a:5:{s:4:"data";s:6:"Jeremy";s:7:"attribs";a:0:{}s:8:"xml_base";s:0:"";s:17:"xml_base_explicit";b:0;s:8:"xml_lang";s:0:"";}}}s:29:"http://search.yahoo.com/mrss/";a:1:{s:7:"content";a:1:{i:0;a:5:{s:4:"data";s:0:"";s:7:"attribs";a:1:{s:0:"";a:2:{s:3:"url";s:75:"https://noted.lol/content/images/2024/07/docmost-self-hosted-wiki-noted.jpg";s:6:"medium";s:5:"image";}}s:8:"xml_base";s:0:"";s:17:"xml_base_explicit";b:0;s:8:"xml_lang";s:0:"";}}}s:40:"http://purl.org/rss/1.0/modules/content/";a:1:{s:7:"encoded";a:1:{i:0;a:5:{s:4:"data";s:10154:"
In order to successfully manage a business or pursue personal projects like self-hosting and homelabs, it's crucial to prioritize organization. While maintaining detailed noted and documentation is important, having a reliable wiki platform takes documentation to the next level by providing a centralized hub for storing and sharing information. Enter Docmost.
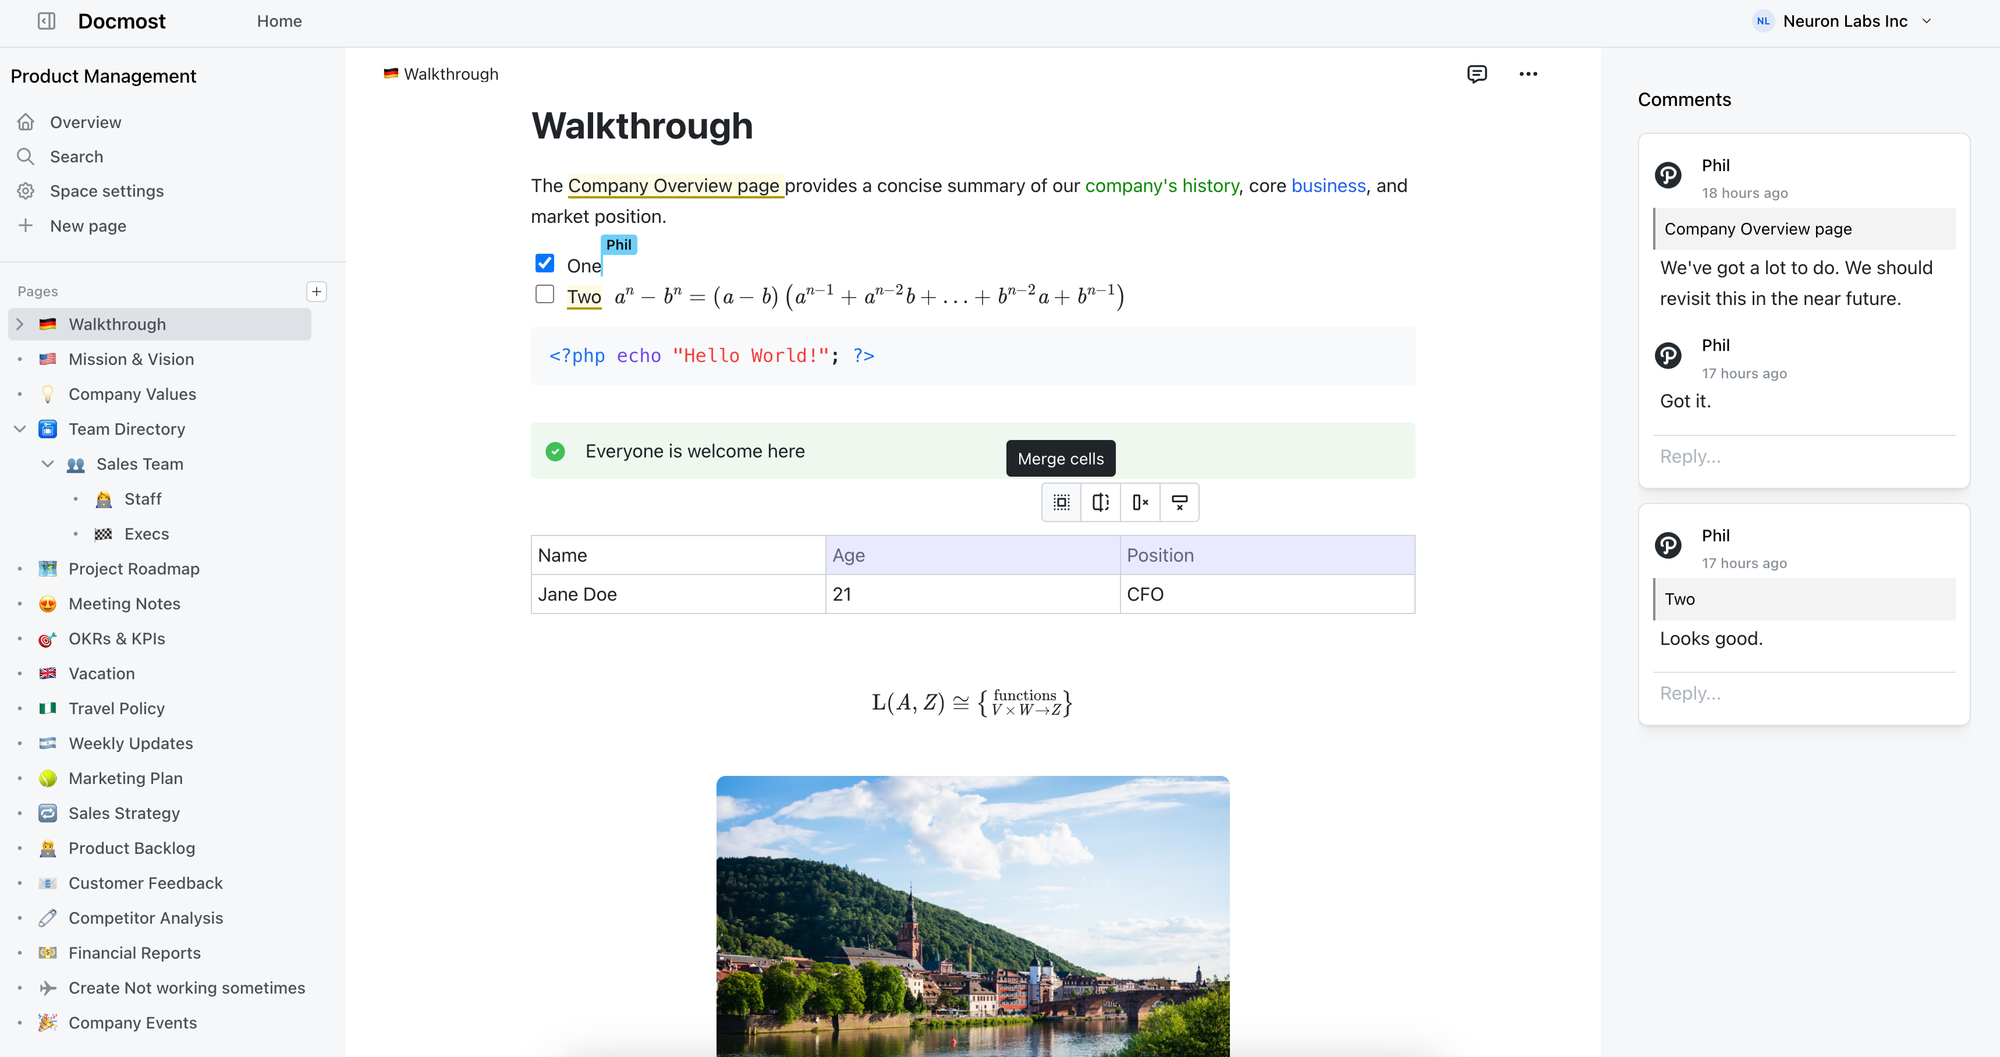
Docmost is a open-source and self-hosted wiki and documentation tool that offers an alternative to popular solutions like Confluence and Notion. As an open-source platform, Docmost empowers users to collaborate on shared knowledge bases without the burden of proprietary licensing fees.
 docmost
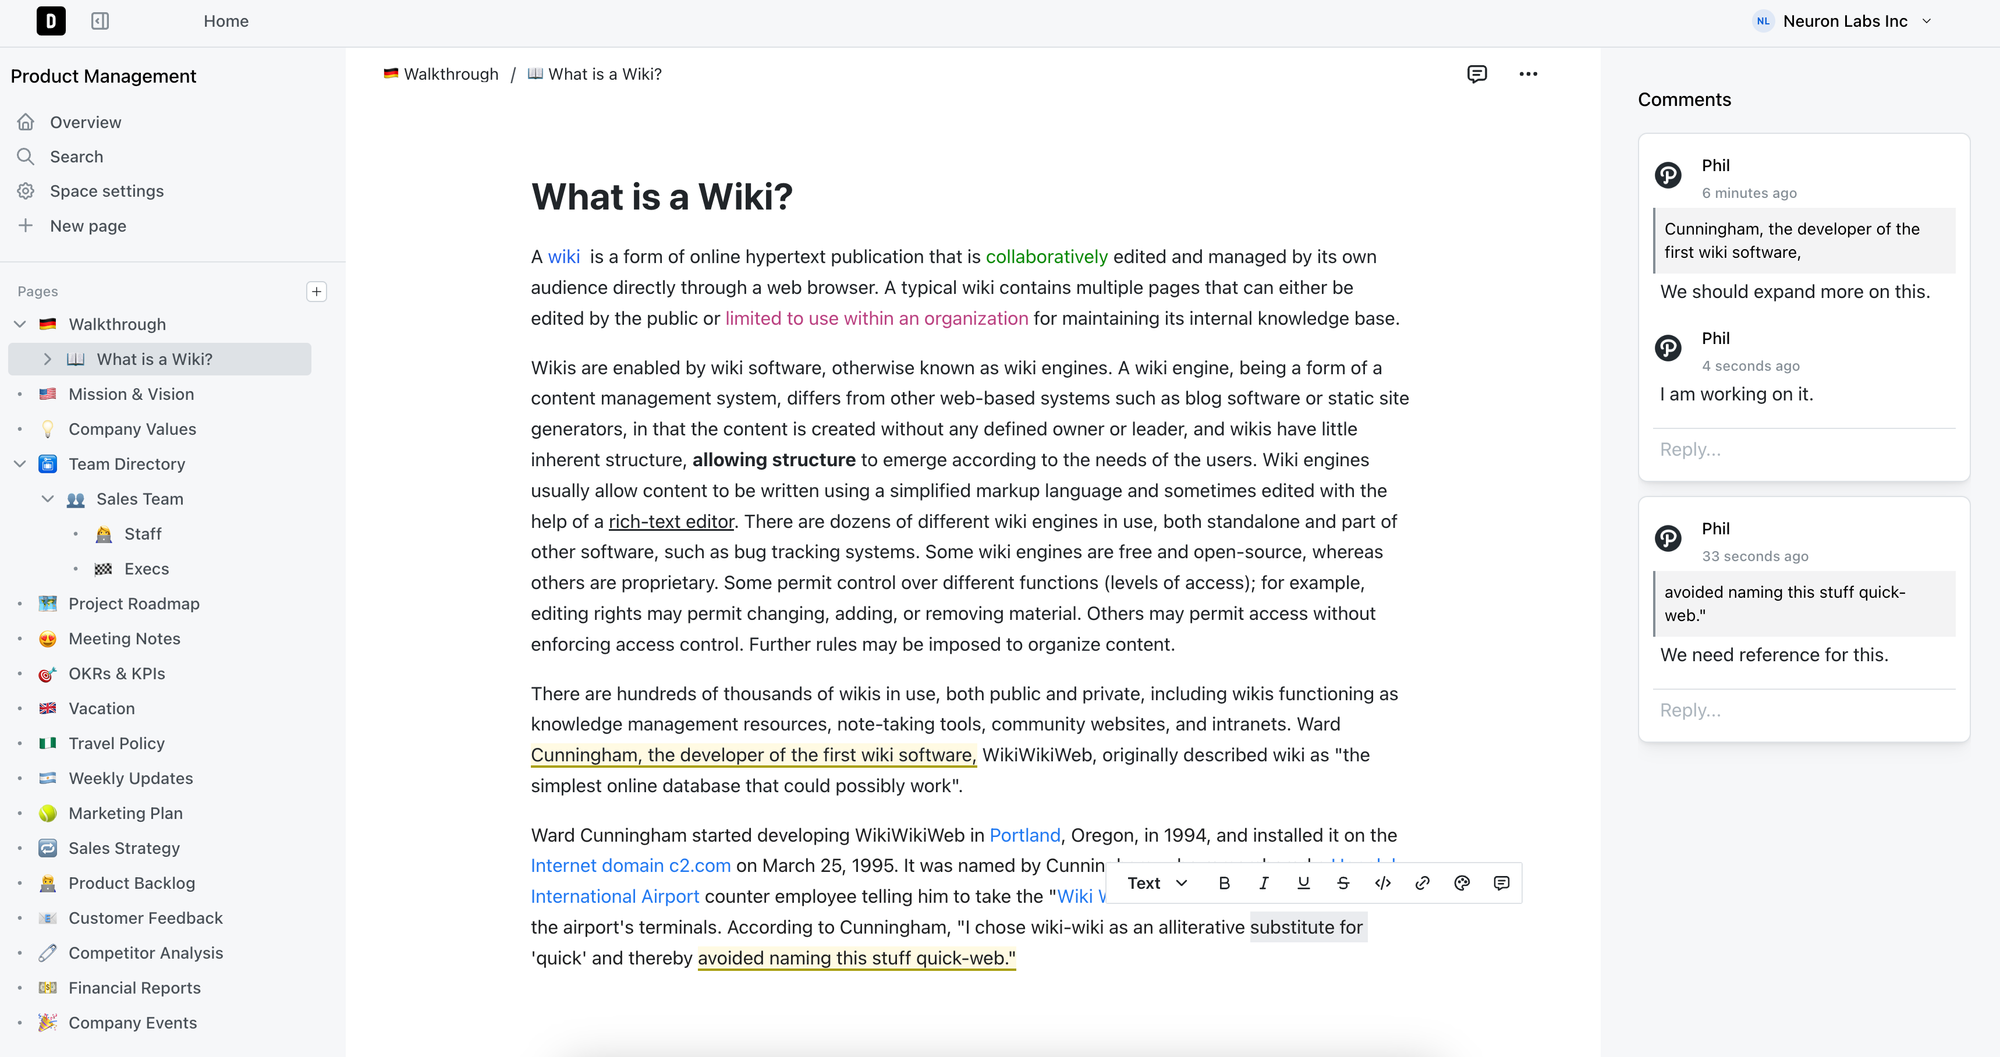
Docmost is a powerful collaborative wiki solution that offers a range of features designed to facilitate seamless information-sharing and teamwork. Its real-time collaborative rich-text editor allows multiple users to edit pages simultaneously, with support for advanced formatting options like tables, math (LaTex), and callouts. A robust permissions system enables administrators to control who can view, edit, or manage content, ensuring information remains secure and accessible only to authorized personnel.
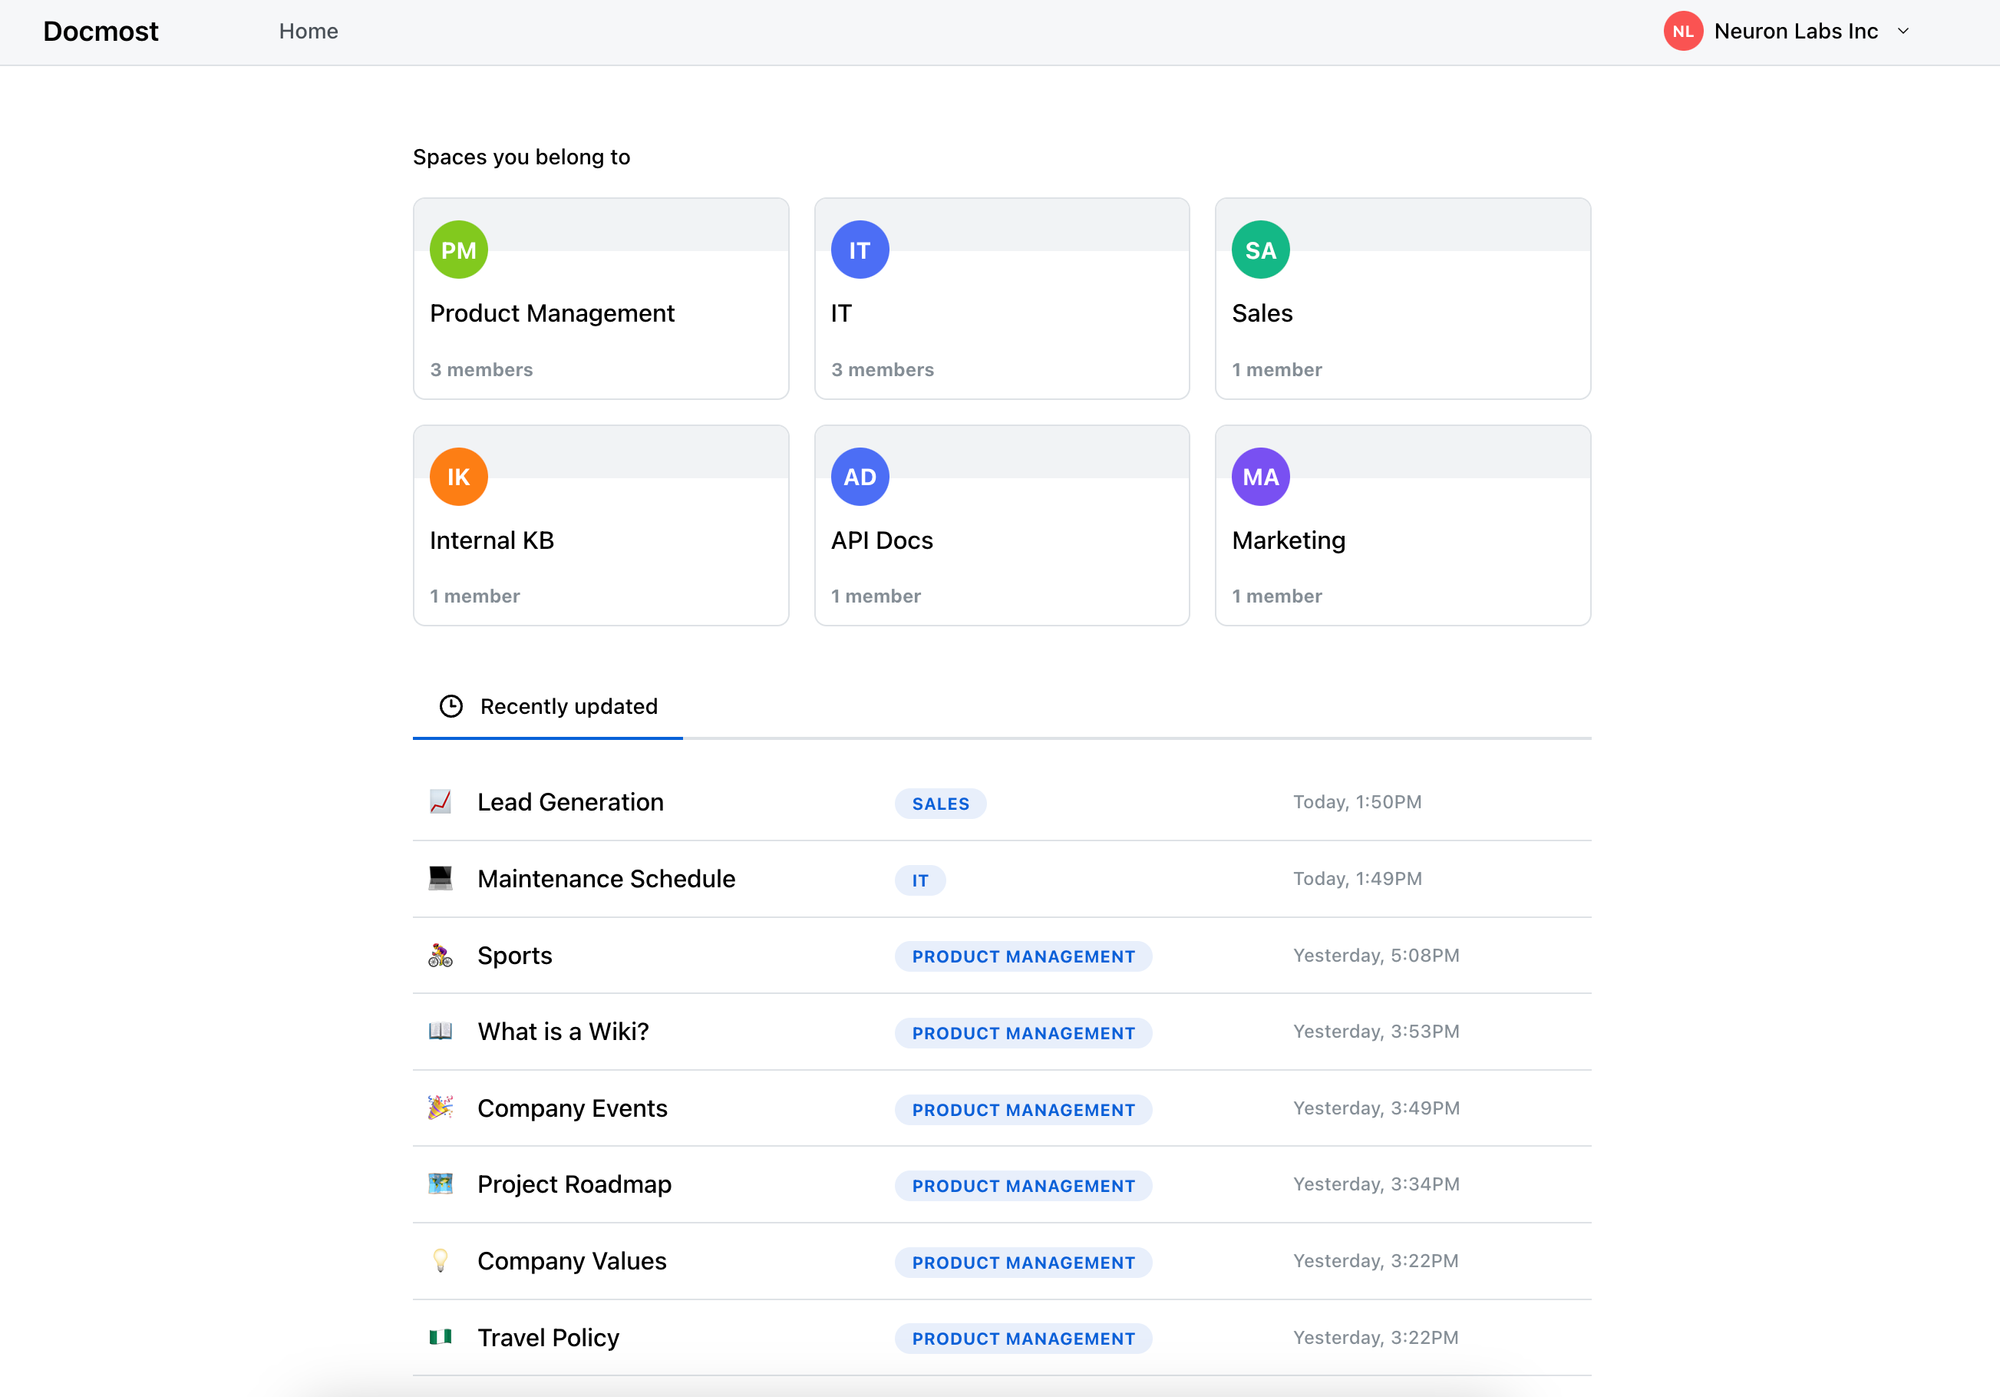
The platform's spaces feature organizes content into distinct areas dedicated to different teams, projects, or departments, providing a structured environment for collaboration. Docmost also features an integrated inline commenting system, enabling meaningful discussions directly on pages. Users can track changes made to each page through the page history feature, and revert to previous versions if needed. The platform's search functionality is powered by Postgres full-text search system, making it easy to locate information across all pages. Additionally, Docmost supports nesting of pages to any level, with simple drag-and-drop functionality from the sidebar for managing content.
This Docker Compose stack can be used to install Docmost on your server. If you need help, see our guides about getting started with self-hosting.
version: '3'
services:
docmost:
image: docmost/docmost:latest
depends_on:
- db
- redis
environment:
APP_URL: 'http://localhost:3000'
APP_SECRET: 'TW3kJSO4HMdwq8Vlc0L8ZRCIZxtO4R'
DATABASE_URL: 'postgresql://docmost:HpKm6jar9T@db:5432/docmost?schema=public'
REDIS_URL: 'redis://redis:6379'
ports:
- "3000:3000"
restart: unless-stopped
volumes:
- /docker/docmost/data:/app/data/storage
db:
image: postgres:16-alpine
environment:
POSTGRES_DB: docmost
POSTGRES_USER: docmost
POSTGRES_PASSWORD: HpKm6jar9T
restart: unless-stopped
volumes:
- /docker/docmost/db_data:/var/lib/postgresql/data
redis:
image: redis:7.2-alpine
restart: unless-stopped
volumes:
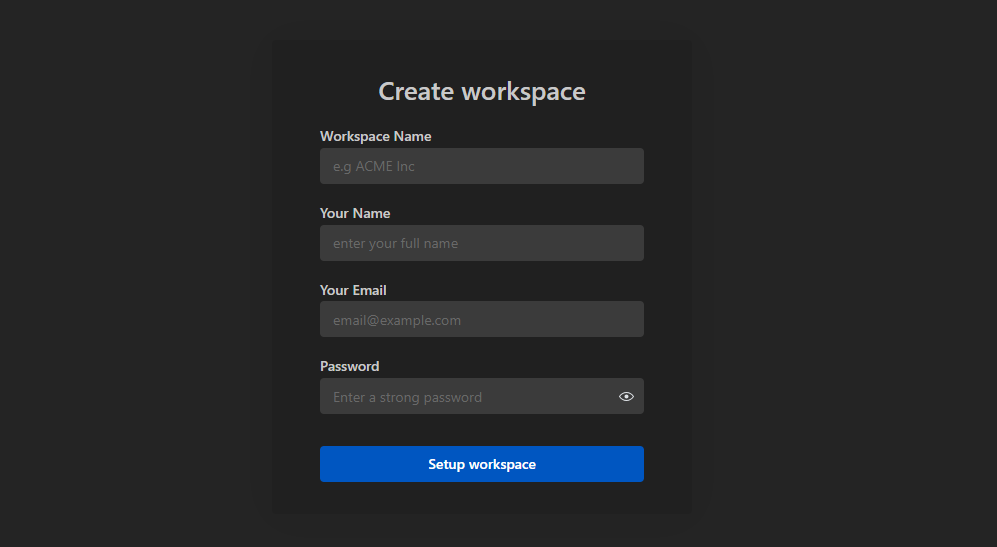
- /docker/docmost/redis_data:/dataNow jump over to the web interface on port 3000 and register an administrator account and create your first workspace.
Upon reviewing Docmost, I was impressed by its attractive design and effectiveness as a collaborative wiki solution. However, as someone who regularly uses wiki apps for personal purposes, I have specific preferences that can enhance the user experience. For instance, I find wikis where I'm in constant collaborative "edit mode" to be distracting, which is why I appreciate tools that offer a more subtle edit indicator or an option to toggle it off.
Additionally, a copy-to-clipboard button on code blocks is a must for me when using wiki apps personally. While this limitation may not be critical for all users, including such a feature would further enhance Docmost's functionality and user experience.
Finally, I noted that all content in Docmost is currently hidden behind authentication. Offering the option to share content publicly is also valuable, as it allows users to decide how they want to utilize their collaborative wiki or knowledge-base.
Overall, while Docmost has many strengths, there are specific areas where it could improve to better meet my needs as a self-hosted user.
If you have any questions about the project, feature requests or want to support the Docmost project, please see the Docmost Github page.
Check out our other self-hosted wiki application reviews!

Ever wondered how to access websites like Wikipedia when you're offline? Enter ZIM files, your go to solution. Today, we'll take a closer look at what ZIM files are, how to convert a website using a free tool, then serve it up using Kiwix Serve.

A ZIM file is a digital format used to store information from websites like Wikipedia so you can access it without needing an internet connection. It's created by the openZIM project and can be read with a program called Kiwix. The name "ZIM" comes from "Zeno IMproved." To save space, it uses compression techniques like the XZ Utils library and Zstandard. It's supported by organizations like Wikimedia CH and the Wikimedia Foundation. So, it's a way to keep website data on your device for offline use.

To begin, it's important to underline that at Noted, we firmly stand behind the belief that access to knowledge is a fundamental human right. (cats count too) This belief is at the core of Kiwix, a non-profit organization and a free, open-source software project committed to providing offline access to educational content. This is why we provide public archives of Noted that can be downloaded as ZIM files.

Zimit is a tool that can turn a website into a .zim file. It works by running a special kind of website scan inside a Docker container.
Zimit uses a system called Browsertrix Crawler to do the website scan. Once it has all the website's data, it converts it into a .zim file using a tool called warc2zim. To start the task, you use a file called zimit.py that orchestrates the entire process making it easier to manage.
After the scan is finished, Zimit saves the .zim file in a folder called /output. This folder can be easily accessed and used for your needs. If you want to keep the original data from the website scan, you can use a special option called --keep, which stores it in a temporary folder inside /output.
To install and run Zimit, you can easily do it by following the well written and simple instructions here.
docker run -v /docker/zimit/output:/output --shm-size=1gb ghcr.io/openzim/zimit zimit --url https://noted.lol --name noted.lol-backup --workers 2 --waitUntil domcontentloadedYou can change the "--url" to the website you want to archive. Depending on the size of the site, images etc., it could take up to 10 minutes to complete. Once finished, you will find your .zim file in the /docker/zimit/output folder.
I recommend you have a machine with at least 2gb of ram, 2 CPU cores and enough space to house your .zim files. I run Zimit on a LXC container with these specs and it works really well.
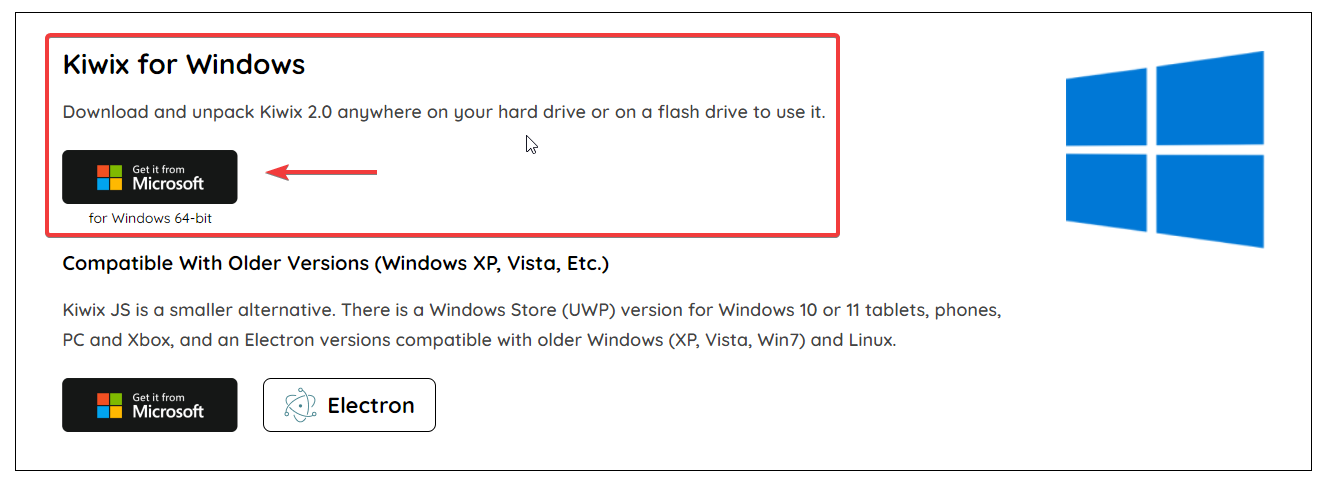
Kiwix Server acts like a web server that can host .zim files. It lets you share these .zim files using the HTTP protocol, but just within your own local network. You can choose how you want to serve the .zim files over on the Kiwix applications page.
Windows - To serve up the ZIM file locally on Windows, you can use Kiwix Server.
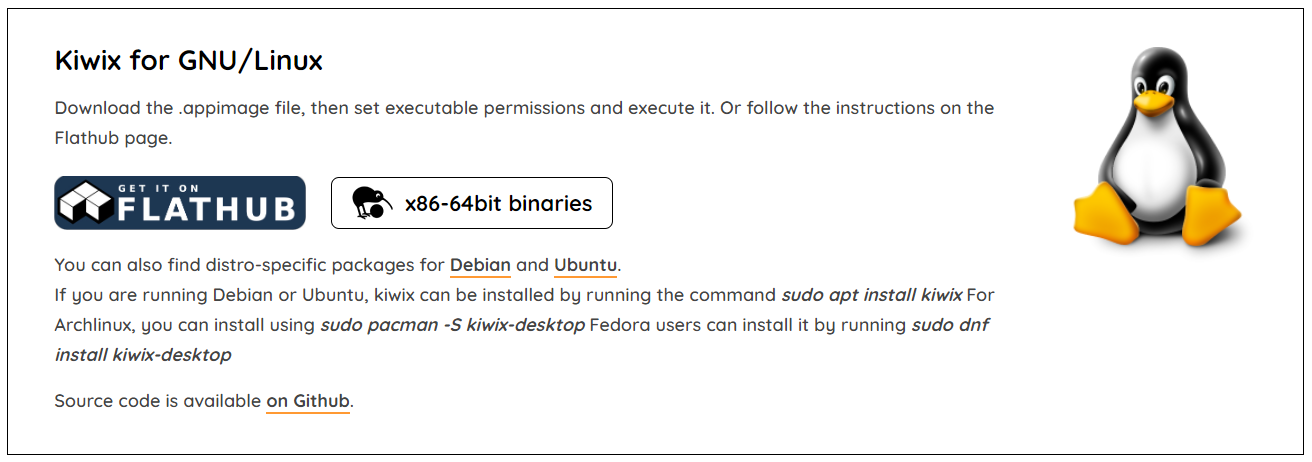
Linux - For Debian, there are binaries you can download. First, get the .appimage file and make it executable by adjusting its permissions. Then, simply run it. Alternatively, you can check out the instructions on the Flathub page for guidance.
Docker - Docker is also an option and can be ran locally. However, if you try to run it in a VM or container over anything other than localhost, you may run into HTTPS errors.

As I mentioned, you can run it on your own computer using Docker. However, if you want to use a virtual machine (VM) or a different method than just your computer, you'll need to make it accessible over HTTPS through a reverse proxy. But, honestly, that kind of takes away the whole idea of offline viewing!
Here is a working Docker Compose using the official Kiwix latest Docker image.
version: '3.3'
services:
  kiwix-serve:
    image: ghcr.io/kiwix/kiwix-serve:latest
    volumes:
      - /docker/output:/data
    ports:
      - '8080:8080'
    command:
      - '*.zim'
This assumes your .zim files are located in /docker/output. It's a good idea to mount this folder to the same place you mounted the Zimit output.
I scraped a couple websites and smaller wiki's of people I like to follow and was impressed with how it turned out. Zimit makes a carbon copy of the entire website that you can browse and search all locally.
Here is a one minute video showing Kiwix Server locally hosted using the Windows version.
You can see how snappy and quick it is as it should be when viewing locally.
Once you realize how easy it is to transform websites into .zim files with Zimit, you might find yourself naturally inclined to save more. This fantastic tool is going to be our not so secret weapon for preserving Noted for the generations ahead. With it, we can ensure that the wealth of information and knowledge contained within our publication remains accessible and ready to stand the test of time.
The creators of Kiwix reached out to me and have created an archive of Noted.lol using this same process. You can see their archive as an example.
If you find this application valuable or would like to explore further information, I encourage you to visit the Zimit GitHub repository and give the project a star.
";s:7:"attribs";a:0:{}s:8:"xml_base";s:0:"";s:17:"xml_base_explicit";b:0;s:8:"xml_lang";s:0:"";}}}}}i:13;a:6:{s:4:"data";s:0:"";s:7:"attribs";a:0:{}s:8:"xml_base";s:0:"";s:17:"xml_base_explicit";b:0;s:8:"xml_lang";s:0:"";s:5:"child";a:4:{s:0:"";a:6:{s:5:"title";a:1:{i:0;a:5:{s:4:"data";s:44:"PdfDing - Self-Hosted PDF Manager and Viewer";s:7:"attribs";a:0:{}s:8:"xml_base";s:0:"";s:17:"xml_base_explicit";b:0;s:8:"xml_lang";s:0:"";}}s:11:"description";a:1:{i:0;a:5:{s:4:"data";s:142:"Seamlessly manage and view your PDFs on multiple devices wherever you are while staying in control of your data with the self-hosted PDF Ding.";s:7:"attribs";a:0:{}s:8:"xml_base";s:0:"";s:17:"xml_base_explicit";b:0;s:8:"xml_lang";s:0:"";}}s:4:"link";a:1:{i:0;a:5:{s:4:"data";s:26:"https://noted.lol/pdfding/";s:7:"attribs";a:0:{}s:8:"xml_base";s:0:"";s:17:"xml_base_explicit";b:0;s:8:"xml_lang";s:0:"";}}s:4:"guid";a:1:{i:0;a:5:{s:4:"data";s:24:"66a54f0b1df9fc000145599d";s:7:"attribs";a:1:{s:0:"";a:1:{s:11:"isPermaLink";s:5:"false";}}s:8:"xml_base";s:0:"";s:17:"xml_base_explicit";b:0;s:8:"xml_lang";s:0:"";}}s:8:"category";a:1:{i:0;a:5:{s:4:"data";s:27:"Slef Hosted Document Viewer";s:7:"attribs";a:0:{}s:8:"xml_base";s:0:"";s:17:"xml_base_explicit";b:0;s:8:"xml_lang";s:0:"";}}s:7:"pubDate";a:1:{i:0;a:5:{s:4:"data";s:29:"Sun, 28 Jul 2024 14:02:22 GMT";s:7:"attribs";a:0:{}s:8:"xml_base";s:0:"";s:17:"xml_base_explicit";b:0;s:8:"xml_lang";s:0:"";}}}s:32:"http://purl.org/dc/elements/1.1/";a:1:{s:7:"creator";a:1:{i:0;a:5:{s:4:"data";s:4:"mrmn";s:7:"attribs";a:0:{}s:8:"xml_base";s:0:"";s:17:"xml_base_explicit";b:0;s:8:"xml_lang";s:0:"";}}}s:29:"http://search.yahoo.com/mrss/";a:1:{s:7:"content";a:1:{i:0;a:5:{s:4:"data";s:0:"";s:7:"attribs";a:1:{s:0:"";a:2:{s:3:"url";s:70:"https://noted.lol/content/images/2024/07/self-hosted-pdfding-noted.jpg";s:6:"medium";s:5:"image";}}s:8:"xml_base";s:0:"";s:17:"xml_base_explicit";b:0;s:8:"xml_lang";s:0:"";}}}s:40:"http://purl.org/rss/1.0/modules/content/";a:1:{s:7:"encoded";a:1:{i:0;a:5:{s:4:"data";s:8959:"
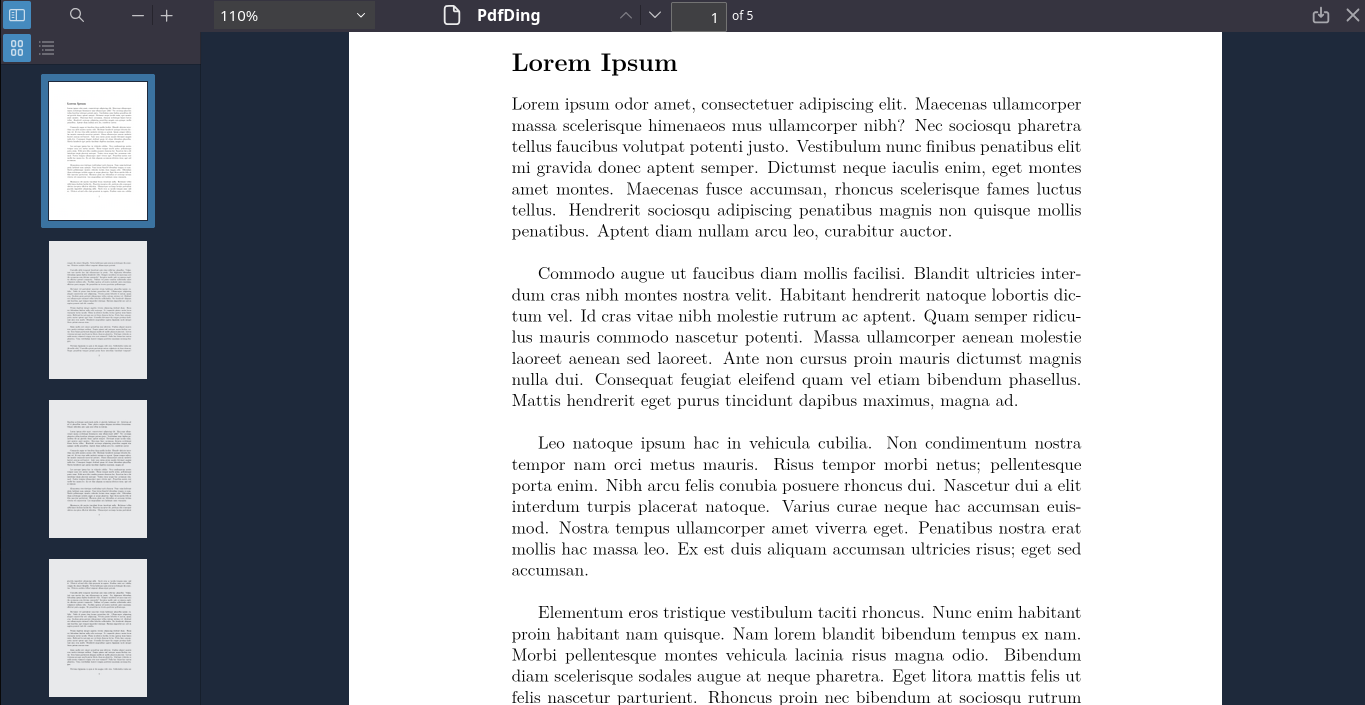
We rely on PDFs for everything from reports to research papers, and sometimes it feels like they're everywhere. But finding a simple way to view and manage them across all your devices can be a challenge. That's where PdfDing comes in - a self-hosted PDF manager that lets you do just that, with a focus on simplicity, ease of use, and flexibility.
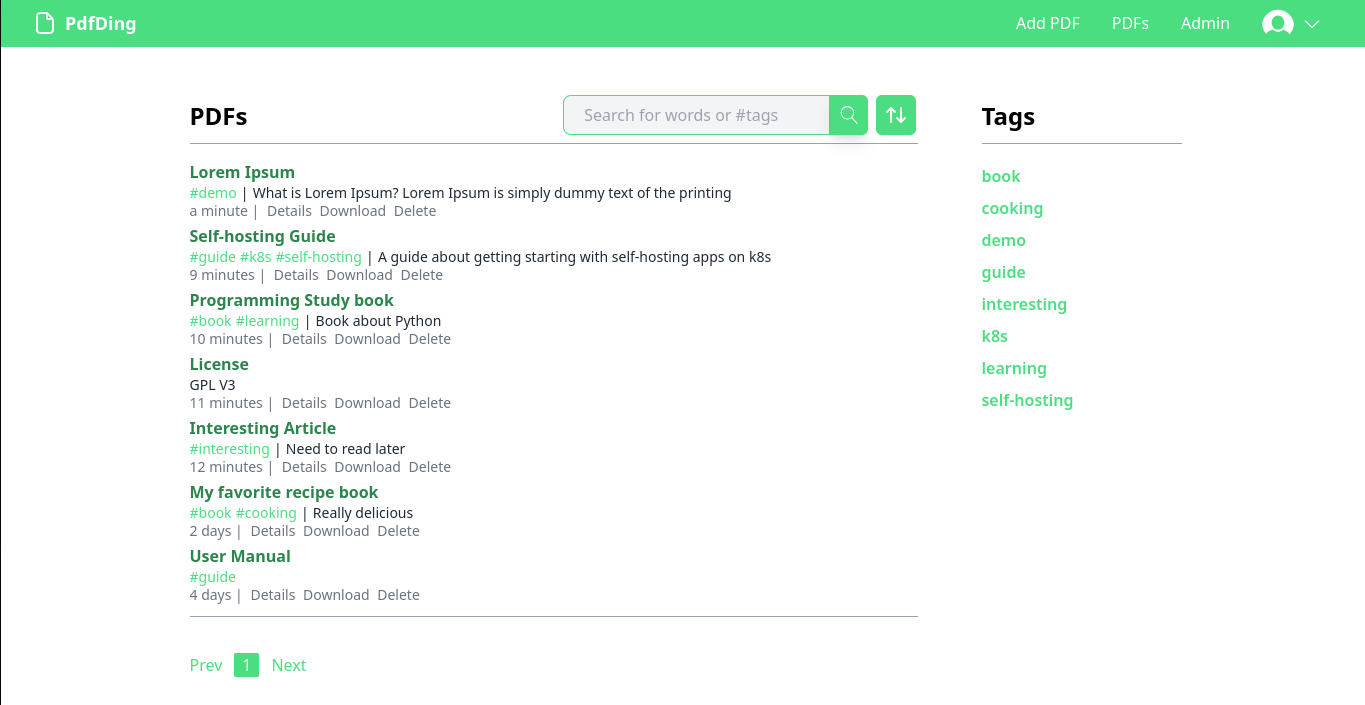
PdfDing is a PDF manager and viewer that you can host yourself. It offers a seamless user experience on multiple devices. It's designed be to be minimal, fast, and easy to set up using Docker.
The name is a combination of PDF and ding. Ding is the German word for thing. Thus, PdfDing is a thing for your PDFs. If the name and the design feel familiar it's no surprise as PdfDing was inspired by the excellent bookmark manager linkding.
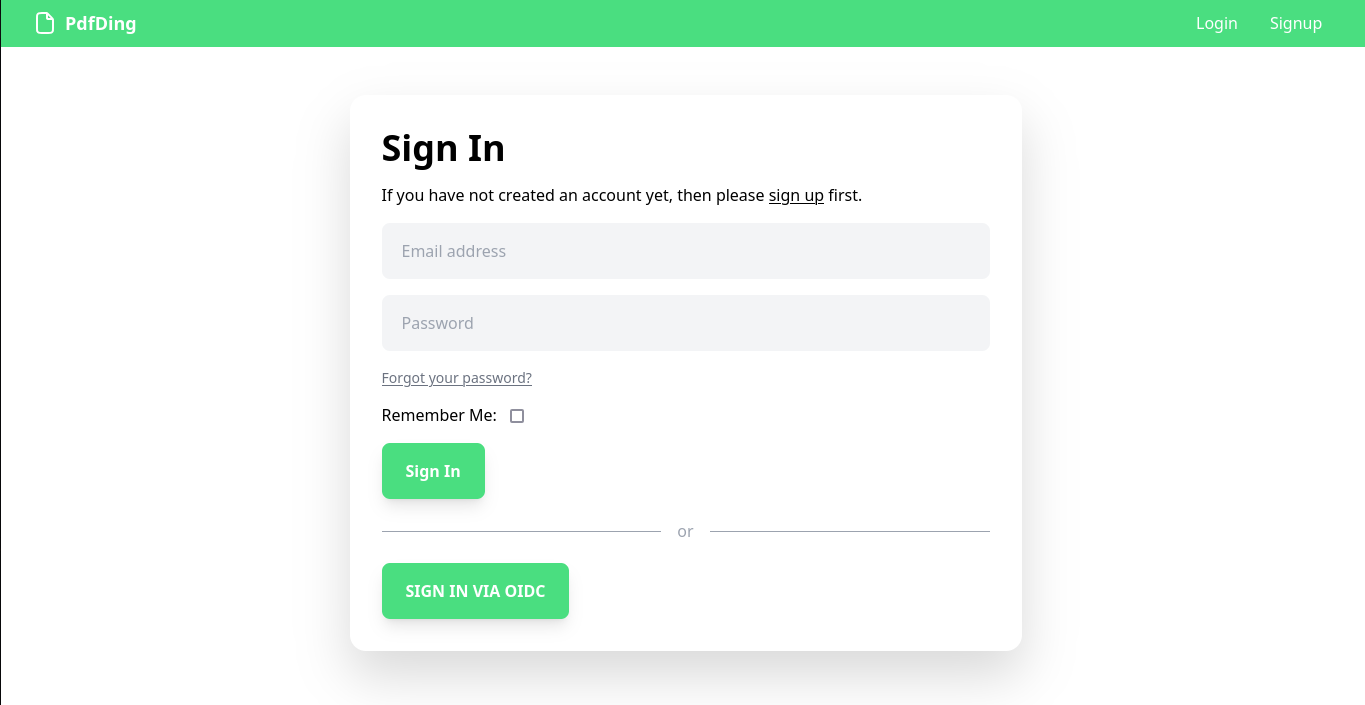
With its simple, intuitive and adjustable UI, PdfDing makes it easy for users to keep track of their PDFs and access them whenever they need to. With a dark mode and colored themes users can style the app to their liking. As PdfDing offers SSO support via OIDC it can be easily integrated into existing setups.

I started developing PdfDing as I was searching for a solution for viewing and managing PDF files. I had a few simple requirements:
I was quite surprised to find out that there was no app matching my simple requirements. While there were some existing solutions they still had some problems:
In order to fix these issues I am developing PDfDing as a simple webapp with a clear focus on a single thing: viewing and managing PDFs.
This Docker Compose stack can be used to install PdfDing on your server. If you need help, see noted's guides about getting started with self-hosting.
version: '3'

services:
  pdfding:
    container_name: pdfding
    image: mrmn/pdfding:latest
    volumes:
      - sqlite_data:/home/nonroot/pdfding/db
      - media:/home/nonroot/pdfding/media
    environment:
      # use a long random secret
      SECRET_KEY: some_secret
      # the domain where you want to access PdfDing, e.g. pdfding.com
      HOST_NAME: 127.0.0.1
      # In production set to TRUE
      CSRF_COOKIE_SECURE: FALSE
      # In production set to TRUE
      SESSION_COOKIE_SECURE: FALSE
#      # use this if you want to use OIDC
#      OIDC_ENABLE: TRUE
#      OIDC_CLIENT_ID: pdfding
#      OIDC_CLIENT_SECRET: client_secret
#      OIDC_AUTH_URL: https://auth.pdfding.com/.well-known/openid-configuration
    ports:
      - "8000:8000"

volumes:
  sqlite_data:
  media:
After running docker compose up you can access PdfDing via http://127.0.0.1:8000.
For more information about the configuration options click here.
PdfDing supports SSO via OIDC. If you want to use SSO uncomment the OIDC variables above.
Once PdfDing is set up for using OIDC the same needs to be done on the OIDC identity provider's side. Of course, this configuration depends on the used identity provider. Here is an example configuration
for Authelia:
oidc:
    ## The other portions of the mandatory OpenID Connect 1.0 configuration go here.
    ## See: https://www.authelia.com/c/oidc
    clients:
      - id: pdfding
            description: PdfDing
            # create client secret and hash with
            # docker run --rm authelia/authelia:latest authelia crypto rand --length 64 --charset alphanumeric
            secret: '$pbkdf2-sha512$310000$<rest_of_hashed_secret>'
            public: false
            authorization_policy: two_factor
            scopes:
              - openid
              - email
              - profile
            redirect_uris:
              - https://pdfding.com/accountoidc/login/callback/
If needed or wished it is possible to create an admin user. Admin users can view and delete users. Creating an admin user is optional. To give a user admin rights execute
python pdfding/manage.py make_admin -e admin@pdfding.com
inside the shell of the running container and specify the correct email address. Admin users can also give other users admin rights via the ui.
PdfDing is a work in progress. While it is already a fully functional PDF manager and viewer, more exciting features are already in the pipeline. For example:
Thanks for checking out PdfDing in this article.
If you enjoy PdfDing, be sure to swing by the PdfDing repo on Codeberg and give it a star. I would also ask that you ask any support related questions for PdfDing there on the Codeberg issue tracker.
As PdfDing is open source you are invited to modify or contribute. More information can be found here.
";s:7:"attribs";a:0:{}s:8:"xml_base";s:0:"";s:17:"xml_base_explicit";b:0;s:8:"xml_lang";s:0:"";}}}}}i:14;a:6:{s:4:"data";s:0:"";s:7:"attribs";a:0:{}s:8:"xml_base";s:0:"";s:17:"xml_base_explicit";b:0;s:8:"xml_lang";s:0:"";s:5:"child";a:4:{s:0:"";a:6:{s:5:"title";a:1:{i:0;a:5:{s:4:"data";s:52:"Readeck - Self-Hosted Bookmark and Read it Later App";s:7:"attribs";a:0:{}s:8:"xml_base";s:0:"";s:17:"xml_base_explicit";b:0;s:8:"xml_lang";s:0:"";}}s:11:"description";a:1:{i:0;a:5:{s:4:"data";s:103:"Discover a smarter way to save what matters most online with the self-hosted Readeck read-it-later app.";s:7:"attribs";a:0:{}s:8:"xml_base";s:0:"";s:17:"xml_base_explicit";b:0;s:8:"xml_lang";s:0:"";}}s:4:"link";a:1:{i:0;a:5:{s:4:"data";s:26:"https://noted.lol/readeck/";s:7:"attribs";a:0:{}s:8:"xml_base";s:0:"";s:17:"xml_base_explicit";b:0;s:8:"xml_lang";s:0:"";}}s:4:"guid";a:1:{i:0;a:5:{s:4:"data";s:24:"66a12d851df9fc0001454a53";s:7:"attribs";a:1:{s:0:"";a:1:{s:11:"isPermaLink";s:5:"false";}}s:8:"xml_base";s:0:"";s:17:"xml_base_explicit";b:0;s:8:"xml_lang";s:0:"";}}s:8:"category";a:1:{i:0;a:5:{s:4:"data";s:41:"Self Hosted Bookmark and Link Saving apps";s:7:"attribs";a:0:{}s:8:"xml_base";s:0:"";s:17:"xml_base_explicit";b:0;s:8:"xml_lang";s:0:"";}}s:7:"pubDate";a:1:{i:0;a:5:{s:4:"data";s:29:"Sat, 27 Jul 2024 13:16:46 GMT";s:7:"attribs";a:0:{}s:8:"xml_base";s:0:"";s:17:"xml_base_explicit";b:0;s:8:"xml_lang";s:0:"";}}}s:32:"http://purl.org/dc/elements/1.1/";a:1:{s:7:"creator";a:1:{i:0;a:5:{s:4:"data";s:6:"Jeremy";s:7:"attribs";a:0:{}s:8:"xml_base";s:0:"";s:17:"xml_base_explicit";b:0;s:8:"xml_lang";s:0:"";}}}s:29:"http://search.yahoo.com/mrss/";a:1:{s:7:"content";a:1:{i:0;a:5:{s:4:"data";s:0:"";s:7:"attribs";a:1:{s:0:"";a:2:{s:3:"url";s:70:"https://noted.lol/content/images/2024/07/self-hosted-readeck-noted.jpg";s:6:"medium";s:5:"image";}}s:8:"xml_base";s:0:"";s:17:"xml_base_explicit";b:0;s:8:"xml_lang";s:0:"";}}}s:40:"http://purl.org/rss/1.0/modules/content/";a:1:{s:7:"encoded";a:1:{i:0;a:5:{s:4:"data";s:8914:"
We're constantly discovering new and interesting content online. From articles and videos to podcasts and images. But as our bookmarks and favorites pile up across multiple platforms, it can be overwhelming to keep track of what we've saved where. That's why self-hosted bookmark managers have become increasingly popular among individuals looking for a more personalized and secure way to organize their digital finds.
Readeck is a self-hosted bookmark manager that allows users to save and organize articles, images, and videos from around the web. By storing all content locally, Readeck prioritizes user privacy and control over online information. With its simple and intuitive interface, Readeck makes it easy for users to keep track of their favorite content and access it whenever they need to.
At its core, Readeck is a versatile platform that combines the functionality of a bookmark manager with the features of a social bookmarking site. This combination allows users to not only store their favorite articles, images, and videos, but also discover and share new content with others who share similar interests. The service is comprised of several key components, including a web-based interface for adding, organizing, and searching bookmarks; a powerful tagging system that enables users to categorize their finds by topic or theme and a robust API that allows developers to integrate Readeck's features into their own applications.
This Docker Compose stack can be used to install Readeck on your server. If you need help, see our guides about getting started with self-hosting.
version: "3.9"
services:
  app:
    image: codeberg.org/readeck/readeck:latest
    container_name: readeck
    ports:
      - 8000:8000
    environment:
      # Defines the application log level. Can be error, warning, info, debug.
      - READECK_LOG_LEVEL=info
      # The IP address on which Readeck listens.
      - READECK_SERVER_HOST=0.0.0.0
      # The TCP port on which Readeck listens. Update container port above to match (right of colon).
      - READECK_SERVER_PORT=8000
      # The URL prefix of Readeck.
      - READECK_SERVER_PREFIX=/
      # A list of hostnames allowed in HTTP requests. Required for reverse proxy configuration.
      - READECK_ALLOWED_HOSTS=readeck.example.com
      # Use the 'X-Forwarded-' headers. Required for reverse proxy configuration.
      - READECK_USE_X_FORWARDED=true
    volumes:
      - readeck-data:/readeck
    restart: unless-stopped
    healthcheck:
      test: ["CMD", "/bin/readeck", "healthcheck", "-config", "config.toml"]
      interval: 30s
      timeout: 2s
      retries: 3
volumes:
readeck-data:Readeck is a bookmark management app that bears some resemblance to Hoarder, another popular choice in the space. While it may not boast as many features, Readeck shines by providing a simple and effective way to organize and access your favorite online content. Its clean interface makes it easy to add, categorize, and search through your bookmarks, while its robust feature set allows for tagging, notes, and even integration with other apps and services. With its ability to store all your bookmarks in one central location, Readeck is an excellent option for anyone looking to streamline their digital organization and stay on top of their favorite online content.
Read more about Readeck on the project page on Codeberg here.
";s:7:"attribs";a:0:{}s:8:"xml_base";s:0:"";s:17:"xml_base_explicit";b:0;s:8:"xml_lang";s:0:"";}}}}}}}s:27:"http://www.w3.org/2005/Atom";a:1:{s:4:"link";a:1:{i:0;a:5:{s:4:"data";s:0:"";s:7:"attribs";a:1:{s:0:"";a:3:{s:4:"href";s:22:"https://noted.lol/rss/";s:3:"rel";s:4:"self";s:4:"type";s:19:"application/rss+xml";}}s:8:"xml_base";s:0:"";s:17:"xml_base_explicit";b:0;s:8:"xml_lang";s:0:"";}}}}}}}}}}}}s:4:"type";i:128;s:7:"headers";a:13:{s:4:"date";s:29:"Mon, 26 Aug 2024 17:37:56 GMT";s:12:"content-type";s:23:"text/xml; charset=utf-8";s:13:"cache-control";s:17:"public, max-age=0";s:16:"content-encoding";s:4:"gzip";s:4:"etag";s:37:"W/"24395-jN5iv+wboPjaIUmX9rrWrU0Q8lY"";s:4:"vary";s:15:"Accept-Encoding";s:12:"x-powered-by";s:7:"Express";s:15:"cf-cache-status";s:7:"DYNAMIC";s:9:"report-to";s:231:"{endpoints:[{url:https:\/\/a.nel.cloudflare.com\/report\/v4?s=IDDGf0VSHfMgtjnqRx2A%2B%2FZUlWar%2FYU%2BQCCRI60J6bL8GRX2c0B7gYGeqw1O68MVv8oZLRnDDzsWBHm7fFCxx2lc%2BvyYfuKe9HP1zi6FsoNbX%2FT5ZFvQZXUQA1w%3D}],group:cf-nel,max_age:604800}";s:3:"nel";s:52:"{success_fraction:0,report_to:cf-nel,max_age:604800}";s:6:"server";s:10:"cloudflare";s:6:"cf-ray";s:20:"8b9597b6e9320492-CDG";s:7:"alt-svc";s:17:"h3=:443; ma=86400";}s:5:"build";s:14:"20240605153603";s:5:"mtime";i:1724693876;s:3:"md5";s:32:"1ed39908026cfe8ee5e965d3331b7a43";}