I've been using Portainer for approximately five years now, and it has proven to be a valuable tool for Docker container management. However, as time has passed, Portainer has increasingly catered to the needs of businesses, making it less user-friendly for self-hosting and home lab enthusiasts. As this transition unfolds, we're witnessing the emergence of new solutions, and Dockge is a notable newcomer in this space.
Dockge is a fancy, easy-to-use and reactive self-hosted docker compose.yaml stack-oriented manager.
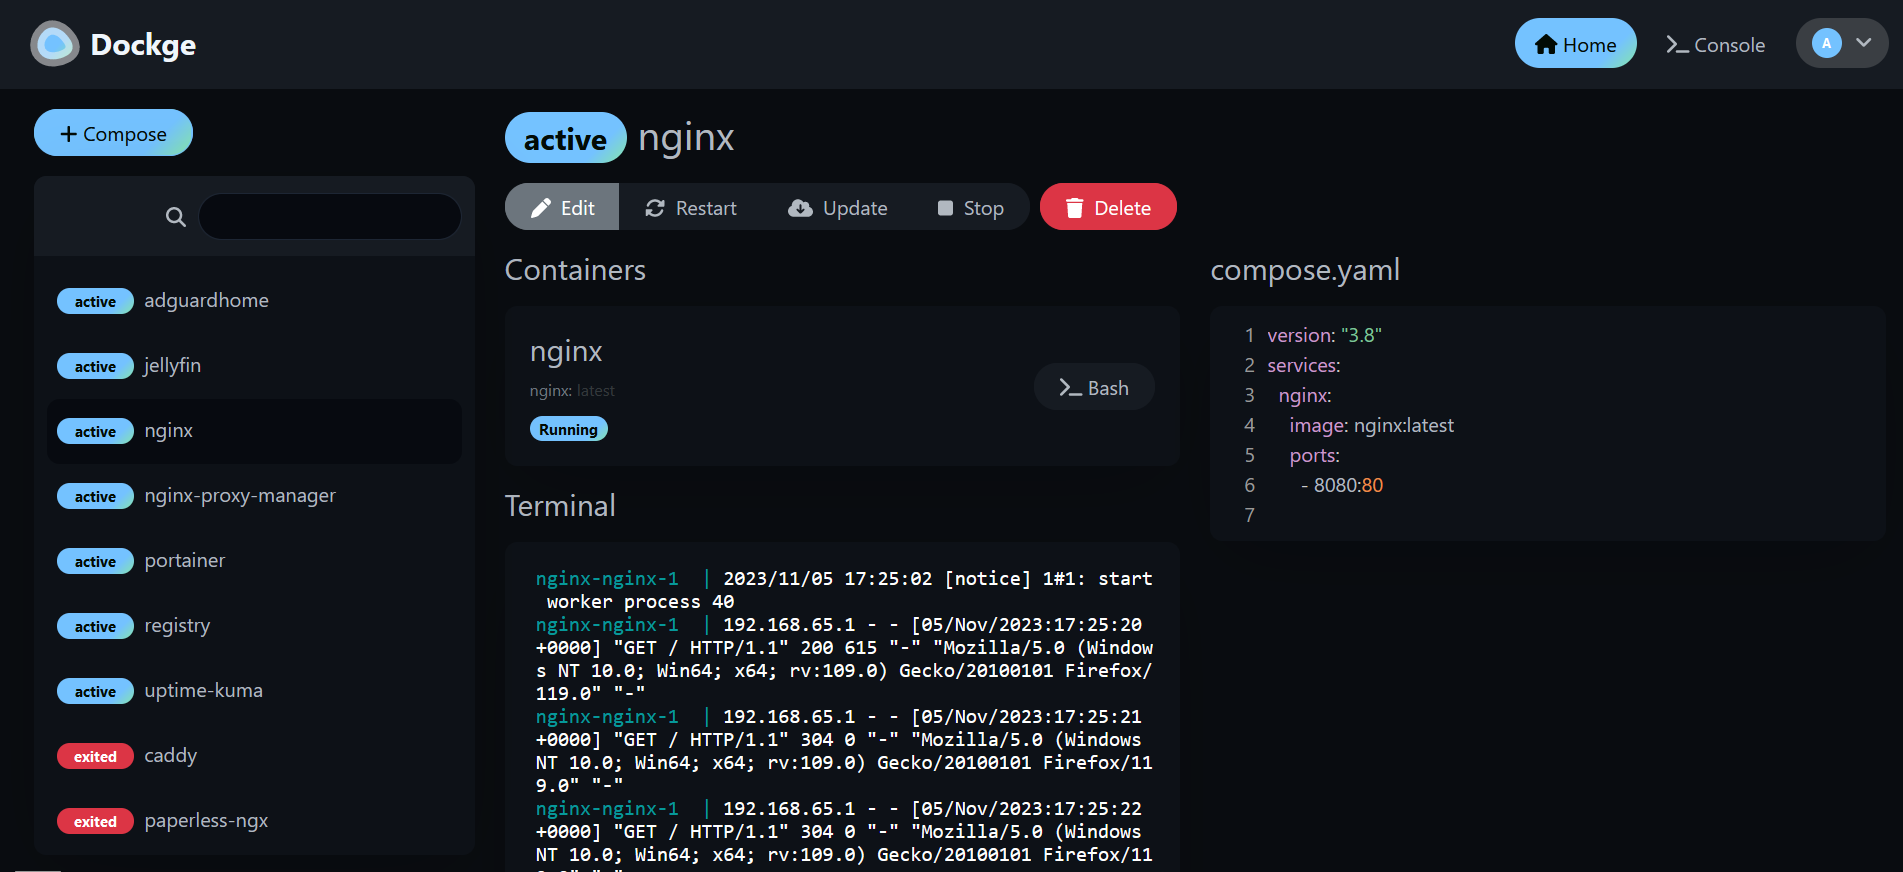
Dockge, developed by the creator of the widely acclaimed Uptime Kuma, offers a streamlined user experience where everything you require is conveniently available on a single page, easily viewable at a glance. When you create a new container, you'll find logs, a YAML editor, a terminal, and container controls all within arm's reach. There's no need to open multiple tabs to check your logs or manage your containers. Dockge consolidates all essential functions into a single interface ensuring a seamless Docker management experience.
Dockge is a versatile tool that simplifies Docker management, particularly when dealing with Docker Compose.yaml stacks. It empowers you to effortlessly perform tasks like creating, editing, starting, stopping, restarting, and deleting Docker containers and services—all conveniently defined within your Compose.yaml files. Dockge features an interactive Compose.yaml editor for hassle-free configuration and offers real-time interaction with your containers and services through its web terminal.
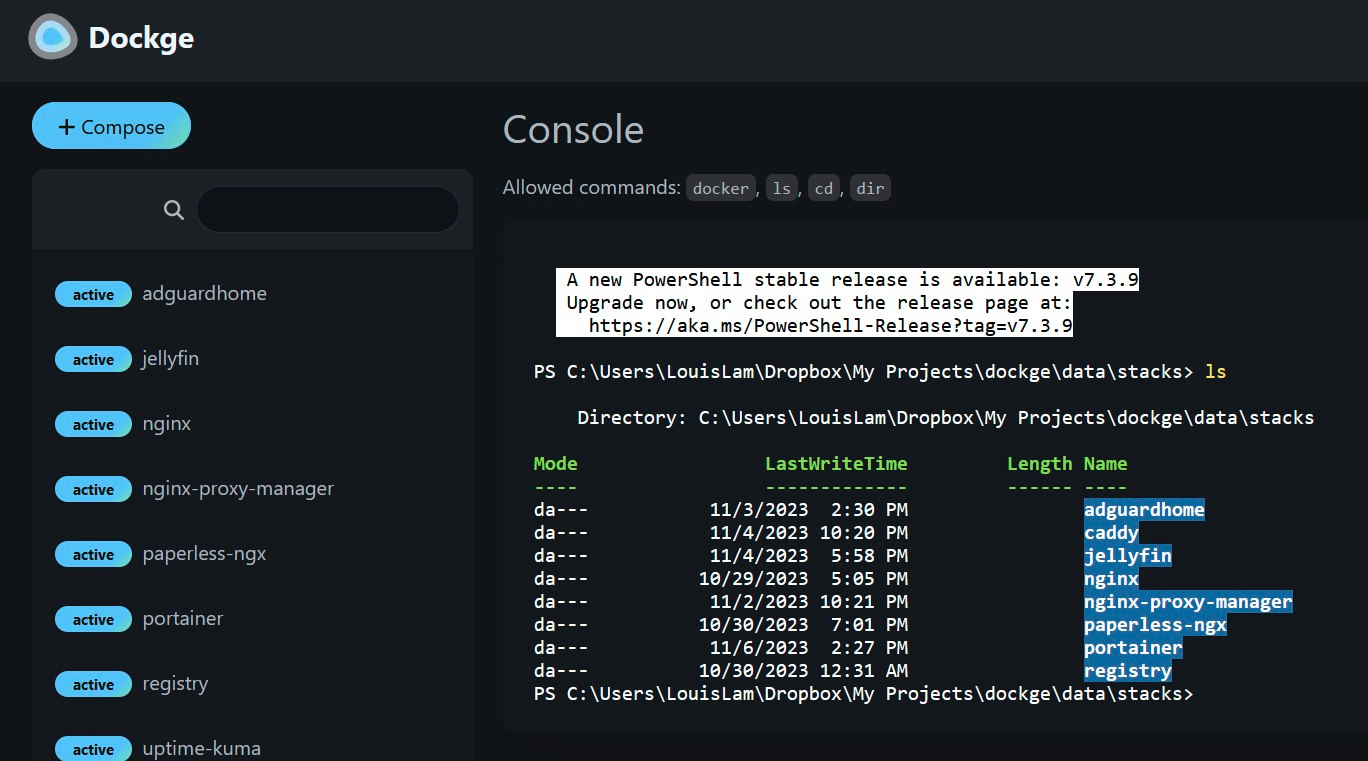
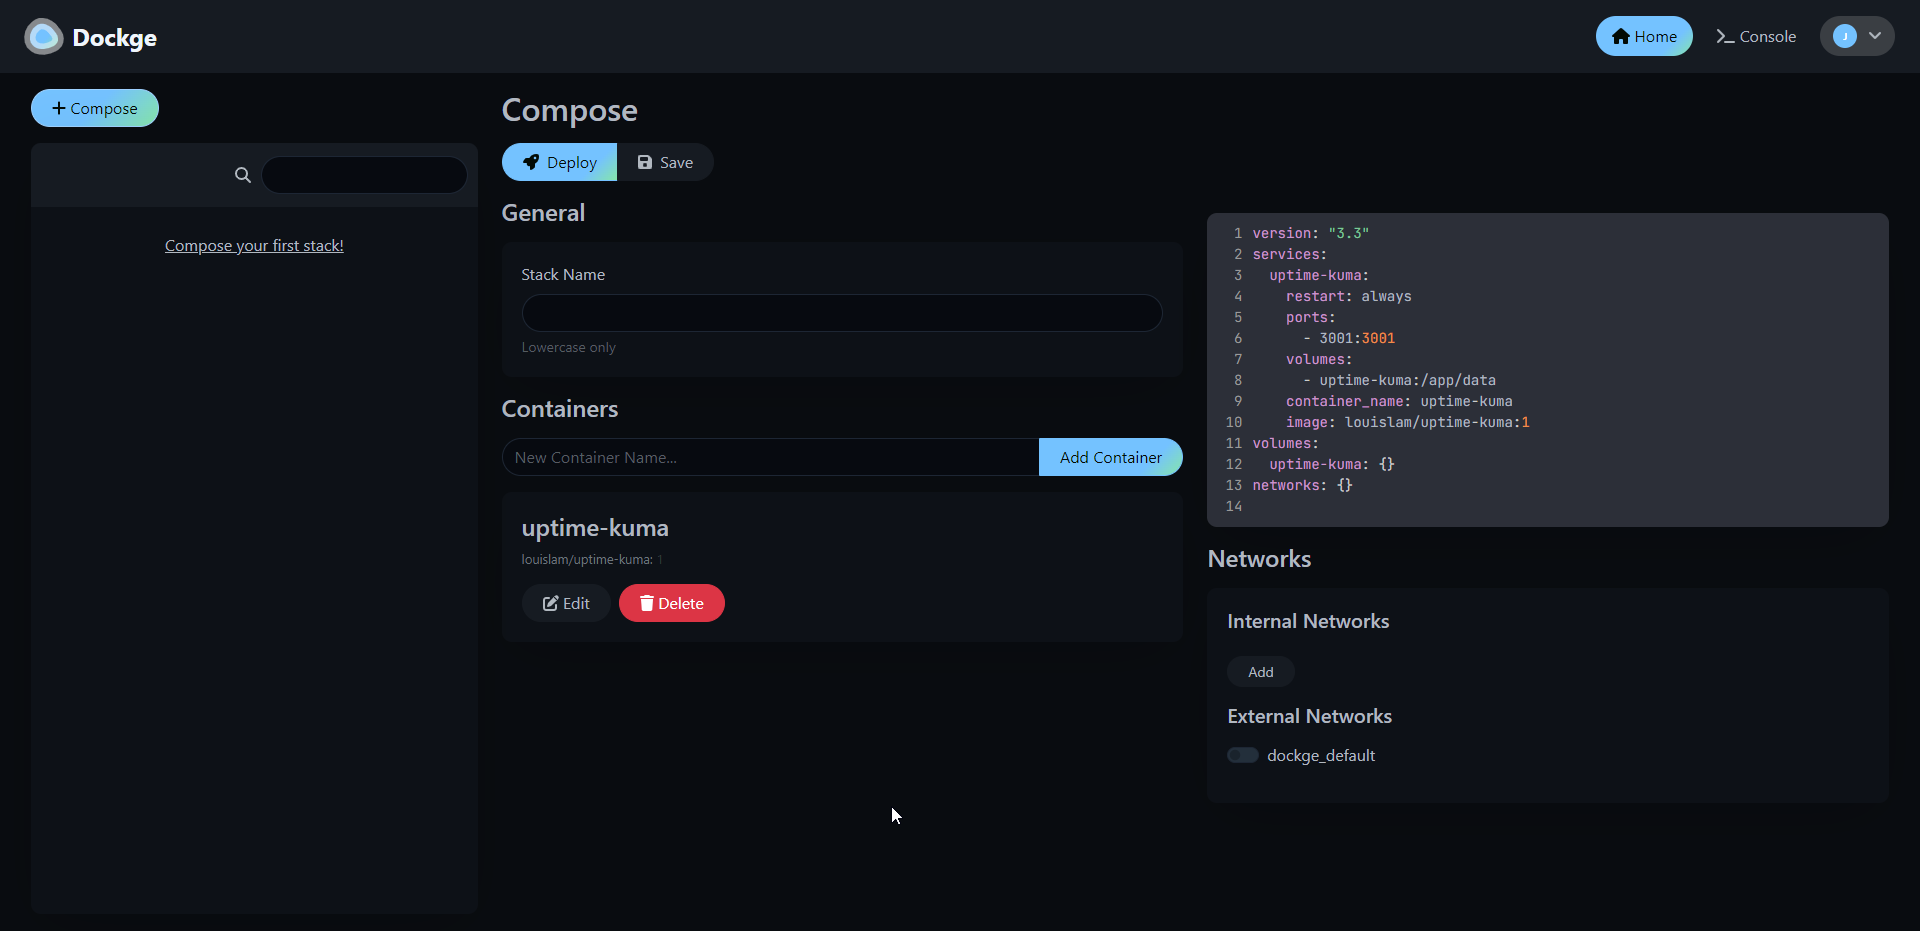
You can monitor progress in real time, whether it's image pulls or other container operations. Its user interface not only gets the job done but also boasts a stylish design, making it a pleasure to use. If you appreciate Uptime Kuma's sleek UI/UX, you'll likely find Dockge's interface equally appealing. Additionally, Dockge simplifies the process of translating complex "docker run" commands into Compose.yaml configurations, maintaining a file-based structure that securely stores your Compose files on your drive. You can easily access and manage them using standard Docker Compose commands, ensuring you remain in control of your configuration files.
One thing I really love about Dockge as mentioned earlier, is its nifty feature that lets you easily convert Docker run commands into Compose configurations. It might sound small, but it's incredibly handy and makes this tool even more fun to use.

Installing Dockge is easy. Here are the steps they lay out on their Github page.
# Create a directory that stores your stacks and stores dockge's compose.yaml
mkdir -p /opt/stacks /opt/dockge
cd /opt/dockge

# Download the compose.yaml
curl https://raw.githubusercontent.com/louislam/dockge/master/compose.yaml --output compose.yaml

# Start the Server
docker compose up -d

# If you are using docker-compose V1 or Podman
# docker-compose up -d
That's all there is to it!
I've been using Dockge for a couple of weeks now, and it's become my top choice for managing Docker. It's easy to use, and I have to admit, I'm pleased to have moved away from the "Upgrade to Portainer business" nags.
If you like the project and want to learn more, be sure to check out the Dockge Github repo and give the project a star!
";s:7:"attribs";a:0:{}s:8:"xml_base";s:0:"";s:17:"xml_base_explicit";b:0;s:8:"xml_lang";s:0:"";}}}}}i:1;a:6:{s:4:"data";s:0:"";s:7:"attribs";a:0:{}s:8:"xml_base";s:0:"";s:17:"xml_base_explicit";b:0;s:8:"xml_lang";s:0:"";s:5:"child";a:4:{s:0:"";a:6:{s:5:"title";a:1:{i:0;a:5:{s:4:"data";s:60:"Awwesome - An Enhanced user interface for Awesome Selfhosted";s:7:"attribs";a:0:{}s:8:"xml_base";s:0:"";s:17:"xml_base_explicit";b:0;s:8:"xml_lang";s:0:"";}}s:11:"description";a:1:{i:0;a:5:{s:4:"data";s:111:"Here's a fun idea for browsing the Awesome Self-Hosted GitHub repository – you can actually host it yourself!";s:7:"attribs";a:0:{}s:8:"xml_base";s:0:"";s:17:"xml_base_explicit";b:0;s:8:"xml_lang";s:0:"";}}s:4:"link";a:1:{i:0;a:5:{s:4:"data";s:27:"https://noted.lol/awwesome/";s:7:"attribs";a:0:{}s:8:"xml_base";s:0:"";s:17:"xml_base_explicit";b:0;s:8:"xml_lang";s:0:"";}}s:4:"guid";a:1:{i:0;a:5:{s:4:"data";s:24:"6529761a17738600010f927e";s:7:"attribs";a:1:{s:0:"";a:1:{s:11:"isPermaLink";s:5:"false";}}s:8:"xml_base";s:0:"";s:17:"xml_base_explicit";b:0;s:8:"xml_lang";s:0:"";}}s:8:"category";a:1:{i:0;a:5:{s:4:"data";s:21:"Self Hosted Web Tools";s:7:"attribs";a:0:{}s:8:"xml_base";s:0:"";s:17:"xml_base_explicit";b:0;s:8:"xml_lang";s:0:"";}}s:7:"pubDate";a:1:{i:0;a:5:{s:4:"data";s:29:"Sat, 18 Nov 2023 15:05:07 GMT";s:7:"attribs";a:0:{}s:8:"xml_base";s:0:"";s:17:"xml_base_explicit";b:0;s:8:"xml_lang";s:0:"";}}}s:32:"http://purl.org/dc/elements/1.1/";a:1:{s:7:"creator";a:1:{i:0;a:5:{s:4:"data";s:6:"Jeremy";s:7:"attribs";a:0:{}s:8:"xml_base";s:0:"";s:17:"xml_base_explicit";b:0;s:8:"xml_lang";s:0:"";}}}s:29:"http://search.yahoo.com/mrss/";a:1:{s:7:"content";a:1:{i:0;a:5:{s:4:"data";s:0:"";s:7:"attribs";a:1:{s:0:"";a:2:{s:3:"url";s:85:"https://noted.lol/content/images/2023/10/self-hosted-resources-featured-noted.lol.jpg";s:6:"medium";s:5:"image";}}s:8:"xml_base";s:0:"";s:17:"xml_base_explicit";b:0;s:8:"xml_lang";s:0:"";}}}s:40:"http://purl.org/rss/1.0/modules/content/";a:1:{s:7:"encoded";a:1:{i:0;a:5:{s:4:"data";s:4363:"
I'm constantly searching for new self-hosted projects to test out and write about. One of my top recommended resources is the Awesome Self-Hosted GitHub repository. It's a fantastic resource with a vast collection of self-hosted apps neatly organized by category. However, it's important to keep in mind that while it covers a lot, it can't list every self-hosted project out there, and that's perfectly understandable.
Awwesome is an enhanced web interface that makes browsing the self-hosted apps listed on Awesome Self-Hosted a little easier with more details about the project repo.
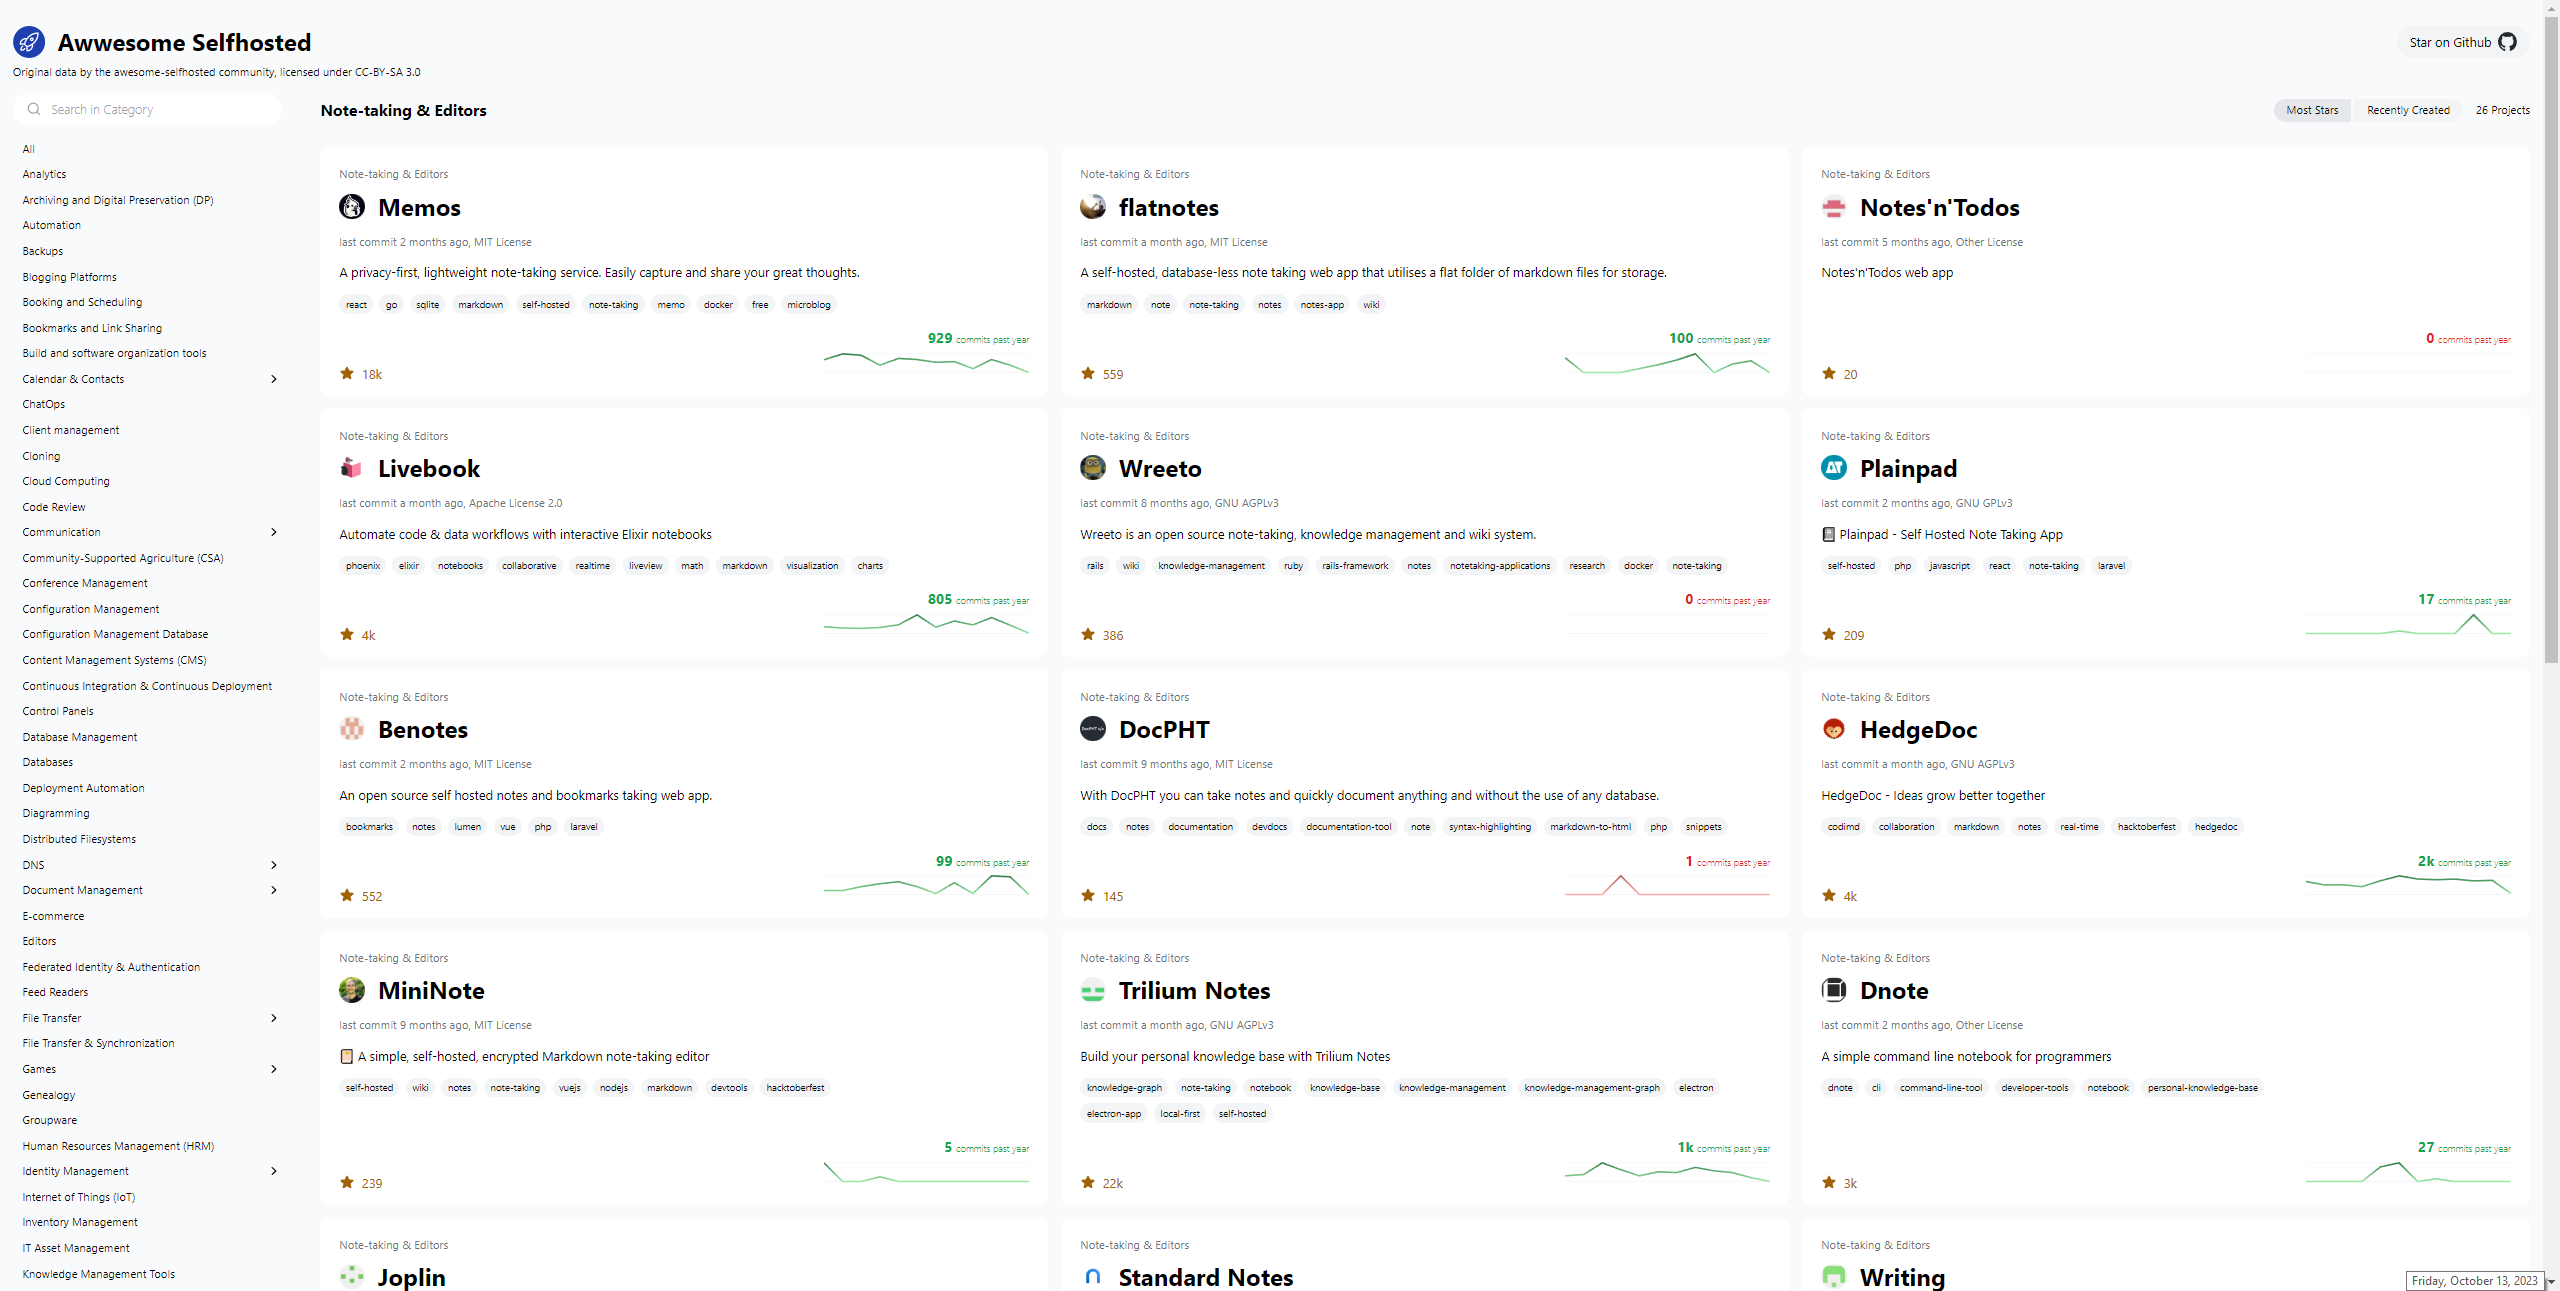
In this project, Svelte and Tailwind are the key technologies being utilized for its development. These technologies have been chosen for their efficiency and flexibility, allowing the project to deliver a seamless user experience while maintaining a visually appealing design.
The project's main source of data comes from the Awesome Selfhosted repository. This repository is a valuable resource for discovering self-hosted software applications and services across a wide range of categories. By crawling this repository, the project ensures that it remains up-to-date with the latest self-hosted solutions available in the open-source community.
However, the project doesn't stop there. It goes a step further by harnessing the power of GitHub's GraphQL API. This API enables the project to access a wealth of information related to each self-hosted project, such as its stars, forks, issues, and contributors. By fetching this additional data, the project enriches its database with valuable insights, making it a more comprehensive resource for users looking to explore and evaluate self-hosted software options.
Awwesome can also be self-hosted using Docker. Here's the Compose.
version: '3'
services:
  ofelia:
    image: mcuadros/ofelia:latest
    container_name: ofelia
    depends_on:
      - source
    command: daemon --docker
    volumes:
      - /var/run/docker.sock:/var/run/docker.sock:ro
    labels:
      ofelia.job-run.awwesome.schedule: "@daily"
      ofelia.job-run.awwesome.container: "awwesome"
  source:
    image: mkitzmann/awwesome
    container_name: awwesome
    working_dir: /usr/src/app
    environment:
      TOKEN_GITHUB: ${TOKEN_GITHUB}
    command: sh -c "npm run build && rm -r html/* && cp -r dist/* html && exit"
    volumes:
      - shared_volume:/usr/src/app/html
  web:
    image: nginx
    container_name: nginx
    ports:
      - "8080:80"
    volumes:
      - shared_volume:/usr/share/nginx/html:ro
volumes:
  shared_volume:
Just plop in a Github Access Token and you're good to go.
I couldn't help but notice that the "Recently Created" page on GitHub sometimes doesn't get it right, showing projects that have been around for a while ahead of newer ones. It's not without its quirks, but it's definitely a fun place to explore and discover more self-hosted ideas. And all credit goes to the Awesome Selfhosted repository!
";s:7:"attribs";a:0:{}s:8:"xml_base";s:0:"";s:17:"xml_base_explicit";b:0;s:8:"xml_lang";s:0:"";}}}}}i:2;a:6:{s:4:"data";s:0:"";s:7:"attribs";a:0:{}s:8:"xml_base";s:0:"";s:17:"xml_base_explicit";b:0;s:8:"xml_lang";s:0:"";s:5:"child";a:4:{s:0:"";a:6:{s:5:"title";a:1:{i:0;a:5:{s:4:"data";s:25:"wg-easy - VPN Made Simple";s:7:"attribs";a:0:{}s:8:"xml_base";s:0:"";s:17:"xml_base_explicit";b:0;s:8:"xml_lang";s:0:"";}}s:11:"description";a:1:{i:0;a:5:{s:4:"data";s:162:"Setting up a VPN has never been easier. Let's get you setup with WireGuard using wg-easy so you can be confident that your data is protected from outside threats.";s:7:"attribs";a:0:{}s:8:"xml_base";s:0:"";s:17:"xml_base_explicit";b:0;s:8:"xml_lang";s:0:"";}}s:4:"link";a:1:{i:0;a:5:{s:4:"data";s:42:"https://noted.lol/wg-easy-vpn-made-simple/";s:7:"attribs";a:0:{}s:8:"xml_base";s:0:"";s:17:"xml_base_explicit";b:0;s:8:"xml_lang";s:0:"";}}s:4:"guid";a:1:{i:0;a:5:{s:4:"data";s:24:"64df95f90903330001702fa2";s:7:"attribs";a:1:{s:0:"";a:1:{s:11:"isPermaLink";s:5:"false";}}s:8:"xml_base";s:0:"";s:17:"xml_base_explicit";b:0;s:8:"xml_lang";s:0:"";}}s:8:"category";a:3:{i:0;a:5:{s:4:"data";s:15:"Self Hosted VPN";s:7:"attribs";a:0:{}s:8:"xml_base";s:0:"";s:17:"xml_base_explicit";b:0;s:8:"xml_lang";s:0:"";}i:1;a:5:{s:4:"data";s:12:"Self Hosting";s:7:"attribs";a:0:{}s:8:"xml_base";s:0:"";s:17:"xml_base_explicit";b:0;s:8:"xml_lang";s:0:"";}i:2;a:5:{s:4:"data";s:8:"Home Lab";s:7:"attribs";a:0:{}s:8:"xml_base";s:0:"";s:17:"xml_base_explicit";b:0;s:8:"xml_lang";s:0:"";}}s:7:"pubDate";a:1:{i:0;a:5:{s:4:"data";s:29:"Fri, 20 Oct 2023 15:36:00 GMT";s:7:"attribs";a:0:{}s:8:"xml_base";s:0:"";s:17:"xml_base_explicit";b:0;s:8:"xml_lang";s:0:"";}}}s:32:"http://purl.org/dc/elements/1.1/";a:1:{s:7:"creator";a:1:{i:0;a:5:{s:4:"data";s:5:"Amrou";s:7:"attribs";a:0:{}s:8:"xml_base";s:0:"";s:17:"xml_base_explicit";b:0;s:8:"xml_lang";s:0:"";}}}s:29:"http://search.yahoo.com/mrss/";a:1:{s:7:"content";a:1:{i:0;a:5:{s:4:"data";s:0:"";s:7:"attribs";a:1:{s:0:"";a:2:{s:3:"url";s:88:"https://noted.lol/content/images/2023/03/self-hosted-wg-easy-wireguard-vpn-noted.lol.jpg";s:6:"medium";s:5:"image";}}s:8:"xml_base";s:0:"";s:17:"xml_base_explicit";b:0;s:8:"xml_lang";s:0:"";}}}s:40:"http://purl.org/rss/1.0/modules/content/";a:1:{s:7:"encoded";a:1:{i:0;a:5:{s:4:"data";s:4764:"
"wg-easy" is a Docker image that provides a simple way to set up and manage WireGuard VPN connections.
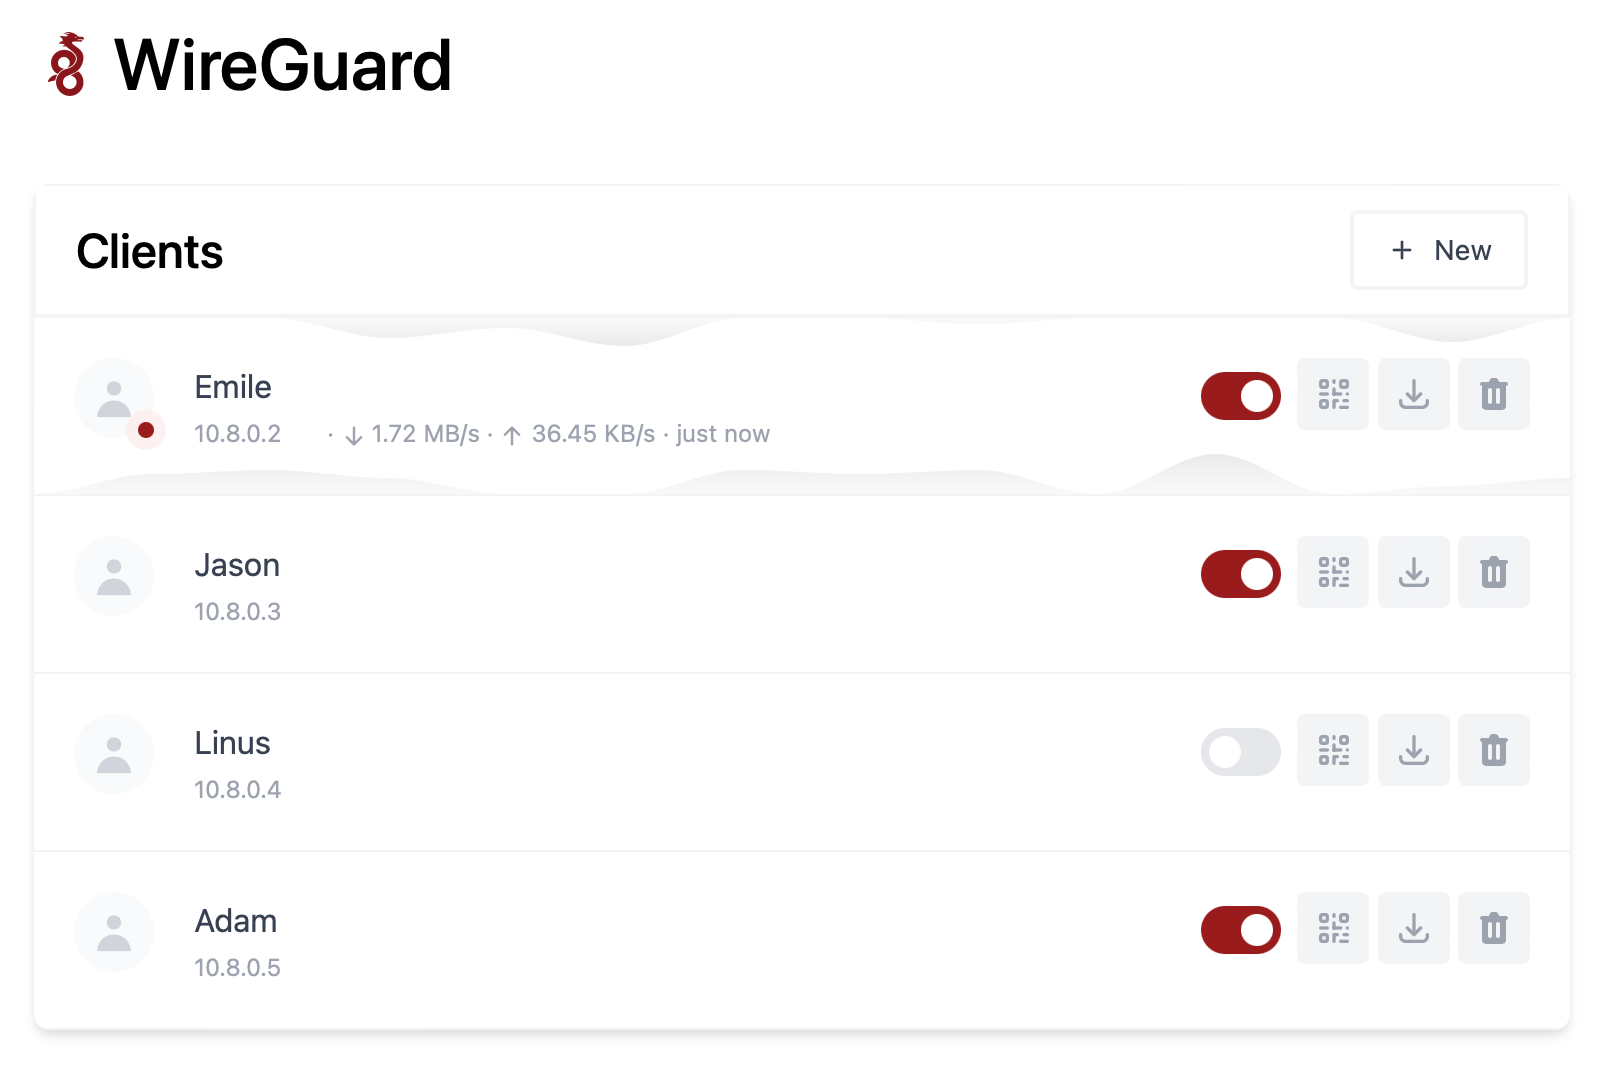
Wireguard is VPN protocol that's faster, more secure, and easier to use than traditional VPN solutions. It allows users to create secure, point-to-point connections over the internet and is often used to protect network traffic and access resources that are on your home network without the need to open ports!
The "wg-easy" Docker image is designed to simplify the process of setting up and managing WireGuard connections by providing a pre-configured environment that includes all the necessary components, such as the WireGuard kernel module, the wg-tools package, and a web-based interface for managing VPN connections.
To use the "wg-easy" Docker image, you will need to have Docker installed on your system and then pull the image from a Docker registry.
Once you have the image, you can run it as a container and start configuring your VPN connections using the provided web interface or command-line tools.
docker run -d \
  --name=wg-easy \
  -e WG_HOST=YOUR_SERVER_IP \
  -e PASSWORD=YOUR_ADMIN_PASSWORD \
  -v ~/.wg-easy:/etc/wireguard \
  -p 51820:51820/udp \
  -p 51821:51821/tcp \
  --cap-add=NET_ADMIN \
  --cap-add=SYS_MODULE \
  --sysctl="net.ipv4.conf.all.src_valid_mark=1" \
  --sysctl="net.ipv4.ip_forward=1" \
  --restart unless-stopped \
  weejewel/wg-easy
You need to modify the command and adapt it :
YOUR_SERVER_IP = WAN IP or Dynamic DNS YOUR_ADMIN_PASSWORD = Password for Web UI version: "3.8"
services:
wg-easy:
environment:
# ⚠️ Required:
# Change this to your host's public address
- WG_HOST=
# Optional:
- PASSWORD= [ADMIN PASSWORD]
# - WG_PORT=51820
# - WG_DEFAULT_ADDRESS= 10.8.0.x
# - WG_DEFAULT_DNS=
# - WG_MTU=1420
- WG_ALLOWED_IPS= [SUBNET]/[MASK]
# - WG_PRE_UP=echo "Pre Up" > /etc/wireguard/pre-up.txt
# - WG_POST_UP=echo "Post Up" > /etc/wireguard/post-up.txt
# - WG_PRE_DOWN=echo "Pre Down" > /etc/wireguard/pre-down.txt
# - WG_POST_DOWN=echo "Post Down" > /etc/wireguard/post-down.txt
image: weejewel/wg-easy
container_name: wg-easy
volumes:
- /storage/path/ofyour/choice:/etc/wireguard
ports:
- "51820:51820/udp"
- "51821:51821/tcp"
restart: unless-stopped
cap_add:
- NET_ADMIN
- SYS_MODULE
sysctls:
- net.ipv4.ip_forward=1
- net.ipv4.conf.all.src_valid_mark=1You need to define the :
PASSWORD : Admin web UI passwordWG_ALLOWED_IPS : your home subnet, this will allow your VPN clients to reach your lan (ex : 192.168.1.0/24]Github Link.
Remember you need to open 51820/UDP on your firewall for the magic to happen.
Self-hosting WG-easy can provide several benefits, including increased control, privacy, and security. By hosting your own VPN server using WG-easy, you can have complete control over your network and data, as well as the ability to customize the server to meet your specific needs. Self-hosting can offer increased privacy, as you are not relying on third-party VPN providers to protect your data. By using WG-easy's strong encryption and security protocols, you can be confident that your data is protected from outside threats.
";s:7:"attribs";a:0:{}s:8:"xml_base";s:0:"";s:17:"xml_base_explicit";b:0;s:8:"xml_lang";s:0:"";}}}}}i:3;a:6:{s:4:"data";s:0:"";s:7:"attribs";a:0:{}s:8:"xml_base";s:0:"";s:17:"xml_base_explicit";b:0;s:8:"xml_lang";s:0:"";s:5:"child";a:4:{s:0:"";a:6:{s:5:"title";a:1:{i:0;a:5:{s:4:"data";s:59:"Continue - An Open-Source AI Software Development Assistant";s:7:"attribs";a:0:{}s:8:"xml_base";s:0:"";s:17:"xml_base_explicit";b:0;s:8:"xml_lang";s:0:"";}}s:11:"description";a:1:{i:0;a:5:{s:4:"data";s:138:"The open-source autopilot for software development that brings the ChatGPT magic to your favorite coding tools like VS Code and JetBrains.";s:7:"attribs";a:0:{}s:8:"xml_base";s:0:"";s:17:"xml_base_explicit";b:0;s:8:"xml_lang";s:0:"";}}s:4:"link";a:1:{i:0;a:5:{s:4:"data";s:27:"https://noted.lol/continue/";s:7:"attribs";a:0:{}s:8:"xml_base";s:0:"";s:17:"xml_base_explicit";b:0;s:8:"xml_lang";s:0:"";}}s:4:"guid";a:1:{i:0;a:5:{s:4:"data";s:24:"6529332617738600010f91f7";s:7:"attribs";a:1:{s:0:"";a:1:{s:11:"isPermaLink";s:5:"false";}}s:8:"xml_base";s:0:"";s:17:"xml_base_explicit";b:0;s:8:"xml_lang";s:0:"";}}s:8:"category";a:1:{i:0;a:5:{s:4:"data";s:8:"AI Tools";s:7:"attribs";a:0:{}s:8:"xml_base";s:0:"";s:17:"xml_base_explicit";b:0;s:8:"xml_lang";s:0:"";}}s:7:"pubDate";a:1:{i:0;a:5:{s:4:"data";s:29:"Fri, 13 Oct 2023 13:25:46 GMT";s:7:"attribs";a:0:{}s:8:"xml_base";s:0:"";s:17:"xml_base_explicit";b:0;s:8:"xml_lang";s:0:"";}}}s:32:"http://purl.org/dc/elements/1.1/";a:1:{s:7:"creator";a:1:{i:0;a:5:{s:4:"data";s:6:"Cedric";s:7:"attribs";a:0:{}s:8:"xml_base";s:0:"";s:17:"xml_base_explicit";b:0;s:8:"xml_lang";s:0:"";}}}s:29:"http://search.yahoo.com/mrss/";a:1:{s:7:"content";a:1:{i:0;a:5:{s:4:"data";s:0:"";s:7:"attribs";a:1:{s:0:"";a:2:{s:3:"url";s:97:"https://noted.lol/content/images/2023/10/continue-coding-chat-ai-assistant-featured-noted.lol.jpg";s:6:"medium";s:5:"image";}}s:8:"xml_base";s:0:"";s:17:"xml_base_explicit";b:0;s:8:"xml_lang";s:0:"";}}}s:40:"http://purl.org/rss/1.0/modules/content/";a:1:{s:7:"encoded";a:1:{i:0;a:5:{s:4:"data";s:9986:"
Many developers have started using ChatGPT in their coding, but the process can be cumbersome due to the need for copying, pasting, and editing to make generated responses fit into their code. Continue streamlines this by allowing LLMs to work seamlessly within your IDE as you complete your coding tasks.
Continue is an open-source tool for software development. It's an extension for integrated development environments (IDEs) like VS Code and JetBrains, and it brings the capabilities of ChatGPT right into your coding environment.
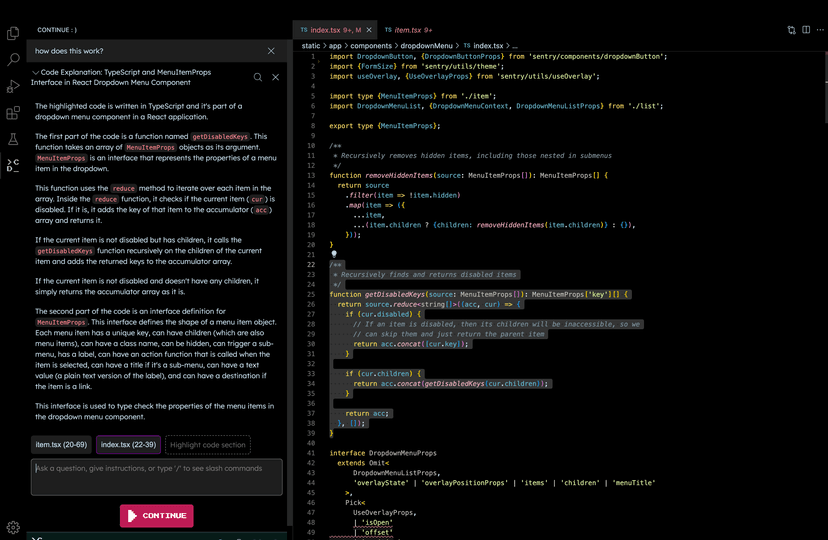
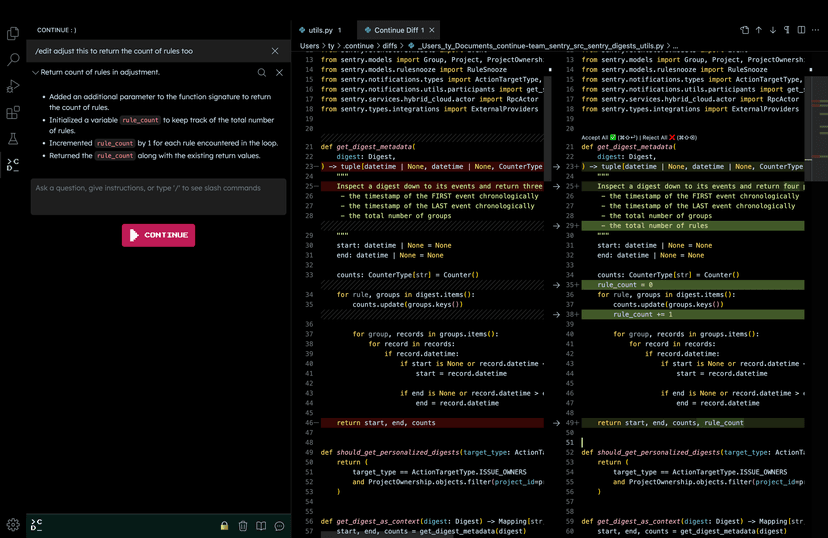
With Continue, you have control over when you want to use Large Language Models (LLMs) such as GPT-4 and Code Llama as a helpful assistant. Just select your code, provide instructions in natural language, and use commands like /edit to guide the LLM.
The effectiveness of Continue depends on the specific LLM you're using for edits and explanations. Keep in mind that LLMs can sometimes generate information that isn't accurate, like inventing a library or using syntax that doesn't exist. If you ever encounter something that doesn't seem right or functional, it's a good idea to cross-check it with a quick Google search to avoid any potential pitfalls. Read more here on how to use Continue in your workflow.
Continue operates in a structured manner, breaking down its actions into units called "steps." What's neat is that these steps can be stacked and combined to handle more complex tasks, making it quite flexible for your coding needs. Each step gets access to the Software Development Kit (SDK), which empowers you to incorporate Large Language Models (LLMs) into your workflow. Whether you need to edit a file or call upon a model, the SDK has your back.
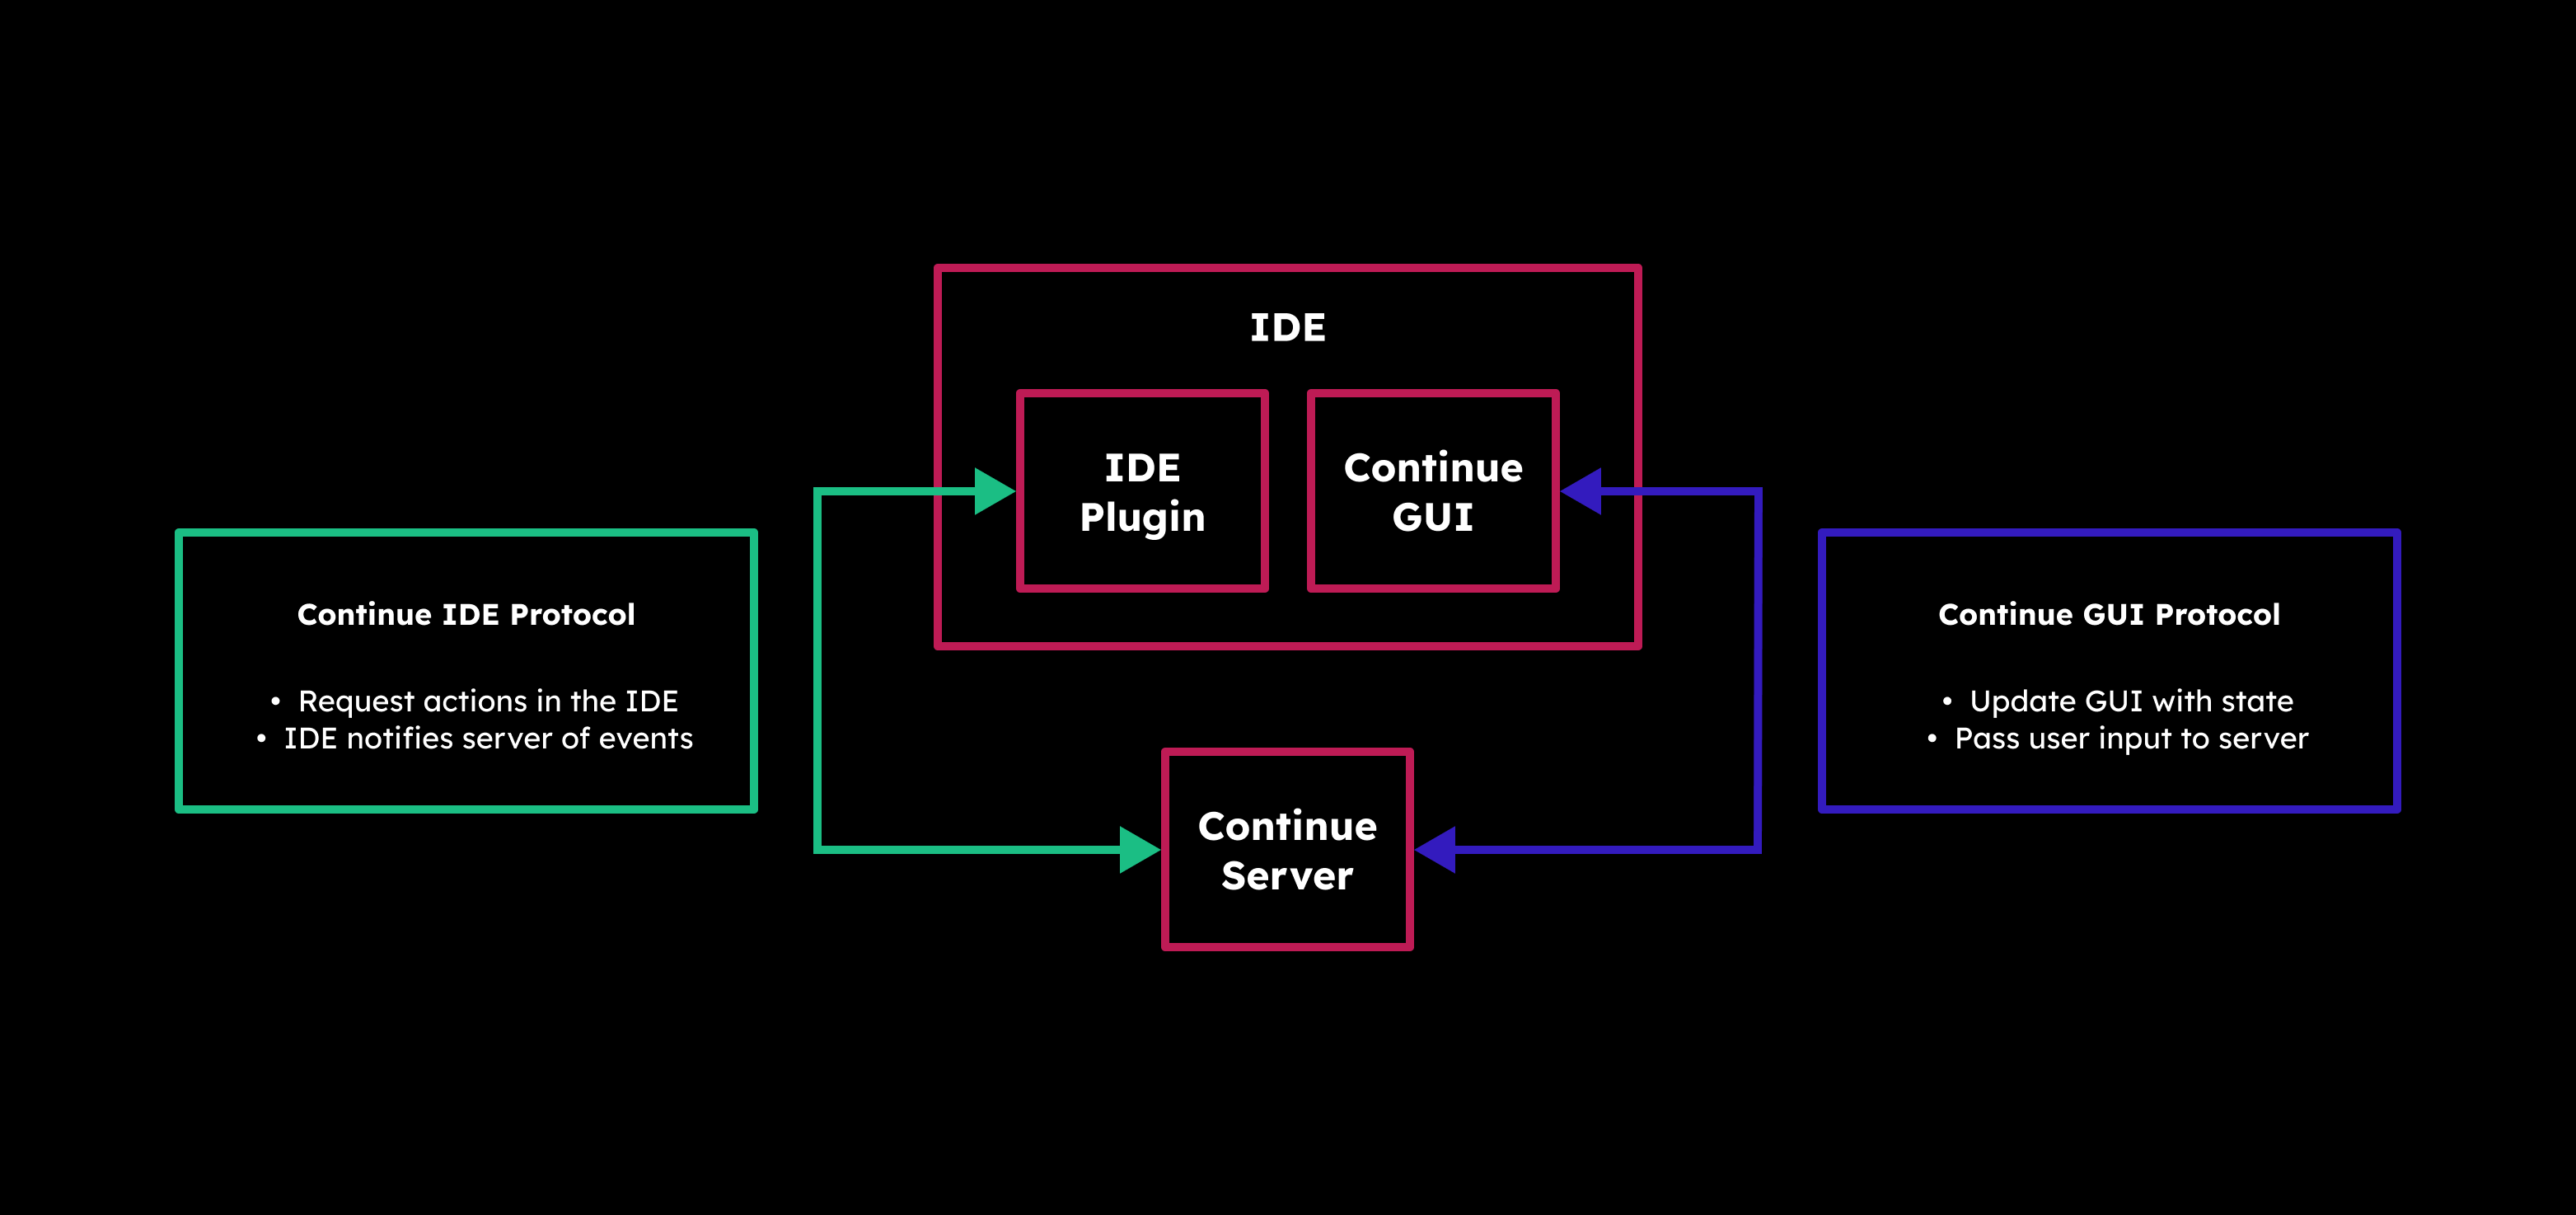
Under the hood, Continue has a Server (which can be run manually) that acts as the bridge between your IDE and the graphical user interface (GUI). It's the brains behind determining what steps should come next. And speaking of the GUI, it's where the magic happens. Here, you can thoroughly review every automated step, offering you the freedom to undo or redo any of them, ensuring your code's journey stays in your control.
Continue seamlessly integrates with popular IDEs to enhance your coding experience. You have two great options to choose from:
First up is VS Code, where Continue is available as an extension. You can easily add it to your VS Code setup to unlock its powerful features. Just head over to the Visual Studio Marketplace, find Continue, and install it with a few clicks.
If you prefer JetBrains IDEs like Intellij, PyCharm, or WebStorm, you're in luck too. Continue offers a plugin for JetBrains, providing you with a helping hand for your coding projects. To get started, just visit the JetBrains Marketplace, locate Continue, and follow the installation process.
In my experience using Continue with VS Code, it's been a really helpful tool for my coding projects. It makes things easier by creating code, making refactoring simpler, and giving me new ideas when I need them. The best part is how well it works inside VS Code, making my work smoother and letting me focus on the creative part of coding while it handles the technical stuff.
For more information about Continue, vist the following links.
Continue Github: https://github.com/continuedev/continue
Continue website and docs: https://continue.dev
Continue on Discord: https://discord.gg/vapESyrFmJ
";s:7:"attribs";a:0:{}s:8:"xml_base";s:0:"";s:17:"xml_base_explicit";b:0;s:8:"xml_lang";s:0:"";}}}}}i:4;a:6:{s:4:"data";s:0:"";s:7:"attribs";a:0:{}s:8:"xml_base";s:0:"";s:17:"xml_base_explicit";b:0;s:8:"xml_lang";s:0:"";s:5:"child";a:4:{s:0:"";a:6:{s:5:"title";a:1:{i:0;a:5:{s:4:"data";s:72:"Ollama - Self-Hosted AI Chat with Llama 2, Code Llama and More in Docker";s:7:"attribs";a:0:{}s:8:"xml_base";s:0:"";s:17:"xml_base_explicit";b:0;s:8:"xml_lang";s:0:"";}}s:11:"description";a:1:{i:0;a:5:{s:4:"data";s:73:"Self-hosted Llama 2 through the power of Ollama in Docker. Let's dive in!";s:7:"attribs";a:0:{}s:8:"xml_base";s:0:"";s:17:"xml_base_explicit";b:0;s:8:"xml_lang";s:0:"";}}s:4:"link";a:1:{i:0;a:5:{s:4:"data";s:25:"https://noted.lol/ollama/";s:7:"attribs";a:0:{}s:8:"xml_base";s:0:"";s:17:"xml_base_explicit";b:0;s:8:"xml_lang";s:0:"";}}s:4:"guid";a:1:{i:0;a:5:{s:4:"data";s:24:"6527f9670da4d600017c276b";s:7:"attribs";a:1:{s:0:"";a:1:{s:11:"isPermaLink";s:5:"false";}}s:8:"xml_base";s:0:"";s:17:"xml_base_explicit";b:0;s:8:"xml_lang";s:0:"";}}s:8:"category";a:1:{i:0;a:5:{s:4:"data";s:20:"Self Hosted AI Tools";s:7:"attribs";a:0:{}s:8:"xml_base";s:0:"";s:17:"xml_base_explicit";b:0;s:8:"xml_lang";s:0:"";}}s:7:"pubDate";a:1:{i:0;a:5:{s:4:"data";s:29:"Thu, 12 Oct 2023 15:57:42 GMT";s:7:"attribs";a:0:{}s:8:"xml_base";s:0:"";s:17:"xml_base_explicit";b:0;s:8:"xml_lang";s:0:"";}}}s:32:"http://purl.org/dc/elements/1.1/";a:1:{s:7:"creator";a:1:{i:0;a:5:{s:4:"data";s:6:"Cedric";s:7:"attribs";a:0:{}s:8:"xml_base";s:0:"";s:17:"xml_base_explicit";b:0;s:8:"xml_lang";s:0:"";}}}s:29:"http://search.yahoo.com/mrss/";a:1:{s:7:"content";a:1:{i:0;a:5:{s:4:"data";s:0:"";s:7:"attribs";a:1:{s:0:"";a:2:{s:3:"url";s:88:"https://noted.lol/content/images/2023/10/ollama-self-hosted-ai-chat-docker-noted.lol.jpg";s:6:"medium";s:5:"image";}}s:8:"xml_base";s:0:"";s:17:"xml_base_explicit";b:0;s:8:"xml_lang";s:0:"";}}}s:40:"http://purl.org/rss/1.0/modules/content/";a:1:{s:7:"encoded";a:1:{i:0;a:5:{s:4:"data";s:20617:"
Hey everyone! I'm back with an exciting tool that lets you run Llama 2, Code Llama, and more directly in your terminal using a simple Docker command. Say hello to Ollama, the AI chat program that makes interacting with LLMs as easy as spinning up a docker container.
Ollama is a command-line chatbot that makes it simple to use large language models almost anywhere, and now it's even easier with a Docker image.
Ollama offers a range of open-source models you can find at ollama.ai/library. Check out these examples of models you can download:
| Model | Parameters | Size | Download |
|---|---|---|---|
| Mistral | 7B | 4.1GB | ollama run mistral |
| Llama 2 | 7B | 3.8GB | ollama run llama2 |
| Code Llama | 7B | 3.8GB | ollama run codellama |
| Llama 2 Uncensored | 7B | 3.8GB | ollama run llama2-uncensored |
| Llama 2 13B | 13B | 7.3GB | ollama run llama2:13b |
| Llama 2 70B | 70B | 39GB | ollama run llama2:70b |
| Orca Mini | 3B | 1.9GB | ollama run orca-mini |
| Vicuna | 7B | 3.8GB | ollama run vicuna |
Please remember: To run the 3B models, make sure you have a minimum of 8 GB of RAM. For the 7B models, you'll need 16 GB, and for the 13B models, you should have 32 GB.

Ollama can take advantage of GPU acceleration in Docker containers designed for Nvidia GPUs. I didn't use the GPU option for testing, and it ran smoothly!
Just ensure you have a computer with Linux and Docker installed. Then, use the following command to download the Ollama image to your computer.
docker run -d -v ollama:/root/.ollama -p 11434:11434 --name ollama ollama/ollamaDon't forget, this is running on your CPU, not the GPU. If you're looking for that extra oomph with GPU support, check out the Ollama blog post for Docker image that supports Nvidia GPU.
docker exec -it ollama ollama run llama2This will download the Llama 2 model to your system. If you use the "ollama run" command and the model isn't already downloaded, it will perform a download. To get the model without running it, simply use "ollama pull llama2."

Once the model is downloaded you can initiate the chat sequence and begin your conversation. You can exit or start a new chat by pressing Ctrl+D. If you exit, you will have to re run the command above to initiate the chat again.
Ok, so performance is completely dependant on the hardware and resources your system has. I ran llama2's 7B version on an LXC container with 15GB of ram and 4 CPU cores. Here is the response speed I was getting.

I was blown away at how fast the responses where out of an LXC container...
Going below 3 CPU cores made it almost unusable, resulting in frequent freezes. Keep in mind, this was just for testing purposes. AI chatbots always work better on dedicated systems or bare metal.
I'd like to point out that Ollama offers desktop apps for both MacOS and Linux, and it seems they're working on a Windows version as well, though I haven't personally tried the desktop versions, having focused on the Docker version as it seems more suited for self-hosting.
I have to admit, I'm genuinely impressed with how Ollama performs in this testing environment. It's so user friendly that I can see myself using it more often. Downloading models is simple and well documented on the Ollama website.
Even though a command-line tool like this might not offer the same convenience and flashy features as a web interface, there's a certain satisfaction in whipping up a chatbot quickly right in your terminal. There's a sense of accomplishment when you see it in action.
If you're new to AI chatbots and LLMs and eager to dive into the topic, don't hesitate to browse through my other articles right here for a deeper understanding. I'll be covering a lot more about the topic here on Noted so stay tuned. 😊
This was a basic example of how to setup Ollama using Docker. There is a lot I didn't cover, like customizing your own models, prompts and even the Rest API. To read more about these Ollama features, visit the following links:
Ollama website: https://ollama.ai
Ollama Github: https://github.com/jmorganca/ollama
Ollama Discord: https://discord.com/invite/ollama
";s:7:"attribs";a:0:{}s:8:"xml_base";s:0:"";s:17:"xml_base_explicit";b:0;s:8:"xml_lang";s:0:"";}}}}}i:5;a:6:{s:4:"data";s:0:"";s:7:"attribs";a:0:{}s:8:"xml_base";s:0:"";s:17:"xml_base_explicit";b:0;s:8:"xml_lang";s:0:"";s:5:"child";a:4:{s:0:"";a:6:{s:5:"title";a:1:{i:0;a:5:{s:4:"data";s:41:"Self-Hosted Blogging Made Easy with Ghost";s:7:"attribs";a:0:{}s:8:"xml_base";s:0:"";s:17:"xml_base_explicit";b:0;s:8:"xml_lang";s:0:"";}}s:11:"description";a:1:{i:0;a:5:{s:4:"data";s:117:"Discover Ghost, your self-hosted blogging companion, for effortless creativity and control over your online presence.";s:7:"attribs";a:0:{}s:8:"xml_base";s:0:"";s:17:"xml_base_explicit";b:0;s:8:"xml_lang";s:0:"";}}s:4:"link";a:1:{i:0;a:5:{s:4:"data";s:28:"https://noted.lol/ghost-cms/";s:7:"attribs";a:0:{}s:8:"xml_base";s:0:"";s:17:"xml_base_explicit";b:0;s:8:"xml_lang";s:0:"";}}s:4:"guid";a:1:{i:0;a:5:{s:4:"data";s:24:"6525cdfa0da4d600017c23c6";s:7:"attribs";a:1:{s:0:"";a:1:{s:11:"isPermaLink";s:5:"false";}}s:8:"xml_base";s:0:"";s:17:"xml_base_explicit";b:0;s:8:"xml_lang";s:0:"";}}s:8:"category";a:1:{i:0;a:5:{s:4:"data";s:25:"Self Hosted CMS Platforms";s:7:"attribs";a:0:{}s:8:"xml_base";s:0:"";s:17:"xml_base_explicit";b:0;s:8:"xml_lang";s:0:"";}}s:7:"pubDate";a:1:{i:0;a:5:{s:4:"data";s:29:"Thu, 12 Oct 2023 13:44:50 GMT";s:7:"attribs";a:0:{}s:8:"xml_base";s:0:"";s:17:"xml_base_explicit";b:0;s:8:"xml_lang";s:0:"";}}}s:32:"http://purl.org/dc/elements/1.1/";a:1:{s:7:"creator";a:1:{i:0;a:5:{s:4:"data";s:6:"Jeremy";s:7:"attribs";a:0:{}s:8:"xml_base";s:0:"";s:17:"xml_base_explicit";b:0;s:8:"xml_lang";s:0:"";}}}s:29:"http://search.yahoo.com/mrss/";a:1:{s:7:"content";a:1:{i:0;a:5:{s:4:"data";s:0:"";s:7:"attribs";a:1:{s:0:"";a:2:{s:3:"url";s:81:"https://noted.lol/content/images/2023/10/ghost-self-hosted-featured-noted.lol.jpg";s:6:"medium";s:5:"image";}}s:8:"xml_base";s:0:"";s:17:"xml_base_explicit";b:0;s:8:"xml_lang";s:0:"";}}}s:40:"http://purl.org/rss/1.0/modules/content/";a:1:{s:7:"encoded";a:1:{i:0;a:5:{s:4:"data";s:12286:"
Tired of struggling with complex blogging platforms that distract you from your writing? Meet Ghost, a streamlined solution that allows you to concentrate on your content. With the option for self-hosting, speed, and reliability, Ghost might be just what you're looking for.
Ghost CMS, or Ghost, is a well-known open-source content management system launched in 2013. It's designed for creating and managing blogs and publications with a focus on simplicity and speedy content creation. Ghost can be self-hosted, giving you control over your website's hosting environment.

Do you remember the days when Blogger and Tumblr were the main choices for creating a blog? Well, it's understandable if you don't, but blogging today relies on the time you can spare. With technology always advancing, our patience with older tech diminishes. We often shift to the newest and best options. In my opinion that is Ghost!

You will need a host machine with Docker and Docker Compose installed for this example. If you need assistance, see our guide Install Docker and Portainer on Debian for Self-Hosting.
Below is an example of how Ghost can be self-hosted using Docker Compose.
version: '3'
services:
  ghost-server:
    image: ghost
    cap_add:
      - CAP_SYS_NICE
    security_opt:
      - seccomp:unconfined
    restart: always
    ports:
      - 2368:2368
    depends_on:
      - ghost-db
    environment:
      url: https://your-domain.com
      database__client: mysql
      database__connection__host: ghost-db
      database__connection__user: root
      database__connection__password: V3ryS3cretP@ss
      database__connection__database: ghost
    volumes:
      - /docker/ghost/content:/var/lib/ghost/content

  ghost-db:
    image: mysql:8
    security_opt:
    - seccomp:unconfined
    restart: always
    command: --default-authentication-plugin=mysql_native_password
    environment:
      MYSQL_ROOT_PASSWORD: V3ryS3cretP@ss
    volumes:
      - /docker/ghost/mysql:/var/lib/mysql
You should change the URL to your domain name and the database password to something more secure. We have a more detailed guide on installing and self-hosting Ghost here.
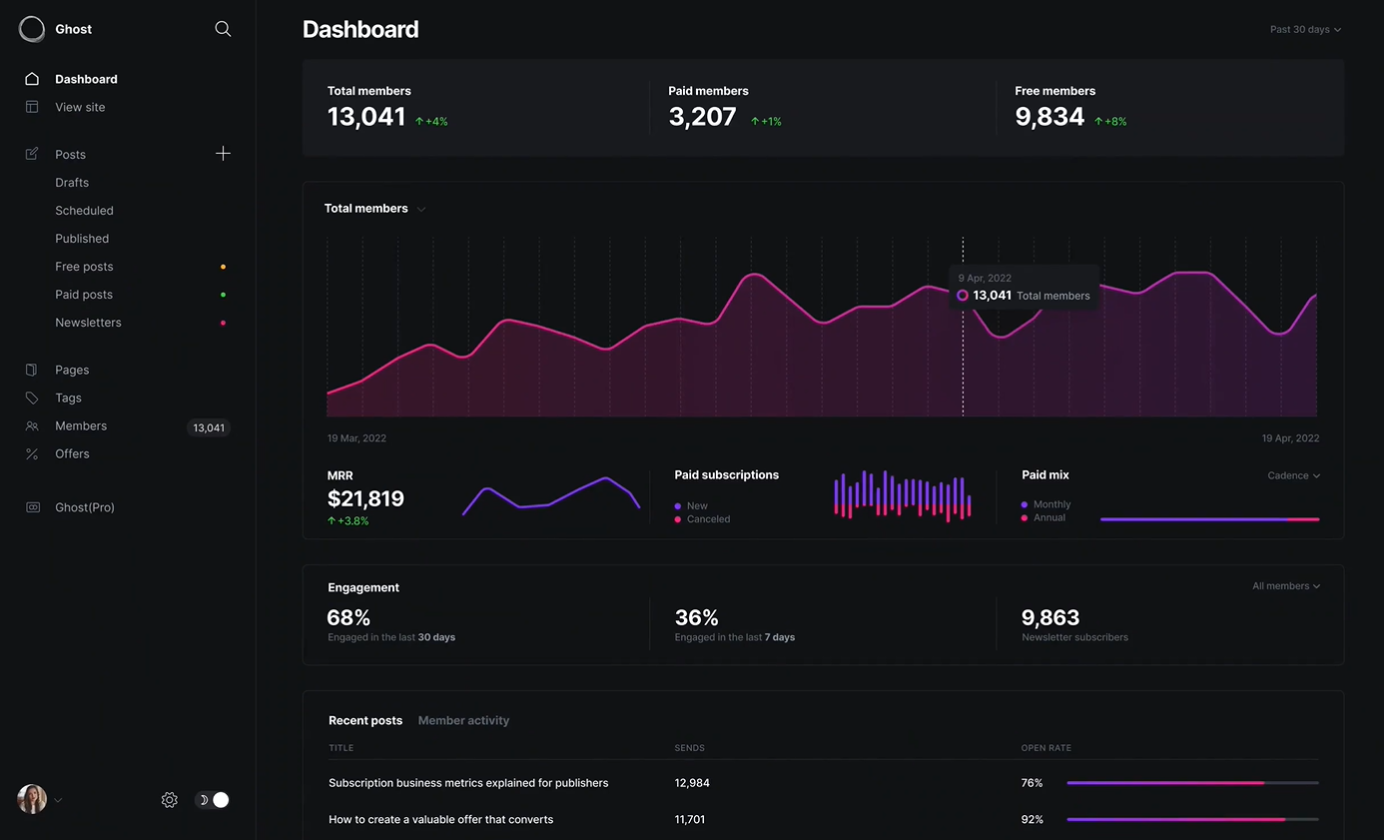
The Ghost admin dashboard is simple and easy to navigate. You can enable dark mode so it's easier on the eyes.
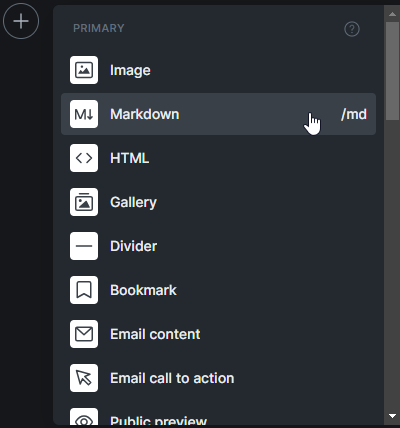
Personally, I love writing in Ghost, and a lot of it has to do with the built-in card feature. These cards give you the freedom to get creative and elevate the look of your articles with minimal effort.
Ghost is all about helping creators grow their fanbase through subscriptions. They've simplified it with features like subscription forms and exclusive content for your subscribers. Personally, I lean toward making knowledge freely available, as I've mentioned in my article on archiving Noted and our strong belief in knowledge as a fundamental human right, so that feature doesn't align with my approach. However, I also recognize how it can be a valuable way to generate income.
If you're thinking about making the switch from WordPress to Ghost, let Ghost do the talking! Instead of hearing it from me, check out what Ghost has to say directly. Explore their platform, read their blog, and see for yourself why so many bloggers and content creators are loving Ghost. Trust me, you won't be disappointed!
In case you didn't catch on, we've chosen Ghost as our website platform here at Noted. Personally, I'm a big fan of Ghost, so I might be a bit partial. But let me tell you, over the past couple of years, Ghost has truly inspired me to get creative with my content. It's all thanks to the the amazing built-in cards that make content creation a whole lot more exciting.
While I may not be the biggest fan of hiding content behind paywalls, Ghost is a versatile tool that creators can use in many ways, including monetization. So, give it a try, let your words flow, and see how Ghost can help you craft your digital presence or create a private place for you to dump your ideas and thoughts.
Learn more about Ghost by visiting the following links:
Ghost website: https://ghost.org
Ghost on Github: https://github.com/TryGhost/Ghost
Ghost on X: https://twitter.com/Ghost
";s:7:"attribs";a:0:{}s:8:"xml_base";s:0:"";s:17:"xml_base_explicit";b:0;s:8:"xml_lang";s:0:"";}}}}}i:6;a:6:{s:4:"data";s:0:"";s:7:"attribs";a:0:{}s:8:"xml_base";s:0:"";s:17:"xml_base_explicit";b:0;s:8:"xml_lang";s:0:"";s:5:"child";a:4:{s:0:"";a:6:{s:5:"title";a:1:{i:0;a:5:{s:4:"data";s:41:"Faraday - Chat with AI Characters Offline";s:7:"attribs";a:0:{}s:8:"xml_base";s:0:"";s:17:"xml_base_explicit";b:0;s:8:"xml_lang";s:0:"";}}s:11:"description";a:1:{i:0;a:5:{s:4:"data";s:78:"Offline first, privacy focused desktop app for creating AI chatbot characters.";s:7:"attribs";a:0:{}s:8:"xml_base";s:0:"";s:17:"xml_base_explicit";b:0;s:8:"xml_lang";s:0:"";}}s:4:"link";a:1:{i:0;a:5:{s:4:"data";s:26:"https://noted.lol/faraday/";s:7:"attribs";a:0:{}s:8:"xml_base";s:0:"";s:17:"xml_base_explicit";b:0;s:8:"xml_lang";s:0:"";}}s:4:"guid";a:1:{i:0;a:5:{s:4:"data";s:24:"65257c730da4d600017c1fa2";s:7:"attribs";a:1:{s:0:"";a:1:{s:11:"isPermaLink";s:5:"false";}}s:8:"xml_base";s:0:"";s:17:"xml_base_explicit";b:0;s:8:"xml_lang";s:0:"";}}s:8:"category";a:1:{i:0;a:5:{s:4:"data";s:8:"AI Tools";s:7:"attribs";a:0:{}s:8:"xml_base";s:0:"";s:17:"xml_base_explicit";b:0;s:8:"xml_lang";s:0:"";}}s:7:"pubDate";a:1:{i:0;a:5:{s:4:"data";s:29:"Wed, 11 Oct 2023 14:42:00 GMT";s:7:"attribs";a:0:{}s:8:"xml_base";s:0:"";s:17:"xml_base_explicit";b:0;s:8:"xml_lang";s:0:"";}}}s:32:"http://purl.org/dc/elements/1.1/";a:1:{s:7:"creator";a:1:{i:0;a:5:{s:4:"data";s:6:"Cedric";s:7:"attribs";a:0:{}s:8:"xml_base";s:0:"";s:17:"xml_base_explicit";b:0;s:8:"xml_lang";s:0:"";}}}s:29:"http://search.yahoo.com/mrss/";a:1:{s:7:"content";a:1:{i:0;a:5:{s:4:"data";s:0:"";s:7:"attribs";a:1:{s:0:"";a:2:{s:3:"url";s:82:"https://noted.lol/content/images/2023/10/faraday-ai-chatbot-featured-noted.lol.jpg";s:6:"medium";s:5:"image";}}s:8:"xml_base";s:0:"";s:17:"xml_base_explicit";b:0;s:8:"xml_lang";s:0:"";}}}s:40:"http://purl.org/rss/1.0/modules/content/";a:1:{s:7:"encoded";a:1:{i:0;a:5:{s:4:"data";s:16704:"
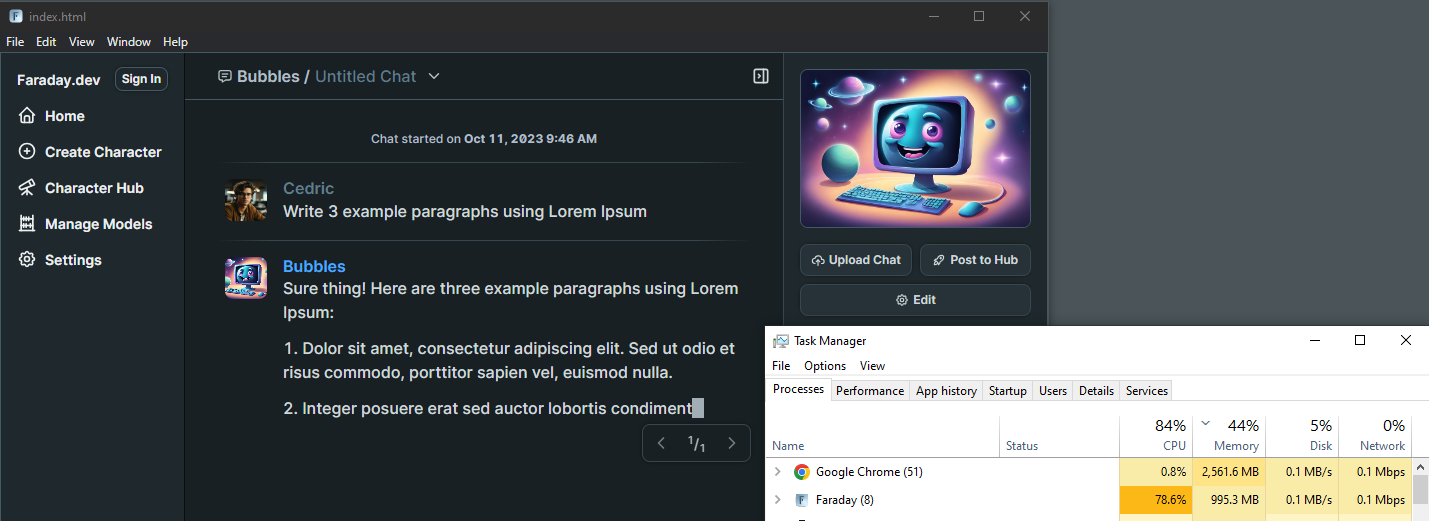
I was on the lookout for a simple way to get a AI chatbot running on my old laptop without too much fuss. I discovered Faraday and was blown away by how simple it is to set up and get running in just a few clicks.
Let's take a quick tour of Faraday and check out the options and features to see if it's a good fit for you.
Faraday is a desktop AI chat tool that prioritizes privacy and simplicity. Faraday is available for both Mac and Windows
Faraday offers a user friendly experience right from the start. You can begin chatting with ease using a simple one click Desktop installer that requires no coding knowledge. It's designed to work seamlessly, even with GPU and Metal acceleration included, ensuring a smooth experience without any complicated setup.
Faraday is commitment to safeguarding your data. The AI models that drive Faraday are stored exclusively on your computer. This means that no one can tamper with how your AI characters behave, deny your access, or remove your data. Your information remains under your control.
Faraday is a desktop application that functions offline. Whether you're on a plane, train, or anywhere without an internet connection, you can still enjoy its capabilities. Your chat data is saved directly on your computer, never sent to a remote server, ensuring your conversations remain private. You can choose to share specific chats to assist in improving the AI models, but it's entirely optional, preserving your privacy.
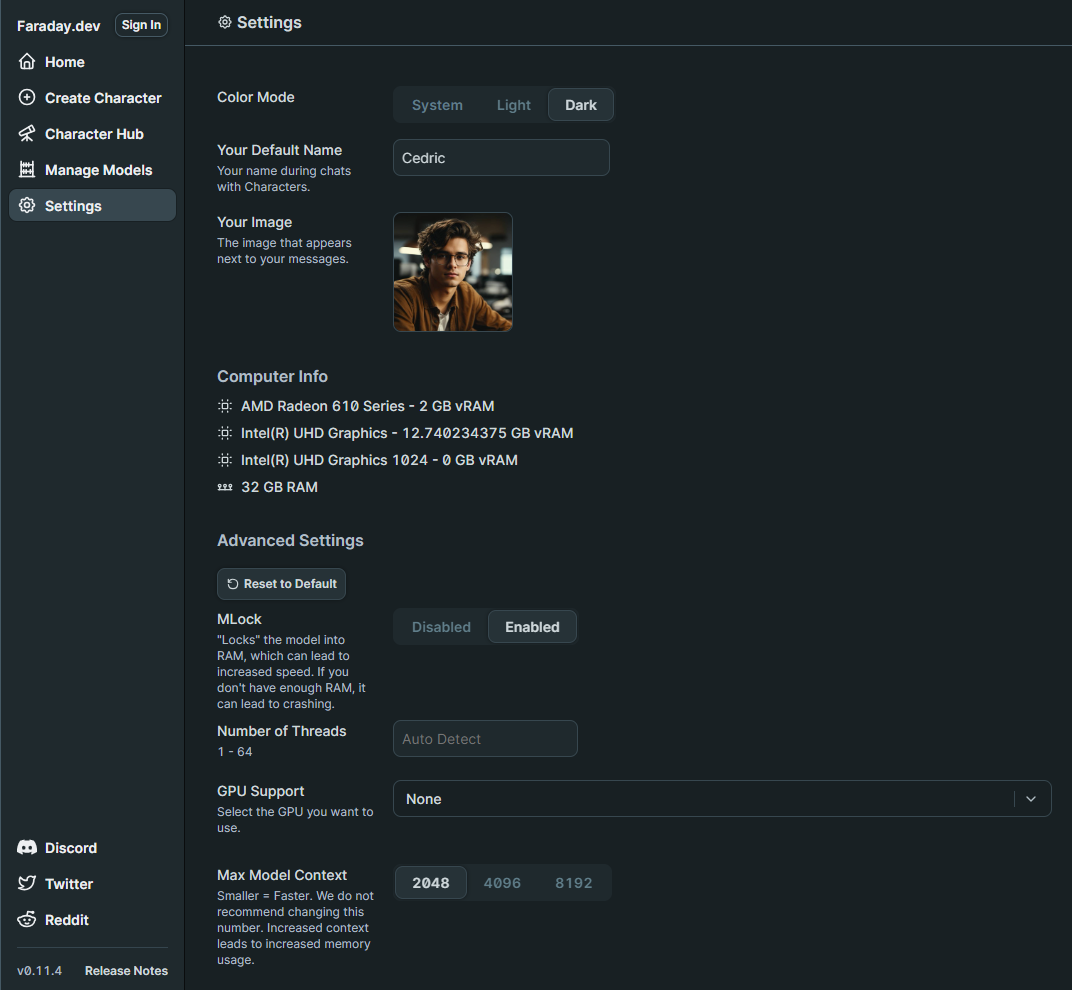
On the settings page you have the option to add your name and photo. You can also view your system specs and other details. I noticed that it detected my AMD Radeon 610, but I decided not to enable GPU support initially. I wanted to see how the performance would be without it first.
When I first launched Faraday, I went straight to the Model Manager where I was shocked how easy it was to choose the right model for my laptop. You can see small badges with stars that even recommend models based on your system specs. This just adds to the simplicity of the app making it easier to get started. You can choose a recommended model or browse the complete collection that is curated from the popular Hugging Face LLM platform.
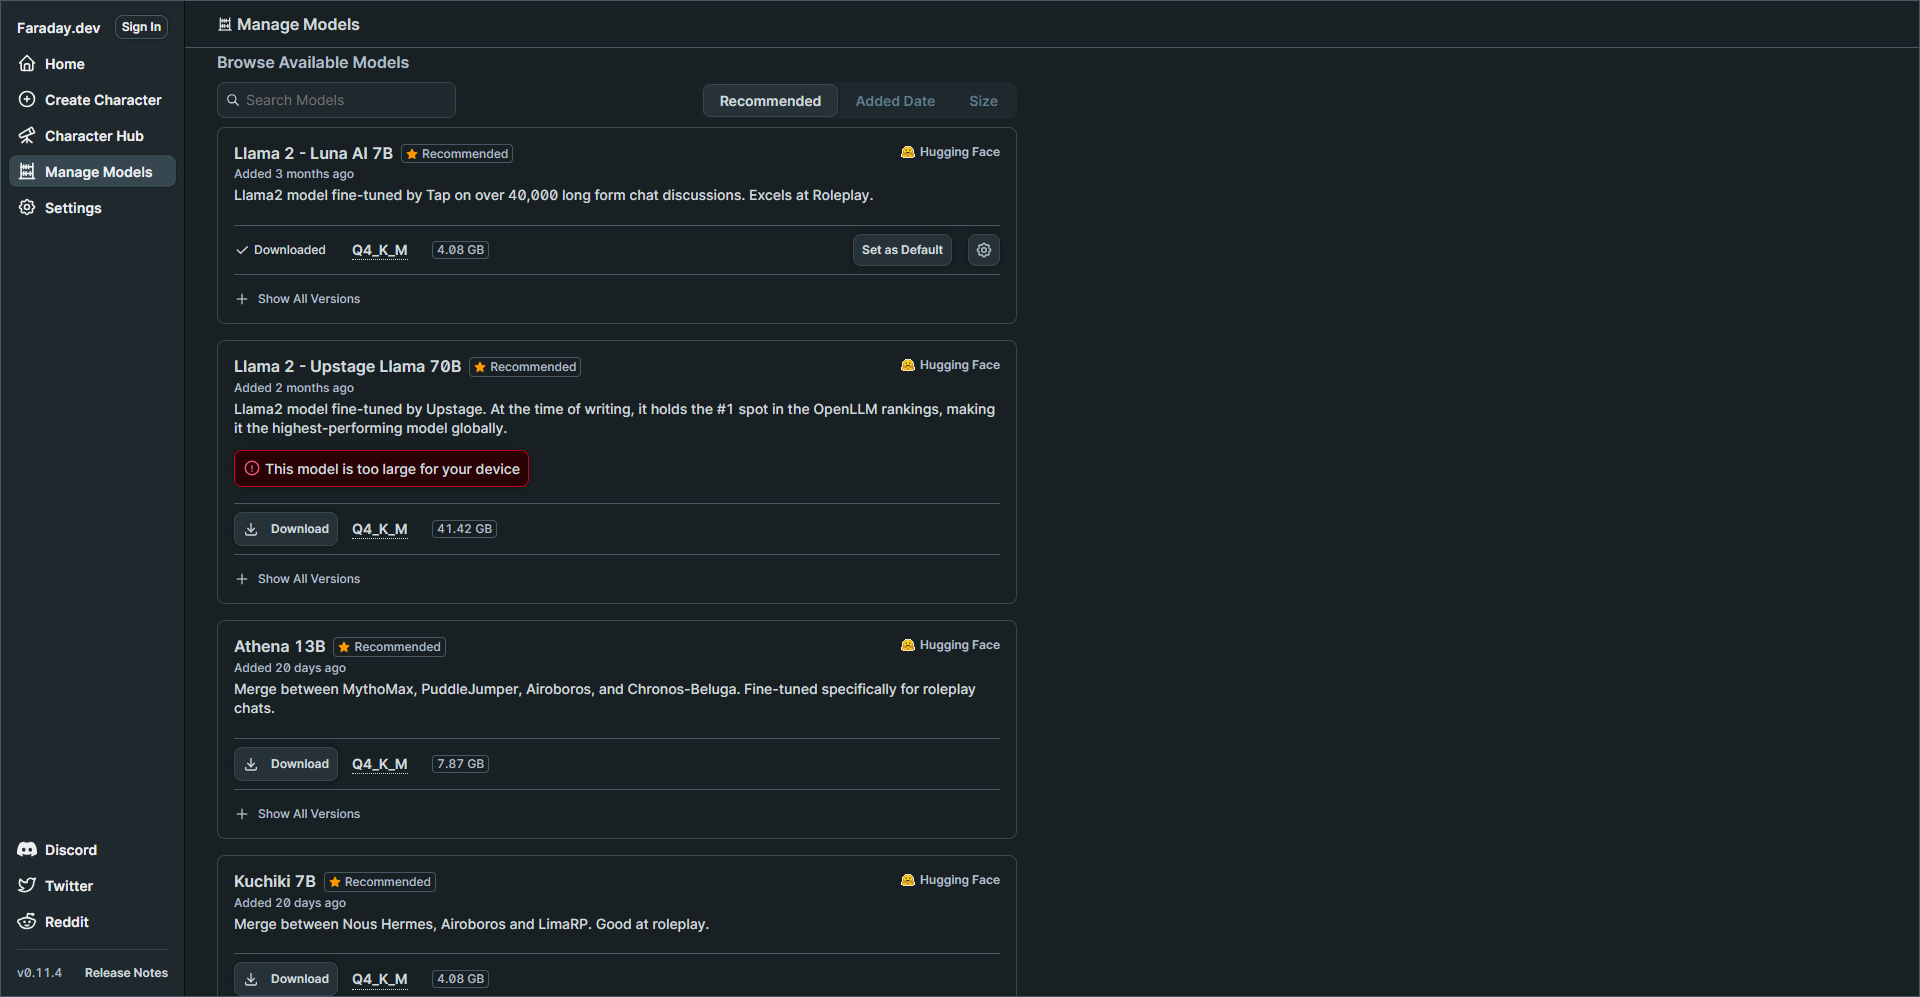
My laptop specs are decent but keep in mind I do not have a GPU which could greatly improve performance and speeds of response times. But you will see later how well this performed.
I chose the Llama 2 - Luna AI 7B model then navigated to the Character Hub.
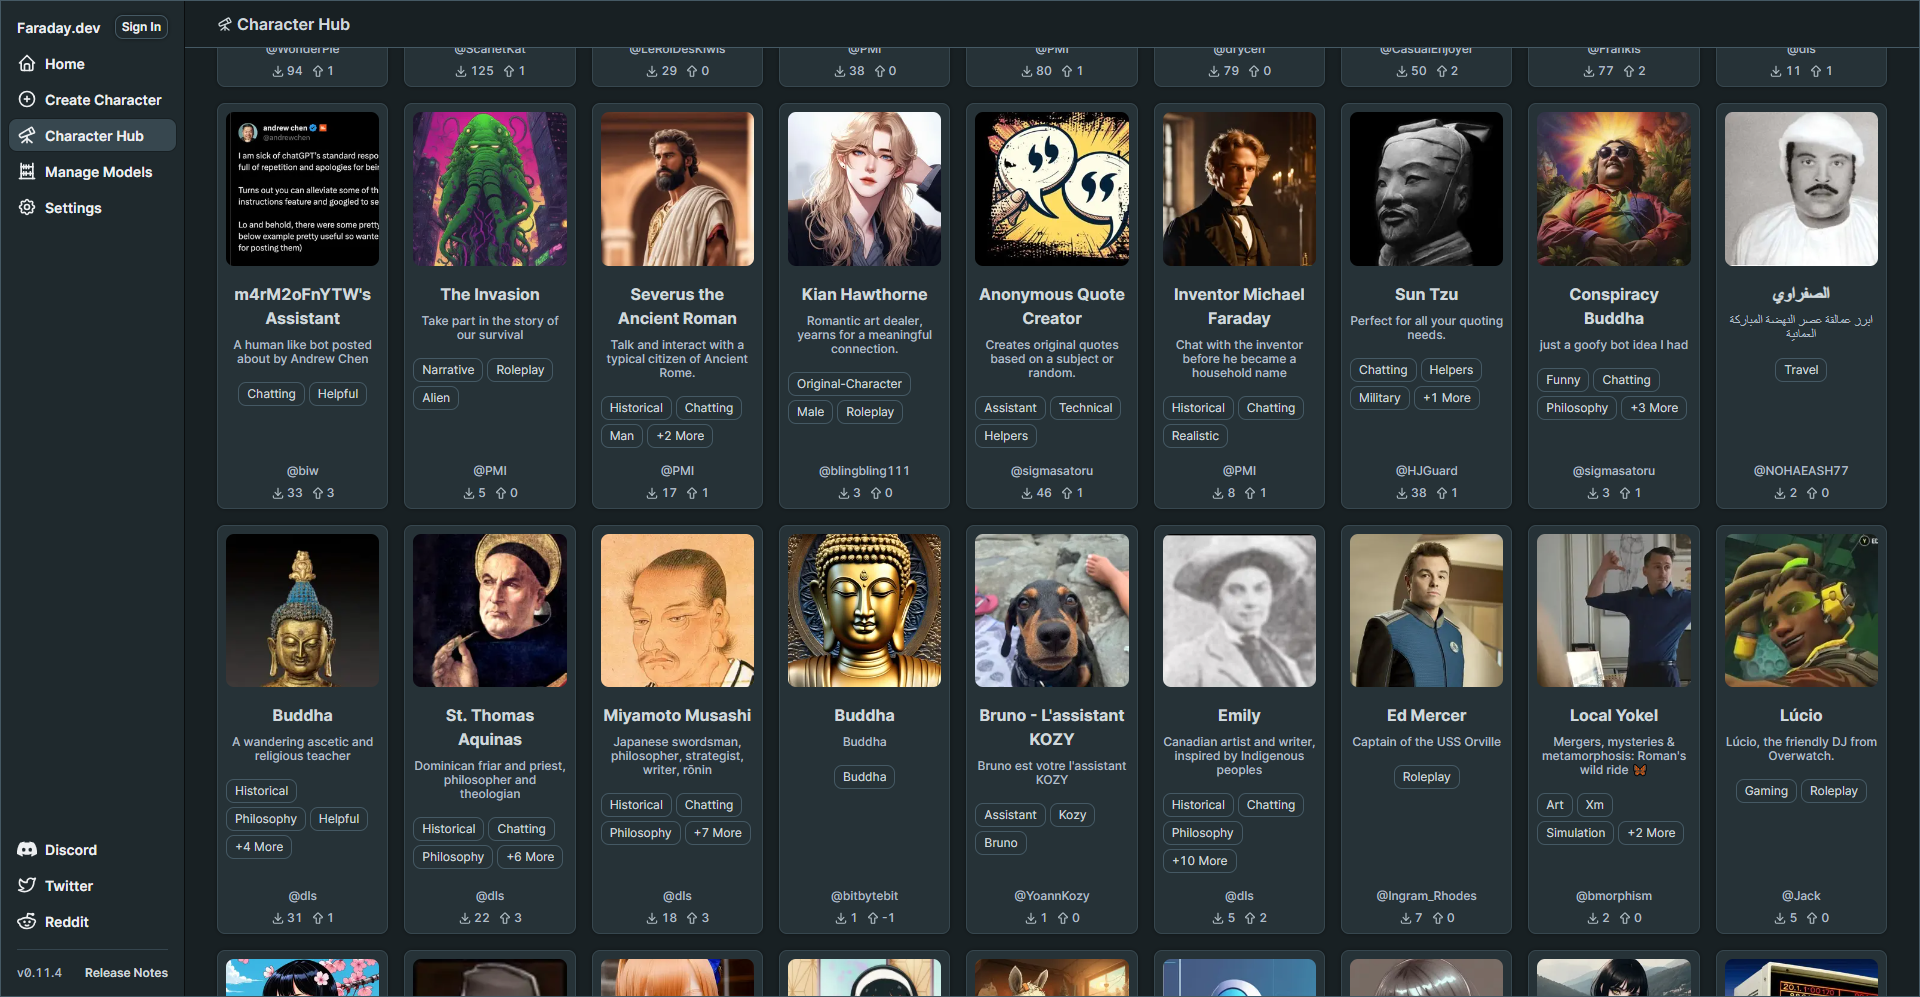
I was genuinely surprised by the variety of characters available. I'm quite adventurous, so I decided to create my own character right away. I was more interested in having an AI assistant that could provide straightforward responses rather than the entertaining responses created by premade characters.
You can browse the complete Faraday Character Hub to see what's available.
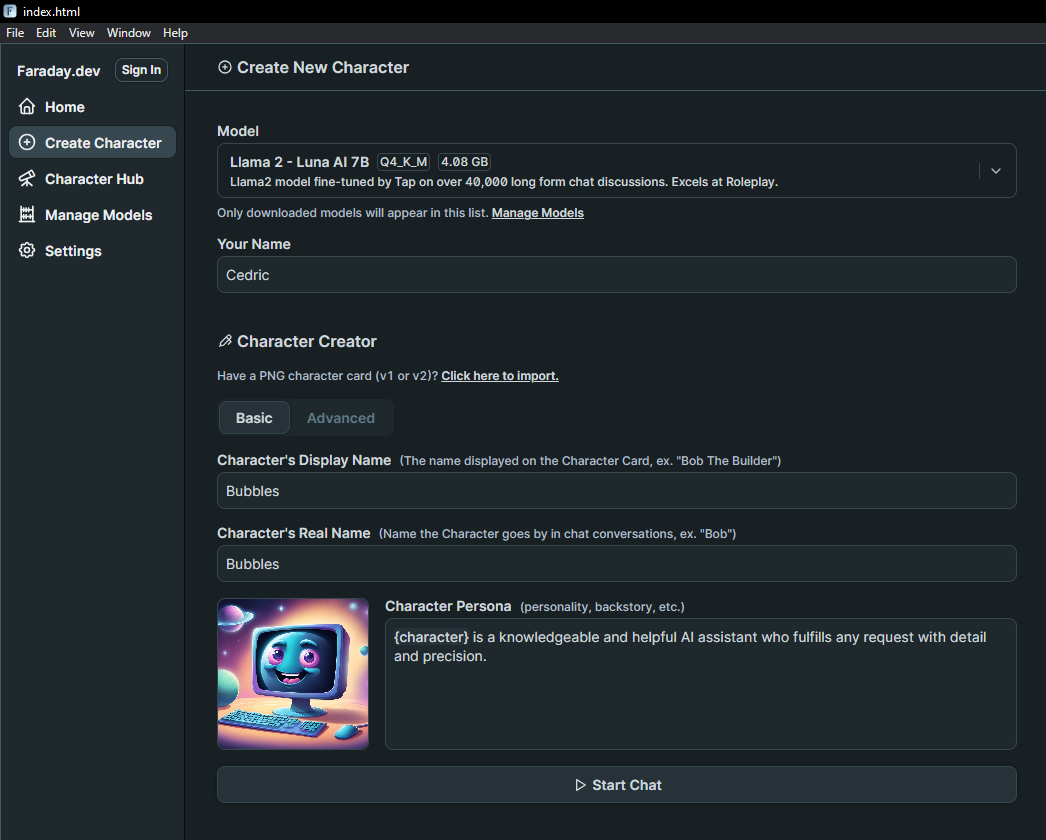
The Character Creator is loaded with a multitude of settings, giving you the freedom to finely adjust how you want your AI to respond and behave. These settings empower you to customize your AI's behavior to match your preferences, creating a truly personalized experience. You can tweak various aspects to make your AI assistant interact with you in a way that feels just right for your needs.
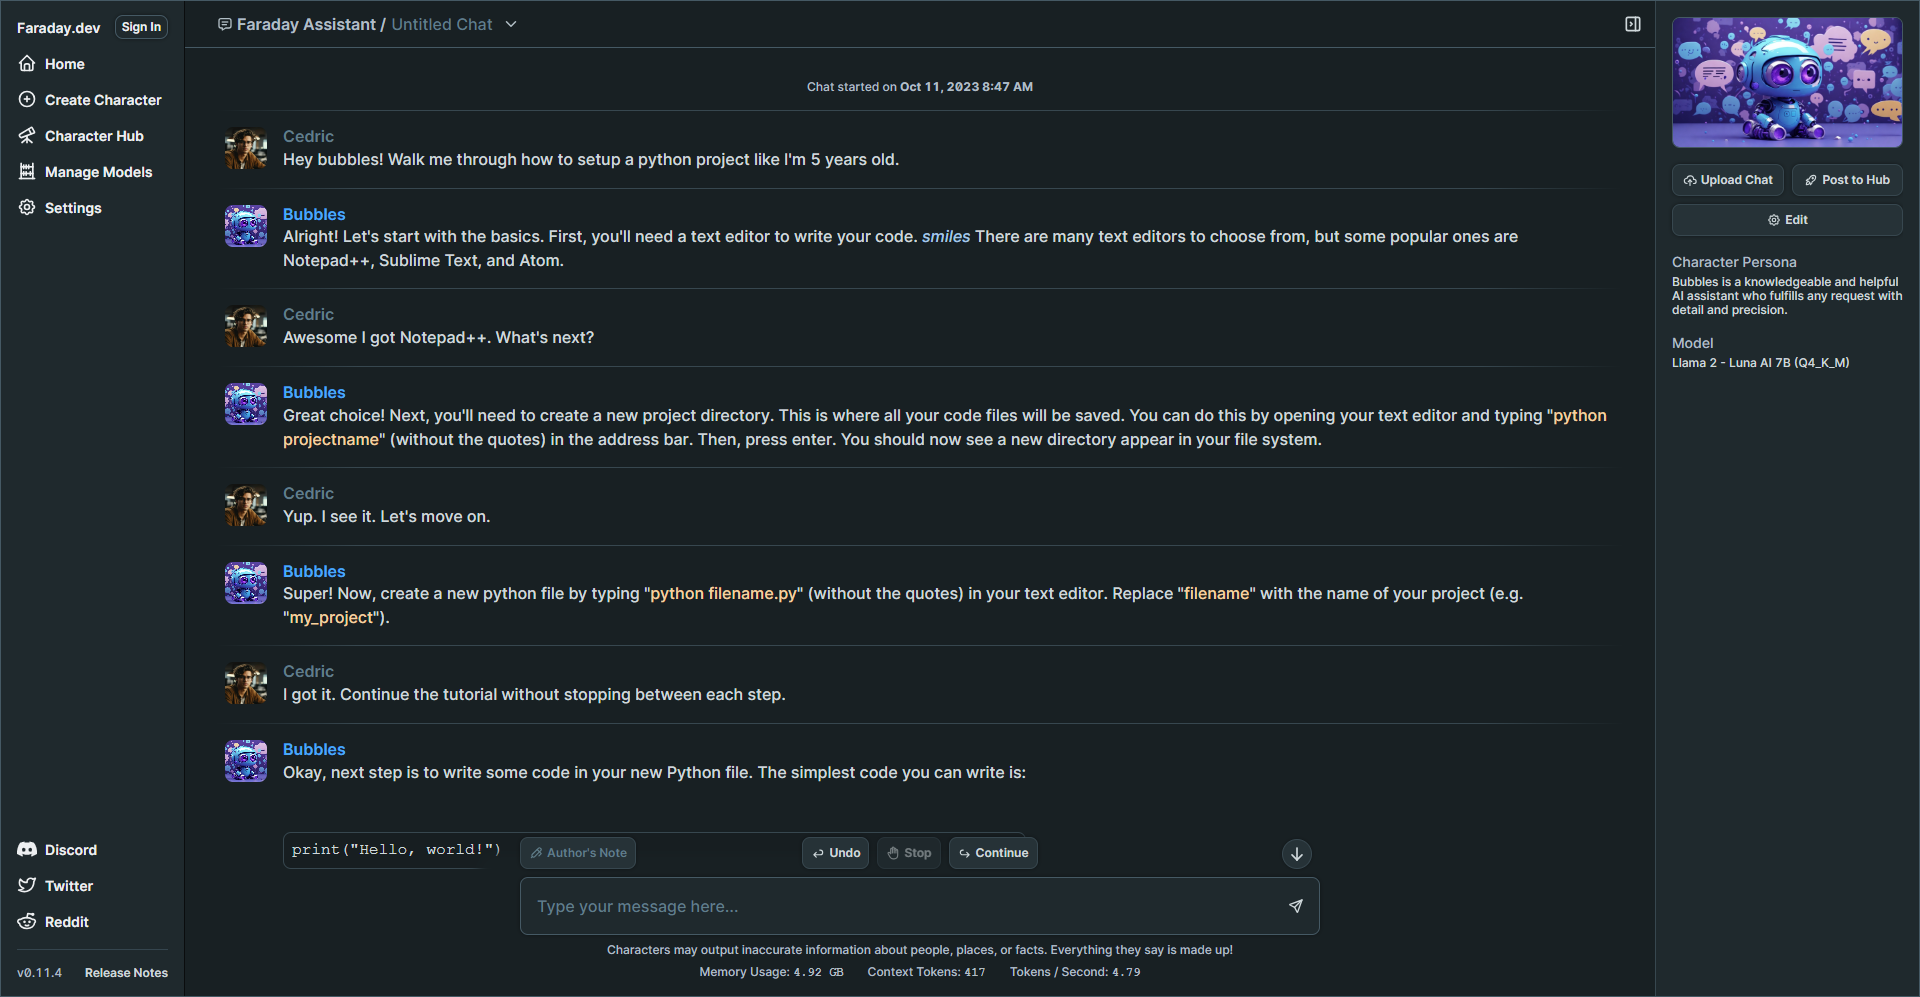
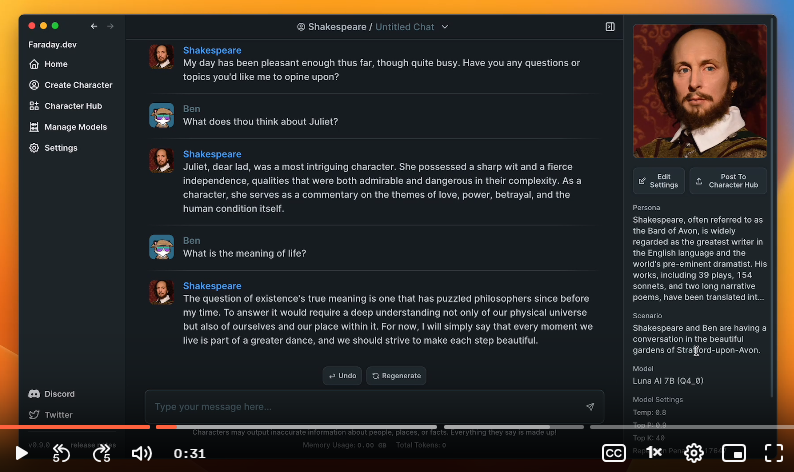
I selected the model at the top, entered my name, and gave my AI character a name. I didn't make any changes to the other settings. I left everything else as default and began chatting with it. This will give me an idea of how the responses will be before I start to fine tune the character settings.
When you enter the first message, it will initialize the new character with the chosen model. That can take a couple minutes but once that is done, it's smooth sailing!
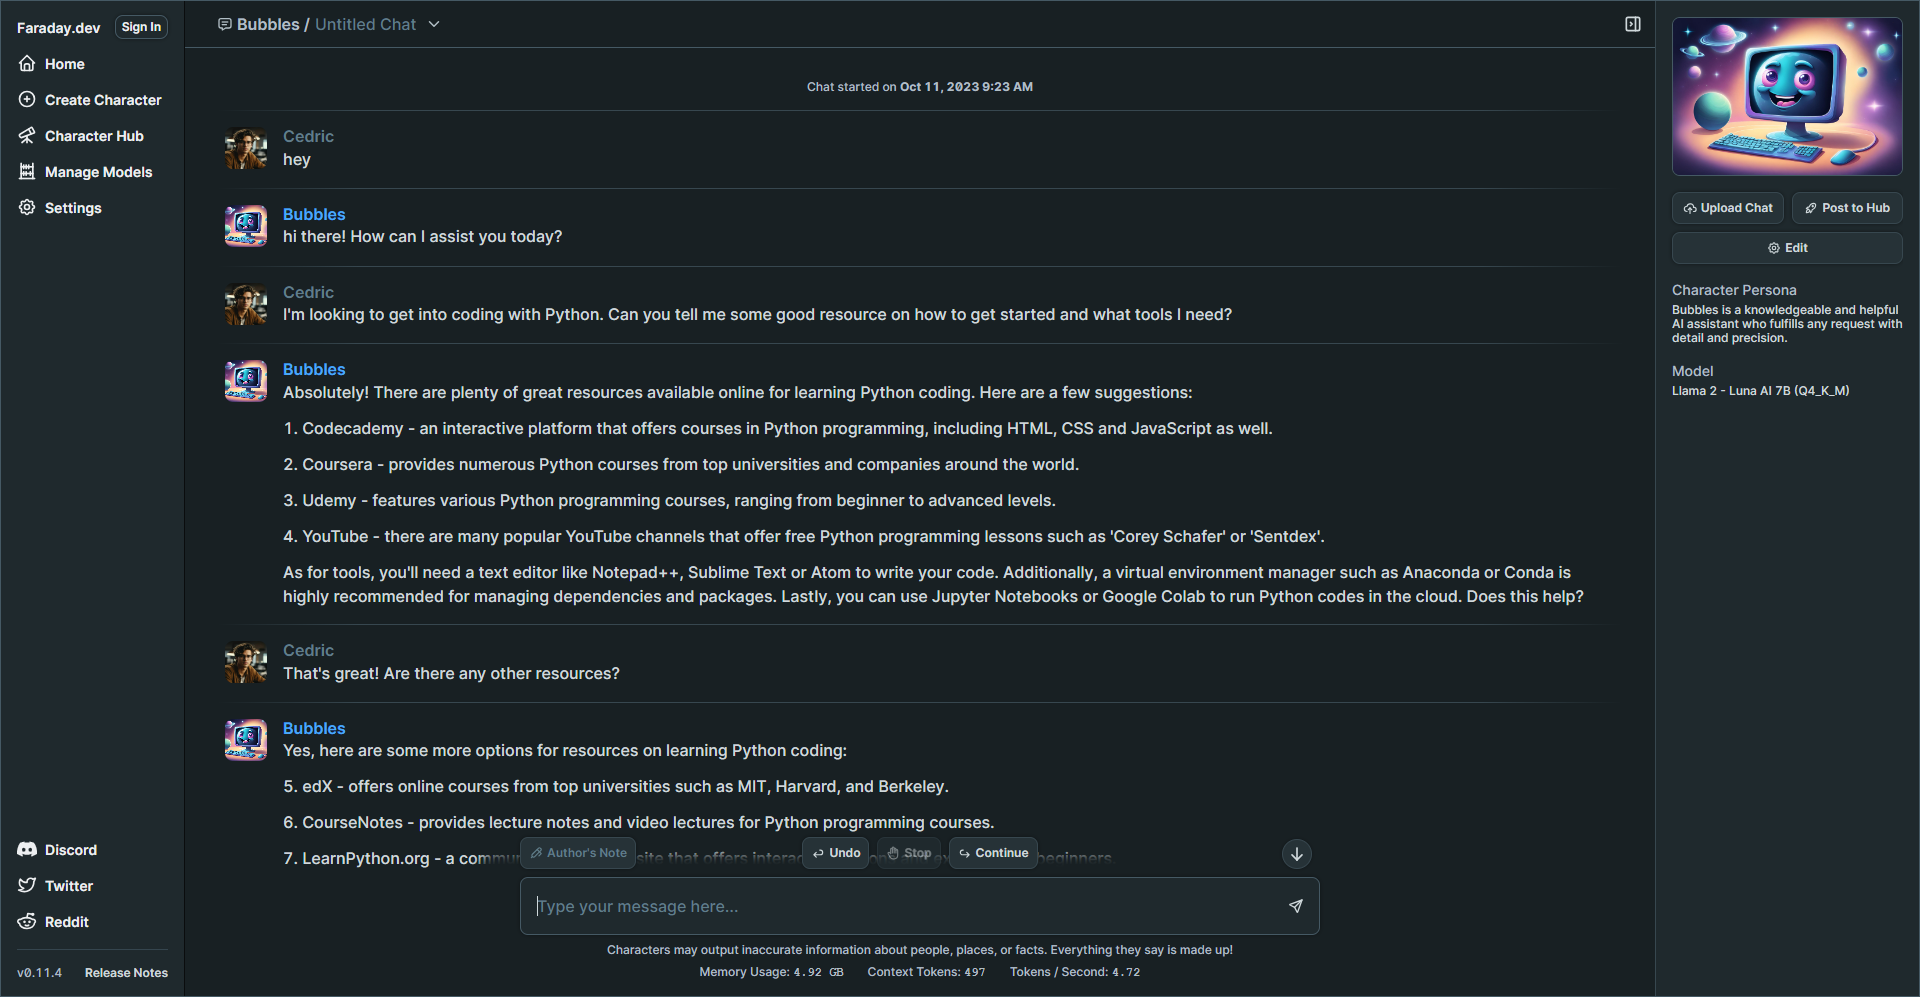
I know you are probably wondering how the performance is so I whipped up this quick gif to show you the speed of the responses.
Pretty good, right? The speed you're seeing in the image above is quite comparable to what I usually experience with third party AI apps like ChatGPT, which genuinely impresses me!
What's intriguing is that it seems to have more impact on my CPU rather than my RAM. Here's a screenshot displaying the system resources Faraday utilizes while processing a response.
Why is Faraday free and how long will this last? Well, I did some digging and here's what I found.
One of the primary questions users often have about Faraday is whether it's truly free. In simple terms, yes, it is. Faraday will always allow you to run inference locally at no cost. (according to lead developers in their Discord) This means you can enjoy its AI capabilities without any charges when using it on your own computer.
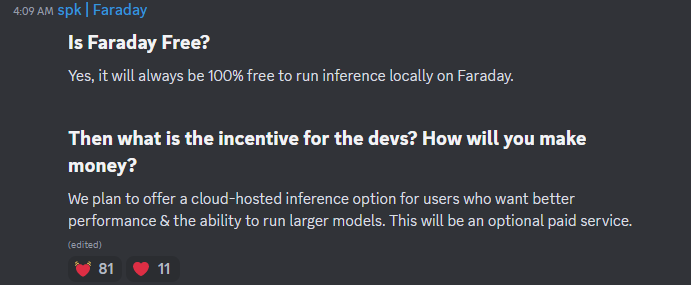
Naturally, you might wonder what the incentive is for the developers and how they plan to sustain this offering. The answer lies in a forward thinking approach. Faraday aims to cater to diverse user needs, and to achieve this, they plan to introduce a cloud-hosted inference option. This option will be particularly appealing to users seeking enhanced performance and the ability to run larger AI models. However, it's essential to note that this cloud-hosted service will be an optional, paid feature.
Faraday is an incredibly innovative tool, and my initial experience with it was a lot of fun. The more I use it and customize my character model, the more impressed I become. It's fantastic to have this tool with me when I'm traveling without internet access. I get hours of entertainment just from chatting with AI. These tools never cease to amaze me and keep exceeding my expectations.
While the devs contribute to open source libraries used within Faraday, the full-stack codebase for our Desktop App is not open source.
Although Faraday isn't open source, I felt it was worth the review here at Noted. I understand that this might raise concerns among some of you, especially given their focus on privacy despite the closed source nature of the app.
You can see the full explanation on the Faraday Discord community FAQ.
";s:7:"attribs";a:0:{}s:8:"xml_base";s:0:"";s:17:"xml_base_explicit";b:0;s:8:"xml_lang";s:0:"";}}}}}i:7;a:6:{s:4:"data";s:0:"";s:7:"attribs";a:0:{}s:8:"xml_base";s:0:"";s:17:"xml_base_explicit";b:0;s:8:"xml_lang";s:0:"";s:5:"child";a:4:{s:0:"";a:6:{s:5:"title";a:1:{i:0;a:5:{s:4:"data";s:47:"Comentario - Self-Hosted, Modern Comment System";s:7:"attribs";a:0:{}s:8:"xml_base";s:0:"";s:17:"xml_base_explicit";b:0;s:8:"xml_lang";s:0:"";}}s:11:"description";a:1:{i:0;a:5:{s:4:"data";s:127:"Comentario is a lightweight comment platform that you can easily self-host using Docker. It's all about simplicity and privacy.";s:7:"attribs";a:0:{}s:8:"xml_base";s:0:"";s:17:"xml_base_explicit";b:0;s:8:"xml_lang";s:0:"";}}s:4:"link";a:1:{i:0;a:5:{s:4:"data";s:29:"https://noted.lol/comentario/";s:7:"attribs";a:0:{}s:8:"xml_base";s:0:"";s:17:"xml_base_explicit";b:0;s:8:"xml_lang";s:0:"";}}s:4:"guid";a:1:{i:0;a:5:{s:4:"data";s:24:"651594a46b972f000149bd79";s:7:"attribs";a:1:{s:0:"";a:1:{s:11:"isPermaLink";s:5:"false";}}s:8:"xml_base";s:0:"";s:17:"xml_base_explicit";b:0;s:8:"xml_lang";s:0:"";}}s:8:"category";a:1:{i:0;a:5:{s:4:"data";s:30:"Self Hosted Commenting Systems";s:7:"attribs";a:0:{}s:8:"xml_base";s:0:"";s:17:"xml_base_explicit";b:0;s:8:"xml_lang";s:0:"";}}s:7:"pubDate";a:1:{i:0;a:5:{s:4:"data";s:29:"Tue, 10 Oct 2023 17:37:14 GMT";s:7:"attribs";a:0:{}s:8:"xml_base";s:0:"";s:17:"xml_base_explicit";b:0;s:8:"xml_lang";s:0:"";}}}s:32:"http://purl.org/dc/elements/1.1/";a:1:{s:7:"creator";a:1:{i:0;a:5:{s:4:"data";s:11:"Dmitry Kann";s:7:"attribs";a:0:{}s:8:"xml_base";s:0:"";s:17:"xml_base_explicit";b:0;s:8:"xml_lang";s:0:"";}}}s:29:"http://search.yahoo.com/mrss/";a:1:{s:7:"content";a:1:{i:0;a:5:{s:4:"data";s:0:"";s:7:"attribs";a:1:{s:0:"";a:2:{s:3:"url";s:95:"https://noted.lol/content/images/2023/10/comentario-self-hosted-comments-featured-noted.lol.png";s:6:"medium";s:5:"image";}}s:8:"xml_base";s:0:"";s:17:"xml_base_explicit";b:0;s:8:"xml_lang";s:0:"";}}}s:40:"http://purl.org/rss/1.0/modules/content/";a:1:{s:7:"encoded";a:1:{i:0;a:5:{s:4:"data";s:15752:"
Hello, I'm Dmitry Kann, the creator of Comentario. I drew inspiration from Commento, which was no longer actively maintained. When I considered using Commento, I found some essential features missing, and the lack of regular updates was a concern. So, I decided to fork it and create a better comment platform.
Comentario is the ultimate tool for website comments. It's lightweight and speedy ensuring your readers can engage without any lag. With support for Markdown syntax, Disqus imports, comment voting, spam and toxicity filters, moderation tools, and more.
There are quite a few to highlight:

So, how does Comentario stack up against Disqus, Hyvor Talk, Facebook Comments, and the rest of the gang? Well, let's spill the beans on them for a sec.
Most of those other guys have some shady privacy practices you should be aware of. They're all about collecting data. Things like your online habits, ads you see, and even personal info. Not cool if you value your privacy.
If their system gets hacked, guess whose data might end up in the wrong hands? Yep, yours! So, before you commit to a commenting system for your site, do yourself a favor and dig into their privacy policies and data handling practices.

Next to that, it's proprietary software. You can't self-host it, you have no slightest idea what's inside.
Finally, they're huge in terms of resources they need. They add megabytes of scripts and other stuff to every page they're on.
Now, let's talk about Comentario, but first, let's be aware of the following.
For the sake of this article, I'll link to the "cutting edge" documentation pages as they'll soon become the new stable.
Comentario is written in Go making it snappy and easy to work with. Here are some screenshots of the admin panel.
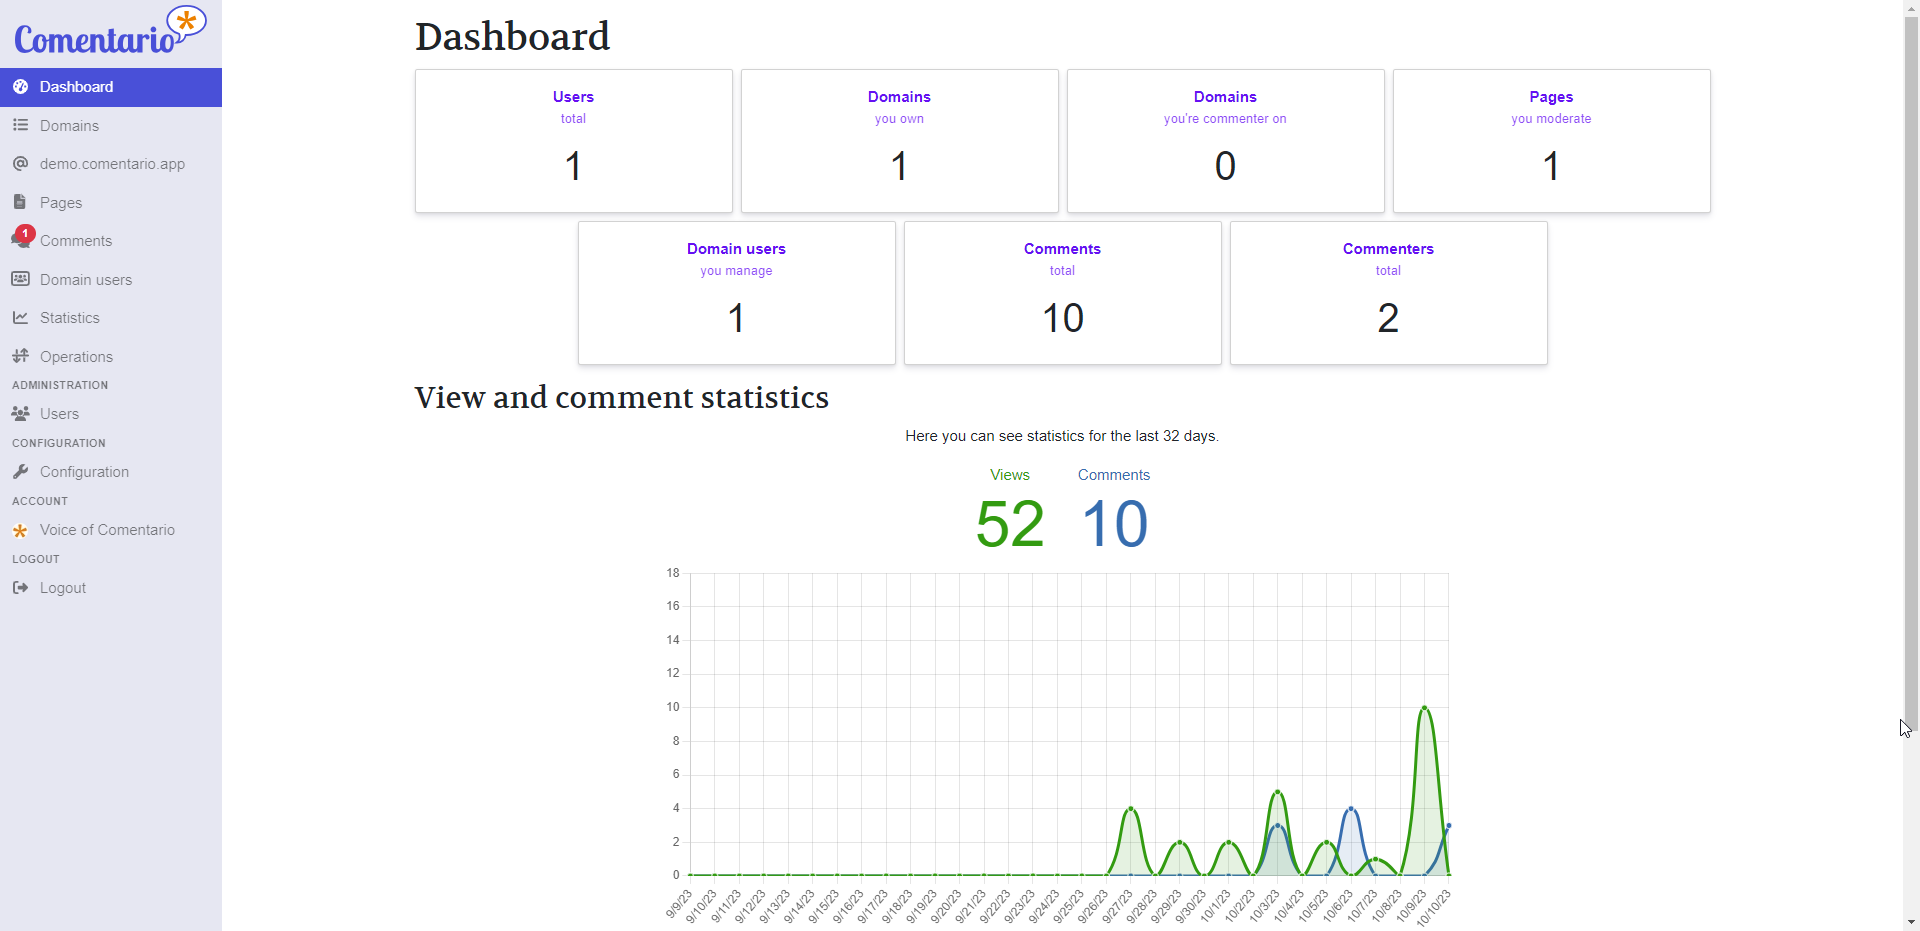
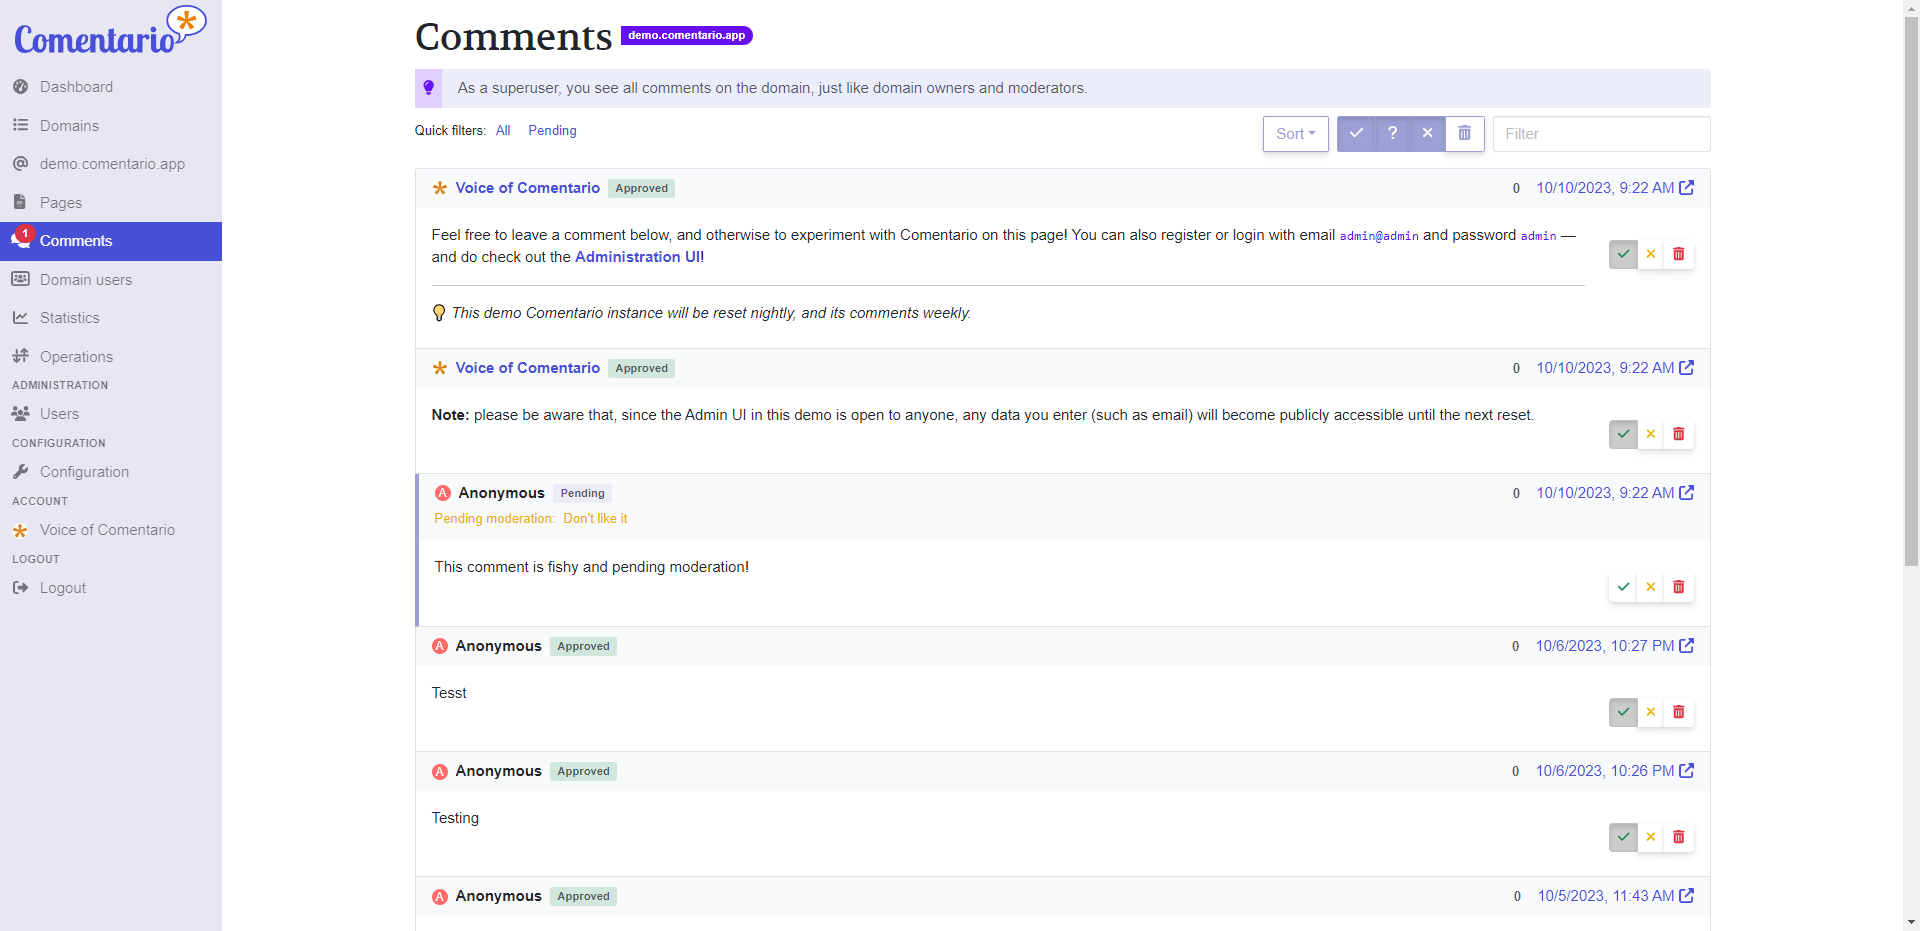
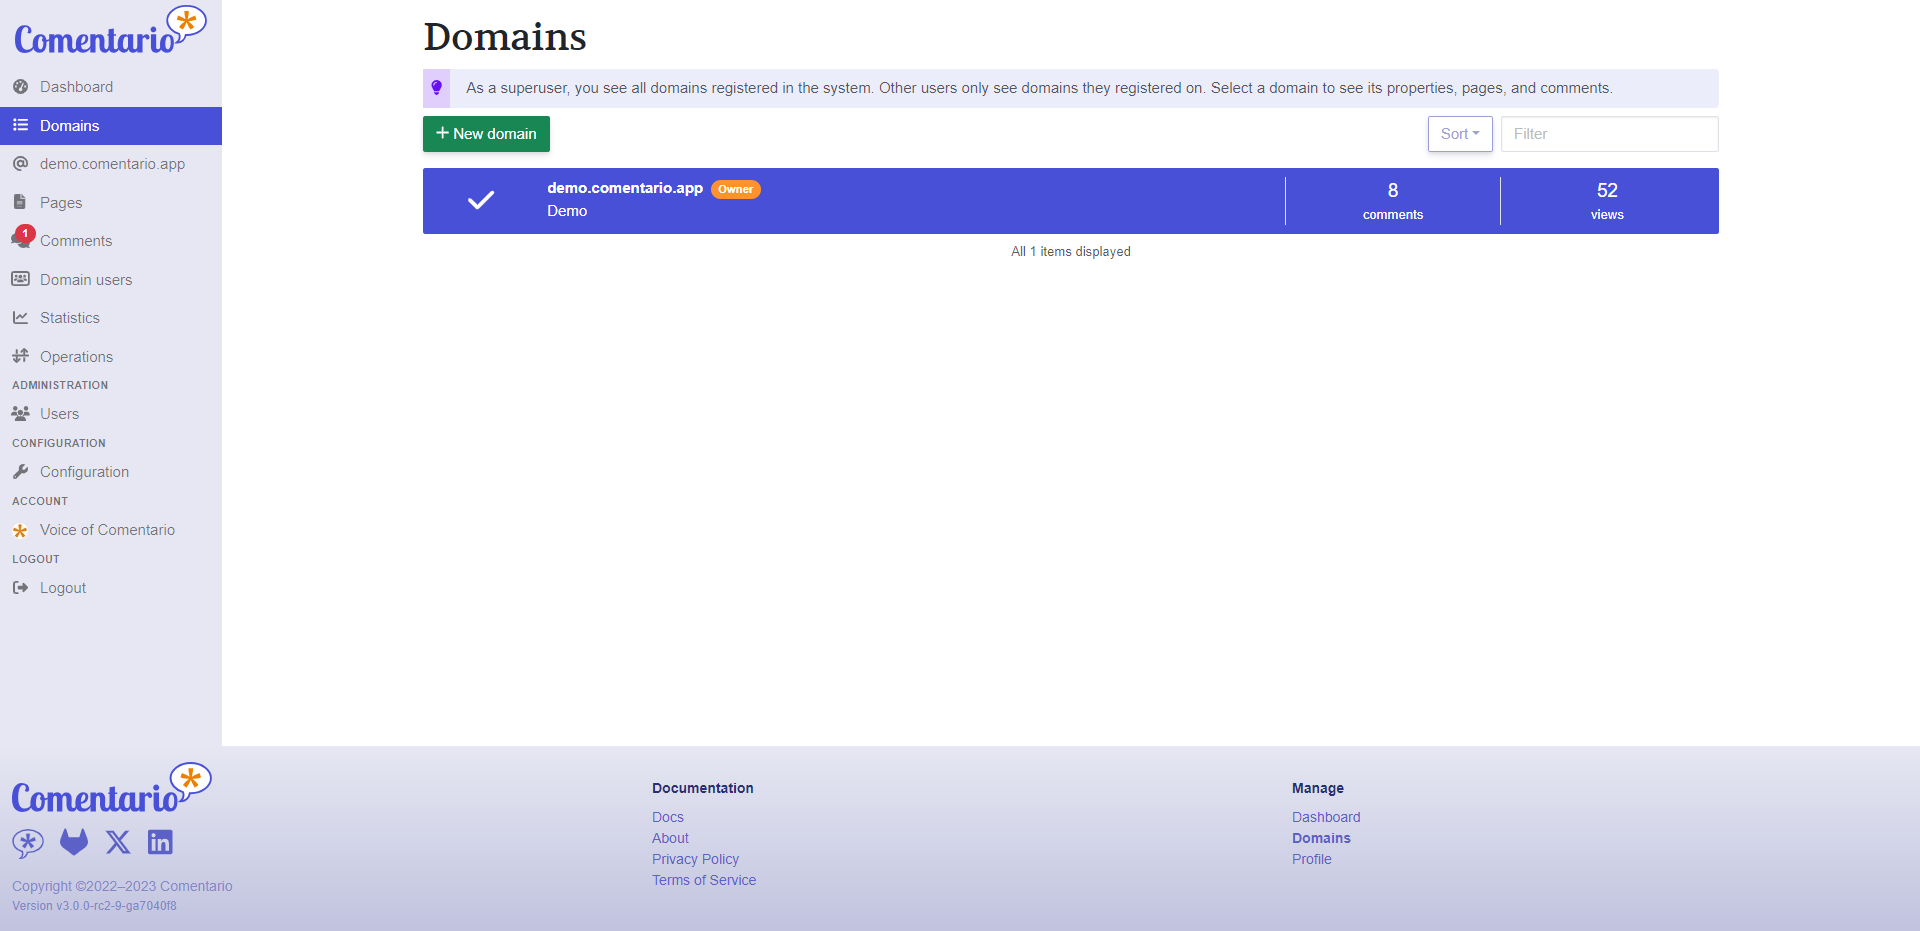
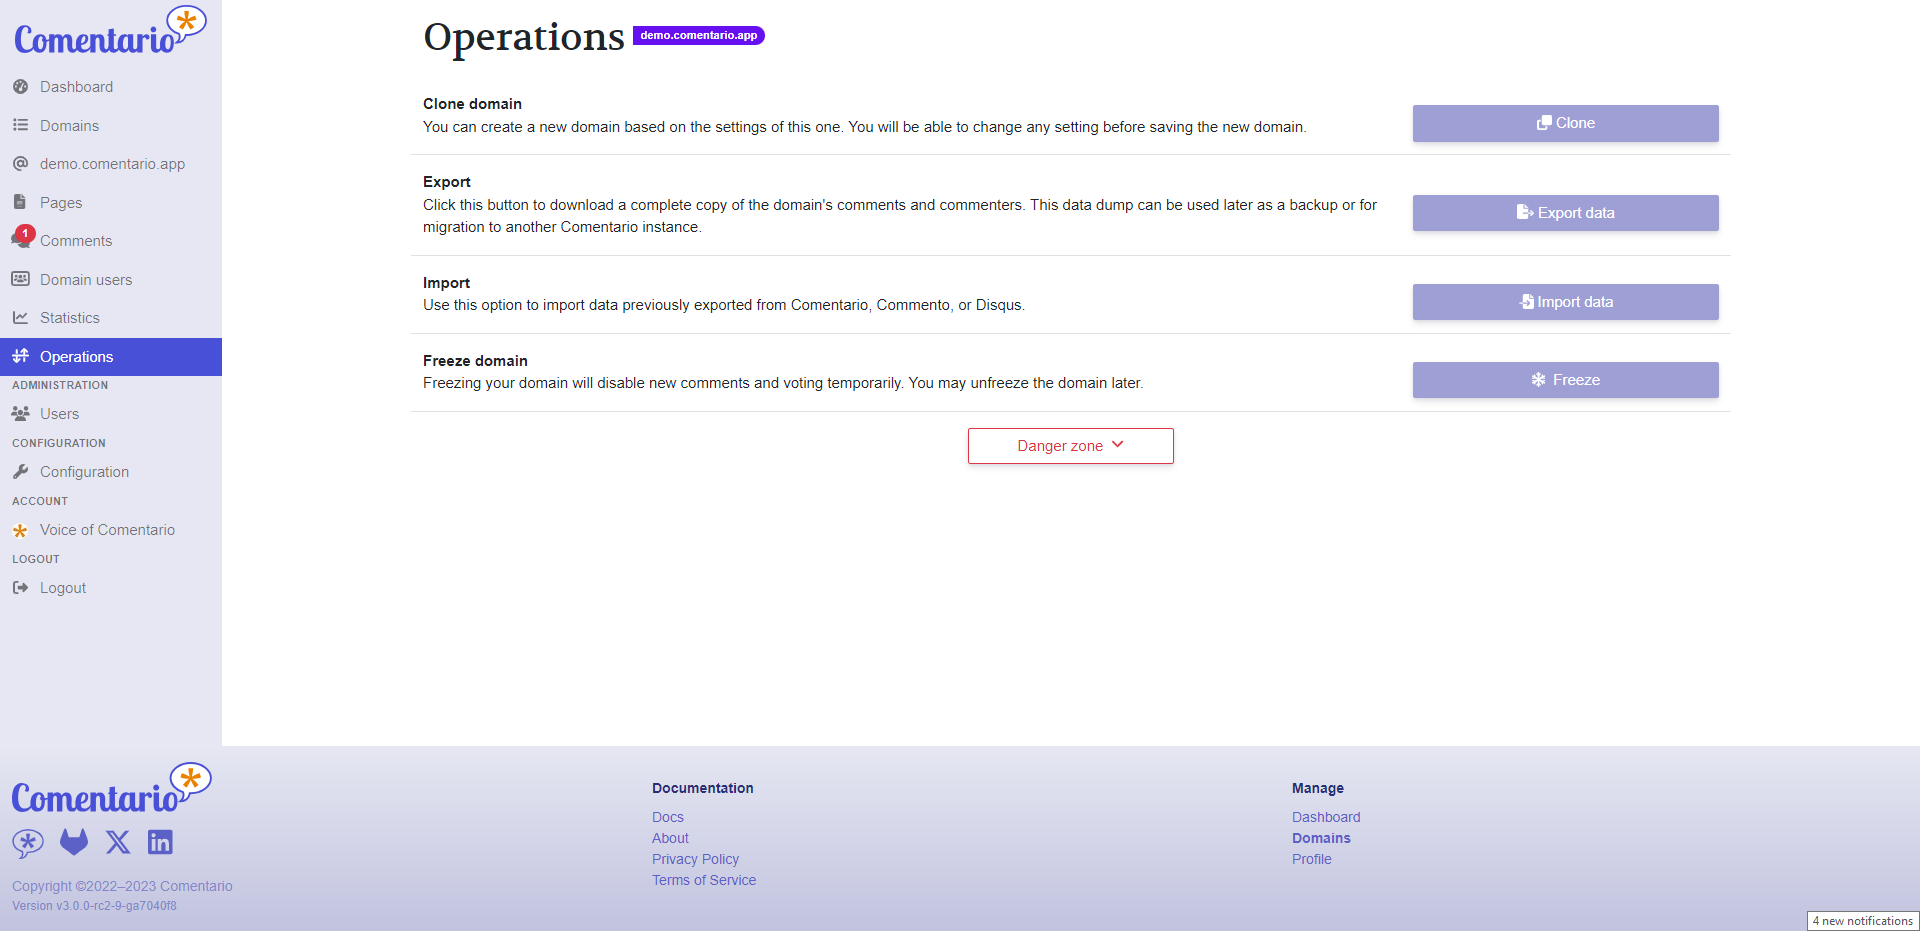
Here's a biggie that sets Comentario apart from Commento: You'll quickly see that you've got a whole lot more control over the comments using the admin interface. You can search, filter, and do all sorts of nifty stuff to keep those comments in check. We've totally revamped the admin UI, so you, as the owner, can finely tune your comment management.
I know you want to get to the best part so let's talk about installation.
We put together a simple Docker Compose stack which consists of a Postgres DB and the app itself. Place this in your preferred directory. Then fill in the details for the secrets.yml file and place them in the same directory. The two files must reside in the same directory.
Then, start the database and the backend using:
docker compose up -dComentario will be reachable at host.machine.ip:8080. Just navigate to Sign up and register with any email and password: you’ll become a superuser and will be able to manage other users, add domains in the UI, change configuration etc.
In a more advanced use-case you can deploy Comentario into a Kubernetes cluster. In this scenario, the cluster will make sure the service remains operational, issue and renew SSL certificates, provide a database etc.
Comentario provides a simple Helm Chart, which can be used for an easy deploy.
You can also opt for a local installation by using a .deb or .rpm package available as of v3.0.0-rc2. Comentario will then be run as a systemd service.
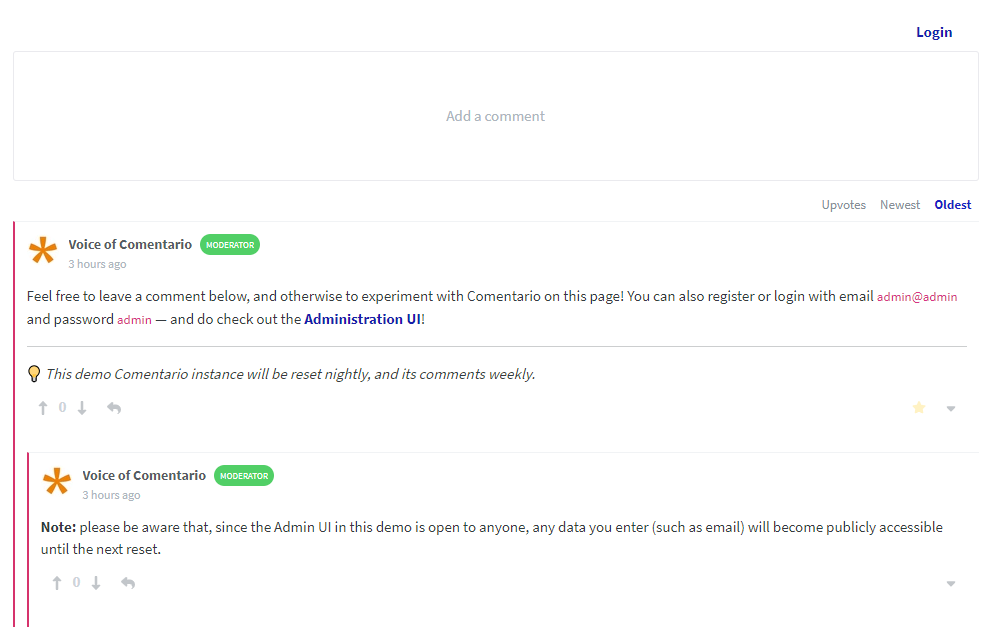
There is a full Comentario demo available where you can add comments on the front end then log into the admin UI and have a look around.
Comentario is something I'm really proud of. It's a tool that I've poured my heart into, and I genuinely hope it brings you joy when you use it on your blog or website.
Thank you for taking the time to check out Comentario! If you have any questions, suggestions, or just want to chat about it, please feel free to leave a comment below. Your feedback means a lot.
Here are all the important links related to the project for your convenience:

For some context, let me tell a quick story about my first experiences with a homelab. Though it was quite a while ago now, I very clearly remember the feeling of setting up my first homelab – absolutely overwhelmed by excitement at all the possibilities! I was initially frustrated by finding no accessible options for me to sandbox programming in between paying for hosting somewhere and running locally on my dev box and figured, hey, why not try building a server at home? After all, I had tinkered with Ubuntu before, I thought to myself.
My wife teases that I went from "I want to try building a home server" to leaving a stranger's house with a beat-up Dell Optiplex to "it's up and running!" faster than she could chime in with very valid concerns like "where is this box going to live, in our apartment?". (It stayed on the dining table for at least a year and a half)

Once the OS was installed, I realized that I now had to get my LAMP stack installed and stay up to date with patches and updates. And make sure that I am up to speed with Nginx and web service security best practices. And networking security best practices. And backup strategy best practices. And disaster recovery best practices. And... you get the picture. A lot was standing between me and the programming sandbox that I set out after.
In all of the years since then, I picked up all of these server administration concepts and so much more, but these roadblocks caused enough friction that when this Ubuntu box caked its shorts a few years in, I gave up on the homelab concept for a while. Enter: Unraid.

After a few years of showing me how easy it was to get started, my best friend convinced me to give it a shot. Unraid, at its core, is a NAS OS but exposes a great toolbox of plugin support and Docker & VM management tools which allow me to focus on the parts of the homelab that I want to focus on – the apps and integrations that power my smart home, personal finance, organization, etc. The Community Apps Store plugin provides a marketplace-style interface for community-submitted Docker installations, called templates, which in many cases provide one-click installations for the containers. Configuring and managing virtual machines is also a sinch, with out-of-the-box instrumentation and observability tooling that just makes VM life easy. Vast community support and extensibility mean that when I do hit snags, I look no further than the community forum and there is bound to be a post outlining what I need to do.
One of the main draws of Unraid is that you can add disks to an array of varying makes, models, ages, and most importantly – capacities. My current array is comprised of 1x1TB, 2x2TB, 1x4TB, and 2x8TB HDDs with only the 8TB drives sharing models/ages since I grabbed these at the same time. This means that whenever I acquire a drive and want to expand my array, I just throw it right on in and let Unraid take care of the rest. The only limitation here is that since the array is protected by bit parity, the storage drives must be the same or smaller capacity than my parity drives. Check out this great video by Spaceinvader One on how Unraid deals with this drive parity operation and what makes it cool!

Right now I'm running a ton of stuff on my Unraid box and it's so easy to spin up new projects and take them down when you're done tinkering. I'm running a Home Assistant VM which acts as the central nervous system for all of my smart home operations and helps communicate with a broad spectrum of home automation devices from different brands and developers. I'm also leveraging Unraid's ability to use cache SSDs to balance speed and performance with the main array's ability to store loads of data along with paperless-ngx to keep track of all of my important documents (and tons of unimportant docs too!) in a way that allows my wife and I to access them easily and quickly when the time comes and without worrying about running low on space or lack of privacy with a cloud provider. For game night, I'm even running a Foundry VTT instance that the other players can log right into from anywhere rather than having to spin up a local instance each time or paying lots of money for cloud hosting when it only gets used a few times a month.
The list goes on – so be sure to check back for future information about how I use Unraid to make tinkering easier and make my home life have a little less friction! Since I set up my Unraid box, I have enjoyed a renewed sense of focus toward my homelab endeavors. The ease of use with Unraid and Docker means that I can safely try a container for - say - invoice generation, and if I have gripes about it, I tear the container down and go shopping in the Community Apps store for something else. Give it a shot and let me know what you spend all of your spare time looking into!
Happy hosting, cheers!
";s:7:"attribs";a:0:{}s:8:"xml_base";s:0:"";s:17:"xml_base_explicit";b:0;s:8:"xml_lang";s:0:"";}}}}}i:9;a:6:{s:4:"data";s:0:"";s:7:"attribs";a:0:{}s:8:"xml_base";s:0:"";s:17:"xml_base_explicit";b:0;s:8:"xml_lang";s:0:"";s:5:"child";a:4:{s:0:"";a:6:{s:5:"title";a:1:{i:0;a:5:{s:4:"data";s:42:"LlamaGPT - A Self-Hosted, Offline, ChatGPT";s:7:"attribs";a:0:{}s:8:"xml_base";s:0:"";s:17:"xml_base_explicit";b:0;s:8:"xml_lang";s:0:"";}}s:11:"description";a:1:{i:0;a:5:{s:4:"data";s:98:"Self-hosting LlamaGPT gives you the power to run your own private AI chatbot on your own hardware.";s:7:"attribs";a:0:{}s:8:"xml_base";s:0:"";s:17:"xml_base_explicit";b:0;s:8:"xml_lang";s:0:"";}}s:4:"link";a:1:{i:0;a:5:{s:4:"data";s:27:"https://noted.lol/llamagpt/";s:7:"attribs";a:0:{}s:8:"xml_base";s:0:"";s:17:"xml_base_explicit";b:0;s:8:"xml_lang";s:0:"";}}s:4:"guid";a:1:{i:0;a:5:{s:4:"data";s:24:"65217f6a3f49c900013d64c1";s:7:"attribs";a:1:{s:0:"";a:1:{s:11:"isPermaLink";s:5:"false";}}s:8:"xml_base";s:0:"";s:17:"xml_base_explicit";b:0;s:8:"xml_lang";s:0:"";}}s:8:"category";a:1:{i:0;a:5:{s:4:"data";s:20:"Self Hosted AI Tools";s:7:"attribs";a:0:{}s:8:"xml_base";s:0:"";s:17:"xml_base_explicit";b:0;s:8:"xml_lang";s:0:"";}}s:7:"pubDate";a:1:{i:0;a:5:{s:4:"data";s:29:"Sat, 07 Oct 2023 17:59:16 GMT";s:7:"attribs";a:0:{}s:8:"xml_base";s:0:"";s:17:"xml_base_explicit";b:0;s:8:"xml_lang";s:0:"";}}}s:32:"http://purl.org/dc/elements/1.1/";a:1:{s:7:"creator";a:1:{i:0;a:5:{s:4:"data";s:6:"Jeremy";s:7:"attribs";a:0:{}s:8:"xml_base";s:0:"";s:17:"xml_base_explicit";b:0;s:8:"xml_lang";s:0:"";}}}s:29:"http://search.yahoo.com/mrss/";a:1:{s:7:"content";a:1:{i:0;a:5:{s:4:"data";s:0:"";s:7:"attribs";a:1:{s:0:"";a:2:{s:3:"url";s:84:"https://noted.lol/content/images/2023/10/llamagpt-self-hosted-featured-noted.lol.jpg";s:6:"medium";s:5:"image";}}s:8:"xml_base";s:0:"";s:17:"xml_base_explicit";b:0;s:8:"xml_lang";s:0:"";}}}s:40:"http://purl.org/rss/1.0/modules/content/";a:1:{s:7:"encoded";a:1:{i:0;a:5:{s:4:"data";s:18957:"
AI chatbots are incredibly popular these days, and it seems like every company out there wants to jump on the bandwagon with their own spin on ChatGPT. LlamaGPT is one of the latest that you can self-host on your trusty old hardware. It's so lightweight that it can strut its stuff with just ~5GB of RAM. Talk about a slimmed down digital llama!
LlamaGPT is a self-hosted chatbot powered by Llama 2 similar to ChatGPT, but it works offline, ensuring 100% privacy since none of your data leaves your device. It also supports Code Llama models and NVIDIA GPUs.
If you're not familiar with it, LlamaGPT is part of a larger suit of self-hosted apps known as UmbrelOS. LlamaGPT is an official app developed by the same folks behind Umbrel. However, you have the option to install LlamaGPT separately as a standalone application if you decide not to use the full UmbrelOS suite.
You will need a host machine with Docker and Docker Compose installed for this example. If you need assistance, see our guide Install Docker and Portainer on Debian for Self-Hosting.
You will need to decide what Compose stack you want to use based on the hardware you have. If you are using an NVIDIA GPU, you would want to use one with CUDA support. You can see all of the Docker Compose examples on the LlamaGPT Github repo. And yes, there's even one for Mac. 😎

CUDA, which stands for "Compute Unified Device Architecture," is a technology developed by NVIDIA. It serves as both a platform and a programming model for parallel computing. Basically, it's technology made by NVIDIA that helps computers do lots of tasks at the same time. 😂
If you do have a NVIDIA GPU, you should go with the Docker Compose examples that have "cuda" in their name listed on the repository. Below is an example.
version: '3.6'

services:
  llama-gpt-api-cuda-gguf:
    build:
      context: ./cuda
      dockerfile: gguf.Dockerfile
    restart: on-failure
    volumes:
      - './models:/models'
      - './cuda:/cuda'
    ports:
      - 3001:8000
    environment:
      MODEL: '/models/${MODEL_NAME:-code-llama-2-7b-chat.gguf}'
      MODEL_DOWNLOAD_URL: '${MODEL_DOWNLOAD_URL:-https://huggingface.co/TheBloke/CodeLlama-7B-Instruct-GGUF/resolve/main/codellama-7b-instruct.Q4_K_M.gguf}'
      N_GQA: '${N_GQA:-1}'
      USE_MLOCK: 1
    cap_add:
      - IPC_LOCK
      - SYS_RESOURCE
    command: '/bin/sh /cuda/run.sh'
    deploy:
      resources:
        reservations:
          devices:
            - driver: nvidia
              count: 1
              capabilities: [gpu]

  llama-gpt-ui:
    # TODO: Use this image instead of building from source after the next release
    # image: 'ghcr.io/getumbrel/llama-gpt-ui:latest'
    build:
      context: ./ui
      dockerfile: Dockerfile
    ports:
      - 3000:3000
    restart: on-failure
    environment:
      - 'OPENAI_API_KEY=sk-XXXXXXXXXXXXXXXXXXXX'
      - 'OPENAI_API_HOST=http://llama-gpt-api-cuda-gguf:8000'
      - 'DEFAULT_MODEL=/models/${MODEL_NAME:-code-llama-2-7b-chat.gguf}'
      - 'NEXT_PUBLIC_DEFAULT_SYSTEM_PROMPT=${DEFAULT_SYSTEM_PROMPT:-"You are a helpful and friendly AI assistant. Respond very concisely."}'
      - 'WAIT_HOSTS=llama-gpt-api-cuda-gguf:8000'
      - 'WAIT_TIMEOUT=${WAIT_TIMEOUT:-3600}'
For this to work, you will need to replace the MODEL_NAME and MODEL_DOWNLOAD_URL to one of the supported models which you can see in the chart below. Make sure you choose a model that matches your systems specs. You'll need to also be sure you have enough space to store the model.
Right now, LlamaGPT can work with these models. They're also planning to add the option for you to use your own custom models in the future. Please reference the LlamaGPT Github repo to see if these have changed.
| Model name | Model size | Model download size | Memory required |
|---|---|---|---|
| Nous Hermes Llama 2 7B Chat (GGML q4_0) | 7B | 3.79GB | 6.29GB |
| Nous Hermes Llama 2 13B Chat (GGML q4_0) | 13B | 7.32GB | 9.82GB |
| Nous Hermes Llama 2 70B Chat (GGML q4_0) | 70B | 38.87GB | 41.37GB |
| Code Llama 7B Chat (GGUF Q4_K_M) | 7B | 4.24GB | 6.74GB |
| Code Llama 13B Chat (GGUF Q4_K_M) | 13B | 8.06GB | 10.56GB |
| Phind Code Llama 34B Chat (GGUF Q4_K_M) | 34B | 20.22GB | 22.72GB |

To put it bluntly, if you have less than 8GB of RAM and no GPU, you might not be too happy with LlamaGPT's performance. In my tests with the smallest models, it was quite slow, taking around 20-30 seconds to generate just one letter. If you find that acceptable, then it might be a great fit for you. 😁 However, I'm still learning the ropes here, so please bear with me as I try out different options. It's possible that the issues I encountered are either my own fault or related to the type of system I'm using to run the models.
It's important to note that this can put a heavy load on your computer's CPU. If your CPU doesn't have enough power, it can slow down the model and lead to performance problems. For the smoothest experience, using a computer with a dedicated GPU is your best bet.

I've got this dream of putting together a fancy "supercomputer" just for running self-hosted chatbots and experimenting with various LLMs. But truth be told, you don't need all that fancy stuff to get started, as LlamaGPT clearly demonstrates. Keep it simple and still get the job done if you are patient.
While LlamaGPT is definitely an exciting addition to the self-hosting atmosphere, don't expect it to kick ChatGPT out of orbit just yet. 😉 It's a step in the right direction, and I'm curious to see where it goes.
There's still plenty to dig into here, and I'm planning to dive deeper into the world of Large Language Models (LLMs) to get a better grasp of how they operate. So, stay tuned for more on this topic. I'll take a look around and explore other self-hosted options as well. It's clear that there's a wealth of topics to discuss just from a quick search.
If you find this application valuable or would like to explore further information, I encourage you to visit the LlamaGPT GitHub repository and give the project a star.
";s:7:"attribs";a:0:{}s:8:"xml_base";s:0:"";s:17:"xml_base_explicit";b:0;s:8:"xml_lang";s:0:"";}}}}}i:10;a:6:{s:4:"data";s:0:"";s:7:"attribs";a:0:{}s:8:"xml_base";s:0:"";s:17:"xml_base_explicit";b:0;s:8:"xml_lang";s:0:"";s:5:"child";a:4:{s:0:"";a:6:{s:5:"title";a:1:{i:0;a:5:{s:4:"data";s:62:"How to Convert any Website into a Zim File for Offline Viewing";s:7:"attribs";a:0:{}s:8:"xml_base";s:0:"";s:17:"xml_base_explicit";b:0;s:8:"xml_lang";s:0:"";}}s:11:"description";a:1:{i:0;a:5:{s:4:"data";s:169:"We explore how to convert a website into a ZIM file, providing you with a handy tool to keep your essential online resources at your fingertips, no matter where you are.";s:7:"attribs";a:0:{}s:8:"xml_base";s:0:"";s:17:"xml_base_explicit";b:0;s:8:"xml_lang";s:0:"";}}s:4:"link";a:1:{i:0;a:5:{s:4:"data";s:60:"https://noted.lol/convert-any-website-into-a-zim-file-zimit/";s:7:"attribs";a:0:{}s:8:"xml_base";s:0:"";s:17:"xml_base_explicit";b:0;s:8:"xml_lang";s:0:"";}}s:4:"guid";a:1:{i:0;a:5:{s:4:"data";s:24:"651f1664f32be30001d03e89";s:7:"attribs";a:1:{s:0:"";a:1:{s:11:"isPermaLink";s:5:"false";}}s:8:"xml_base";s:0:"";s:17:"xml_base_explicit";b:0;s:8:"xml_lang";s:0:"";}}s:8:"category";a:2:{i:0;a:5:{s:4:"data";s:12:"Linux Basics";s:7:"attribs";a:0:{}s:8:"xml_base";s:0:"";s:17:"xml_base_explicit";b:0;s:8:"xml_lang";s:0:"";}i:1;a:5:{s:4:"data";s:6:"How To";s:7:"attribs";a:0:{}s:8:"xml_base";s:0:"";s:17:"xml_base_explicit";b:0;s:8:"xml_lang";s:0:"";}}s:7:"pubDate";a:1:{i:0;a:5:{s:4:"data";s:29:"Fri, 06 Oct 2023 15:22:48 GMT";s:7:"attribs";a:0:{}s:8:"xml_base";s:0:"";s:17:"xml_base_explicit";b:0;s:8:"xml_lang";s:0:"";}}}s:32:"http://purl.org/dc/elements/1.1/";a:1:{s:7:"creator";a:1:{i:0;a:5:{s:4:"data";s:6:"Jeremy";s:7:"attribs";a:0:{}s:8:"xml_base";s:0:"";s:17:"xml_base_explicit";b:0;s:8:"xml_lang";s:0:"";}}}s:29:"http://search.yahoo.com/mrss/";a:1:{s:7:"content";a:1:{i:0;a:5:{s:4:"data";s:0:"";s:7:"attribs";a:1:{s:0:"";a:2:{s:3:"url";s:69:"https://noted.lol/content/images/2023/10/zimit-featured-noted.lol.jpg";s:6:"medium";s:5:"image";}}s:8:"xml_base";s:0:"";s:17:"xml_base_explicit";b:0;s:8:"xml_lang";s:0:"";}}}s:40:"http://purl.org/rss/1.0/modules/content/";a:1:{s:7:"encoded";a:1:{i:0;a:5:{s:4:"data";s:13791:"
Ever wondered how to access websites like Wikipedia when you're offline? Enter ZIM files, your go to solution. Today, we'll take a closer look at what ZIM files are, how to convert a website using a free tool, then serve it up using Kiwix Serve.

A ZIM file is a digital format used to store information from websites like Wikipedia so you can access it without needing an internet connection. It's created by the openZIM project and can be read with a program called Kiwix. The name "ZIM" comes from "Zeno IMproved." To save space, it uses compression techniques like the XZ Utils library and Zstandard. It's supported by organizations like Wikimedia CH and the Wikimedia Foundation. So, it's a way to keep website data on your device for offline use.

To begin, it's important to underline that at Noted, we firmly stand behind the belief that access to knowledge is a fundamental human right. (cats count too) This belief is at the core of Kiwix, a non-profit organization and a free, open-source software project committed to providing offline access to educational content. This is why we provide public archives of Noted that can be downloaded as ZIM files.

Zimit is a tool that can turn a website into a .zim file. It works by running a special kind of website scan inside a Docker container.
Zimit uses a system called Browsertrix Crawler to do the website scan. Once it has all the website's data, it converts it into a .zim file using a tool called warc2zim. To start the task, you use a file called zimit.py that orchestrates the entire process making it easier to manage.
After the scan is finished, Zimit saves the .zim file in a folder called /output. This folder can be easily accessed and used for your needs. If you want to keep the original data from the website scan, you can use a special option called --keep, which stores it in a temporary folder inside /output.
To install and run Zimit, you can easily do it by following the well written and simple instructions here.
I recommend you have a machine with at least 2gb of ram, 2 CPU cores and enough space to house your .zim files. I run Zimit on a LXC container with these specs and it works really well.
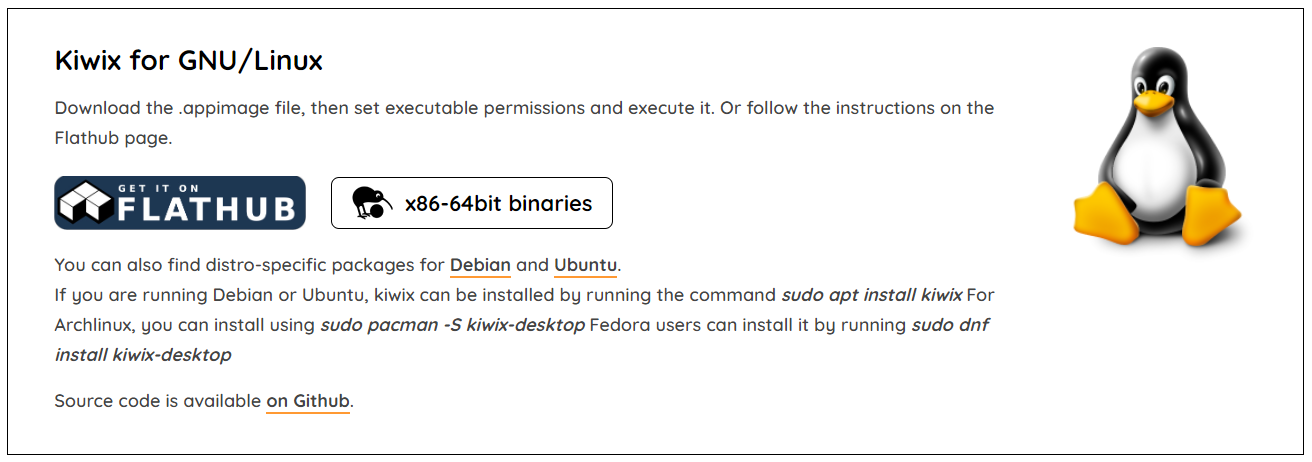
Kiwix Server acts like a web server that can host .zim files. It lets you share these .zim files using the HTTP protocol, but just within your own local network. You can choose how you want to serve the .zim files over on the Kiwix applications page.
Windows - To serve up the ZIM file locally on Windows, you can use Kiwix Server.
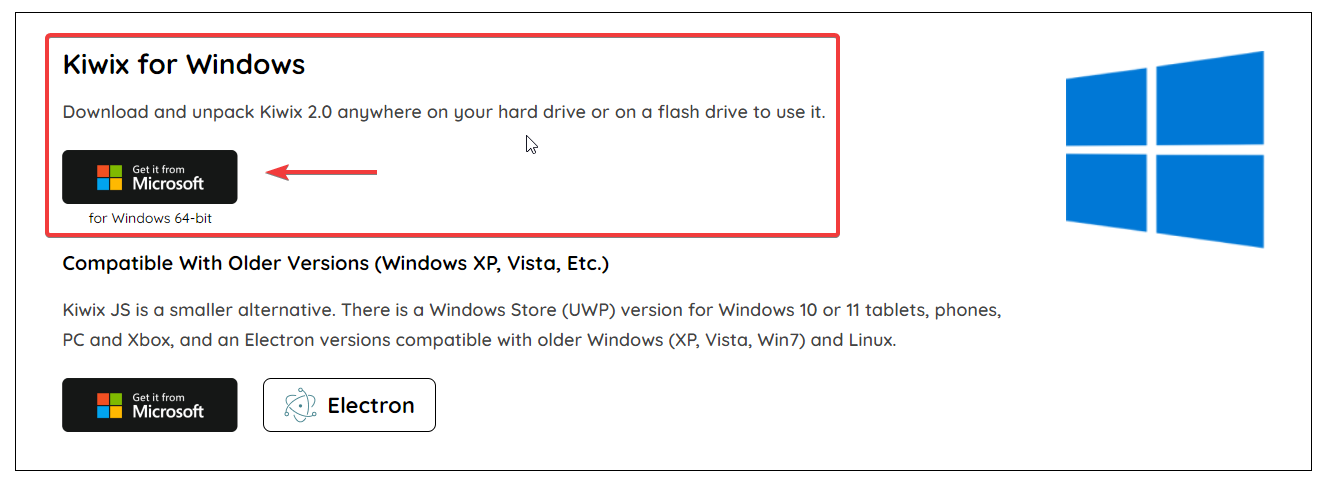
Linux - For Debian, there are binaries you can download. First, get the .appimage file and make it executable by adjusting its permissions. Then, simply run it. Alternatively, you can check out the instructions on the Flathub page for guidance.
Docker - Docker is also an option and can be ran locally. However, if you try to run it in a VM or container over anything other than localhost, you may run into HTTPS errors.

As I mentioned, you can run it on your own computer using Docker. However, if you want to use a virtual machine (VM) or a different method than just your computer, you'll need to make it accessible over HTTPS through a reverse proxy. But, honestly, that kind of takes away the whole idea of offline viewing!
Here is a working Docker Compose using the official Kiwix latest Docker image.
version: '3.3'
services:
  kiwix-serve:
    image: ghcr.io/kiwix/kiwix-serve:latest
    volumes:
      - /docker/output:/data
    ports:
      - '8080:8080'
    command:
      - '*.zim'
This assumes your .zim files are located in /docker/output. It's a good idea to mount this folder to the same place you mounted the Zimit output.
I scraped a couple websites and smaller wiki's of people I like to follow and was impressed with how it turned out. Zimit makes a carbon copy of the entire website that you can browse and search all locally.
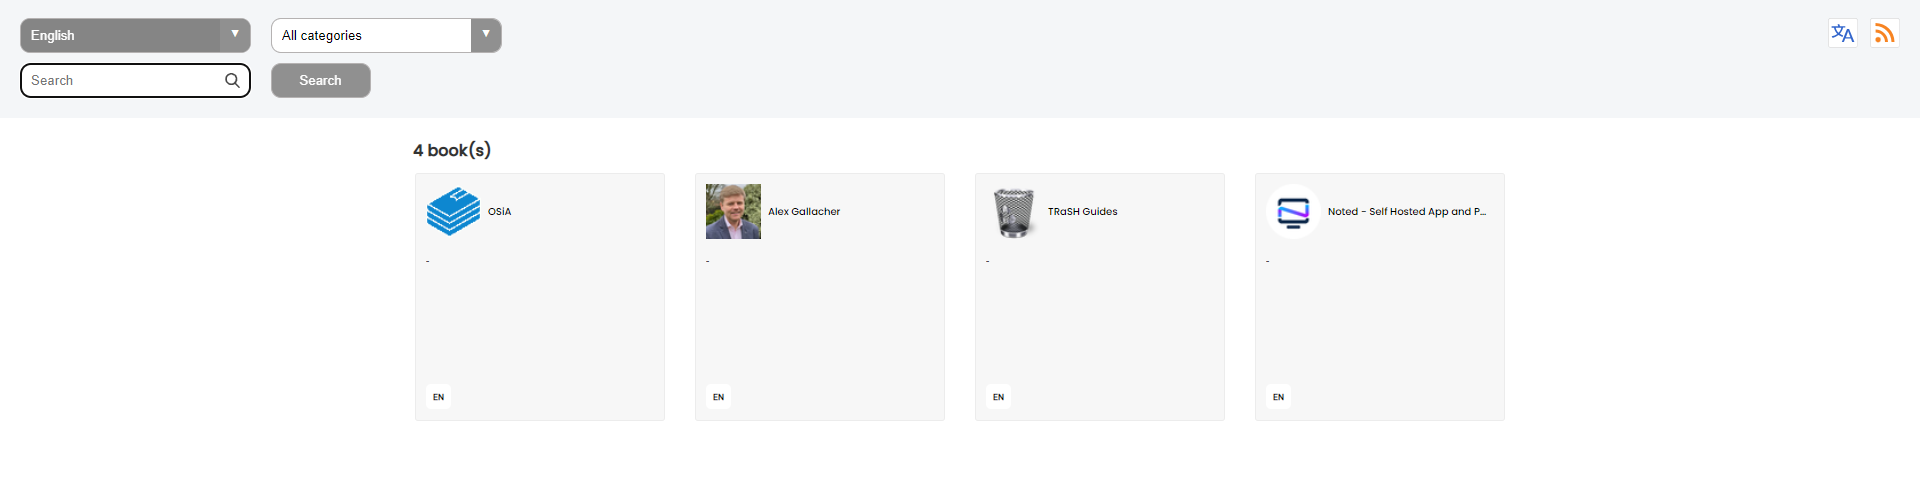
Here is a one minute video showing Kiwix Server locally hosted using the Windows version.
You can see how snappy and quick it is as it should be when viewing locally.
Once you realize how easy it is to transform websites into .zim files with Zimit, you might find yourself naturally inclined to save more. This fantastic tool is going to be our not so secret weapon for preserving Noted for the generations ahead. With it, we can ensure that the wealth of information and knowledge contained within our publication remains accessible and ready to stand the test of time.
If you find this application valuable or would like to explore further information, I encourage you to visit the Zimit GitHub repository and give the project a star.
";s:7:"attribs";a:0:{}s:8:"xml_base";s:0:"";s:17:"xml_base_explicit";b:0;s:8:"xml_lang";s:0:"";}}}}}i:11;a:6:{s:4:"data";s:0:"";s:7:"attribs";a:0:{}s:8:"xml_base";s:0:"";s:17:"xml_base_explicit";b:0;s:8:"xml_lang";s:0:"";s:5:"child";a:4:{s:0:"";a:6:{s:5:"title";a:1:{i:0;a:5:{s:4:"data";s:55:"You can Download Noted.lol Archives for Offline Reading";s:7:"attribs";a:0:{}s:8:"xml_base";s:0:"";s:17:"xml_base_explicit";b:0;s:8:"xml_lang";s:0:"";}}s:11:"description";a:1:{i:0;a:5:{s:4:"data";s:186:"Imagine being able to browse Noted even when you're offline. Noted contributes to the free and open availability of knowledge by granting access to our site content through our archives.";s:7:"attribs";a:0:{}s:8:"xml_base";s:0:"";s:17:"xml_base_explicit";b:0;s:8:"xml_lang";s:0:"";}}s:4:"link";a:1:{i:0;a:5:{s:4:"data";s:33:"https://noted.lol/noted-archives/";s:7:"attribs";a:0:{}s:8:"xml_base";s:0:"";s:17:"xml_base_explicit";b:0;s:8:"xml_lang";s:0:"";}}s:4:"guid";a:1:{i:0;a:5:{s:4:"data";s:24:"651f0110f32be30001d03ded";s:7:"attribs";a:1:{s:0:"";a:1:{s:11:"isPermaLink";s:5:"false";}}s:8:"xml_base";s:0:"";s:17:"xml_base_explicit";b:0;s:8:"xml_lang";s:0:"";}}s:8:"category";a:1:{i:0;a:5:{s:4:"data";s:4:"News";s:7:"attribs";a:0:{}s:8:"xml_base";s:0:"";s:17:"xml_base_explicit";b:0;s:8:"xml_lang";s:0:"";}}s:7:"pubDate";a:1:{i:0;a:5:{s:4:"data";s:29:"Fri, 06 Oct 2023 15:05:44 GMT";s:7:"attribs";a:0:{}s:8:"xml_base";s:0:"";s:17:"xml_base_explicit";b:0;s:8:"xml_lang";s:0:"";}}}s:32:"http://purl.org/dc/elements/1.1/";a:1:{s:7:"creator";a:1:{i:0;a:5:{s:4:"data";s:6:"Jeremy";s:7:"attribs";a:0:{}s:8:"xml_base";s:0:"";s:17:"xml_base_explicit";b:0;s:8:"xml_lang";s:0:"";}}}s:29:"http://search.yahoo.com/mrss/";a:1:{s:7:"content";a:1:{i:0;a:5:{s:4:"data";s:0:"";s:7:"attribs";a:1:{s:0:"";a:2:{s:3:"url";s:72:"https://noted.lol/content/images/2023/10/noted.lol-archives-featured.jpg";s:6:"medium";s:5:"image";}}s:8:"xml_base";s:0:"";s:17:"xml_base_explicit";b:0;s:8:"xml_lang";s:0:"";}}}s:40:"http://purl.org/rss/1.0/modules/content/";a:1:{s:7:"encoded";a:1:{i:0;a:5:{s:4:"data";s:9142:"
The Noted.lol archives have been available for a few months now. However, it's time we get into the reasons behind their existence and how they can be beneficial for you.

First off, you may ask yourself "why would I want to download archives of a website?"
Noted was born with a clear purpose, to make self-hosted and open-source knowledge readily available to everyone. In line with this mission, we've made sure that Noted remains easily accessible to the public to promote the free and open availability of knowledge.
Here are a couple of reasons why we're all about promoting the archives and why we think you should snag them.

1. Convenient Offline Access: Having access to valuable information offline can be revolutionary. Whether you're on a plane without internet access, in a remote area, or simply prefer to disconnect from the web occasionally, the Noted.lol archives offer you the flexibility to browse the content offline.
2. Preservation of Knowledge: The archives serve as a robust repository of the articles, guides, and resources we've curated over time. This means that even if articles are updated or removed from the website, you can still refer back to the original content.
3. Sharing Knowledge: Downloading the entire collection as a zim file not only grants you access but also the ability to easily share this knowledge with others.
4. Freedom to Explore: With individual article downloads, you have the freedom to select specific topics of interest. It's like handpicking chapters from a book rather than reading it cover to cover.

Well, some of you might already be fancy with your self-hosted archiving tools like Shiori, Archive Box, or Omnivore. You're probably thinking, "Why bother when you can just scrape websites with wget?" But here's our official way of serving up the content for you. ❤
Noted uses two different methods of archiving the content. Here's how it's done.

For additional information about the Archives and to access file downloads, please visit this link.
No matter how many backups I maintain for Noted.lol, there's still that tiny chance they might vanish into the digital abyss thanks to those pesky unforeseen issues. And guess what? Every website out there dances to the same uncertain tune. Nothing's forever on the internet folks! 😉
";s:7:"attribs";a:0:{}s:8:"xml_base";s:0:"";s:17:"xml_base_explicit";b:0;s:8:"xml_lang";s:0:"";}}}}}i:12;a:6:{s:4:"data";s:0:"";s:7:"attribs";a:0:{}s:8:"xml_base";s:0:"";s:17:"xml_base_explicit";b:0;s:8:"xml_lang";s:0:"";s:5:"child";a:4:{s:0:"";a:6:{s:5:"title";a:1:{i:0;a:5:{s:4:"data";s:54:"MicroBin: Self-Hosted Pastebin for Simplifying Sharing";s:7:"attribs";a:0:{}s:8:"xml_base";s:0:"";s:17:"xml_base_explicit";b:0;s:8:"xml_lang";s:0:"";}}s:11:"description";a:1:{i:0;a:5:{s:4:"data";s:167:"MicroBin, the self-hosted pastebin that simplifies sharing long texts, large files, and sensitive documents securely. It's also a URL shortener and secure upload host.";s:7:"attribs";a:0:{}s:8:"xml_base";s:0:"";s:17:"xml_base_explicit";b:0;s:8:"xml_lang";s:0:"";}}s:4:"link";a:1:{i:0;a:5:{s:4:"data";s:27:"https://noted.lol/microbin/";s:7:"attribs";a:0:{}s:8:"xml_base";s:0:"";s:17:"xml_base_explicit";b:0;s:8:"xml_lang";s:0:"";}}s:4:"guid";a:1:{i:0;a:5:{s:4:"data";s:24:"651da36bf32be30001d03960";s:7:"attribs";a:1:{s:0:"";a:1:{s:11:"isPermaLink";s:5:"false";}}s:8:"xml_base";s:0:"";s:17:"xml_base_explicit";b:0;s:8:"xml_lang";s:0:"";}}s:8:"category";a:2:{i:0;a:5:{s:4:"data";s:21:"Self Hosted Pastebins";s:7:"attribs";a:0:{}s:8:"xml_base";s:0:"";s:17:"xml_base_explicit";b:0;s:8:"xml_lang";s:0:"";}i:1;a:5:{s:4:"data";s:26:"Self Hosted URL Shorteners";s:7:"attribs";a:0:{}s:8:"xml_base";s:0:"";s:17:"xml_base_explicit";b:0;s:8:"xml_lang";s:0:"";}}s:7:"pubDate";a:1:{i:0;a:5:{s:4:"data";s:29:"Thu, 05 Oct 2023 15:14:08 GMT";s:7:"attribs";a:0:{}s:8:"xml_base";s:0:"";s:17:"xml_base_explicit";b:0;s:8:"xml_lang";s:0:"";}}}s:32:"http://purl.org/dc/elements/1.1/";a:1:{s:7:"creator";a:1:{i:0;a:5:{s:4:"data";s:6:"Jeremy";s:7:"attribs";a:0:{}s:8:"xml_base";s:0:"";s:17:"xml_base_explicit";b:0;s:8:"xml_lang";s:0:"";}}}s:29:"http://search.yahoo.com/mrss/";a:1:{s:7:"content";a:1:{i:0;a:5:{s:4:"data";s:0:"";s:7:"attribs";a:1:{s:0:"";a:2:{s:3:"url";s:81:"https://noted.lol/content/images/2023/10/microbin-self-hosted-main1-noted.lol.png";s:6:"medium";s:5:"image";}}s:8:"xml_base";s:0:"";s:17:"xml_base_explicit";b:0;s:8:"xml_lang";s:0:"";}}}s:40:"http://purl.org/rss/1.0/modules/content/";a:1:{s:7:"encoded";a:1:{i:0;a:5:{s:4:"data";s:15031:"
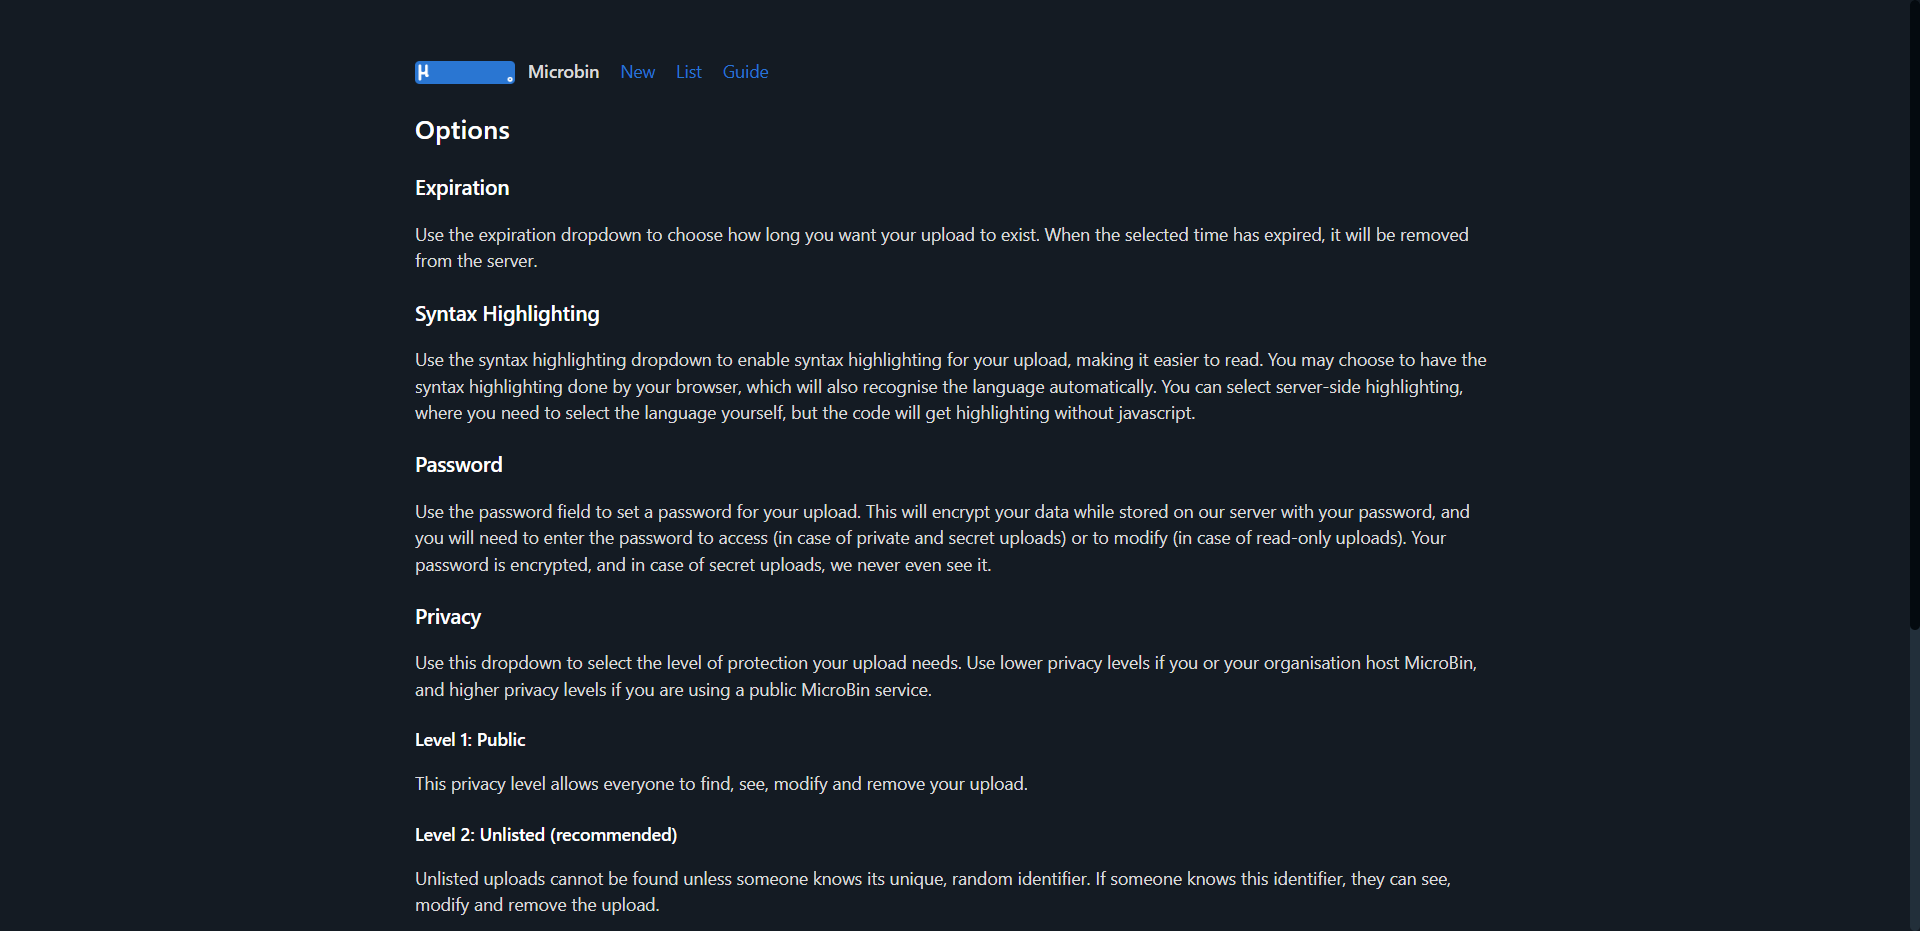
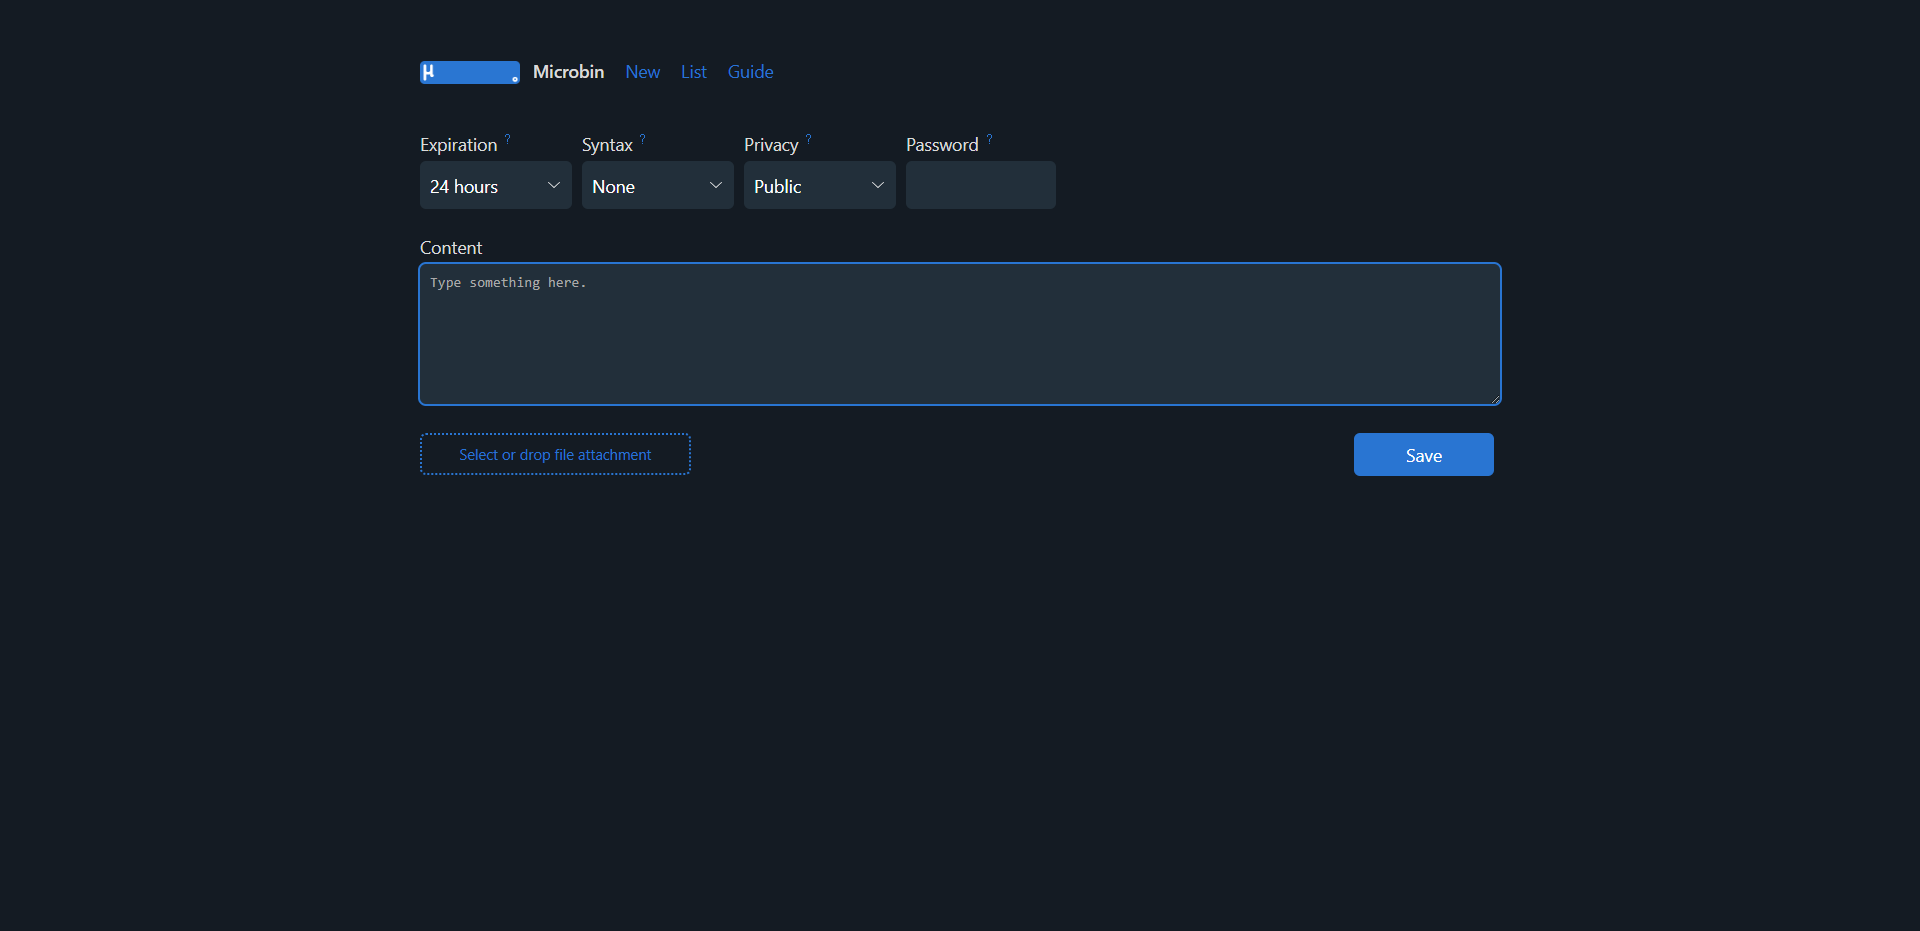
A self-hosted pastebin can be useful for many different purposes. It serves as a platform for effortlessly sharing text based information, such as code snippets, draft documents, or crucial notes. In this article, we'll take a look at MicroBin.
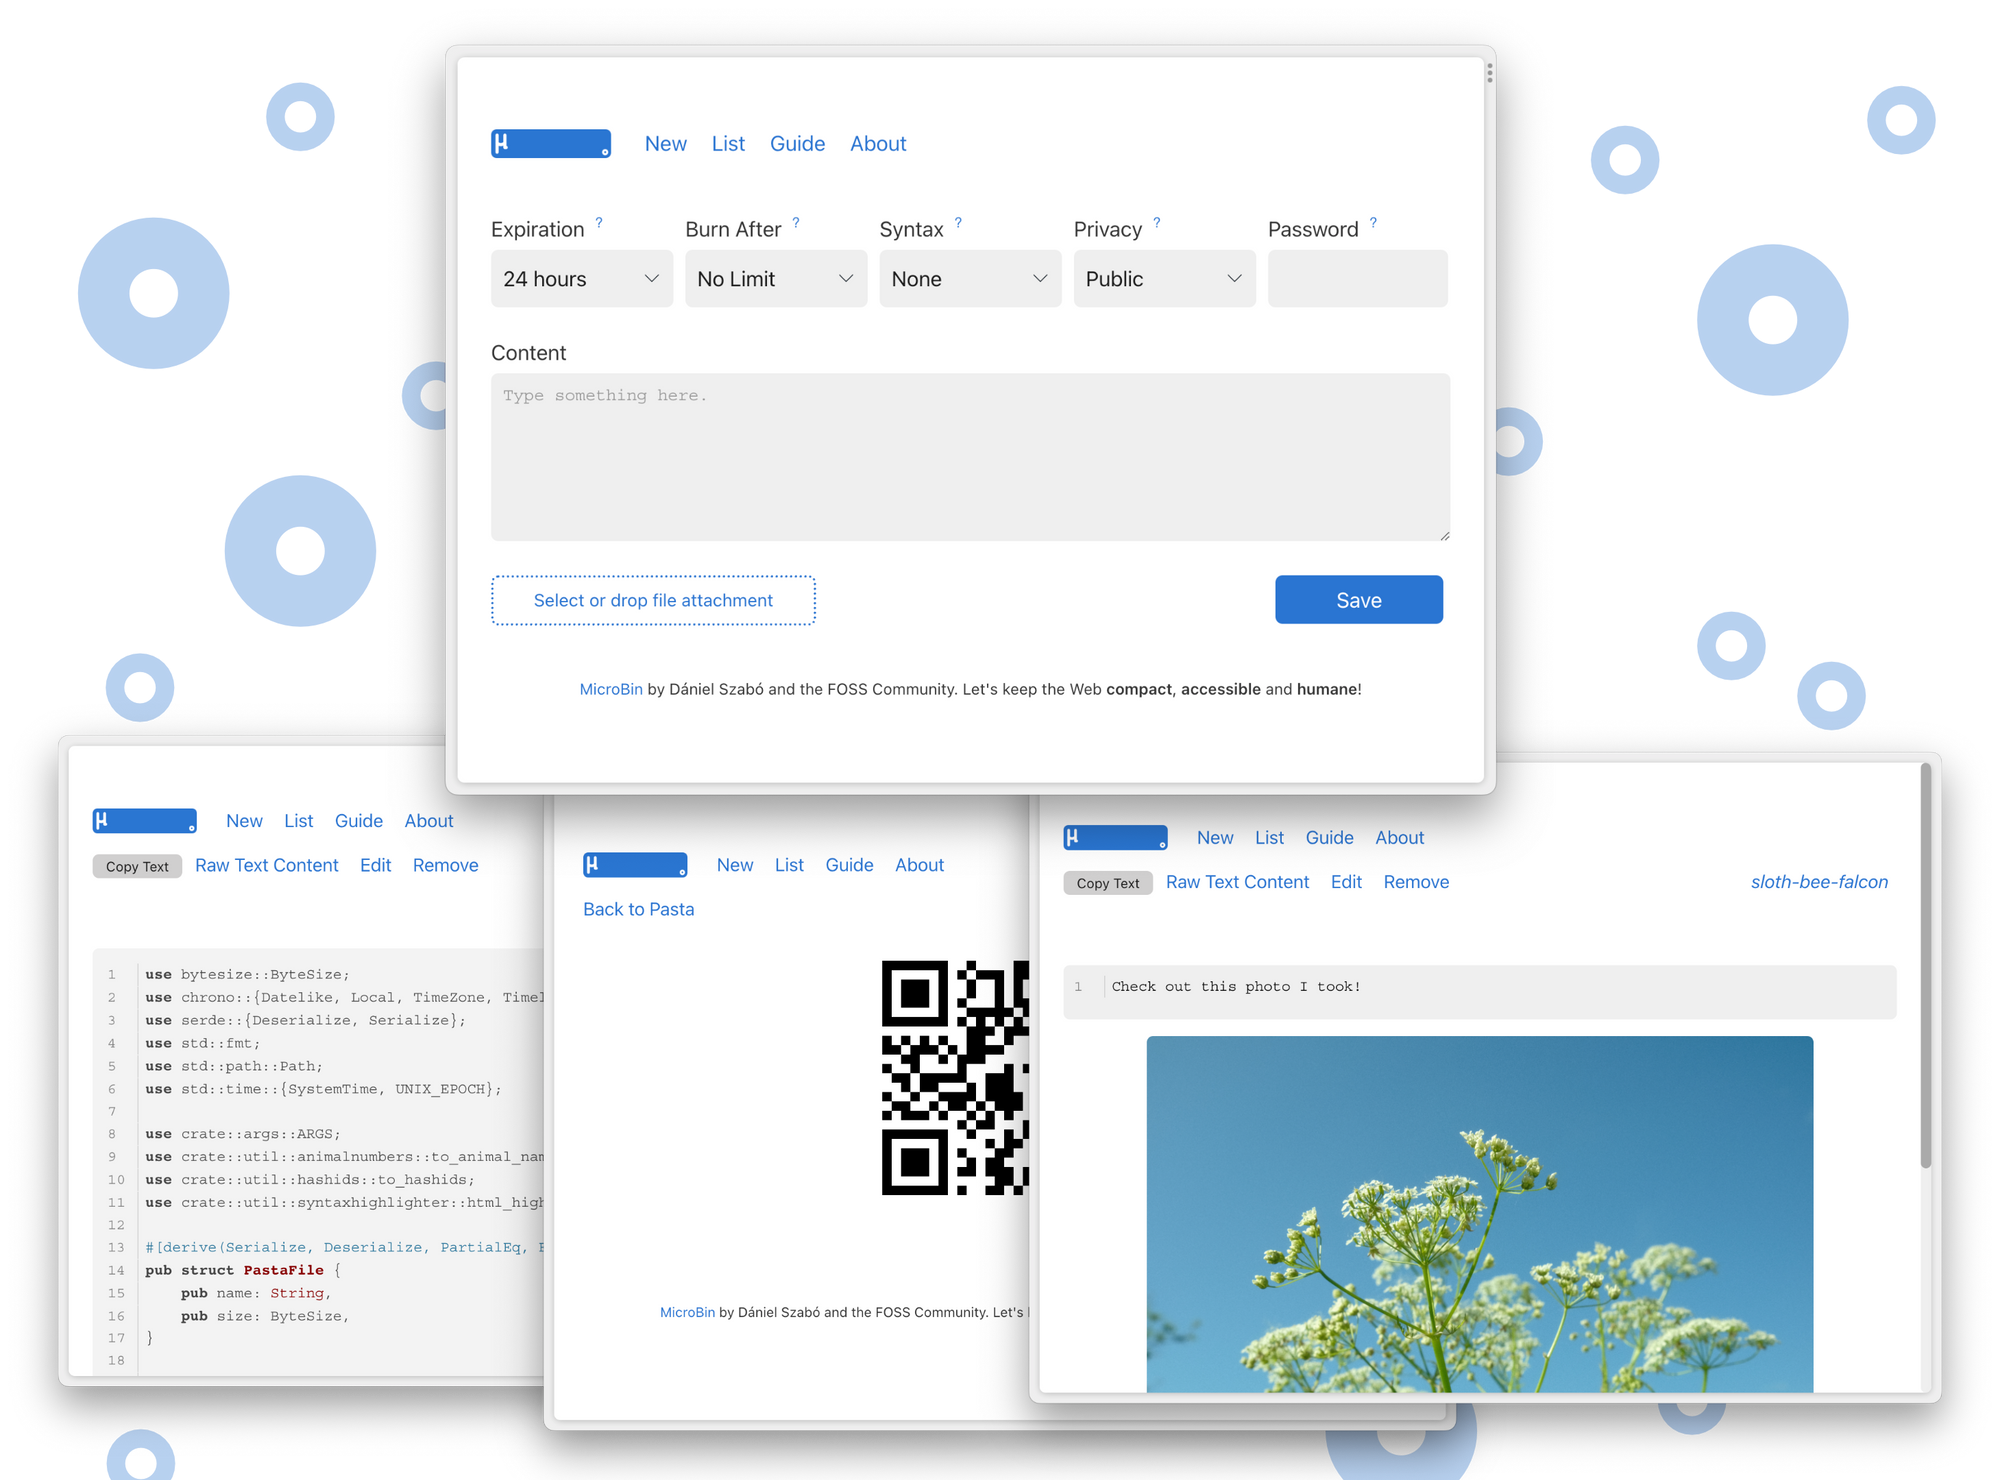
MicroBin is a compact yet loaded pastebin web app that you can self-host. It's simple to set up by tweaking environment variables to add or remove features. With Docker, you can have it good to go in just a couple of minutes.
MicroBin demo: https://pub.microbin.eu/
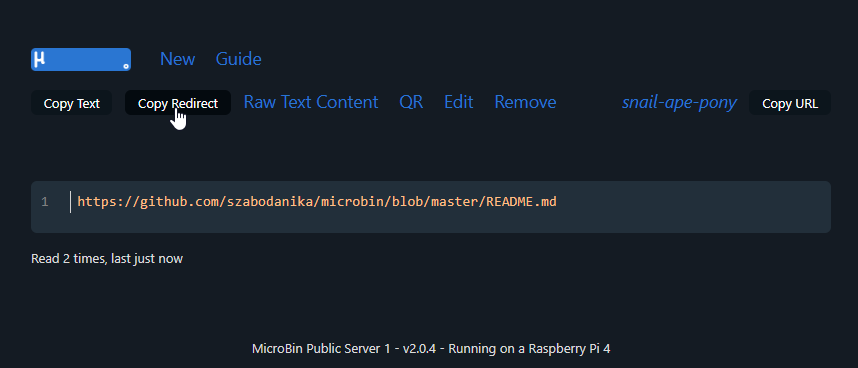
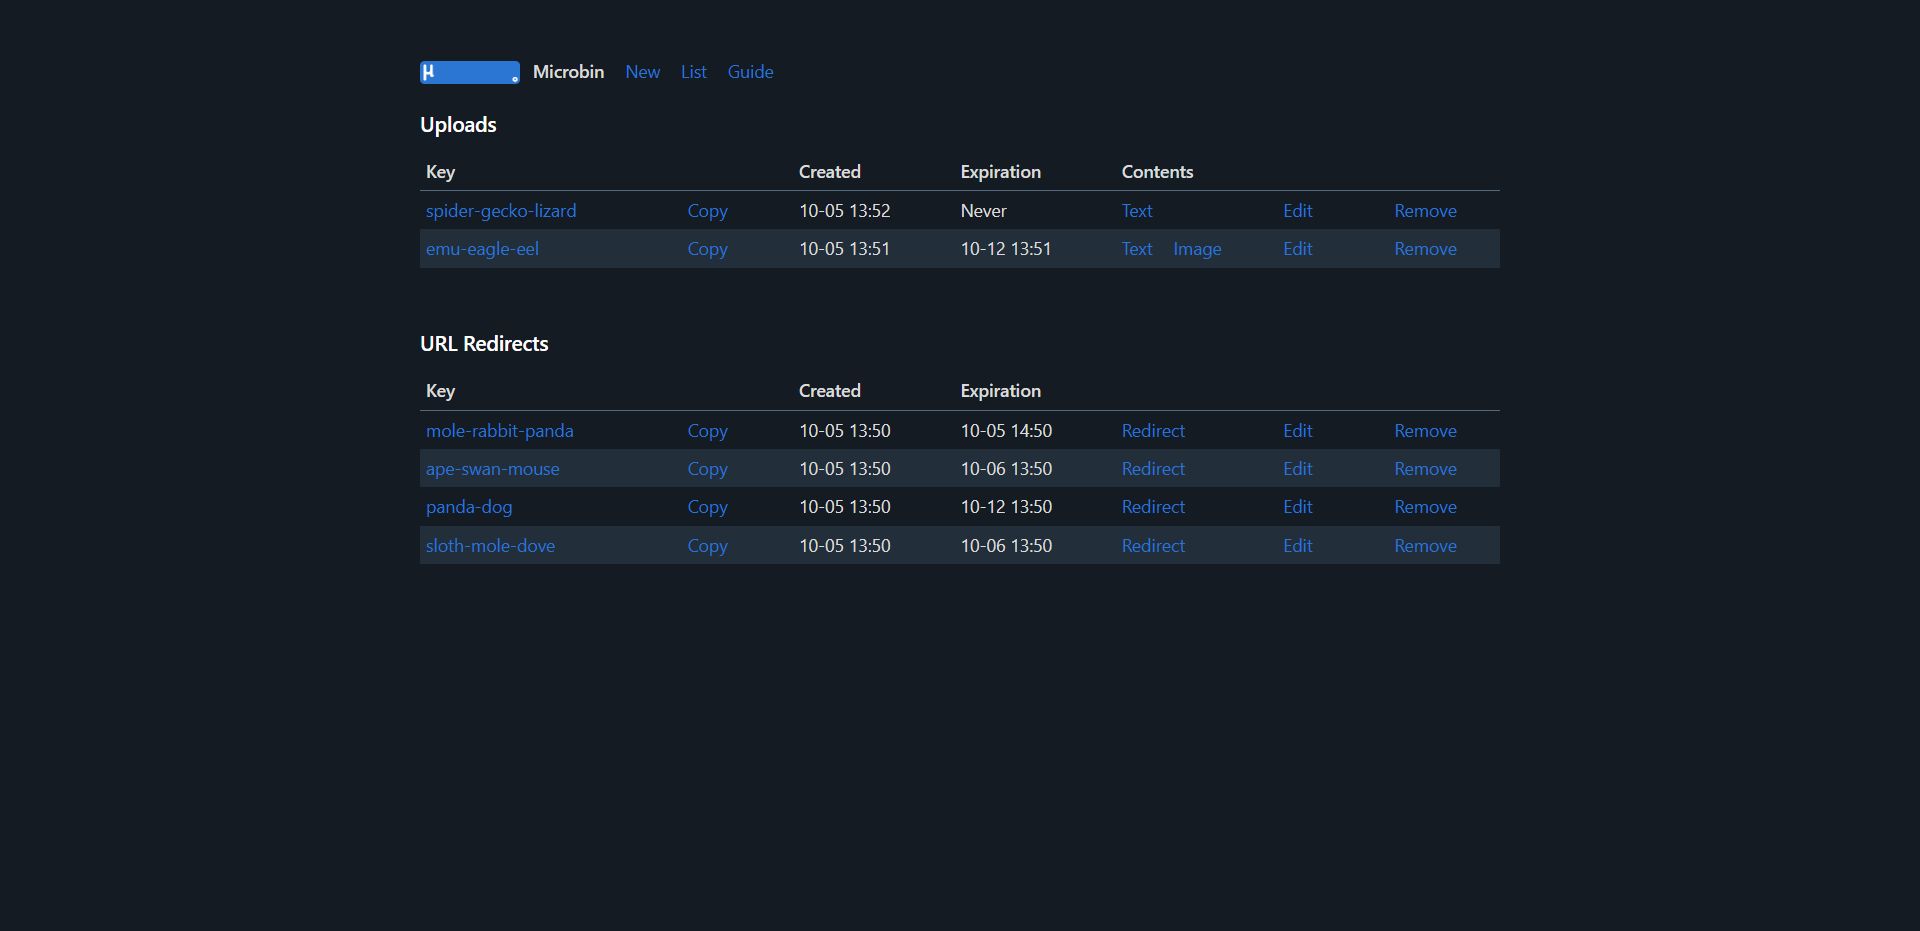
MicroBin is a multi-tool that can simplify various tasks. You can use it to send long texts or share large files with others. It's also a "secure" way to exchange sensitive documents. MicroBin also functions as a URL shortener and redirection service, making it easy to keep track of your links. You can even transfer files between your computer and a server accessed from the console.
One of the newer features of MicroBin available in version 2.0 is the URL shortening ability. You can simply pop a link into the content box and it will utilize the link creator as a way to shorten links. I believe they should be shorter, but it follows a naming method using three animals so for now that is out of your control.
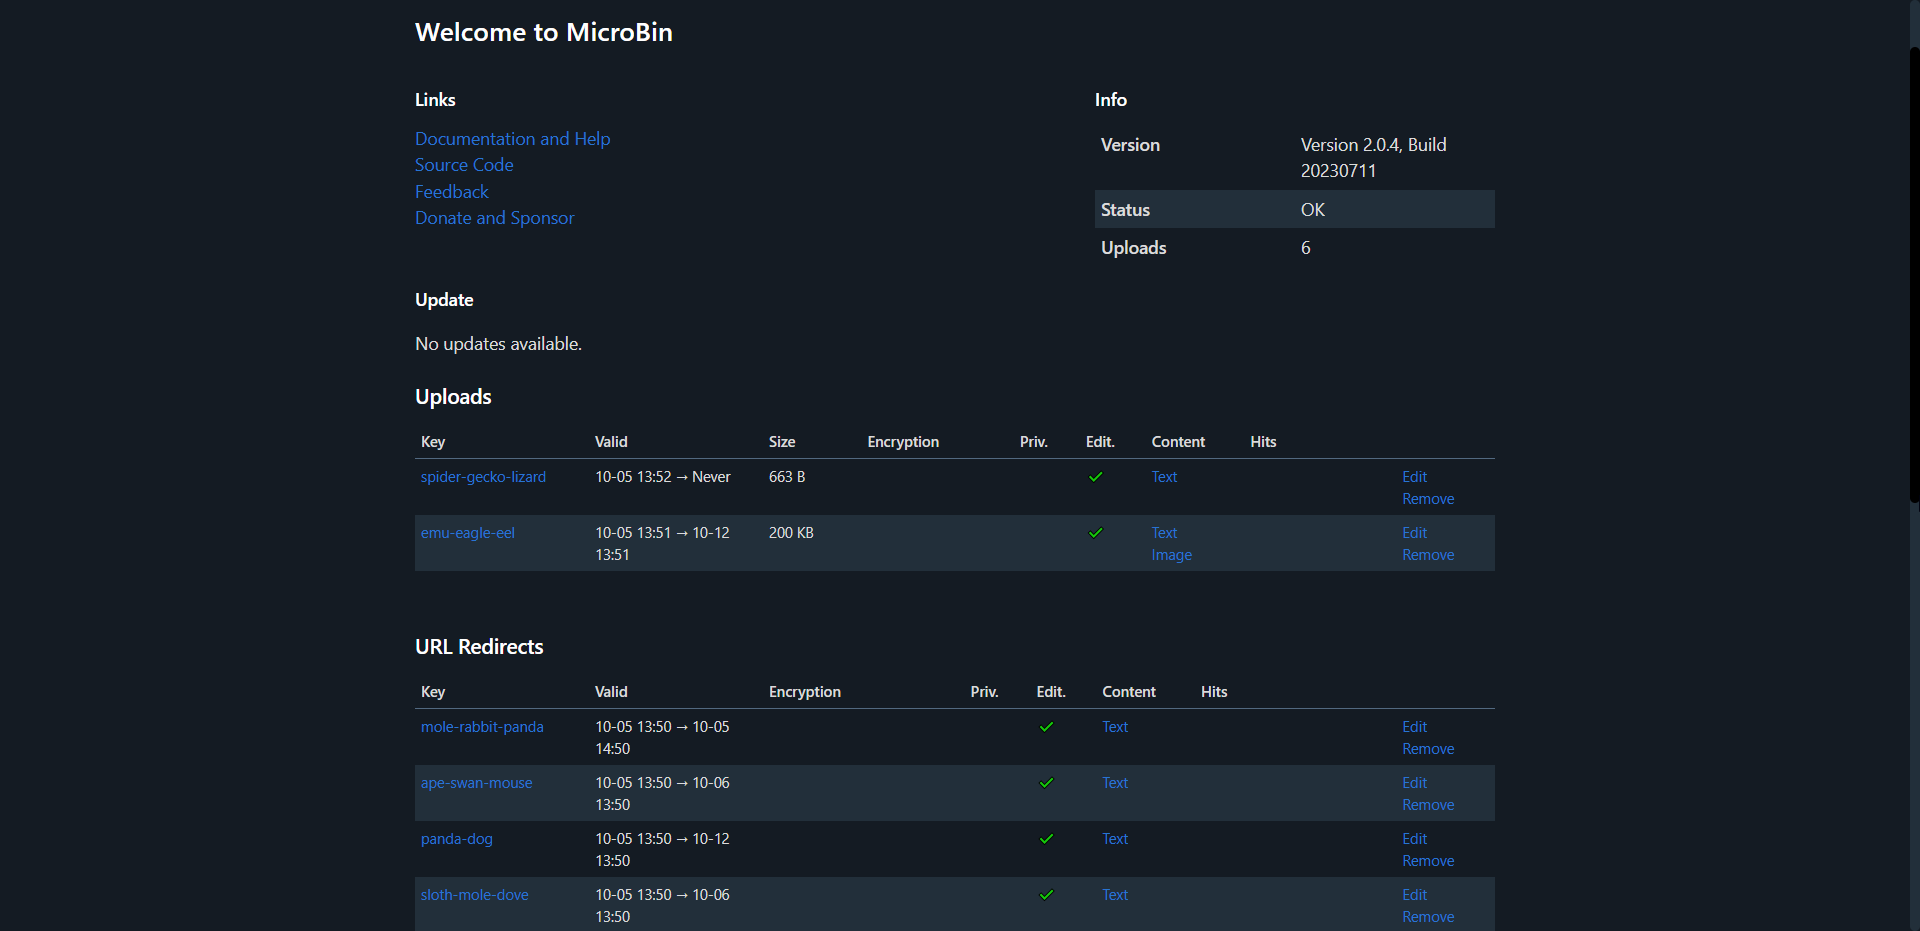
There has been a few important updates in version 2.0 that make MicroBin way cooler than before. Included is also an admin page where you can see all the pastas and short URLs. I find the admin area looks much better if you have the MICROBIN_WIDE=true environment variable set to true.
I'd like to point out an interesting feature of MicroBin. It's not limited to text! You can also upload images or documents alongside your pastes, making it suitable for a range of content. This feature can come in handy for showcasing a bug you've encountered in an application. You can paste the error message and simultaneously include a screenshot to provide a clearer picture of the issue. Don't mind me though, I decided to be a little more creative 😁
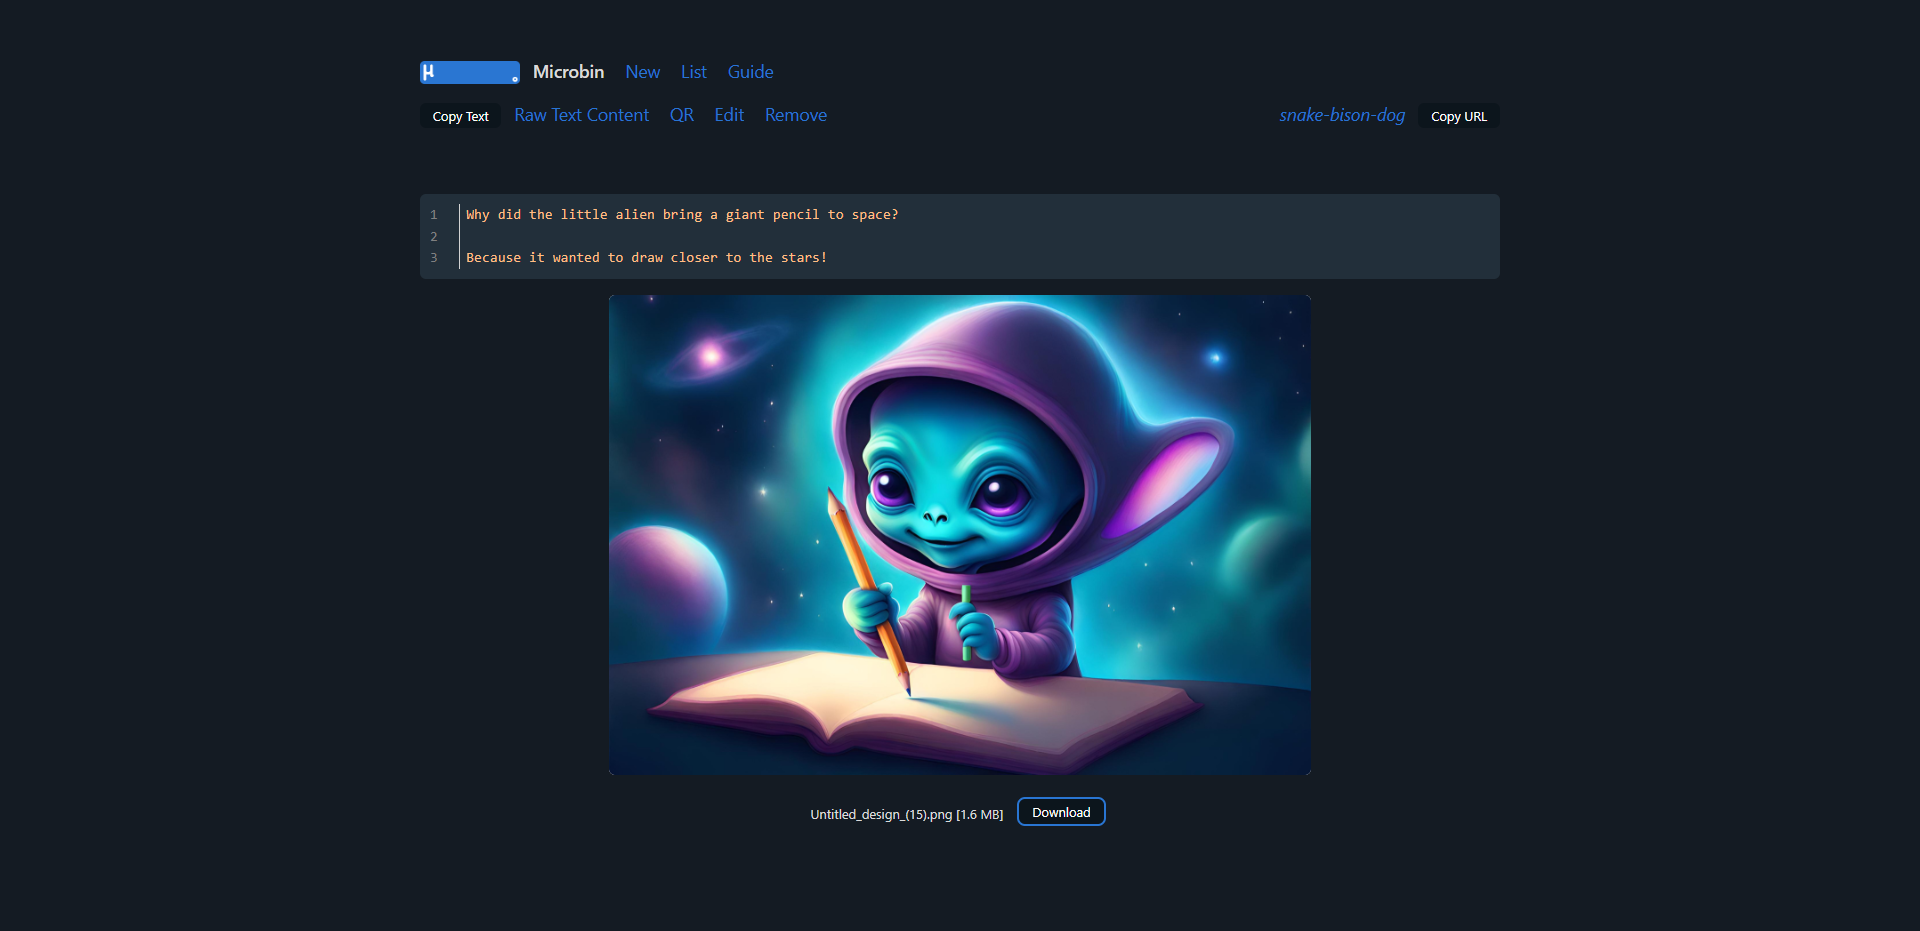
Here's a quick photo tour of the MicroBin in action on my server.
Turn device sideways for larger view or zoom.
You will need a host machine with Docker and Docker Compose installed for this example. If you need assistance, see our guide Install Docker and Portainer on Debian for Self-Hosting.
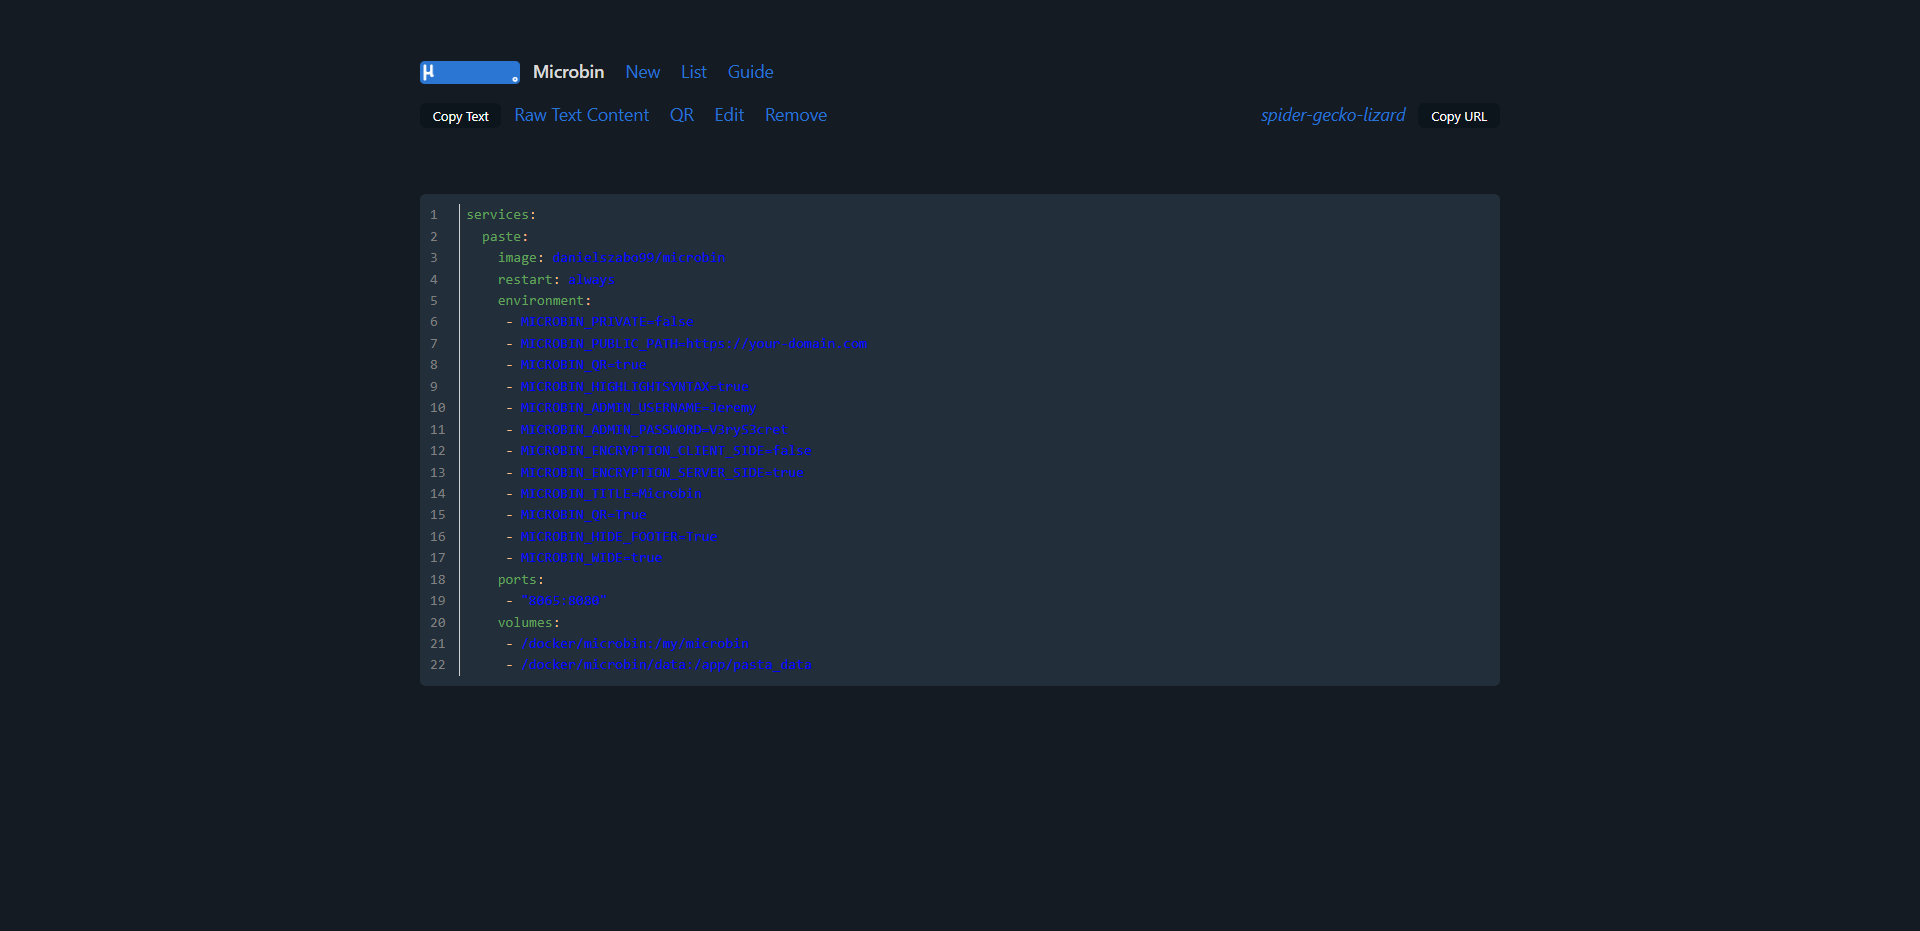
Below is the compose I crafted based on the environment variables that best suit my needs. You can see all of the available MicroBin environment variables here.
services:
  paste:
    image: danielszabo99/microbin
    restart: always
    environment:
     - MICROBIN_PRIVATE=false
     - MICROBIN_PUBLIC_PATH=https://your-domain.com
     - MICROBIN_QR=true
     - MICROBIN_HIGHLIGHTSYNTAX=true
     - MICROBIN_ADMIN_USERNAME=Jeremy
     - MICROBIN_ADMIN_PASSWORD=V3ryS3cret
     - MICROBIN_ENCRYPTION_CLIENT_SIDE=false
     - MICROBIN_ENCRYPTION_SERVER_SIDE=true
     - MICROBIN_TITLE=Microbin
     - MICROBIN_QR=True
     - MICROBIN_HIDE_FOOTER=True
     - MICROBIN_WIDE=true
    ports:
     - "8065:8080"
    volumes:
     - /docker/microbin:/my/microbin
     - /docker/microbin/data:/app/pasta_data
One significant drawback I encountered with this otherwise wonderful app nearly made me reconsider reviewing it. Pastes don't persist when the container restarts. I wondered, "What's the point?" So, I dug into the issue tracker and found a issue addressing this concern. It seems the developer intends to fix this in MicroBin version 2.1.
MicroBin is well designed and does its job effectively. I believe that soon there will be an option to personalize your paste names, which will enhance the tool's functionality, especially for those who use it for URL shortening.
All-in-all, I recommend giving it a try if you don't mind losing your pastes after a container or system reboot. As I mentioned earlier, the solution for this problem is expected to come with version 2.1, but we don't have a confirmed release date yet.
The only other feature I wish MicroBin has is the ability to render MarkDown. But you can't have it all can you? That's the beauty of open-source and self-hosting, there are options and apps for just about everything!
If you find this application valuable or would like to explore further information, I encourage you to visit the MicroBin GitHub repository and give the project a star. Browse the Microbin docs to see all the features and guide.
";s:7:"attribs";a:0:{}s:8:"xml_base";s:0:"";s:17:"xml_base_explicit";b:0;s:8:"xml_lang";s:0:"";}}}}}i:13;a:6:{s:4:"data";s:0:"";s:7:"attribs";a:0:{}s:8:"xml_base";s:0:"";s:17:"xml_base_explicit";b:0;s:8:"xml_lang";s:0:"";s:5:"child";a:4:{s:0:"";a:6:{s:5:"title";a:1:{i:0;a:5:{s:4:"data";s:85:"Linkwarden - Collaborative Bookmark Manager to Collect, Organize and Archive Webpages";s:7:"attribs";a:0:{}s:8:"xml_base";s:0:"";s:17:"xml_base_explicit";b:0;s:8:"xml_lang";s:0:"";}}s:11:"description";a:1:{i:0;a:5:{s:4:"data";s:152:"Linkwarden is a user friendly, self-hosted, and open-source bookmark manager that distinguishes itself by simplifying link management and collaboration.";s:7:"attribs";a:0:{}s:8:"xml_base";s:0:"";s:17:"xml_base_explicit";b:0;s:8:"xml_lang";s:0:"";}}s:4:"link";a:1:{i:0;a:5:{s:4:"data";s:29:"https://noted.lol/linkwarden/";s:7:"attribs";a:0:{}s:8:"xml_base";s:0:"";s:17:"xml_base_explicit";b:0;s:8:"xml_lang";s:0:"";}}s:4:"guid";a:1:{i:0;a:5:{s:4:"data";s:24:"6516bec56b972f000149bdd2";s:7:"attribs";a:1:{s:0:"";a:1:{s:11:"isPermaLink";s:5:"false";}}s:8:"xml_base";s:0:"";s:17:"xml_base_explicit";b:0;s:8:"xml_lang";s:0:"";}}s:8:"category";a:1:{i:0;a:5:{s:4:"data";s:41:"Self Hosted Bookmark and Link Saving apps";s:7:"attribs";a:0:{}s:8:"xml_base";s:0:"";s:17:"xml_base_explicit";b:0;s:8:"xml_lang";s:0:"";}}s:7:"pubDate";a:1:{i:0;a:5:{s:4:"data";s:29:"Tue, 03 Oct 2023 13:08:15 GMT";s:7:"attribs";a:0:{}s:8:"xml_base";s:0:"";s:17:"xml_base_explicit";b:0;s:8:"xml_lang";s:0:"";}}}s:32:"http://purl.org/dc/elements/1.1/";a:1:{s:7:"creator";a:1:{i:0;a:5:{s:4:"data";s:11:"Daniel31x13";s:7:"attribs";a:0:{}s:8:"xml_base";s:0:"";s:17:"xml_base_explicit";b:0;s:8:"xml_lang";s:0:"";}}}s:29:"http://search.yahoo.com/mrss/";a:1:{s:7:"content";a:1:{i:0;a:5:{s:4:"data";s:0:"";s:7:"attribs";a:1:{s:0:"";a:2:{s:3:"url";s:86:"https://noted.lol/content/images/2023/10/linkwarden-self-hosted-featured-noted.lol.jpg";s:6:"medium";s:5:"image";}}s:8:"xml_base";s:0:"";s:17:"xml_base_explicit";b:0;s:8:"xml_lang";s:0:"";}}}s:40:"http://purl.org/rss/1.0/modules/content/";a:1:{s:7:"encoded";a:1:{i:0;a:5:{s:4:"data";s:9040:"
Whether you're a researcher, student, project manager, or just someone surfing the web, chances are you come across many websites. It's also likely that you're part of a team or a group of friends with whom you want to share these sites.
As a developer, I've always been drawn to the idea of working together to gather information, but was annoyed by losing access to important online resources due to Link Rot. Also, it matters to me if an app is open-source and can be self-hosted by anyone. This led to the creation of Linkwarden, a tool designed not just to help organize links collaboratively, but also to preserve important web content.
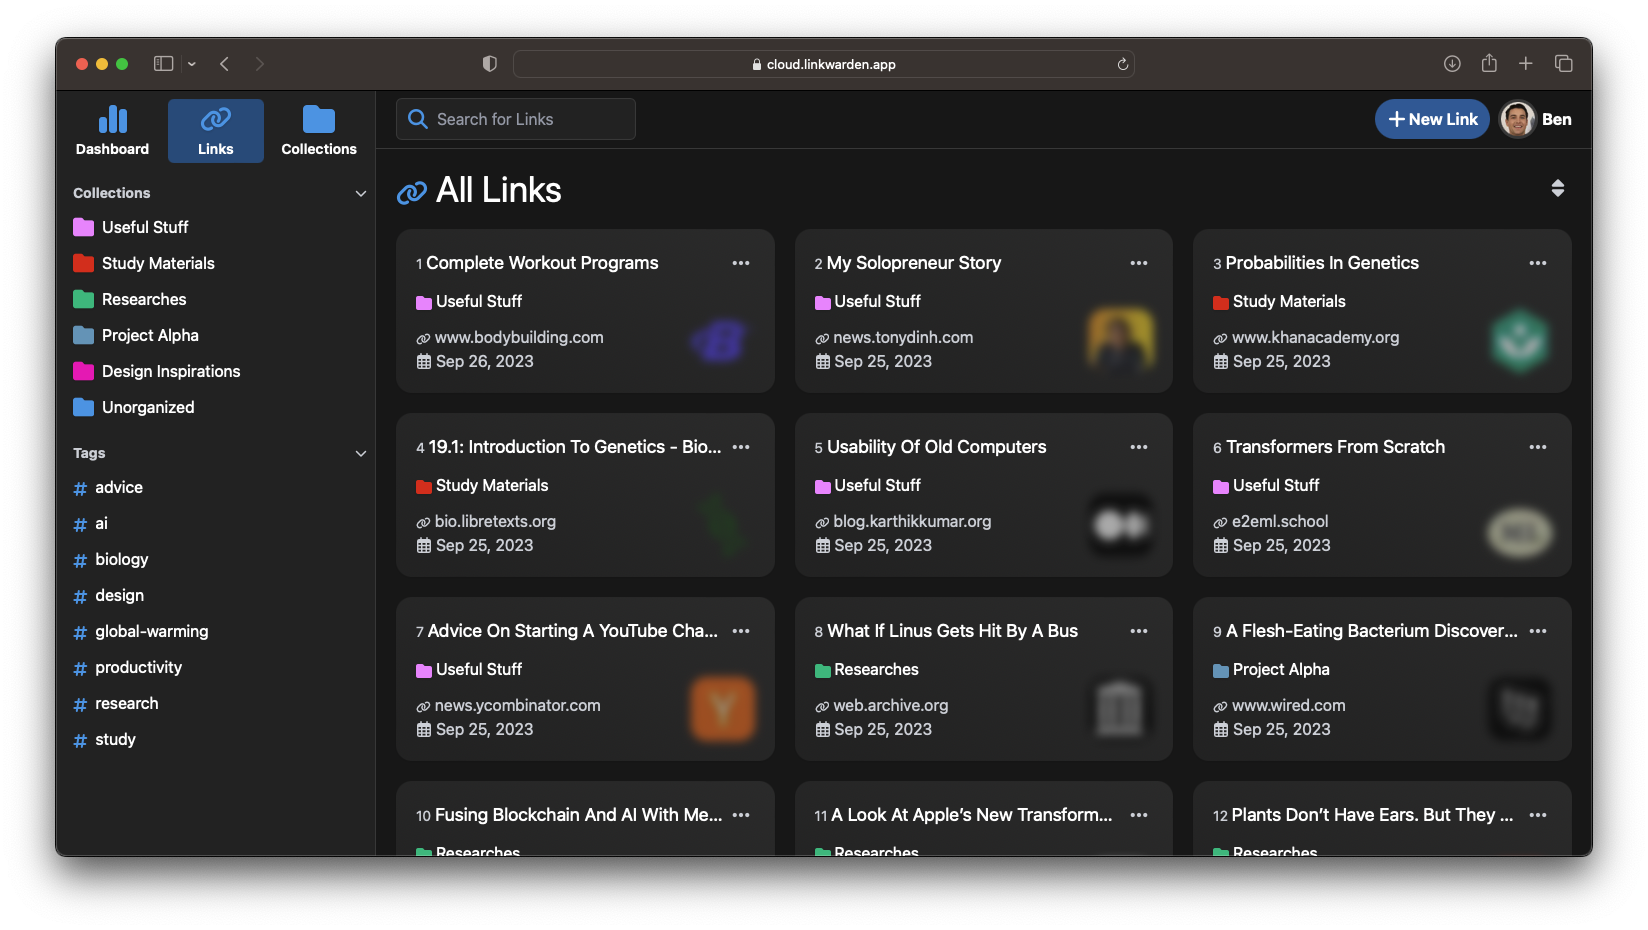
Linkwarden is a self-hosted, open-source collaborative bookmark manager designed for collecting, organizing, and archiving webpages. Its distinct edge lies in its collaborative nature coupled with open-source transparency and self-hosted independence, setting it apart from other competitors in the arena.
Linkwarden offers efficient link management with features like automatic screenshot and PDF capture. Easily organize links by collection, name, description, and tags. Collaborate effortlessly with link collections, customizable member permissions, and simple sharing options. Enjoy a user friendly, open-source, and self-hostable bookmark manager that lets you search, filter, and sort with ease.
The only requirement you'll need is a server being based on either arm64 or amd64 architecture and with Docker and Git being installed.
Head to the terminal and run the following command:
git clone https://github.com/linkwarden/linkwarden.git
Change directory to the linkwarden folder and create a new file called .env with the following environment variables:
NEXTAUTH_SECRET=VERY_SENSITIVE_SECRET
POSTGRES_PASSWORD=ALSO_VERY_SENSITIVE
NEXTAUTH_URL=http://localhost:3000 # or use your domain name if you are hosting it somewhere other than your local network.
In the same folder simply run the following command:
docker compose up -d
After a few minutes (depending on your internet connection) you can access Linkwarden via http://localhost:3000.
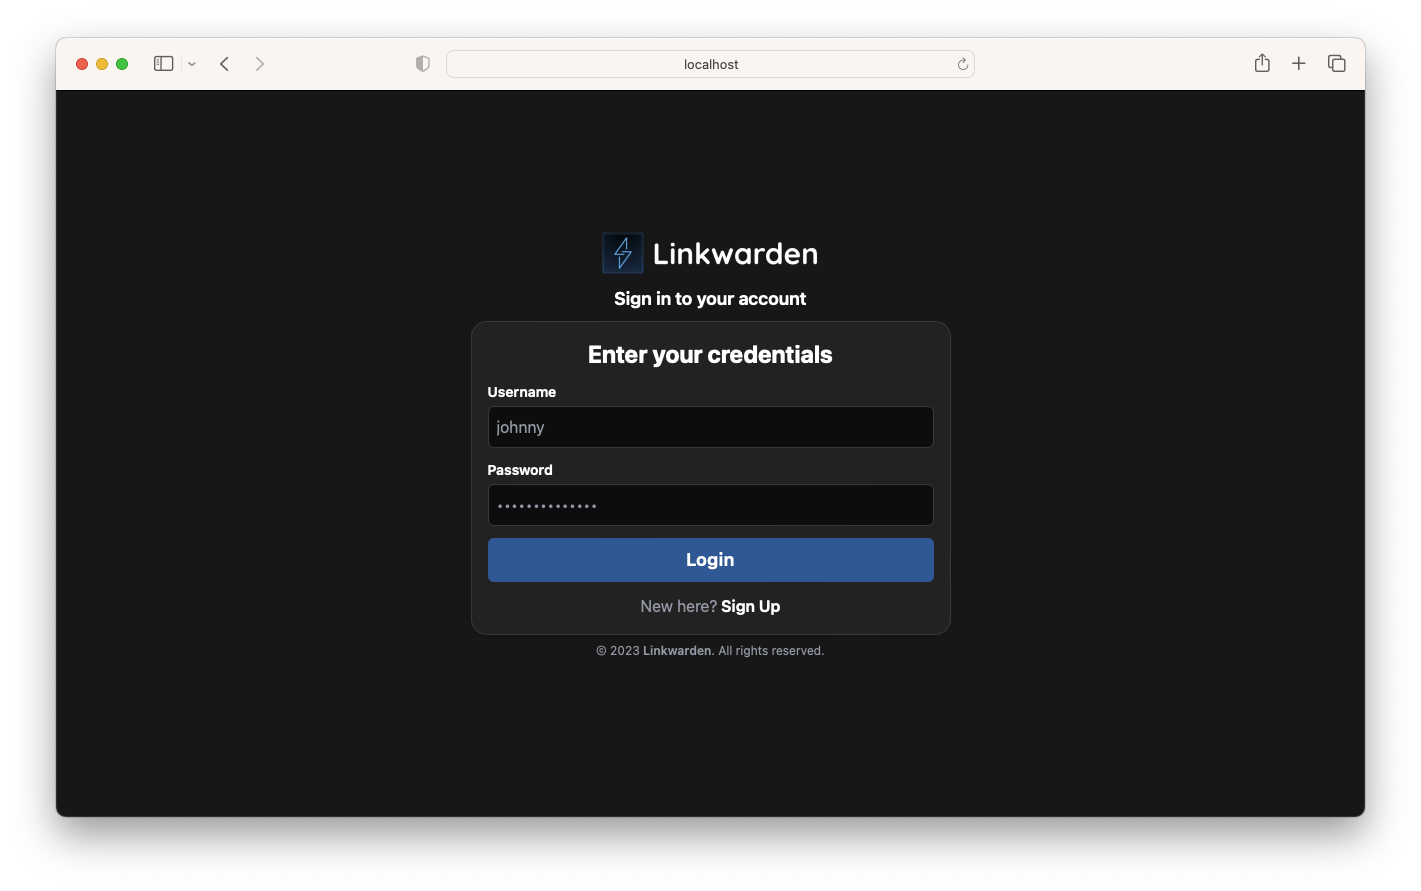
The vision is simple, we want to elevate resource management to the next level. Just as you can easily 'like' and 'share' a post on social media platforms such as TikTok or Instagram, we envision a similar system for websites. Some of the things that we're actively working on are:
And more...
You can also check out our public roadmap anytime.
Thanks for checking out Linkwarden in this article. Your input and feedback are essential in improving Linkwarden for all users. Don't hesitate to share your thoughts and join the community discussion.
Website: https://linkwarden.app/
Github: https://github.com/linkwarden/linkwarden
Browser Extension: https://github.com/linkwarden/browser-extension
Public Roadmap: https://github.com/orgs/linkwarden/projects/1/views/1
";s:7:"attribs";a:0:{}s:8:"xml_base";s:0:"";s:17:"xml_base_explicit";b:0;s:8:"xml_lang";s:0:"";}}}}}i:14;a:6:{s:4:"data";s:0:"";s:7:"attribs";a:0:{}s:8:"xml_base";s:0:"";s:17:"xml_base_explicit";b:0;s:8:"xml_lang";s:0:"";s:5:"child";a:4:{s:0:"";a:6:{s:5:"title";a:1:{i:0;a:5:{s:4:"data";s:43:"My Homelab: A Source of Confidence Building";s:7:"attribs";a:0:{}s:8:"xml_base";s:0:"";s:17:"xml_base_explicit";b:0;s:8:"xml_lang";s:0:"";}}s:11:"description";a:1:{i:0;a:5:{s:4:"data";s:177:"My homelab tamed my fear of tinkering and trying new things. This is what is in my homelab, a little about how it helped quel my tinker fears, and my plans for future additions.";s:7:"attribs";a:0:{}s:8:"xml_base";s:0:"";s:17:"xml_base_explicit";b:0;s:8:"xml_lang";s:0:"";}}s:4:"link";a:1:{i:0;a:5:{s:4:"data";s:61:"https://noted.lol/my-homelab-a-source-of-confidence-building/";s:7:"attribs";a:0:{}s:8:"xml_base";s:0:"";s:17:"xml_base_explicit";b:0;s:8:"xml_lang";s:0:"";}}s:4:"guid";a:1:{i:0;a:5:{s:4:"data";s:24:"65170c076b972f000149bde3";s:7:"attribs";a:1:{s:0:"";a:1:{s:11:"isPermaLink";s:5:"false";}}s:8:"xml_base";s:0:"";s:17:"xml_base_explicit";b:0;s:8:"xml_lang";s:0:"";}}s:8:"category";a:1:{i:0;a:5:{s:4:"data";s:15:"Homelab Diaries";s:7:"attribs";a:0:{}s:8:"xml_base";s:0:"";s:17:"xml_base_explicit";b:0;s:8:"xml_lang";s:0:"";}}s:7:"pubDate";a:1:{i:0;a:5:{s:4:"data";s:29:"Mon, 02 Oct 2023 20:20:19 GMT";s:7:"attribs";a:0:{}s:8:"xml_base";s:0:"";s:17:"xml_base_explicit";b:0;s:8:"xml_lang";s:0:"";}}}s:32:"http://purl.org/dc/elements/1.1/";a:1:{s:7:"creator";a:1:{i:0;a:5:{s:4:"data";s:7:"Flavius";s:7:"attribs";a:0:{}s:8:"xml_base";s:0:"";s:17:"xml_base_explicit";b:0;s:8:"xml_lang";s:0:"";}}}s:29:"http://search.yahoo.com/mrss/";a:1:{s:7:"content";a:1:{i:0;a:5:{s:4:"data";s:0:"";s:7:"attribs";a:1:{s:0:"";a:2:{s:3:"url";s:74:"https://noted.lol/content/images/2023/10/homelabing-featured-noted.lol.jpg";s:6:"medium";s:5:"image";}}s:8:"xml_base";s:0:"";s:17:"xml_base_explicit";b:0;s:8:"xml_lang";s:0:"";}}}s:40:"http://purl.org/rss/1.0/modules/content/";a:1:{s:7:"encoded";a:1:{i:0;a:5:{s:4:"data";s:8274:"
I used to be afraid of trying random software, changing perspective and trying something from a different point of view, or losing progress. This was before I built out my homelab. Before I learned that learning things for learning's sake is worth learning, even if that means I have to break or rip something apart piece by piece to dissect and study until I understood better. I used to be afraid of this, but now I'm not.
Back when I started, if I messed up my main system I'd have to re-install, re-build, from scratch or worse, waiting to replace parts. I had an aged desktop and an okay laptop, that was it. Is it enough? Absolutely, I was and remain happy that I had the chance to have those things when I did.

However, with time, I built out my homelab and with my homelab, even though I spend a lot of time deciding apps or what to learn for the stuff in my lab, I no longer fear tearing things apart and learning just about anything. Whereas before, I would be skittish to try something new, in fear that I'd have to repair, reinstall, or order replacement parts if I messed up and be down my main rig for the duration.
My homelab was made of things I was alright with messing up, low cost items that weren't meaningful to a job or school or life, yet allowed me to try something new and learn the things I needed to advance in what I wanted. At first I bought a couple raspberry pis to build a cluster along with a synology nas. I wanted to learn server hosting and clustering with the Pis, I also wanted more storage and for that storage to be available on my laptop and my desktop and to be able to backup my work better without requiring something like Dropbox.
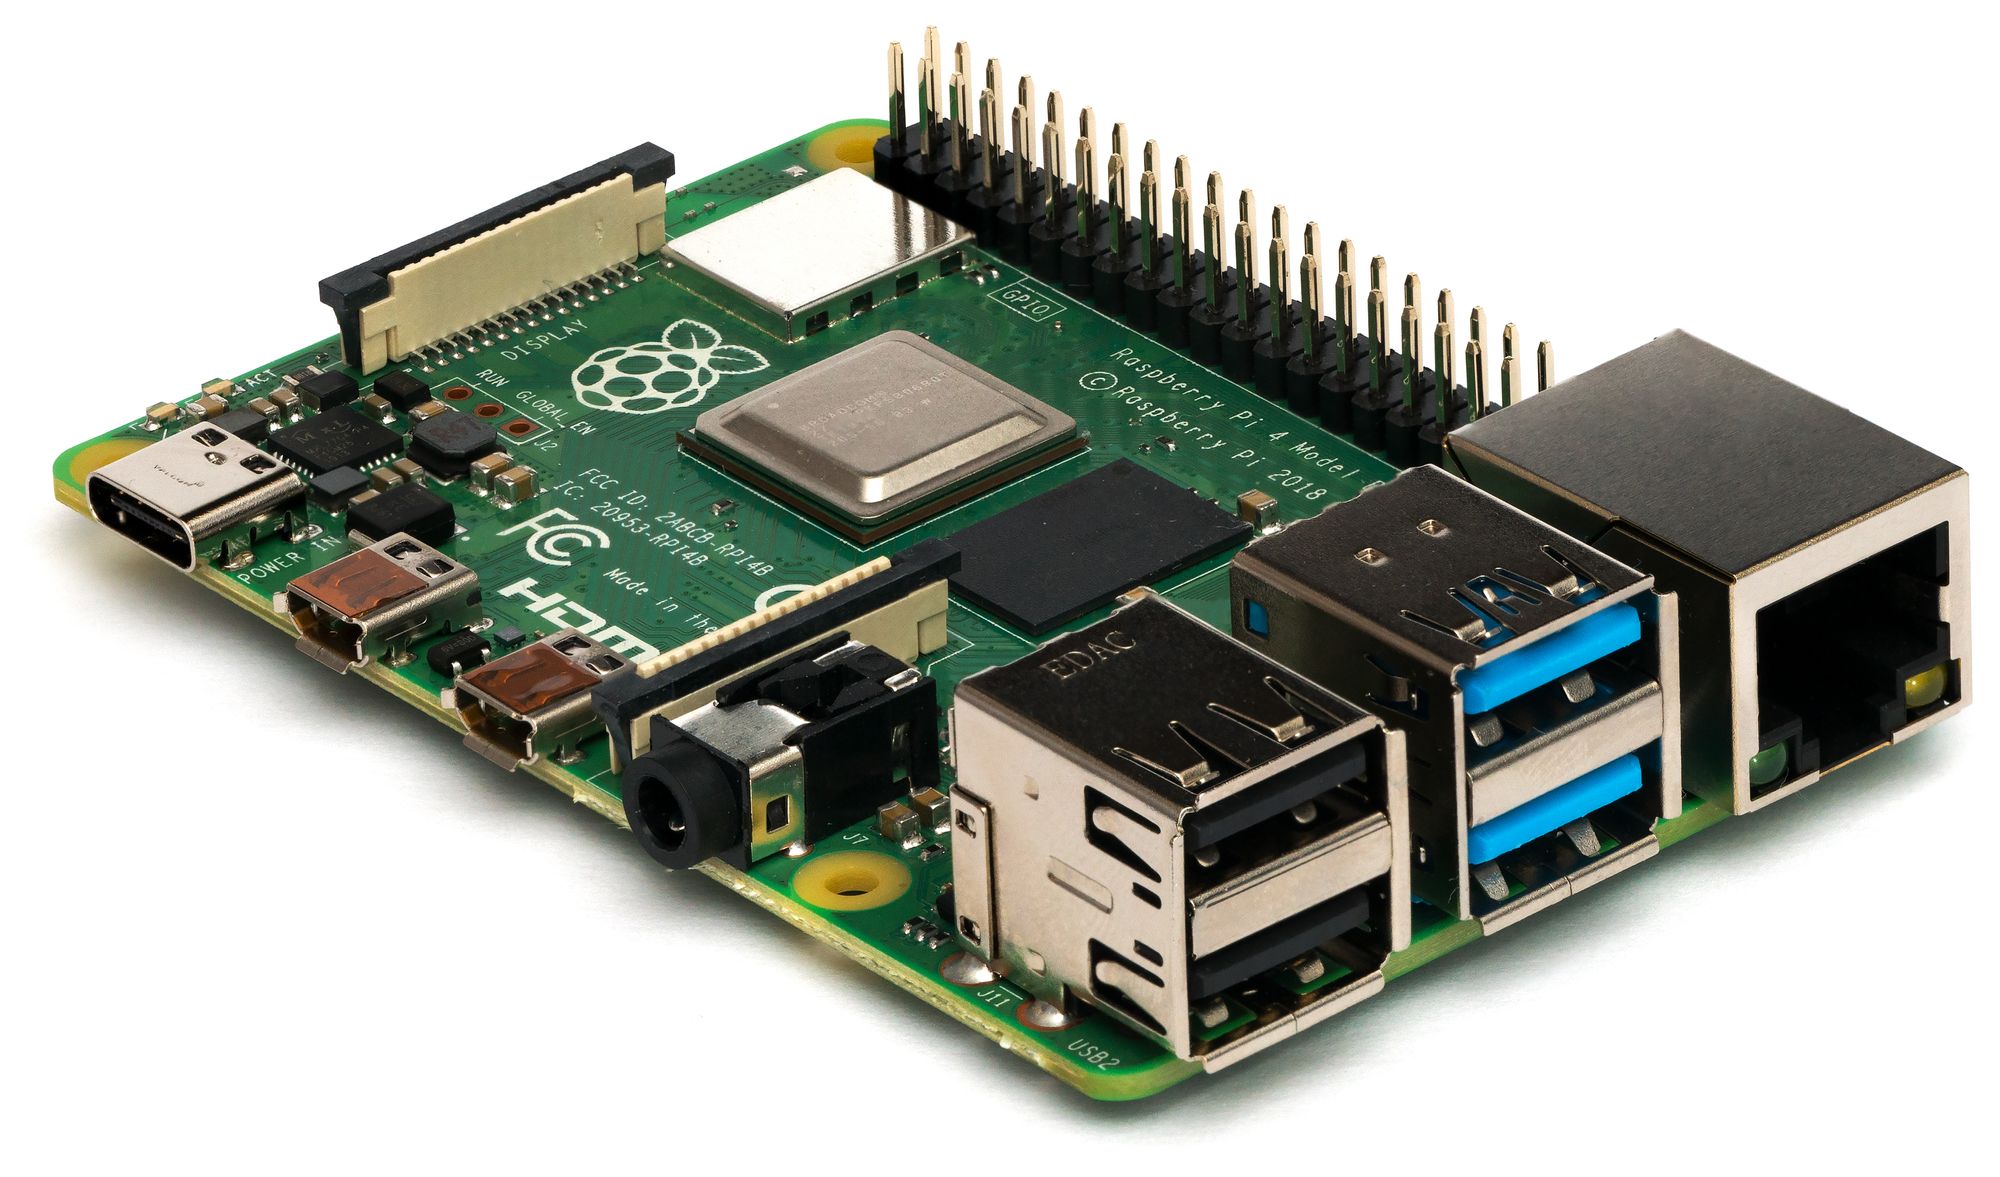
My next purchase was a Nucbox, a little square pc that I wanted to try running Linux on as a dev environment. Turned out maybe I purchased too low a spec for how I use my computer and I went back to using my laptop for a dev environment aside from my desktop, more on this later or in another part.
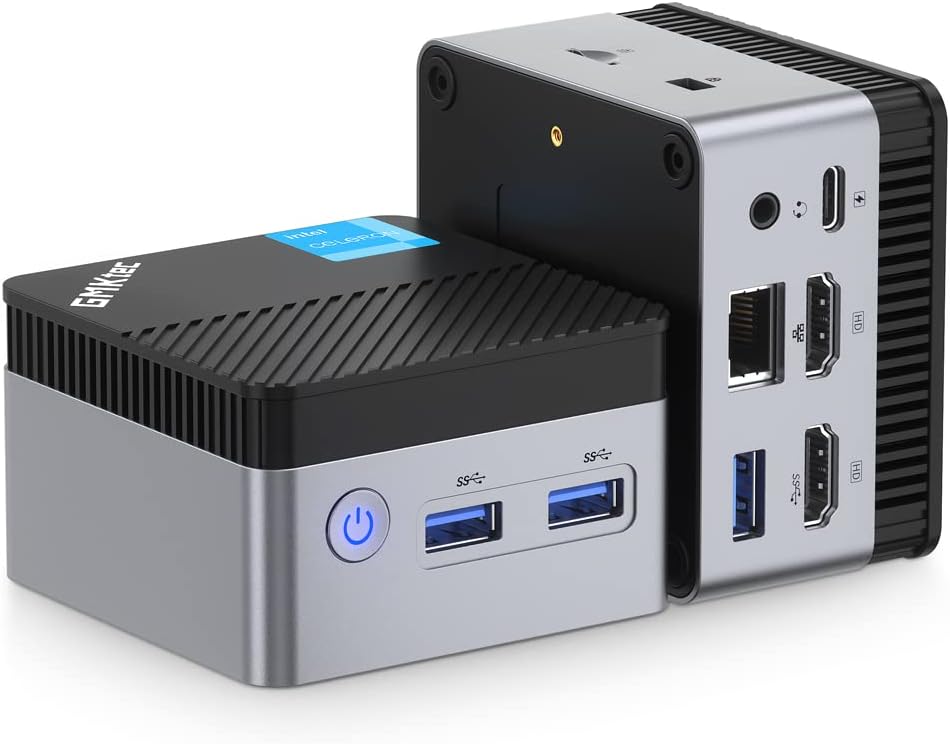
Then I bought an old retired rackmount server, an HP DL360P to be exact. I tossed proxmox on this and have been learning server hosting that way, the only thing that was missing was being able to learn clustering of Proxmox and having failover, something I want to learn although to be honest, I don't have a need, just a desire to learn it. This thing has helped me a lot, learning Proxmox and how easy it is to spin up VMs for testing, or even not having to set them up entirely each time. I can set one up for my needs and just use it as a template to clone a new vm from when I want to try something new. No more accidentally breaking my Pis or Nucbox OS and having to do some reinstallation. Load a VM at the click of a button and good to go, remove it when done. I use my Pis and Nucbox more for apps that I know I want running full time now as opposed to trying something new.

Lastly, I'm waiting on three HP EliteDesk 800 G2 mini/micro computers to set up as a proxmox cluster. This is for a similar takeaway that the Pis were for, clustering. I want to learn how to set up Proxmox clustering, failover and other things. I would do game hosting on my big server as well but.. hosting game servers over Starlink would be meh. Someday I shall have fiber! Then watch out because the self hosting truly begins for me when I can self host properly! That was dumb, I know but guess what? I laughed while typing it so I'm leaving it.

Well, a lot! Actually, I'm going to briefly summarize this as I want to make this its own part. Over the years I have learned how to use Linux server more effectively. I even run linux on one of my laptops as my dev environment now. My main rig still runs windows as I have games that wont work on Linux yet but when everything becomes 100% compatible with what I want to do? Maybe I'll swap over full time.
On the pis, I learned how to host ASP Net Core and other C# applications, bot apps that I've created for live streaming even though I don't live stream at the moment, and even docker! On docker I run several things and I'm using ansible on one thing, (even though I don't really know ansible), to run Jeff Geerling's playbook for Internet-Pi, a internet monitor along with pi-hole. On my Pis I was hosting MongoDB, PostreSQL database, MySQL database and other things like FreshRSS, an RSS reader, and just trying out other apps that were written about here on Noted.lol.
I'm excited to share more upcoming posts where I'll delve into the specifics of what's running in my setup, how I utilize each component, and perhaps even the quirky evolutions of my homelab and desk configurations that have enabled me to learn on the fly. Rest assured, you'll have moments of amazement and perhaps a few chuckles as I recount what I've done and why I may have moved on from certain setups.
";s:7:"attribs";a:0:{}s:8:"xml_base";s:0:"";s:17:"xml_base_explicit";b:0;s:8:"xml_lang";s:0:"";}}}}}}}s:27:"http://www.w3.org/2005/Atom";a:1:{s:4:"link";a:1:{i:0;a:5:{s:4:"data";s:0:"";s:7:"attribs";a:1:{s:0:"";a:3:{s:4:"href";s:22:"https://noted.lol/rss/";s:3:"rel";s:4:"self";s:4:"type";s:19:"application/rss+xml";}}s:8:"xml_base";s:0:"";s:17:"xml_base_explicit";b:0;s:8:"xml_lang";s:0:"";}}}}}}}}}}}}s:4:"type";i:128;s:7:"headers";a:13:{s:4:"date";s:29:"Sun, 26 Nov 2023 10:04:50 GMT";s:12:"content-type";s:23:"text/xml; charset=utf-8";s:13:"cache-control";s:17:"public, max-age=0";s:16:"content-encoding";s:4:"gzip";s:4:"etag";s:37:"W/"2e5fe-0D04aqpRmiix0gWnbPb0EKAw8Io"";s:4:"vary";s:15:"Accept-Encoding";s:12:"x-powered-by";s:7:"Express";s:15:"cf-cache-status";s:7:"DYNAMIC";s:9:"report-to";s:223:"{endpoints:[{url:https:\/\/a.nel.cloudflare.com\/report\/v3?s=VUKYFp%2FCLfM7SF2mvalYXuaLGuysvDeJRtOWh39O5Lbp7SmjP%2Bg7K2LJEJ1YEZWDUCYwmSOx73mO8sR4RmGGkzJNY3N8Avx1y2eGWIg5h6VKS8E8hiec1HHwlMM%3D}],group:cf-nel,max_age:604800}";s:3:"nel";s:52:"{success_fraction:0,report_to:cf-nel,max_age:604800}";s:6:"server";s:10:"cloudflare";s:6:"cf-ray";s:20:"82c14f3c9f8c077e-MRS";s:7:"alt-svc";s:17:"h3=:443; ma=86400";}s:5:"build";s:14:"20230304122624";s:5:"mtime";i:1700993090;s:3:"md5";s:32:"1808d7291f16f89160dabf082db99c19";}